Fail2banとは
公式:http://www.fail2ban.org/wiki/index.php/Main_Page
ログを監視し、大量アクセスなど攻撃の兆候を検知したら自動的に対象IPからのアクセスを拒否してくれます。
最近メールサーバを立てたので、
セキュリティを高めるべく導入します。
環境
| OS | CentOS7 |
| firewall | Firewalld |
| Postfix認証 | SASL認証 |
ちなみにメールサーバに対する現在の攻撃状況
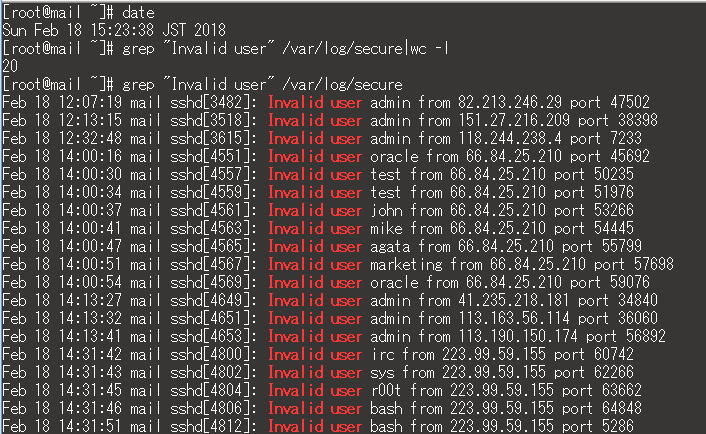
SSH
ログファイル:/var/log/secure
今日のお昼過ぎにポートのIP制限を撤廃しました。そこから3時間弱で20件よくわからんアクセスが来ています
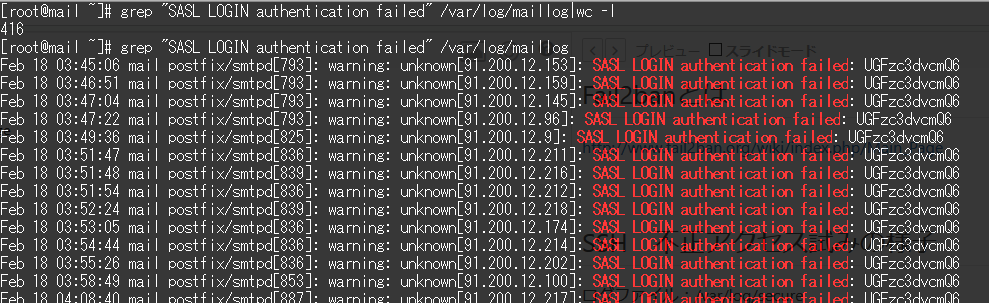
SMTP
ログファイル:/var/log/maillog
こちらは約1週間で416件…
こいつらをやっつけます
インストールと設定
インストール
$ yum install fail2ban
設定
■ 一般設定
"fail2ban.conf"が設定ファイルですが
内容を編集したいときには、新規に"fail2ban.local"を新規作成して必要な個所のみオーバーライドします。
今回はログレベルをINFO → NOTICE へ下げました。
[Definition]
loglevel = NOTICE
■ 監視対象と条件
"jail.conf"が設定ファイルですが
これも内容を編集したいときには、新規に"jail.local"を新規作成して必要な個所のみオーバーライドします。
[DEFAULT]

# 24時間以内に3回不審なアクセスがあったら24時間BAN
bantime  = 86400
findtime  = 86400
maxretry = 3

# CentOS7なのでsystemd
backend = systemd

# メール通知時の設定(ご自分の環境に合わせて)
destemail = you@example.com
sender = fail2ban@example.com
mta = postfix

# SSHのアクセスに対する設定
[sshd]
enabled = true
banaction = firewallcmd-ipset
       sendmail-whois[name=SSH, dest=you@example.com, sender=fail2ban@example.com, sendername="Fail2Ban"]#メール通知(任意)

# Postfixのアクセスに対する設定
[postfix-sasl]
enabled = true
banaction = firewallcmd-ipset
            sendmail-whois[name=SMTP, dest=you@example.com, sender=fail2ban@example.com, sendername="Fail2Ban"]#メール通知(任意)
■ アクションの設定
規定回数の攻撃を検知した後は、対象のIPからのパケットを REJECT(拒否)ではなくDROP(破棄) するようにしておきます。
REJECTだと攻撃者にエラーメッセージを返してしまうため。
blocktype = DROP
■ 起動
起動して、自動起動設定。
$ systemctl start fail2ban
$ systemctl enable fail2ban
$ systemctl is-enabled fail2ban # 確認
 enabled
動作確認
・ ブロックされたIPを確認。
しめしめ
# fail2ban-client status sshd
Status for the jail: sshd
|- Filter
|  |- Currently failed: 8
|  |- Total failed:     26
|  `- Journal matches:  _SYSTEMD_UNIT=sshd.service + _COMM=sshd
`- Actions
   |- Currently banned: 2
   |- Total banned:     2
   `- Banned IP list:   ***.***.***.*** ***.***.***.***


# fail2ban-client status postfix-sasl
Status for the jail: postfix-sasl
|- Filter
|  |- Currently failed: 17
|  |- Total failed:     877
|  `- Journal matches:  _SYSTEMD_UNIT=postfix.service
`- Actions
   |- Currently banned: 24
   |- Total banned:     24
   `- Banned IP list:   ***.***.***.*** ***.***.***.*** (以下略)
# ipset list fail2ban-sshd
Name: fail2ban-sshd
Type: hash:ip
Revision: 1
Header: family inet hashsize 1024 maxelem 65536 timeout 86400
Size in memory: 16656
References: 0
Members:
***.***.***.*** timeout 86145
***.***.***.*** timeout 86146

# ipset list fail2ban-postfix-sasl
Name: fail2ban-postfix-sasl
Type: hash:ip
Revision: 1
Header: family inet hashsize 1024 maxelem 65536 timeout 86400
Size in memory: 17936
References: 0
Members:
***.***.***.*** timeout 86143
***.***.***.*** timeout 86143
***.***.***.*** timeout 86299
(以下略)
既にBANされているIPからリクエストがあると
/var/log/fail2ban.logで "NOTICE [postfix-sasl] ... already banned"と通知が出ますが
/var/log/maillog の方には接続ログが出てきません。
参考にさせていただいたページ
ありがとうございました。
アタック対策 fail2ban (2016.1)
fail2banをインストールしてサーバへの不正攻撃を防ぐ
https://gtrt7.com/blog/linux/fail2ban