# はじめに
まず、Stack Overflowの天才達に感謝。
やりたかったことは、ブラウザ側でパスワードをハッシュ化して送信、サーバ側でもパスワードをハッシュ化して検証。
(サーバ側で保存しておくべきは平文パスワードでもなければ、HMACでもなく、PBKDF2を保存しなければ元も子もないのですがそこらへんの説明は割愛で)
困ったことは、Node.jsでそれをやりたいとき、ライブラリがいろいろあってわからない。
cryptoとかcrypto-jsとかWeb Cryptography APIとかjsrsasignとか。
最初は、そもそもブラウザ側なの‽サーバ側なの‽ってなっていた。
で、Node.jsの標準モジュールのcryptoとブラウザのWeb Cryptography APIだけでできたのでまとめた。
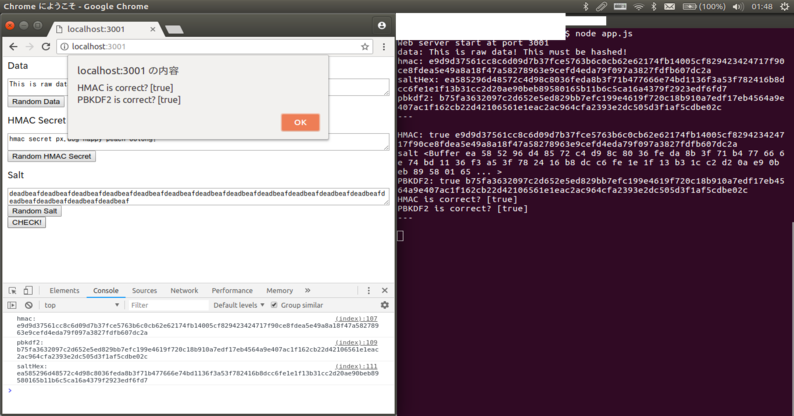
ついでに、ブラウザで生成したものをサーバで確認するシンプルなWebサーバのコードを書いた。
こんな感じ。
GitHubにソースコードを投げた。
# サーバ側(Node.js)
まずはサーバ側で、生成。
Node.jsの生成サンプルコード
  const crypto = require('crypto')
  const getHmac512 = (data, secret) => {
    const hmac = crypto.createHmac('sha512', secret)
    hmac.update(data)
    return hmac.digest('hex')
  }

  const genSalt = () => {
    return crypto.randomBytes(64)
  }

  const hex2Buf = (hex) => {
    return Buffer.from(hex, 'hex')
  }

  const calcPBKDF2 = (data, salt) => {
    return new Promise((resolve, reject) => {
      crypto.pbkdf2(data, salt, 1000*1000, 64, 'sha512', (err, derivedKey) => {
        if(err) {
          return resolve(null)
        }
        return resolve(derivedKey.toString('hex'))
      })
    })
  }
Node.jsの利用サンプルコード
  const main = async () => {
    const hmacSecret = 'hmac secret px.dog happy peach oolong!'
    const data = 'This is raw data! This must be hashed!'

    const hmacCorrect = getHmac512(data, hmacSecret)
    console.log('HMAC:', hmacCorrect)

    const salt = genSalt()
    const pbkdf2Correct = await calcPBKDF2(data, salt)
    console.log('PBKDF2:', pbkdf2Correct)
    const saltHex = hex2Buf(salt)
    console.log('saltHex:', saltHex)
  }
  main()
ブラウザ側の生成サンプルコード
  const calcHmac512 = (data, secret) => {
    return new Promise((resolve, reject) => {
      const enc = new TextEncoder('utf-8')
      window.crypto.subtle.importKey(
        'raw',
        enc.encode(secret),
        {
          name: 'HMAC',
          hash: {name: 'SHA-512'}
        },
        false,
        ['sign', 'verify']
      ).then((key) => {
        window.crypto.subtle.sign(
          'HMAC',
          key,
          enc.encode(data),
        ).then((hash) => {
          const buf = new Uint8Array(hash)
          resolve(buf2Hex(buf))
        })
      })
    })
  }

  const genSalt = () => {
    return window.crypto.getRandomValues(new Uint8Array(64))
  }

  const buf2Hex = (buf) => {
    return Array.prototype.map.call(new Uint8Array(buf), x => ('00' + x.toString(16)).slice(-2)).join('')
  }

  const calcPBKDF2 = (str, salt) => {
    return new Promise((resolve, reject) => {
      const byteList = new Uint8Array(Array.prototype.map.call(str, (c) => {
        return c.charCodeAt(0)
      }))
      window.crypto.subtle.importKey('raw', byteList, { name: 'PBKDF2', }, false, ['deriveBits'])
        .then((key) => {
          const opt = {
            name: 'PBKDF2',
            salt: salt,
            iterations: 1000*1000,
            hash: {name: 'SHA-512'},
          }
          return window.crypto.subtle.deriveBits(opt, key, 512).then((buf) => {
            resolve(buf2Hex(buf))
          })
        })
    })
  }
ブラウザ側の利用サンプルコード
  const main = async () => {
    const hmacSecret = 'hmac secret px.dog happy peach oolong!'
    const data = 'This is raw data! This must be hashed!'

    const salt = genSalt()
    const hmac = await calcHmac512(data, hmacSecret)
    console.log('hmac:', hmac)
    const pbkdf2 = await calcPBKDF2(data, salt)
    console.log('pbkdf2:', pbkdf2)
    const saltHex = buf2Hex(salt)
    console.log('saltHex:', saltHex)
  }
  main()
ブラウザでハッシュを生成するindex.htmlと、それをサーブし、かつデータを検証するapp.jsを用意した。
git clone https://github.com/pxdog/simple-hashes.git
# もしくは普通にダウンロードして同じディレクトリに配置すればよい
Express(Version 4)だけ用意してほしい。
npm i express
# もしくは yarn add express
実行すると、3001番ポートでListen。rootは不要。
node app.js
# Web server start at port 3001 と表示されればOK!
ブラウザでlocalhostの3001にアクセスしてみよう♪
http://localhost:3001
ブラウザで[CHECK!]というボタンを押すと、/checkに平文を含むデータをPOST。
受け取ったサーバ側Node.jsでは、同じ平文を同じSALTを使ってハッシュ計算。
# 最後に
愚記事と言われてしまうかもしれませんが。。。
HMACとかPBKDF2とか調べても古いライブラリを利用するものだったり、別環境で生成したものをどうやって検証するの?みたいなところがまとまっていなくて、調べるのが大変だったのでまとめてみました。
現在、OAuthで疎結合に繋がるWebサービスを個人で構築していて、そこにこれらを使う予定です。
全てのパスワードが適切にハッシュ化される世の中になりますように。
※これで動いた!やった!というノリですので、間違いや、イテレーション数やバイト数がこれじゃまずいですよ!というご指摘がありましたらご教示ください。
