AWS CLIを使ってEC2インスタンスの作成・削除・再作成をやってみました。
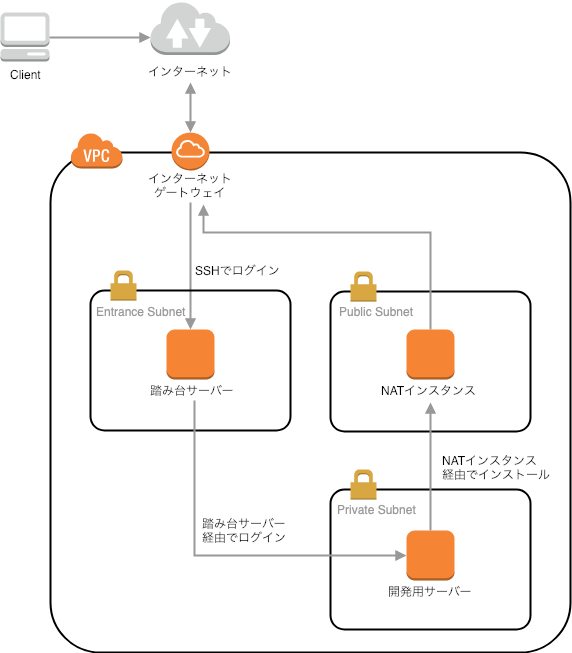
事前に作成済みの踏み台サーバーから、プライベートネットワークに開発用サーバーを作成・削除・再作成します。

目次
- 踏み台サーバーに権限付与
- インスタンスの作成
- インスタンスにPython3関係をインストール
- AMIの作成
- インスタンスの停止・削除
- 作成したAMIからインスタンスを作成
前提条件
- VPC, サブネット、インターネットゲートウェイ、セキュリテイグループ、キーペア、等々は作成済み
- 踏み台サーバーとNATインスタンスは作成済み
- 踏み台サーバーからインスタンスの作成・削除・再作成を行う
手順
[1] 踏み台サーバーに権限付与
IAMで踏み台サーバーに権限を付与します。
EC2に関するアクセスを全て許可する「AmazonEC2FullAccess」を付与します。
- マネージメントコンソールのIAMの画面から[ロールの作成]を選択
- このロールを使用するサービスで[EC2]を選択
- アクセス権限ポリシーの画面で"EC2"で検索し[AmazonEC2FullAccess]を選択
- タグの追加は設定無し
- ロールの作成でロール名を入力
- 踏み台サーバーに作成したロールの割り当て


[2] インスタンスの作成
踏み台サーバーはOSがAmazon Linuxなので、デフォルトでAWS CLIがインストールされています。
$ aws --version
aws-cli/1.15.80 Python/2.7.14 Linux/4.14.88-88.76.amzn2.x86_64 botocore/1.10.79
AWS CLIでの操作ではJSON形式でデータを扱うため、便利のために"jq"コマンドをインストールします。
$ sudo yum -y install jq
[2-1] AWS CLIを試す
試しに作成済みインスタンスの情報をAWS CLIで取得してみます。
$ aws ec2 describe-instances | jq '.Reservations[].Instances[] | {InstanceId, Tags}'
You must specify a region. You can also configure your region by running \
"aws configure".
リージョンを指定しないとダメなようです。
$ aws ec2 describe-instances --region ap-northeast-1 \
  | jq '.Reservations[].Instances[] | {InstanceId}'
{
  "InstanceId": "i-xxxxxxxxx"
}
{
  "InstanceId": "i-xxxxxxxxxxxx",
}
今度は上手くいきました。
作成したIAMロールが踏み台サーバーに割り当てられていることが確認できました。
[2-2] インスタンスの種類を決める
インスタンスを作成する前に、インスタンスタイプやAMI(OS)を決めます。
セキュリティグループ、サブネット、キーペアは事前に作成しました。
| 項目 | 内容 | AWSで設定するときの値 |
|---|---|---|
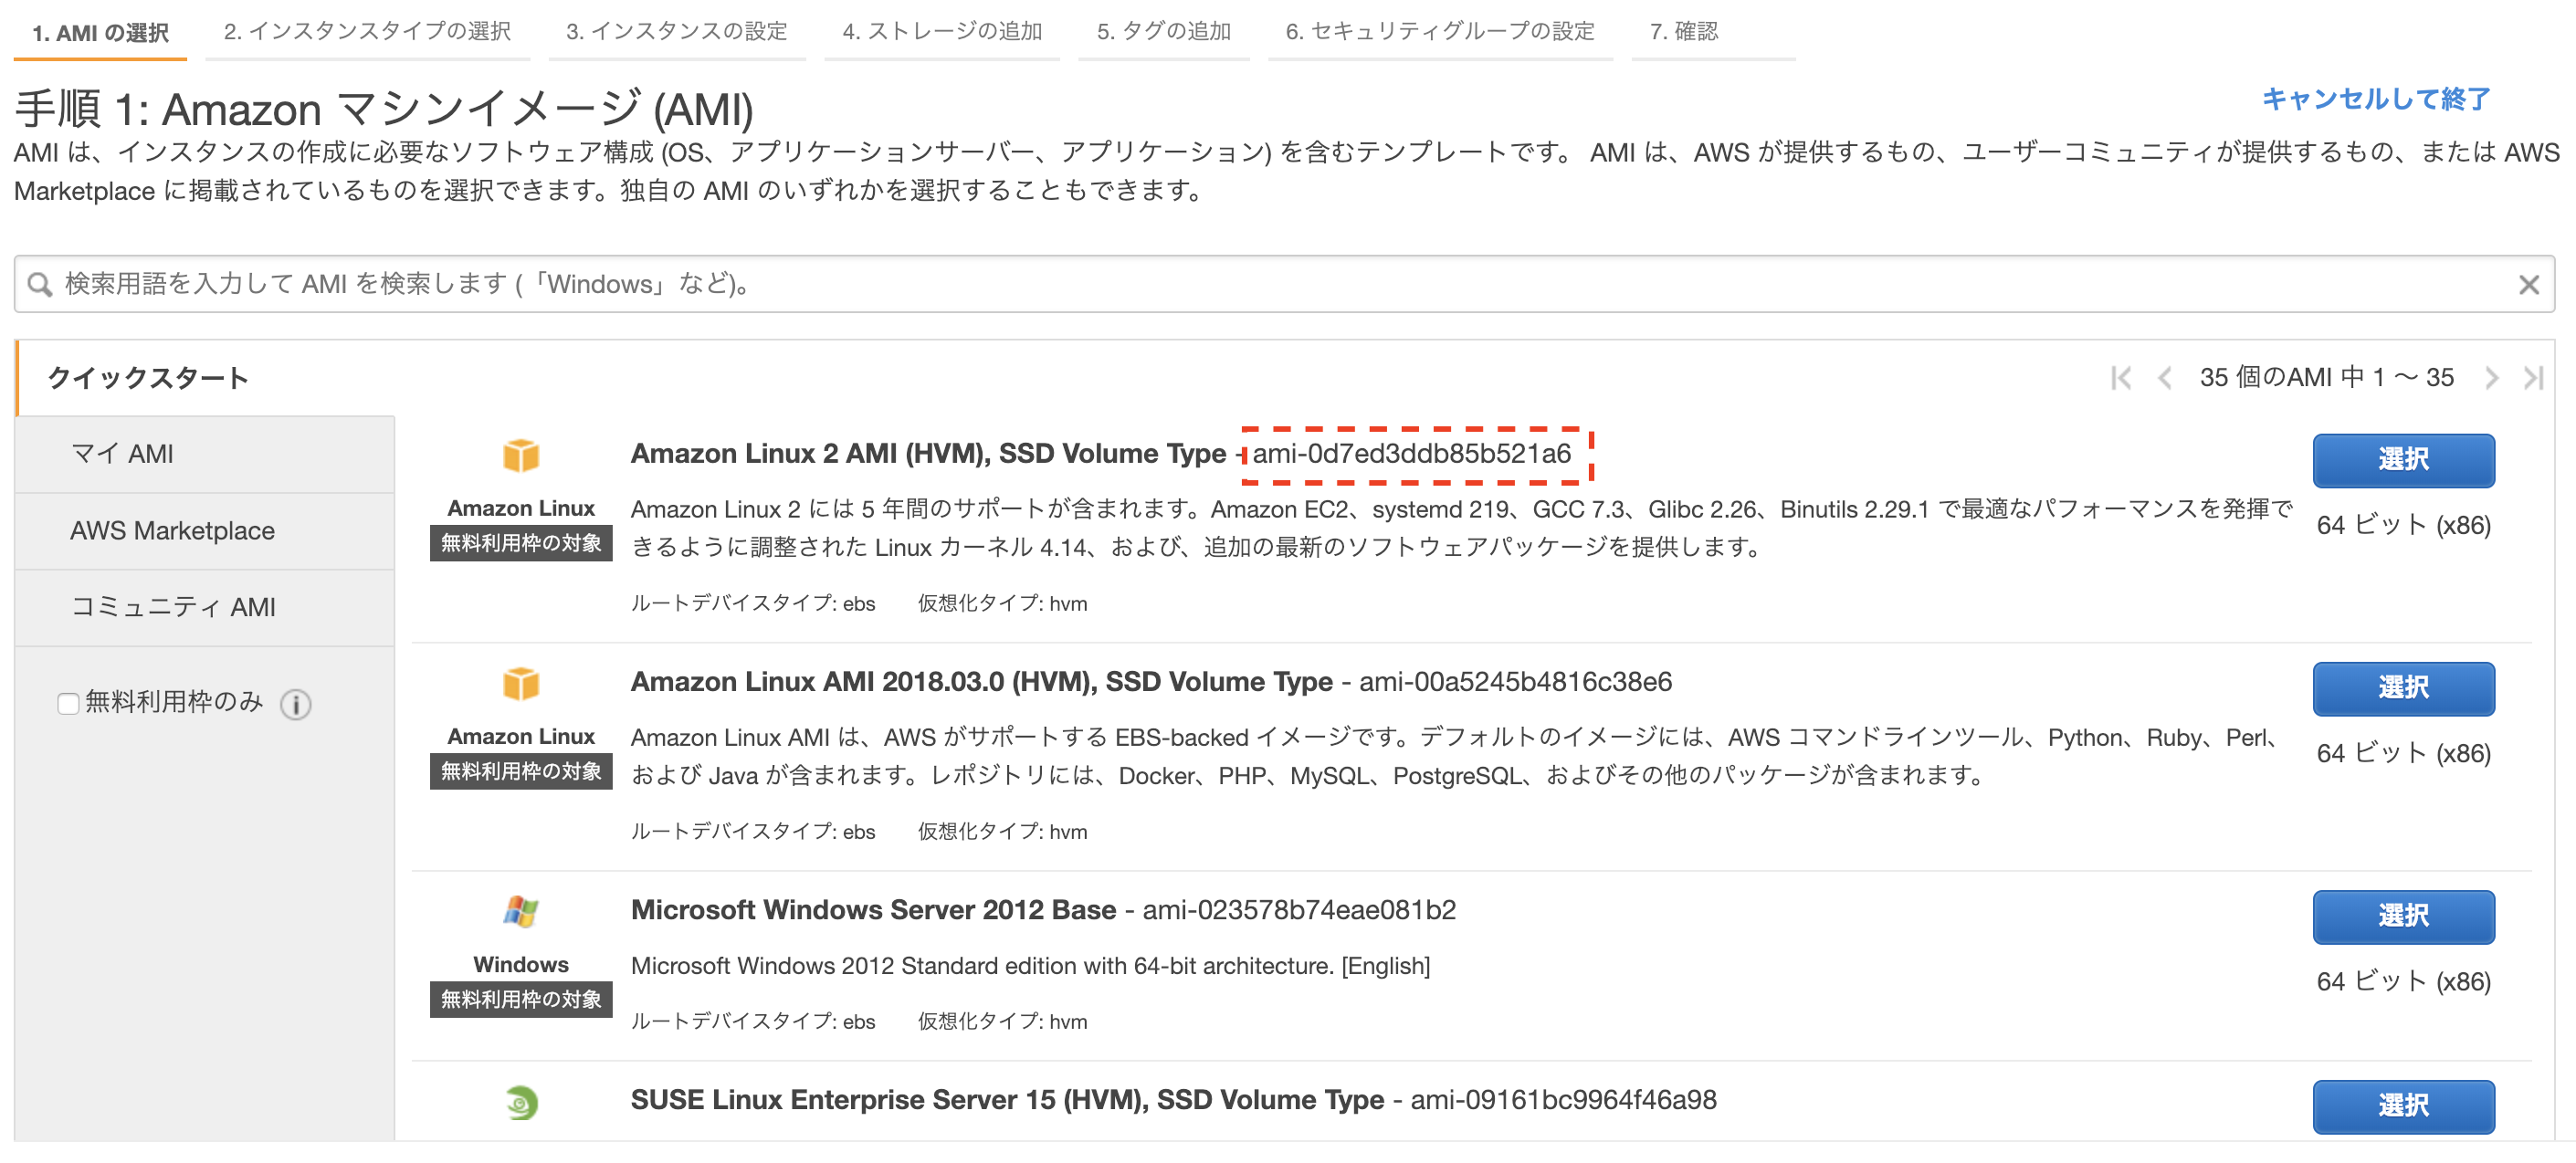
| AMI | Amazon Linux 2 AMI | ami-0d7ed3ddb85b521a6 |
| インスタンスタイプ | t3.nano | t3.nano |
| 作成するインスタンスの数 | 1 | 1 |
| キーペア | - | (キーペアの名称) |
| サブネット | - | subnet-xxxxxx |
| プライベートIP | 10.xx.xx.xx | 10.xx.xx.xx |
| セキュリティグループ | - | sg-xxxxxx |
| タグ | Name=private-inst | Tags=[{Key=Name,Value=private-inst}] |
| T2/T3 無制限 | 無効 | standard |
AMIのIDはマネジメントコンソールから確認するのが簡単です。

[2-3] dry-runで試す
実際にインスタンスを作成する前に、dry-runオプションを付けてエラーがないか確認していきます。
$ aws ec2 run-instances --dry-run --region ap-northeast-1 \
  --image-id ami-0d7ed3ddb85b521a6 --count 1 \
  --instance-type t3.nano --key-name (キーペアの名称) \
  --subnet-id subnet-xxxxxx --private-ip-address 10.xx.xx.xx \
  --security-group-ids sg-xxxxxx \
  --tag-specifications 'ResourceType=instance,Tags=[{Key=Name,Value=private-inst}]' \
  --credit-specification CpuCredits=standard

An error occurred (DryRunOperation) when calling the RunInstances operation: \
Request would have succeeded, but DryRun flag is set.
上手くいくだろう("Request would have succeeded")と返ってきました。
[2-4] 本番コマンド実行
dry-runオプションを削除して実行します。
$ aws ec2 run-instances --region ap-northeast-1 \
  --image-id ami-0d7ed3ddb85b521a6 --count 1 \
  --instance-type t3.nano --key-name (キーペアの名称) \
  --subnet-id subnet-xxxxxx --private-ip-address 10.xx.xx.xx \
  --security-group-ids sg-xxxxxx \
  --tag-specifications 'ResourceType=instance,Tags=[{Key=Name,Value=private-inst}]' \
  --credit-specification CpuCredits=standard
{
    "Instances": [
        {
...(以下、省略)...
作成されたインスタンスの情報が返ってきたので、作成に成功したようです。
念の為、マネジメントコンソールから確認すると、インスタンスが追加されていました。
ルートデバイスの容量はデフォルトで8GiBになるようです。
[3] インスタンスにPython3関係をインストール
踏み台サーバーから、作成したインスタンスにログインします。
$ ssh -i ./xxxx.pem ec2-user@10.xx.xx.xx
Python3, pip3, virtualenvをインストールします。
$ sudo yum install python3 python3-pip
$ sudo pip3 install virtualenv
[4] AMIの作成
踏み台サーバーからAMIの作成を行います。
$ aws ec2 create-image --region ap-northeast-1 --instance-id i-xxxxxx \
  --name "python3-base-ami" --reboot
{
    "ImageId": "ami-xxxxxx"
}
作成したAMIのIDが返ってきます。
describe-imagesで確認すると、AMIが作成されていることが分かります。
$ aws ec2 describe-images --region ap-northeast-1 --image-id ami-xxxxxx \
  | jq '.Images[]'
{
...(途中省略)...
  "Name": "python3-base-ami",
  "Hypervisor": "xen",
  "EnaSupport": true,
  "SriovNetSupport": "simple",
  "ImageId": "ami-xxxx",
  "State": "available",
  "BlockDeviceMappings": [
    {
      "DeviceName": "/dev/xvda",
      "Ebs": {
        "Encrypted": false,
        "DeleteOnTermination": true,
        "VolumeType": "gp2",
        "VolumeSize": 8,
        "SnapshotId": "snap-xxxxxx"
      }
    }
  ],
...(途中省略)...
}
[5] インスタンスの停止・削除
インスタンスの停止と削除を行います。
$ aws ec2 stop-instances --region ap-northeast-1 --instance-ids i-xxxxxx
$ aws ec2 terminate-instances --region ap-northeast-1 --instance-ids i-xxxxxx
Stateを確認すると"terminated"になっています。
$ aws ec2 describe-instances --region ap-northeast-1 --instance-ids i-xxxxxx \
  | jq '.Reservations[].Instances[] | {InstanceId,Tags,State}'
{
  "InstanceId": "i-xxxxxx",
  "Tags": [
    {
      "Value": "private-inst",
      "Key": "Name"
    }
  ],
  "State": {
    "Code": 48,
    "Name": "terminated"
  }
}
[6] 作成したAMIからインスタンスを作成
[6-1] ルートデバイスの容量を拡張する
インスタンスを作成する際、ルートデバイスの容量はデフォルトだと8GiBですが、16GiBに拡張してみます。
拡張するための設定をJSONファイルに記述します。
- DeviceNameはデフォルトのルートデバイスと合わせる
- SnapshotIdに作成したAMIのSnapshotIdを設定する
[
  {
    "DeviceName": "/dev/xvda",
    "Ebs": {
      "DeleteOnTermination": true,
      "VolumeType": "gp2",
      "VolumeSize": 16,
      "SnapshotId": "snap-xxxxxx"
    }
  }
]
[6-2] インスタンス作成
"--image-id"に作成したAMIのID、"--block-device-mappings"にルートデバイス拡張のJSONファイルのパスを設定します。
$ aws ec2 run-instances --dry-run --region ap-northeast-1 --image-id ami-xxxxxx \
  --block-device-mappings file://device-mapping.json --count 1 \
  --instance-type t3.nano --key-name (キーペアの名称) \
  --subnet-id subnet-xxxxxx --private-ip-address 10.0.2.10 \
  --security-group-ids sg-xxxxxx \
  --tag-specifications 'ResourceType=instance,Tags=[{Key=Name,Value=private-inst}]' \
  --credit-specification CpuCredits=standard
作成したインスタンスのボリュームを確認すると16GiBになっていることが分かります。
$ aws ec2 describe-volumes --region ap-northeast-1 | jq '.Volumes[] | \
  select(.Attachments[].InstanceId=="i-xxxxxx")'
{
  "AvailabilityZone": "ap-northeast-1d",
  "Attachments": [
    {
      "AttachTime": "2019-02-03T09:51:34.000Z",
      "InstanceId": "i-xxxxxx",
      "VolumeId": "vol-xxxxx",
      "State": "attached",
      "DeleteOnTermination": true,
      "Device": "/dev/xvda"
    }
  ],
  "Encrypted": false,
  "VolumeType": "gp2",
  "VolumeId": "vol-xxxxxx",
  "State": "in-use",
  "Iops": 100,
  "SnapshotId": "snap-xxxxxx",
  "CreateTime": "2019-02-03T09:51:34.102Z",
  "Size": 16
}
[6-3] ライブラリ・ツールの確認
AMI作成前にインストールしたPython3, pip3, virtualenvがインストールされていることを確認します。
$ python3 --version
Python 3.7.1
$ pip3 --version
pip 9.0.3 from /usr/lib/python3.7/site-packages (python 3.7)
$ virtualenv --version
16.3.0
参考資料
AWS Cli自分用Tips - Qiita
AWS-CLI EC2でおなじものをつくるよ - Qiita
AWS CLI Command Reference — AWS CLI 1.16.96 Command Reference
EC2 インスタンスを起動、リスト、および終了する - AWS Command Line Interface
コマンドラインからの EBS ボリュームの変更 - Amazon Elastic Compute Cloud