前回の投稿 「ESP32をGoogle Smart Homeデバイスにする」 で、Google Homeデバイスを扱ってみましたが、いまいちしっくりきません。
理解を深めるために、今回は、AWS IoTと連携してみます。
AWS IoTにはシャドウという機能があり、IoTデバイスと相性がよさそうなので、Google HomeデバイスとIoTデバイスの間に、AWS IoTを挟んで連携しやすくしてみます。
AWS IoT Device Shadow
https://docs.aws.amazon.com/ja_jp/iot/latest/developerguide/iot-device-shadows.html
しくみ
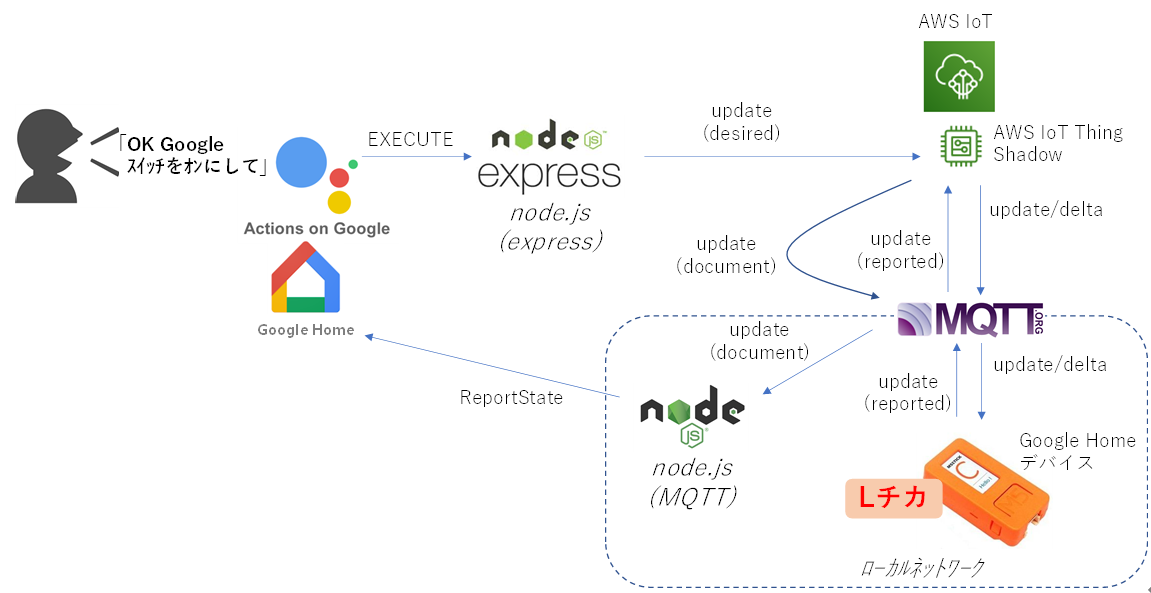
今回実装するのは、node.jsとGoogle Homeデバイスです。
node.jsの役割は、Google Home通信とAWS IoT通信の仲介です。
node.jsには2種類あり、Google HomeからHTTP通信を受け付けてAWS IoTにMQTT Publishするnode.js(express)サーバと、MQTT SubscribeしてAWS IoTからメッセージを受け取ってGoogle Homeに通知するnode.js(MQTT)サーバです。
Google Homeデバイスとして、M5StickCのようなESP32での実装と、node.jsでのバーチャルデバイスとしての実装の2種類を用意しました。
ということで、この投稿は、前回の投稿 「ESP32をGoogle Homeデバイスにする」 の続きです。
ソースは以下に上げておきました。以前のGitHubに加えています。
poruruba/GoogleHomeDevice
https://github.com/poruruba/GoogleHomeDevice/tree/master/IoTSmartHome
流れ
①Google Home Miniに対して「OK Google スイッチをオンにして」と発するか、スマホのGoogle Homeアプリから、スイッチをオンにします。
②Actions on Googleは、node.js(express)に対して、スイッチオンの要求のため、EXECUTEを呼び出します。
③node.js(express)は、スイッチのAWS IoT Thingのシャドウに対して、スイッチをオンにするdesiredとして更新します。
④AWS IoTは、変更要求が来ていることをupdate/deltaで変更差分をMQTT Publishします。
⑤Google Homeデバイスでは、update/deltaをサブスクライブしておき、受信した差分に基づき、デバイスのLED状態を変更します。そして、変更されたことをreportedとしてAWS IoT ThingのシャドウにMQTT Publishします。
⑥AWS IoTは、シャドウの更新を検知すると、変更後の状態をupdate/documentで通知します。
⑦node.js(MQTT)はupdate/documentをサブスクライブしておき、受信された現在のシャドウの状態を、Google HomeにReportStateとして通知します。
参考情報は以下の通りです。
②action.devices.EXECUTE
https://developers.google.com/assistant/smarthome/reference/intent/execute
③UpdateThingShadow
https://docs.aws.amazon.com/iot/latest/apireference/API_iotdata_UpdateThingShadow.html
https://docs.aws.amazon.com/ja_jp/iot/latest/developerguide/using-device-shadows.html
④/update/delta
https://docs.aws.amazon.com/ja_jp/iot/latest/developerguide/device-shadow-mqtt.html#update-delta-pub-sub-topic
⑥/updata/documents
https://docs.aws.amazon.com/ja_jp/iot/latest/developerguide/device-shadow-mqtt.html#update-documents-pub-sub-topic
⑦ReportState
https://developers.google.com/assistant/smarthome/develop/report-state
AWS IoT Thingの作成
AWS IoTのWeb管理コンソールを開きます。
AWS IoT Web管理コンソール
https://ap-northeast-1.console.aws.amazon.com/iot/home?region=ap-northeast-1#/home
左側のナビゲーションより、管理の下のモノを選択し、その後表示される画面の右上の「作成」ボタンを押下します。
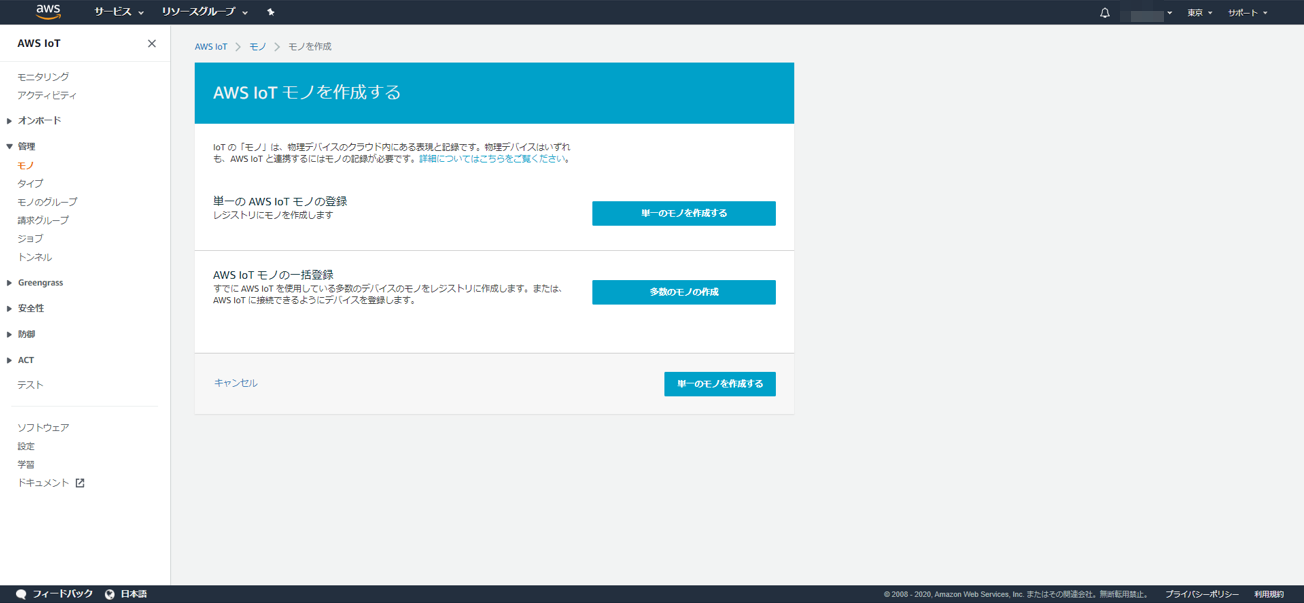
手っ取り早く、「単一のモノを作成する」ボタンを押下します。
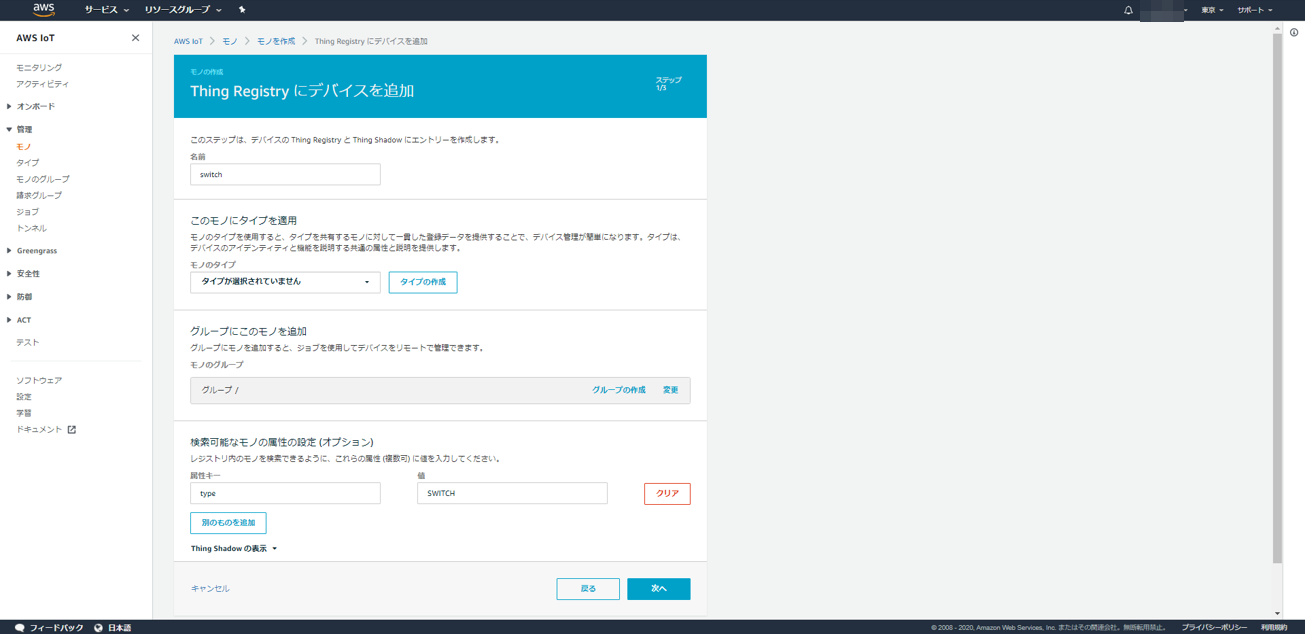
名前には、適当な識別子を入力します。たとえば、「switch」
属性キーとして、typeでデバイスタイプを指定します。
たとえば、action.devices.types.SWITCH のGoogle Homeデバイスを作りたい場合は、「SWITCH」とします。
デバイスタイプの一覧は以下にあります。
https://developers.google.com/assistant/smarthome/guides
「次へ」ボタンを押下します。
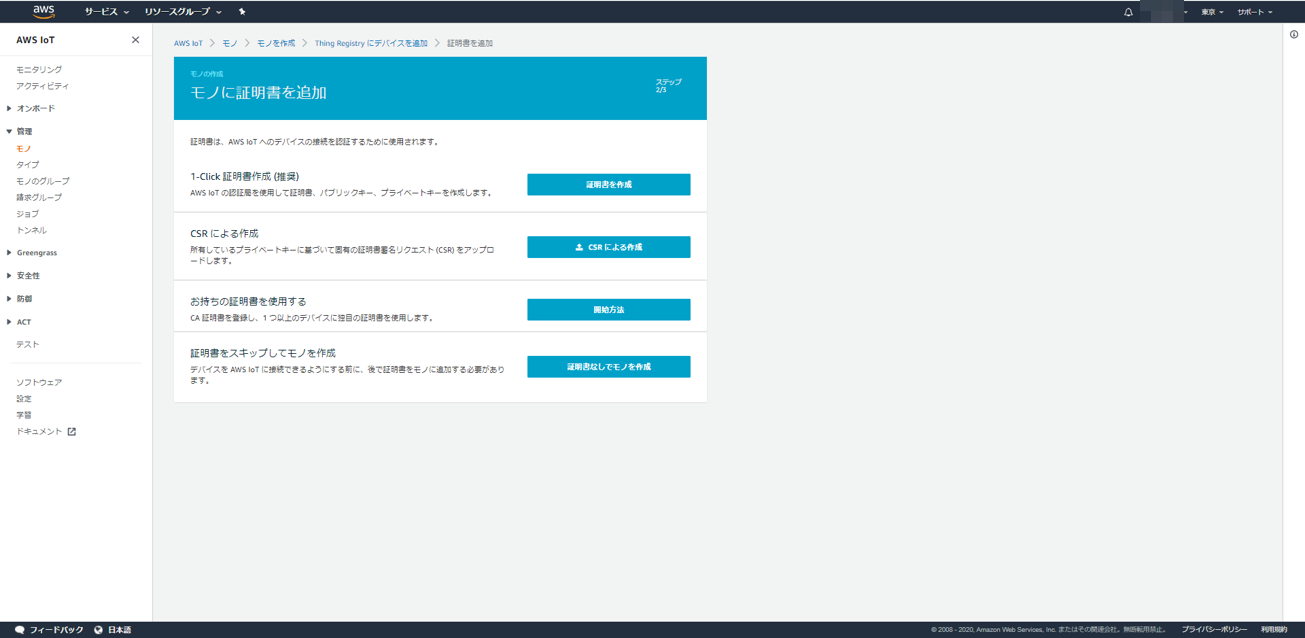
手っ取り早く、「証明書を作成」ボタンを押下します。
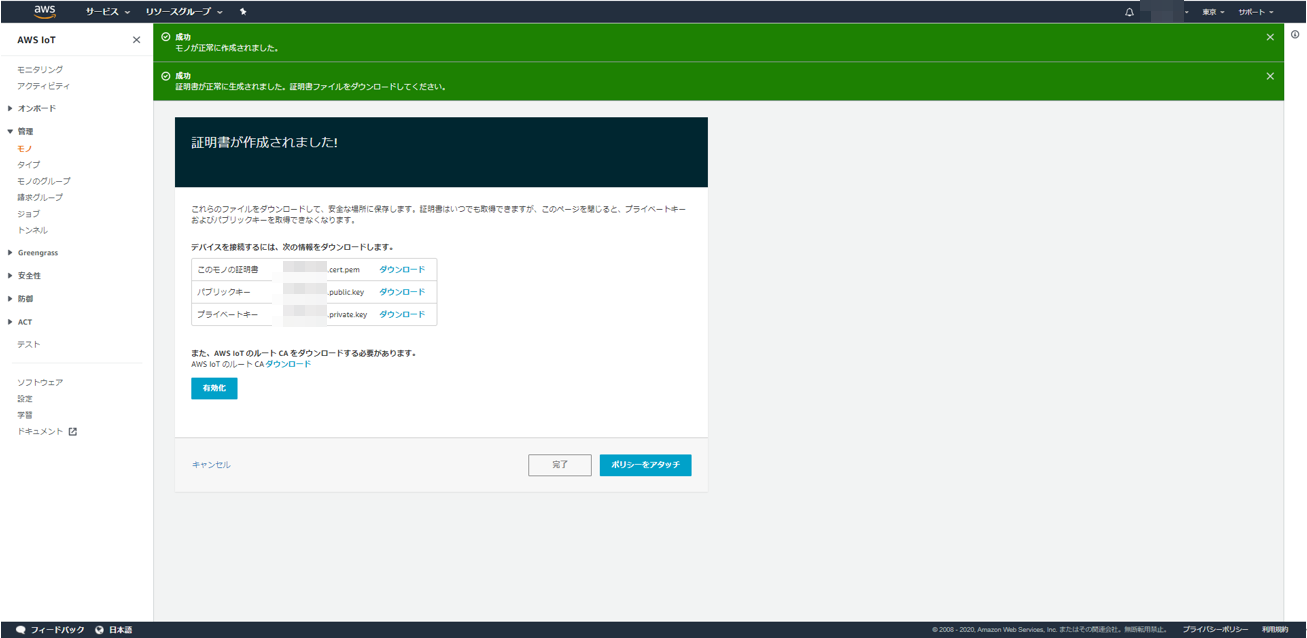
各種証明書やキーをダウンロードし、「有効化」ボタンを一度押下して、「完了」ボタンを押下します。
次に、シャドウを作成します。
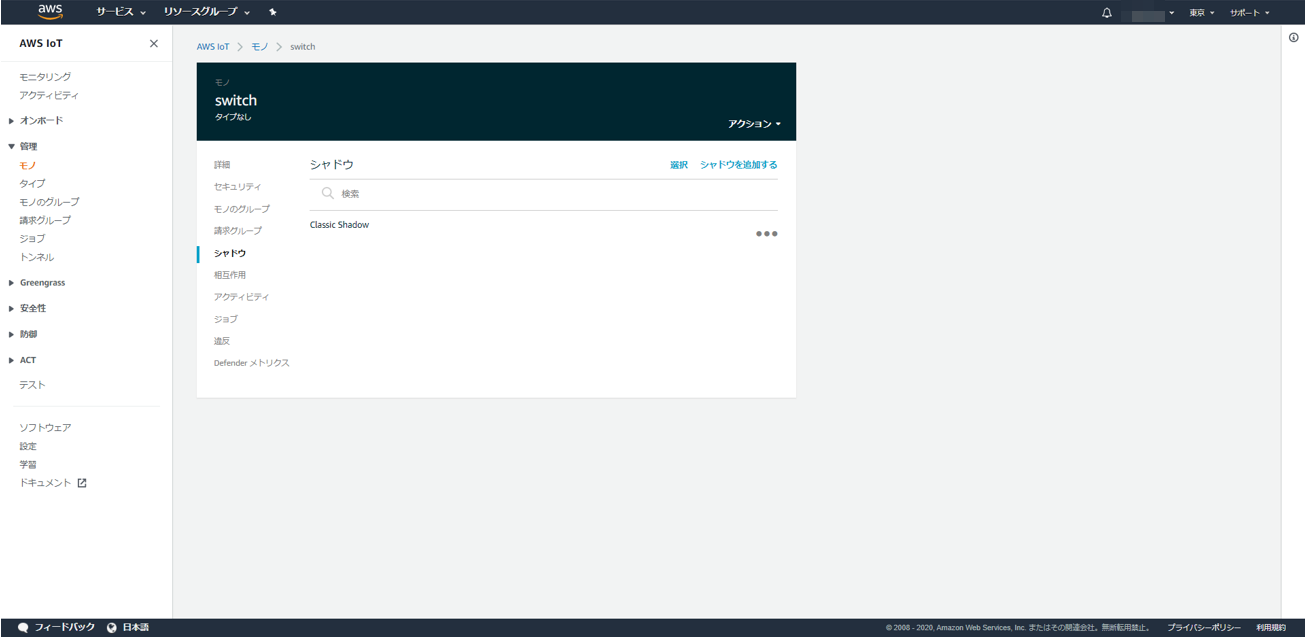
Classic Shadowの右側の「・・・」を選択し、表示を選択します。
そうするとシャドウドキュメントが表示されるので、「編集」をクリックします。
以下のように追記します。
{
  "desired": {
    "welcome": "aws-iot",
    "on": false
  },
  "reported": {
    "welcome": "aws-iot",
    "on": false
  }
}
welcomeは削除できないようでそのままにします。
onは、Google Homeデバイスとして保持しておくべき状態です。ちょっとややこしいのですが、これから作るswitchは、以下の機能(Traits)を持っています。
action.devices.traits.OnOff
このTraitsを持っているデバイスは、状態として以下に上げるSTATESに上げられるStateをGoogle Homeと共有する必要があります。
OnOffのDevices STATE
https://developers.google.com/assistant/smarthome/traits/onoff#device-states
1つのデバイスに複数の機能(Traits)を持つことができるので、すべてシャドウとして保持しておきます。
例えば、action.devices.traits.LockUnlockとaction.devices.traits.OpenCloseの2つのTraitsをもったaction.devices.types.LOCKというGoogle Homeデバイスを作るとします。
その場合は、属性type=LOCKとし、シャドウは以下のようにします。値は初期値であり何でも良いです。
{
  "desired": {
    "welcome": "aws-iot",
    "openPercent": 0,
    "isLocked": false,
    "isJammed": false
  },
  "reported": {
    "welcome": "aws-iot",
    "openPercent": 0,
    "isLocked": false,
    "isJammed": false
  }
}
(参考)
https://developers.google.com/assistant/smarthome/traits/openclose#device-states
https://developers.google.com/assistant/smarthome/traits/lockunlock#device-states
次にモノのグループを作成します。左側のナビゲーションから選択できます。
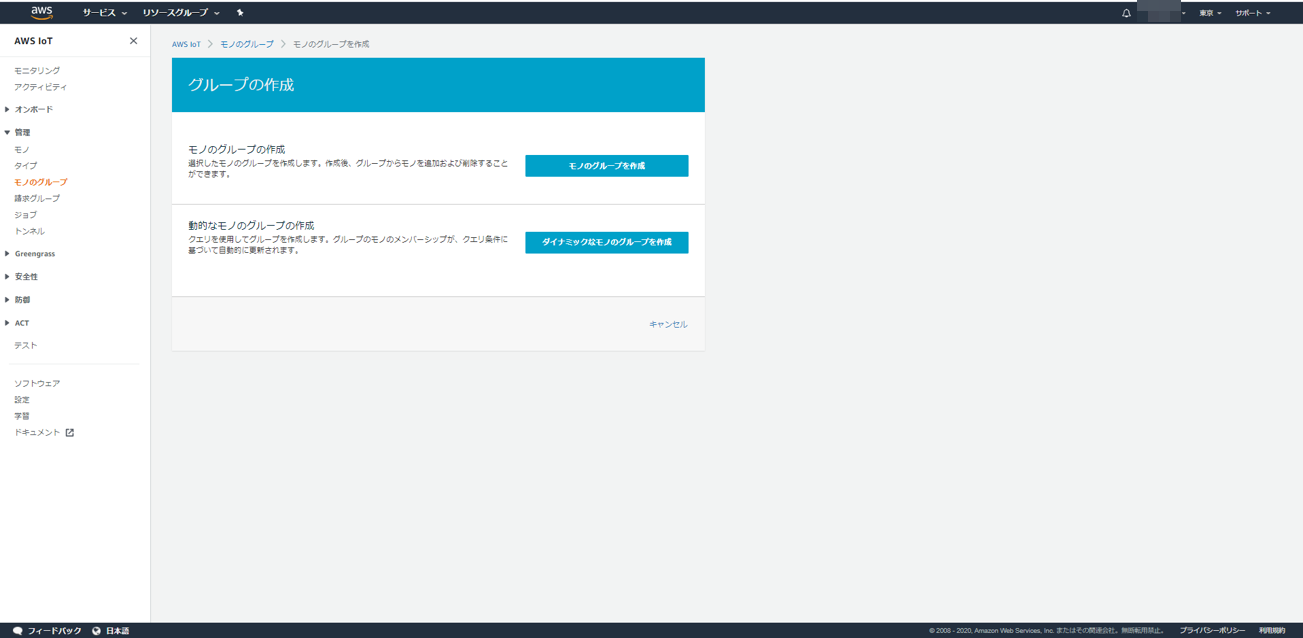
「モノのグループを作成」ボタンを押下します。
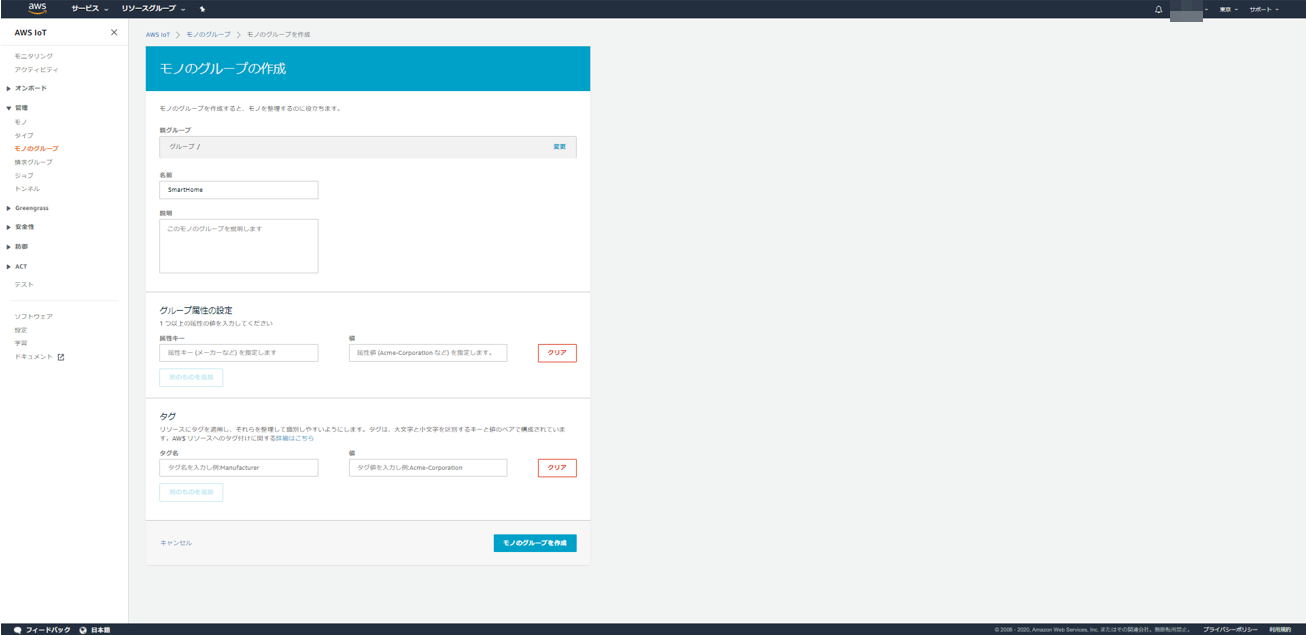
名前は適当に「SmartHome」とでもしておきます。最後に「モノのグループを作成」ボタンを押下します。
続けて、このグループに先ほど作成したモノを登録します。
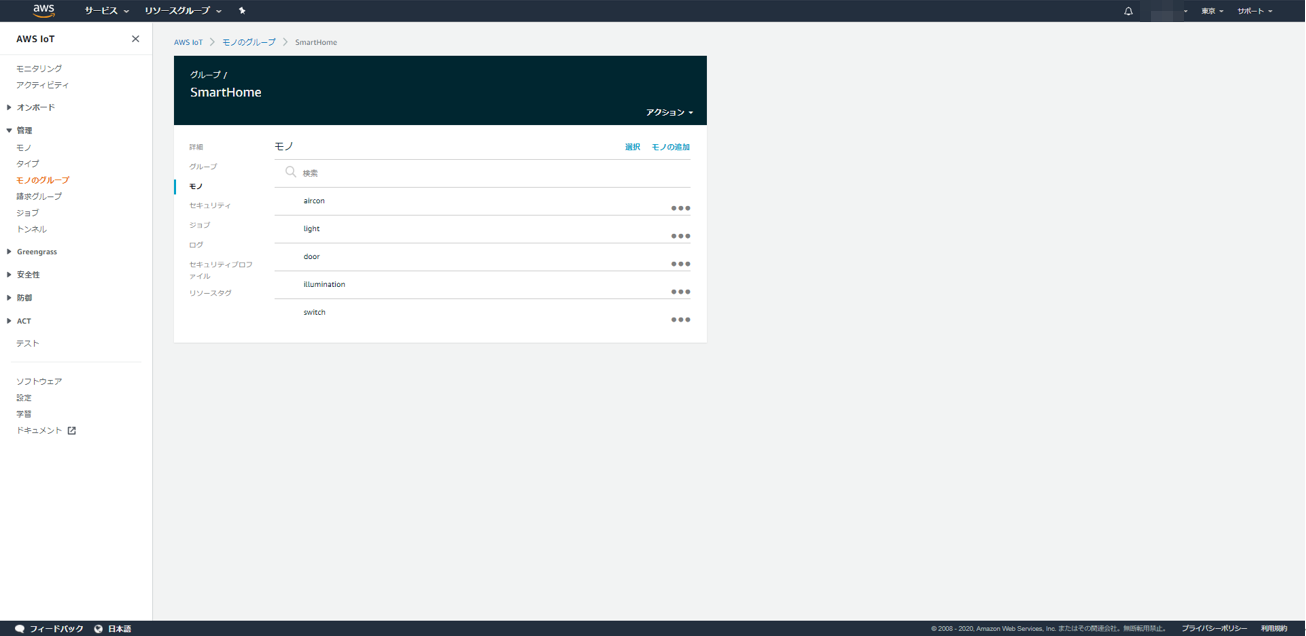
モノの追加 リンクをクリックすれば、モノを選択できます。
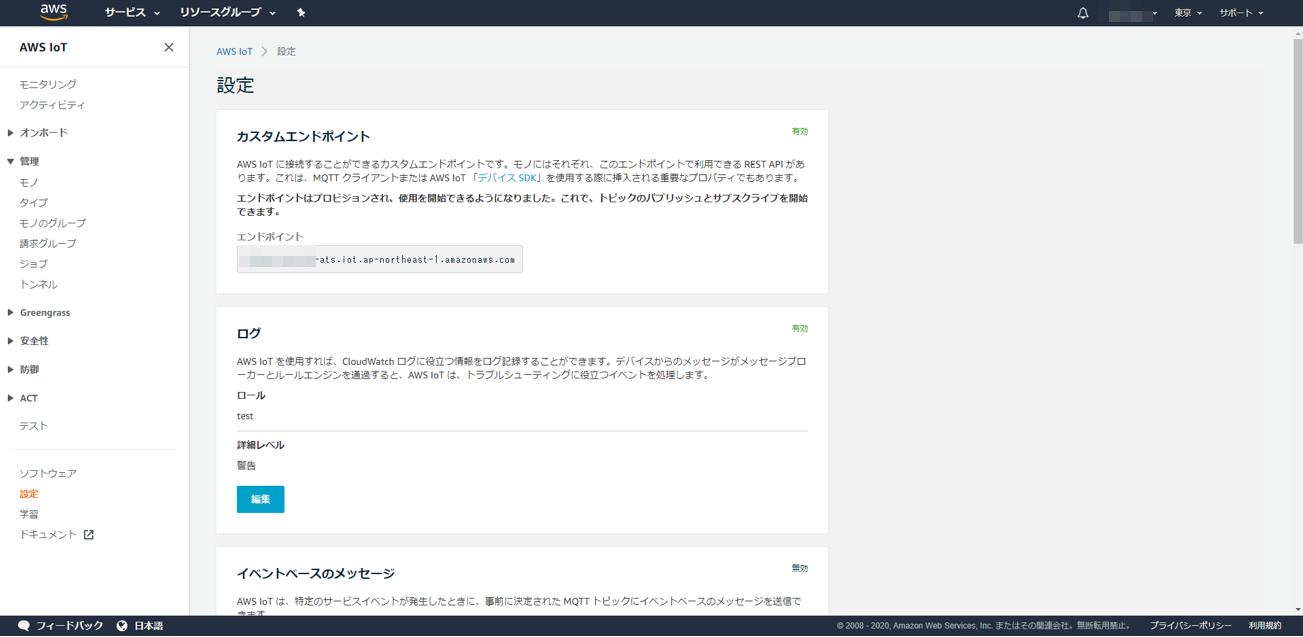
最後に、左側ナビゲーションから設定を選択し、表示されるエンドポイントを覚えておきます。
node.js(express)の実装
'use strict';

const AWS = require("aws-sdk");
AWS.config.update({
  region: "ap-northeast-1",
});

const MANUFACTURER_NAME = process.env.MANUFACTURER_NAME || 'MyHome Devices';
const IOT_ENDPOINT = process.env.IOT_ENDPOINT || '【AWS IoTのエンドポイント】';
var iot = new AWS.Iot();
var iotdata = new AWS.IotData({endpoint: IOT_ENDPOINT});

const jwt_decode = require('jwt-decode');
const {smarthome} = require('actions-on-google');
const app = smarthome();

const DEFAULT_USER_ID = process.env.DEFAULT_USER_ID || "user01";
var agentUserId = DEFAULT_USER_ID;

app.onSync(async (body, headers) => {
  console.info('onSync');
  console.log('onSync body', body);

  var decoded = jwt_decode(headers.authorization);
  console.log(decoded);

  var param_list = {
    thingGroupName: "SmartHome"
  };
  var list = await iot.listThingsInThingGroup(param_list).promise();
  var result = {
    requestId: body.requestId,
    payload: {
      agentUserId: agentUserId,
      devices: []
    }
  };

  for( var i = 0 ; i < list.things.length ; i++ ){
    var param_desc = {
      thingName: list.things[i]
    };
    var desc = await iot.describeThing(param_desc).promise();
    var device = {
      id: list.things[i],
      type: 'action.devices.types.' + desc.attributes.type,
      deviceInfo: {
        manufacturer: MANUFACTURER_NAME,
      },
      willReportState: false,
    };
    switch(device.id){
      case 'switch': {
        device.traits = ['action.devices.traits.OnOff'];
        device.name = { name: "スイッチ" };
        break;
      }
      case 'door': {
        device.traits = ['action.devices.traits.LockUnlock', 'action.devices.traits.OpenClose'];
        device.name = { name: "ドア" };
        device.attributes = {
          discreteOnlyOpenClose: false,
        }
        break;
      }
      case 'illumination': {
        device.traits = ['action.devices.traits.Brightness', 'action.devices.traits.OnOff'];
        device.name = { name: "イルミ" };
        break;
      }
      case 'light': {
        device.traits = ['action.devices.traits.OnOff'];
        device.name = { name: "電気" };
        device.attributes = {
          commandOnlyOnOff: true,
        };
        break;
      }
      case 'aircon': {
        device.traits = ['action.devices.traits.OnOff', 'action.devices.traits.TemperatureSetting'];
        device.name = { name: "エアコン" };
        device.attributes = {
          availableThermostatModes: 'off,heat,cool,auto,dry,on',
          thermostatTemperatureUnit: 'C',
          commandOnlyTemperatureSetting: true,
          commandOnlyOnOff: true,
        };
        device.willReportState = false;
        break;
      }
    }
    result.payload.devices.push(device);
  };

  console.log("onSync result", result);
  return result;
});

app.onQuery(async (body, headers) => {
  console.info('onQuery');
  console.log('onQuery body', body);

  var decoded = jwt_decode(headers.authorization);
  console.log(decoded);

  const {requestId} = body;
  const payload = {
    devices: {}
  };

  for( var i = 0 ; i < body.inputs.length ; i++ ){
    if( body.inputs[i].intent == 'action.devices.QUERY' ){
      for( var j = 0 ; j < body.inputs[i].payload.devices.length ; j++ ){
        var device = body.inputs[i].payload.devices[j];
        var params = {
          thingName: device.id
        };
        var shadow = await iotdata.getThingShadow(params).promise();
        shadow = JSON.parse(shadow.payload);
        var state = shadow.state.reported;
        delete state.welcome;
        state.online = true;
        state.status = 'SUCCESS';
        payload.devices[device.id] = state;
      }
    }
  }

  var result = {
    requestId: requestId,
    payload: payload,
  };

  console.log("onQuery result", result);
  return result;
});

app.onExecute(async (body, headers) => {
  console.info('onExecute');
  console.log('onExecute body', body);

  var decoded = jwt_decode(headers.authorization);
  console.log(decoded);

  const {requestId} = body;

  // Execution results are grouped by status
  var ret = {
    requestId: requestId,
    payload: {
      commands: [],
    },
  };
  for( var i = 0 ; i < body.inputs.length ; i++ ){
    if( body.inputs[i].intent == "action.devices.EXECUTE" ){
      for( var j = 0 ; j < body.inputs[i].payload.commands.length ; j++ ){
        var result = {
          ids:[],
          status: 'SUCCESS',
        };
        ret.payload.commands.push(result);

        var devices = body.inputs[i].payload.commands[j].devices;
        var execution = body.inputs[i].payload.commands[j].execution;
        for( var k = 0 ; k < execution.length ; k++ ){
          console.log("command", execution[k].command);
          console.log("params", execution[k].params);
          for( var l = 0 ; l < devices.length ; l++ ){
            result.ids.push(devices[l].id);

            var param_get = {
              thingName: devices[l].id
            };
            var current_shadow = await iotdata.getThingShadow(param_get).promise();
            console.log('current_shadow', current_shadow);

            var state = {};
            switch(execution[k].command){
              case 'action.devices.commands.ThermostatSetMode': {
                state.thermostatMode = execution[k].params.thermostatMode;
                break;
              }
              case 'action.devices.commands.OnOff': {
                state.on = execution[k].params.on;
                break;
              }
              case 'action.devices.commands.mute': {
                state.isMuted = execution[k].params.mute;
                break;
              }
              case 'action.devices.commands.setVolume': {
                state.currentVolume = execution[k].params.volumeLevel;
                break;
              }
              case 'action.devices.commands.LockUnlock': {
                state.isLocked = execution[k].params.lock;
                break;
              }
              case 'action.devices.commands.OpenClose': {
                state.openPercent = execution[k].params.openPercent;
                break;
              }
              case 'action.devices.commands.BrightnessAbsolute': {
                state.brightness = execution[k].params.brightness;
                break;
              }
            }

            var shadow = {
              state: {
                desired: state
              }
            };

            var param_update = {
              thingName: devices[l].id,
              payload: JSON.stringify(shadow)
            };
            console.log('updateThingShadow', param_update);
            await iotdata.updateThingShadow(param_update).promise();
          }
        }
      }
    }
  }

  console.log("onExecute result", ret);
  return ret;
});

app.onDisconnect((body, headers) => {
  console.info('onDisconnect');
  console.log('body', body);

  var decoded = jwt_decode(headers.authorization);
  console.log(decoded);

  // Return empty response
  return {};
});

exports.fulfillment = app;
環境に合わせて以下を書き換えてください。
【AWS IoTのエンドポイント】
app.onSync(async (body, headers)
の中の、
switch(device.id){
のところに、await iot.listThingsInThingGroup()を呼び出して、Google Homeデバイス用に作ったグループ(SmartHome)の配下のモノがリストアップしていますので、今回実装したいGoogle Homeデバイスを記述します。
さきほど、AWS IoT Thingとして登録した「switch」が以下の部分です。
      case 'switch': {
        device.traits = ['action.devices.traits.OnOff'];
        device.name = { name: "スイッチ" };
        break;
      }
devices.traitsのところに、サポートしたい機能(Traits)を指定します。
nameは呼びやすい名前を付けます。
ほかにもありますが、ご参考まで。
door : type=LOCK
illumination : type=LIGHT
light : type=LIGHT
aircon : type=AC_UNIT
今回の実装では、以下のTraitsで要求されうるEXECUTE(Command)を実装しておきました。(不完全かと思いますが。。。。)
・action.devices.traits.OnOff
・action.devices.traits.LockUnlock
・action.devices.traits.OpenClose
・action.devices.traits.Brightness
・action.devices.traits.TemperatureSetting
app.onExecute(async (body, headers)
の中で、AWS IoTのupdateの引数に変換して、iotdata.updateThingShadow()を呼び出しています。
app.onQuery(async (body, headers)
は何をしているかというと、iotdata.getThingShadow()を呼び出して各デバイスのAWS IoT Thingシャドウを取得して、その値をonQuery呼び出し元、すなわち、Actions on Googleに戻しています。
node.js(MQTT)の実装
'use strict';

const AWS = require("aws-sdk");
AWS.config.update({
  region: "ap-northeast-1",
});
var iot = new AWS.Iot();

const mqtt = require('mqtt');
const {smarthome} = require('actions-on-google');

const JWT_FILE_PATH = process.env.JWT_FILE_PATH || '【サービスアカウントキーファイル名】';
const jwt = require(JWT_FILE_PATH);
const app = smarthome({
  jwt: jwt
});

const MQTT_HOST = process.env.MQTT_HOST || '【MQTTブローカのURL】';
var mqttClient  = mqtt.connect(MQTT_HOST);

const DEFAULT_USER_ID = process.env.DEFAULT_USER_ID || "user01";
var agentUserId = DEFAULT_USER_ID;

var requestId = 0;

mqttClient.on('connect', async () => {
  console.log('connected');
  var param_list = {
    thingGroupName: "SmartHome"
  };
  var list = await iot.listThingsInThingGroup(param_list).promise();
  for( var i = 0 ; i < list.things.length ; i++ ){
    console.log( 'waiting: ' + list.things[i]);
    mqttClient.subscribe('$aws/things/' + list.things[i] + '/shadow/update/documents');
  }
});

mqttClient.on('message', async (topic, message) =>{
  try{
    var tps = topic.split('/');
    if( tps.length < 6 )
      return;
    if( tps[0] != '$aws' || tps[1] != 'things' || tps[3] != "shadow" )
      return;

    var thing = tps[2];
    var cmd = tps[4];
    var param = tps[5];
    var document = JSON.parse(message.toString());
    console.log(thing, cmd, param, JSON.stringify(document));
    if( cmd != 'update' )
      return;

    await onUpdate(mqttClient, thing, param, document);
  }catch(error){
    console.error(error);
  }
});

async function onUpdate(client, thingName, param, document ){
  if( param != 'documents' )
    return;

  var reported = document.current.state.reported;
  delete reported.welcome;
  await reportState(thingName, reported);
}

async function reportState(id, state){
  console.log("reportstate", state);
  var message = {
    requestId: String(++requestId),
    agentUserId: agentUserId,
    payload: {
      devices: {
        states:{
          [id]: state
        }
      }
    }
  };

  console.log("reportstate", JSON.stringify(message));
  await app.reportState(message);

  return message;
}
【サービスアカウントキーファイル名】は、以前の投稿で作成したものです。
【MQTTブローカのURL】は以下の感じです。
mqtt:// MQTTブローカのホスト名:ポート番号
このMQTTブローカは、以下を参考にして立ち上げたものです。
AWS IoTにMosquittoをブリッジにしてつなぐ
直接、AWS IoTが用意するMQTTブローカに接続する形でもできます。
その場合は、X509証明書をクライアントに指定する必要があります。(クライアントごとに指定するのが面倒なため、Mosquittoを中継用に立てています)
await iot.listThingsInThingGroup()を呼び出して、Google Homeデバイス用に作ったグループ(SmartHome)の配下のモノをサブスクライブ対象としています。
最後に、app.reportState()で、reportedのstateをGoogle Homeにレポートしています。
これで準備ができました。
Google Homeデバイスの実装(Arduino)
//#define M5CORE2
# define M5STICKC

# ifdef M5CORE2
# include <M5Core2.h>
# include <Fonts/EVA_20px.h>
# endif
# ifdef M5STICKC
# include <M5StickC.h>
# endif

# include <WiFi.h>
# include <ArduinoJson.h>
# include <PubSubClient.h>

const char* wifi_ssid = "【WiFiアクセスポイントのSSID】";
const char* wifi_password = "【WiFiアクセスポイントのパスワード】";

# define DISP_FORE_COLOR   WHITE
# define DISP_BACK_COLOR   BLACK

# define DEVICE_NAME "switch" // ★DEVICEの名前

const char* mqtt_server = "【MQTTブローカのホスト名】"; // MQTTのIPかホスト名
const int mqtt_port = 1883;       // MQTTのポート
const char* topic_notify = "$aws/things/" DEVICE_NAME "/shadow/update/delta"; // 受信用トピック名
const char* topic_report = "$aws/things/" DEVICE_NAME "/shadow/update"; // 送信用トピック名

# ifdef M5CORE2
# define MQTT_CLIENT_NAME  "M5Core2" // MQTTサーバ接続時のクライアント名
# endif
# ifdef M5STICKC
# define MQTT_CLIENT_NAME  "M5StickC" // MQTTサーバ接続時のクライアント名
# endif

WiFiClient wifiClient;
PubSubClient client(wifiClient);

# define MQTT_BUFFER_SIZE  1024 // MQTT送受信のバッファサイズ

// ★DEVICEごとの定義
# define NUM_OF_ATTR   1
# define LED_PIN     GPIO_NUM_10
typedef struct{
  bool on;
} DEVICE_STATUS;
DEVICE_STATUS device_status = { false };

const int capacity_notify = JSON_OBJECT_SIZE(4) + 3*JSON_OBJECT_SIZE(NUM_OF_ATTR);
const int capacity_report = JSON_OBJECT_SIZE(1) + JSON_OBJECT_SIZE(2) + 2*JSON_OBJECT_SIZE(NUM_OF_ATTR);
StaticJsonDocument<capacity_notify> json_notify;
StaticJsonDocument<capacity_report> json_report;
# define BUFFER_SIZE   MQTT_BUFFER_SIZE
char buffer_notify[BUFFER_SIZE];
char buffer_report[BUFFER_SIZE];

bool isPressed = false;

void updateState(){
  json_report.clear();
  JsonObject state = json_report.createNestedObject("state");
  JsonObject desired = state.createNestedObject("desired");
  JsonObject reported = state.createNestedObject("reported");

  // ★DEVICEごとの処理
  {
    desired["on"] = device_status.on;
    reported["on"] = device_status.on;
  }

  serializeJson(json_report, Serial);
  Serial.println("");

  serializeJson(json_report, buffer_report, sizeof(buffer_report));
  client.publish(topic_report, buffer_report);
}

void mqtt_callback(char* topic, byte* payload, unsigned int length) {
  Serial.println("MQTT received");

  // JSONをパース
  DeserializationError err = deserializeJson(json_notify, payload, length);
  if( err ){
    Serial.println("Deserialize error");
    Serial.println(err.c_str());
    return;
  }
  serializeJson(json_notify, Serial);
  Serial.println("");

  // ★DEVICEごとの処理
  {
    if( json_notify["state"].containsKey("on") ){
      device_status.on = json_notify["state"]["on"];
    }
    digitalWrite(LED_PIN, device_status.on ? LOW : HIGH);
  }

  updateState();
}

void wifi_connect(void){
  Serial.println("");
  Serial.print("WiFi Connenting");

  WiFi.begin(wifi_ssid, wifi_password);
  while (WiFi.status() != WL_CONNECTED) {
    Serial.print(".");
    delay(1000);
  }
  Serial.println("");
  Serial.print("Connected : ");
  Serial.println(WiFi.localIP());
  M5.Lcd.println(WiFi.localIP());
}

void setup() {
# ifdef M5CORE2
  M5.begin(true, false, true, true);
  M5.Lcd.setTextSize(2);
# endif
# ifdef M5STICKC
  M5.begin(true, true, true);
  M5.Lcd.setRotation(3);
  M5.Lcd.setTextSize(1);
# endif

  Serial.begin(9600);
  Serial.println("");
  Serial.println("Now Initializing");

  M5.Lcd.fillScreen(DISP_BACK_COLOR);
  M5.Lcd.setTextColor(DISP_FORE_COLOR);

  // ★DEVICEごとの処理
  {
    pinMode(LED_PIN, OUTPUT);
    digitalWrite(LED_PIN, HIGH);
  }

  wifi_connect();

  // バッファサイズの変更
  client.setBufferSize(MQTT_BUFFER_SIZE);
  // MQTTコールバック関数の設定
  client.setCallback(mqtt_callback);
  // MQTTブローカに接続
  client.setServer(mqtt_server, mqtt_port);

  M5.Lcd.println("MQTT Connect");
}

void loop() {
  M5.update();
  client.loop();

  // MQTT未接続の場合、再接続
  while(!client.connected() ){
    Serial.println("Mqtt Reconnecting");
    if( client.connect(MQTT_CLIENT_NAME) ){
      // MQTT Subscribe
      client.subscribe(topic_notify);
      Serial.println("Mqtt Connected and Subscribing");
      break;
    }
    delay(1000);
  }

  if( M5.BtnA.isPressed() ){
    if( !isPressed ){
      isPressed = true;

      Serial.println("BtnA.Released");

      // ★DEVICEごとの処理
      {
        device_status.on = !device_status.on;
        digitalWrite(LED_PIN, device_status.on ? LOW : HIGH);
      }

      updateState();

      delay(100);
    }
  }else if( M5.BtnA.isReleased() ){
    isPressed = false;
  }

  delay(10);
}
以下の部分を環境に合わせて変更します。
【WiFiアクセスポイントのSSID】
【WiFiアクセスポイントのパスワード】
【MQTTブローカのホスト名】
以下の部分は、実装するGoogle Homeデバイスの機能(Traits)に合わせて実装します。
★DEVICEの名前
★DEVICEごとの定義
★DEVICEごとの処理
今回は、「action.devices.traits.OnOff」のみ実装しており、保持すべき状態(シャドウに相当)は、onのみです。
onがtrueとする要求の場合にLEDを点灯させ、falseの場合には消灯させました。
以下のコールバックのところに、/update/deltaが飛んできます。
void mqtt_callback(char* topic, byte* payload, unsigned int length)
待ち受けるMQTTトピック名は、「$aws/things/" DEVICE_NAME "/shadow/update/delta」です。
変更したことの通知先のMQTTトピック名は、「$aws/things/" DEVICE_NAME "/shadow/update」です。
Google Homeデバイスの実装(バーチャルデバイス)
バーチャルデバイスをNode.jsで実装しました。Arduinoで実装していることと同じです。
'use strict';

const mqtt = require('mqtt');
const MQTT_HOST = process.env.MQTT_HOST || '【MQTTブローカのURL】';
var mqttClient  = mqtt.connect(MQTT_HOST);

const DEVICE_LIST = ["door", "light", "aircon", "illumination"]; // バーチャルデバイスで処理するデバイス名

mqttClient.on('connect', function () {
  console.log('connected');
  for( var i = 0 ; i < DEVICE_LIST.length ; i++ ){
    console.log("waiting: " + DEVICE_LIST[i]);
    mqttClient.subscribe('$aws/things/' + DEVICE_LIST[i] + '/shadow/update/delta');
  }
});

mqttClient.on('message', async (topic, message) =>{
  try{
    var tps = topic.split('/');
    if( tps.length < 6 )
      return;
    if( tps[0] != '$aws' || tps[1] != 'things' || tps[3] != "shadow" )
      return;

    var thing = tps[2];
    var cmd = tps[4];
    var param = tps[5];
    var document = JSON.parse(message.toString());
    console.log(thing, cmd, param, document);
    if( cmd != 'update' )
      return;

    await onUpdate(mqttClient, thing, param, document);
  }catch(error){
    console.error(error);
  }
});

async function updateDocument(client, thingName, state){
  console.log('updateDocument');
  var topic = "$aws/things/" + thingName + '/shadow/update';
  var message = {
    state: {
      reported: state,
      desired: state
    }
  };
  console.log(JSON.stringify(message));
  client.publish(topic, JSON.stringify(message));
}

async function onUpdate(client, thingName, param, document ){
  if( param != 'delta' )
    return;

  var desired_state = document.state;

  var reported_state;
  if( thingName == 'light' ){
    reported_state = await process_light(thingName, desired_state);
  }else
  if( thingName == 'aircon' ){
    reported_state = await process_aircon(thingName, desired_state);
  }else
{
    reported_state = await process_other (thingName, desired_state);
  }

  await updateDocument(client, thingName, reported_state);
}

async function process_other(thingName, desired_state){
  // それぞれのデバイスのtraitsに合わせて処理
  return desired_state;
}

async function process_light(thingName, desired_state){
  //
  // desired_state.on=trueまたはfalseの場合の処理
  //

  var state = {
    on: desired_state.on
  };
  return state;
}

async function process_aircon(thingName, desired_state){
  if( desired_state.on !== undefined ){
    //
    // desired_state.on=trueまたはfalseの場合の処理
    //

    var state;
    if( desired_state.on ){
      state = {
        on: true,
        thermostatMode: "auto"
      }
    }else{
      state = {
        on: false,
        thermostatMode: "off"
      }
    }

    return state;
  }else
  if( desired_state.thermostatMode !== undefined ){
    //
    // desired_state.thermostatMode=on または off または cool または heat または auto または dry の場合の処理
    //

    var state;
    if( desired_state.thermostatMode == 'off'){
      state = {
        on: false,
        thermostatMode: "off"
      }
    }else{
      state = {
        on: true,
        thermostatMode: desired_state.thermostatMode
      }
    }

    return state;
  }else{
    throw 'unknown desired';
  }
}
(参考) Mosquittoの設定の修正
MosquittoでローカルネットワークとAWS IoTエンドポイントを仲介させていますが、AWS IoTのMQTTトピックも仲介できるように、以下のように変更しています。
connection awsiot
address 【AWS IoTのエンドポイント】:8883
topic awsiot/# both 0
topic $aws/things/# both 0
最後から2番目がいつも使っているトピック名の接頭辞ですが、最後の1行目を今回のために追加しました。
(参考) AWS IoTにMosquittoをブリッジにしてつなぐ
あと、AWSのSDKのインストールやら権限設定やらの説明がなくてすみません。
以上