GoogleのスマートスピーカであるGoogle Home Miniに「OK Google、スイッチをオンにして」というと、M5StickCのLEDが点灯するようにします。(要は、Lチカです)
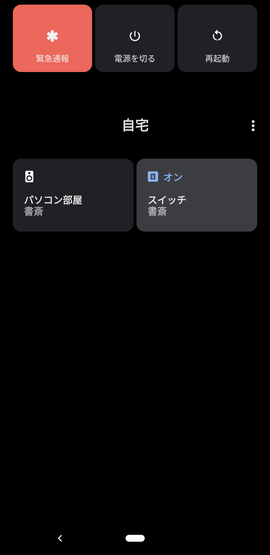
いまさら感はあるのですが、なんでも最新のAndroid 11になって、電源長押しで、Google Homeデバイスを手軽に操作できるようになったのです。
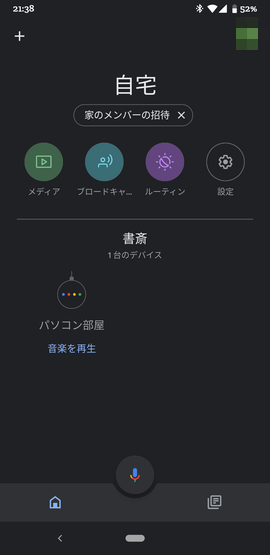
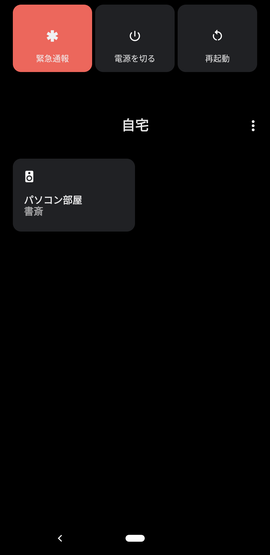
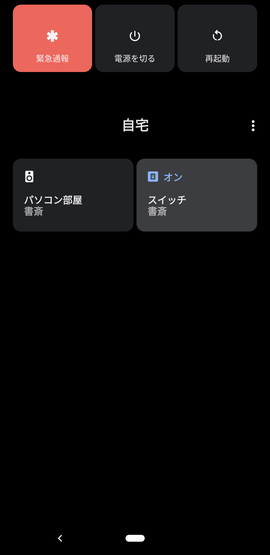
Androidスマホから、電源長押しでこんな感じの画面がすぐ出せるので、いろいろ使えそうです。
ソースコードをGitHubに上げておきました。
poruruba/GoogleHomeDevice
https://github.com/poruruba/GoogleHomeDevice
(参考)
Google Assistant : Smart Home Guide
https://developers.google.com/assistant/smarthome/overview
Google Assistant : Smart Home Reference
https://developers.google.com/assistant/smarthome/traits
構成
まずは、一般ユーザがM5StickCを使うときの構成です。
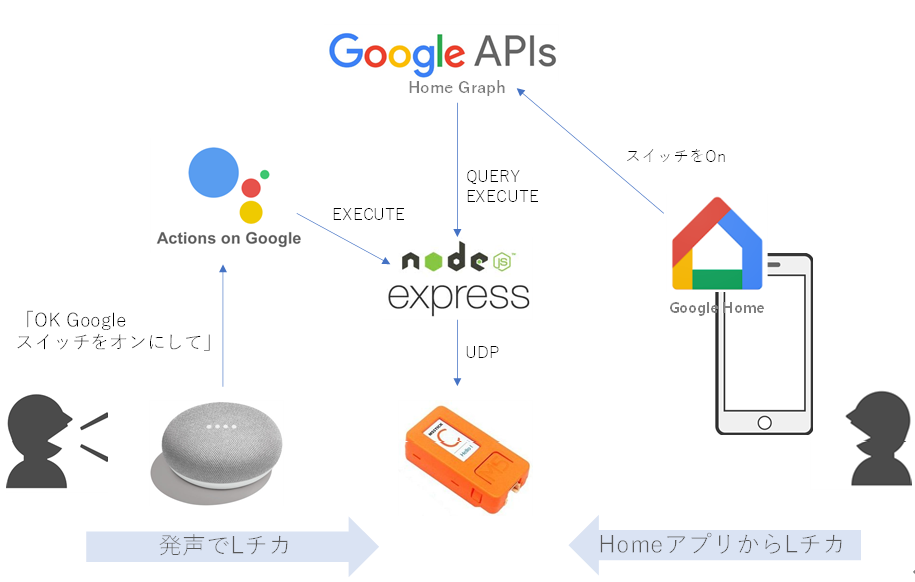
自宅のGoogle Home Miniスピーカに、「OK Google スイッチをオンにして」と言うと、今回立ち上げるNode.jsサーバが呼び出され、その中でM5StickCと通信して、M5StickCについているLEDを点灯させます。
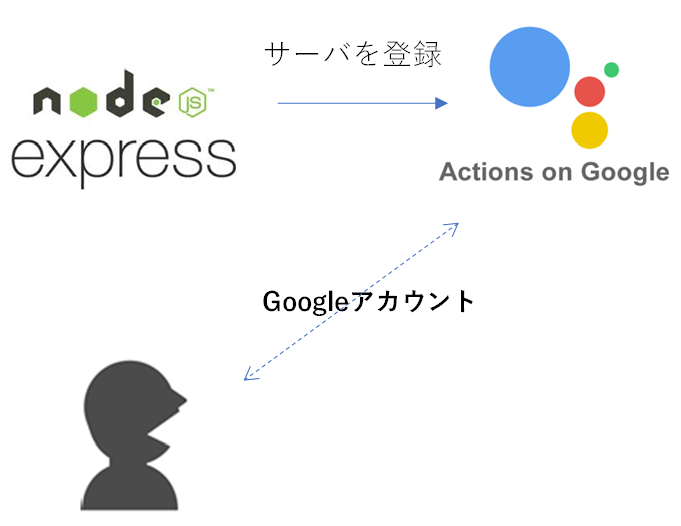
M5StickCがGoogleHomeデバイスとして認識されるように、Node.jsサーバがActions on Googleに登録しているためです。今回、M5StickCをGoogleHomeデバイスのスイッチとして認識させます。
同様に、手持ちのAndroidスマホからGoogle Homeアプリを立ち上げ、スイッチを選択して、OnさせたりOffさせたりすることもできます。さらに、Android 11であれば、電源長押しで表示される画面からも操作できます。
<準備>
上記の動作となるためには、あらかじめNode.jsサーバがGoogle Homeデバイスを扱えるサーバであることをActions on Google登録する必要があります。これは、GoogleHomeデバイス管理会社としての作業です。
一方、ユーザの方です。
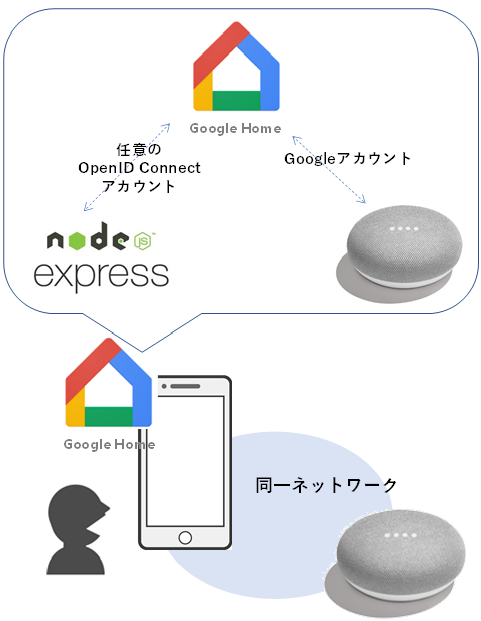
Google HomeとGoogle Home Miniスピーカは、すでにGoogle Homeアプリを使って、Googleアカウントとつながっているのではないでしょうか。そして、Google HomeとGoogle Home Miniスピーカとnode.jsサーバを紐づければ、すべてがつながります。
これらは、Google Home Miniを所有している一般ユーザの作業です。一般ユーザが、自身が持っているGoogle Home Miniに、GoogleHomeデバイス管理会社を登録することになります。
ちょっとわかりにくいかもしれませんが、順を追って説明します。
必要なもの
<一般ユーザとして>
・Google Home Miniスマートスピーカ
・Google Homeアプリ(スマホ)
・Googleアカウント
<GoogleHomeデバイス管理会社として>
・Node.jsサーバとそれが動くハードウェア
・LED付きESP32
・Googleアカウント
Googleアカウントとして、一般ユーザのものとGoogleHomeデバイス管理会社としてのものの2つがあります。
今回は、開発用に作成し、一般には公開しないため、同一アカウントである必要があります。
参考となるサンプルコード
以下に、参考となるサンプルコードがあります。
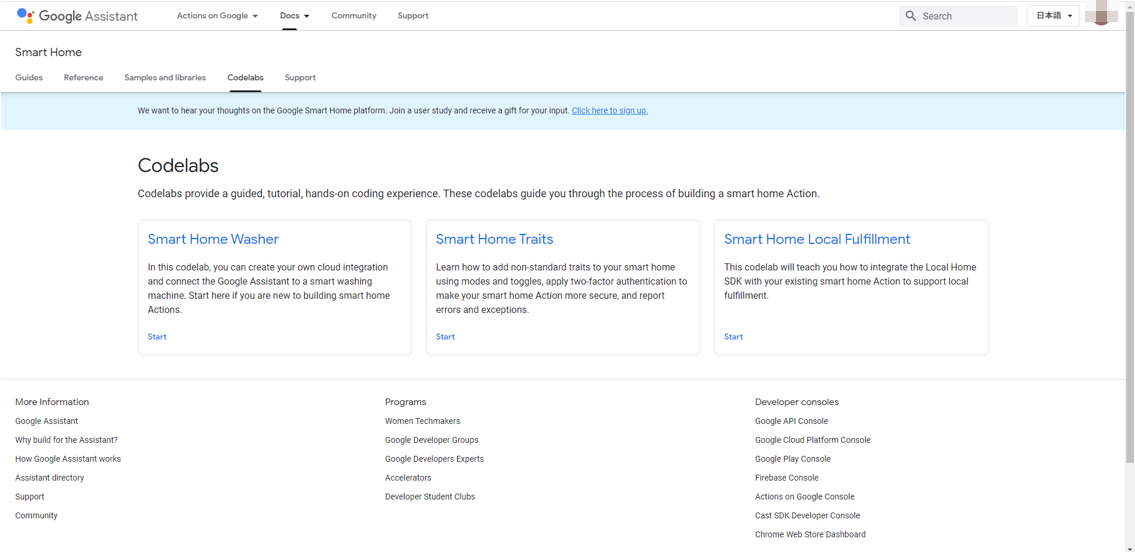
Codelabs
https://developers.google.com/assistant/smarthome/codelabs?hl=ja
このうち、Smart Home Washerがわかりやすく、これをベースに進めていきます。
が、Firebaseを使っていて、何が必須かわけわからなくなりそうなので、Firebaseを使わない方法で進めます。
〇Googleアカウントのアクティビティの確認
Googleアカウントは必須なのですが、以下のアクティビティが有効となっている必要があるそうです。
アクティビティの管理
https://myaccount.google.com/activitycontrols
・Web & App Activity
・Device Information
・Voice & Audio Activity
〇GoogleHomeデバイス管理会社としてプロジェクトを作成する
Actions on Google Developer Consoleより、プロジェクトを作成します。
Actions on Google Developer Console
http://console.actions.google.com/
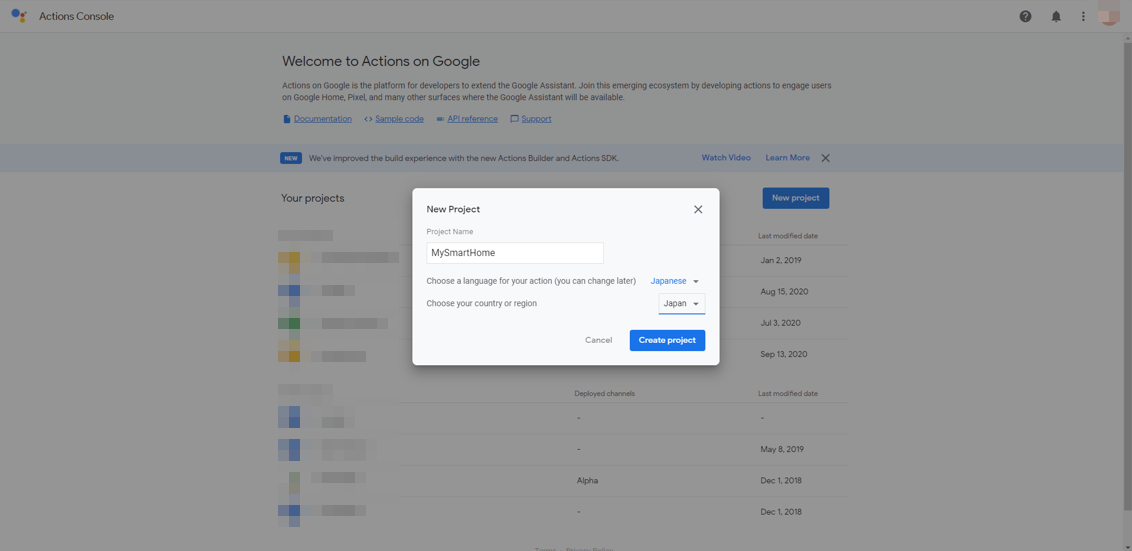
適当なプロジェクト名を入力し、言語をJapanese、国をJapanにします。例えば、MySmartHomeとか。
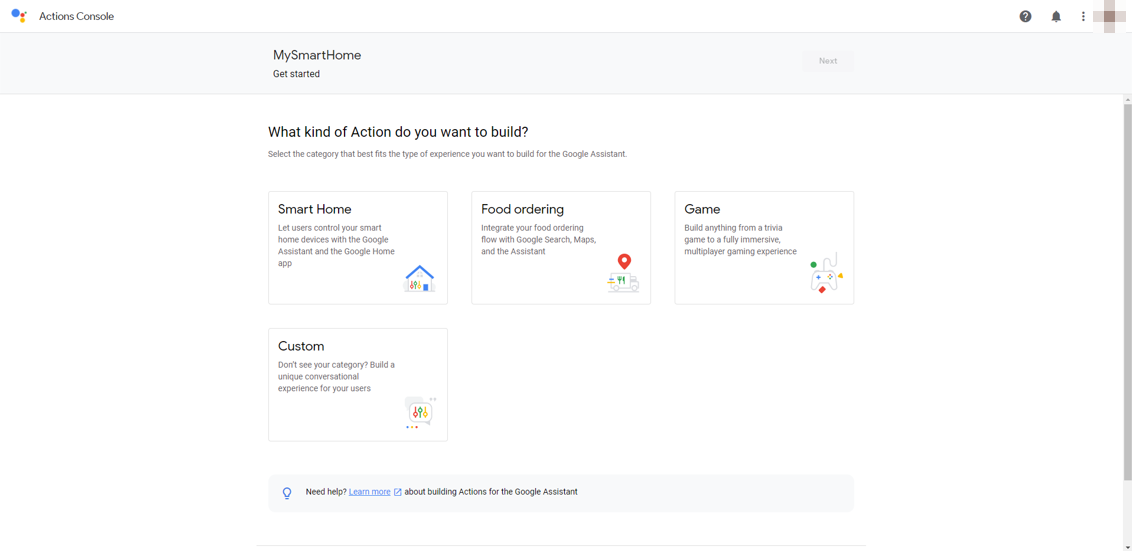
次に、アクションの種類を選ぶのですが、Smart Homeを選択します。
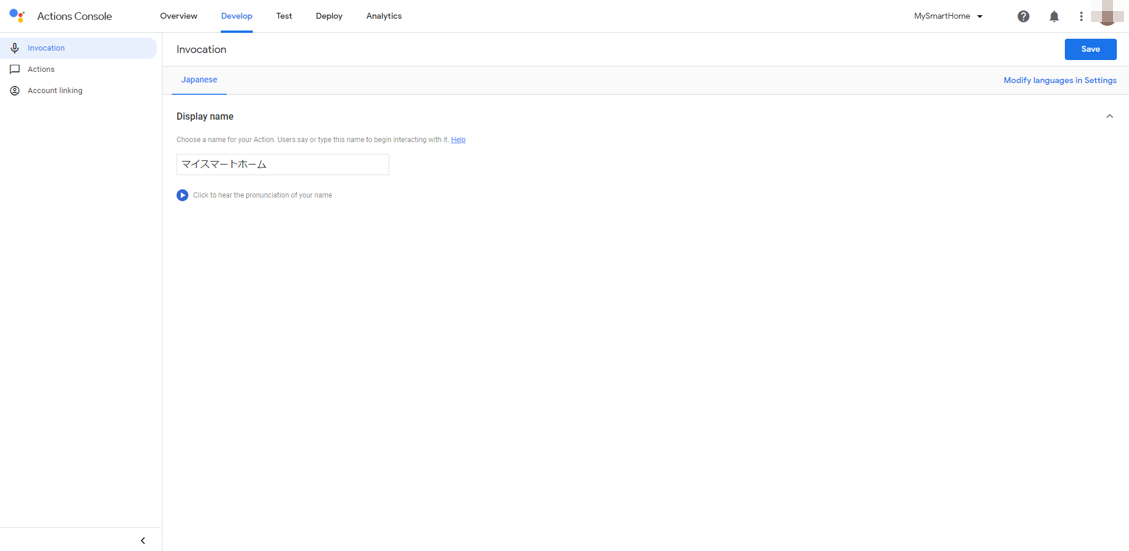
次に、OverviewのQuick setupのName your Smart Home actionを選択し、適当なDisplay nameを入力します。例えば、マイスマートホームとか。
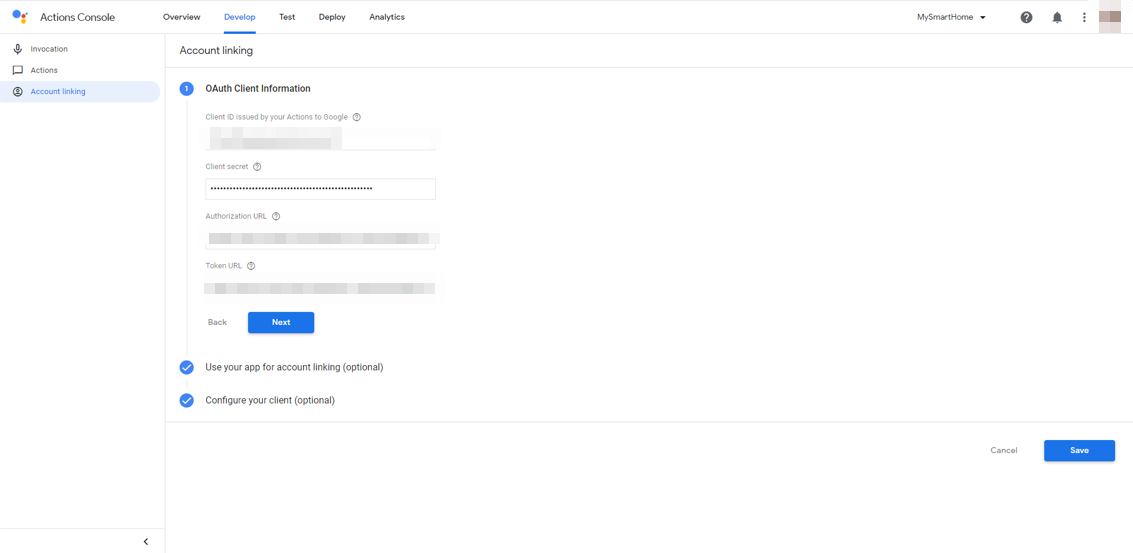
次に、Developタブを選択し、左側のナビゲーションから、Account linkingを選択します。
ここがちょっとわかりにくいかもしれません。
OpenID Connectの設定なのですが、今回はCognitoを使います。Google HomeとNode.jsサーバをつなぐときに使います。
Cognitoのユーザプールを作成し、アプリクライアントを作成し、そのアプリクライアントIDとアプリクライアントのシークレットをそれぞれ入力します。
手抜きですみませんが、詳細はこちらが参考になるかと思います。
AWS CognitoにGoogleとYahooとLINEアカウントを連携させる
Authorization URLは、以下のようになります。
https://[ドメイン名].auth.ap-northeast-1.amazoncognito.com/oauth2/authorize
Token URLは以下のようになります。
https://[ドメイン名].auth.ap-northeast-1.amazoncognito.com/oauth2/token
scopeを指定したい場合は、Configure your client (optional)を選択すると、scopeを入力できます。
アプリクライアントの設定において、コールバックURLとして以下を追加しておきます。これはAWS Cognito側の作業です。
https://oauth-redirect.googleusercontent.com/r/[プロジェクトID]
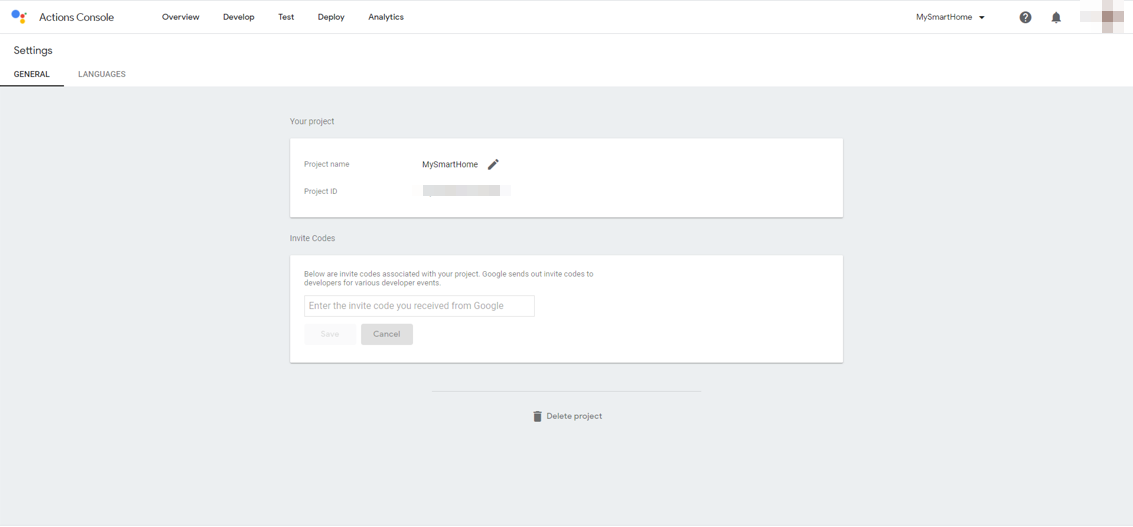
プロジェクト名は、Actions on Googleのプロジェクト名で、右上のメニューアイコンから、Project settingsを選択すると表示されるProject IDです。
次に、同じくDevelopタブで、左側のナビゲーションからActionsを選択します。
Fulfillment URLにはこれから立ち上げるサーバのURLを入力します。HTTPSである必要があります。
https://【Node.jsサーバのホスト名】/smarthome
以上で、GoogleHomeデバイスを管理するサーバの設定が完了しました。
GoogleHomeAPIの有効化
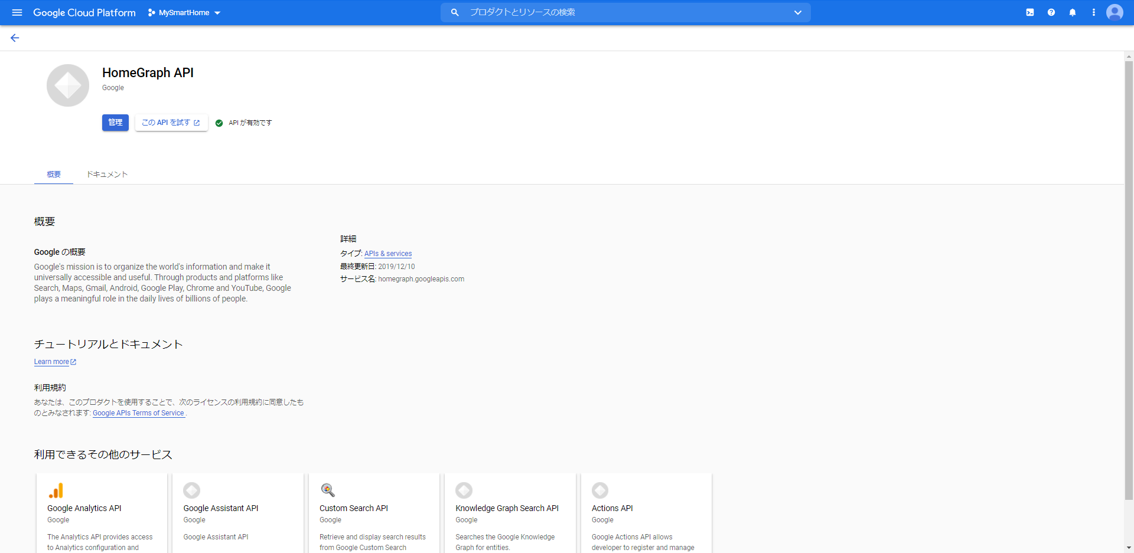
さきに、GoogleHomeデバイス管理会社は、GoogleHomeと連携するためにGoogleHome APIを実行できるようにしておく必要があります。
GoogleHome API
https://console.cloud.google.com/apis/library/homegraph.googleapis.com
ここで、「有効にする」ボタンを押下します。
(絵ではすでに有効化されていますが)
次に、Node.jsサーバからHomeGraphAPIを呼び出せるように、サービスアカウントキーを作成します。
プロジェクトの認証情報のページに行きます。
APIとサービス:認証情報
https://console.cloud.google.com/apis/credentials
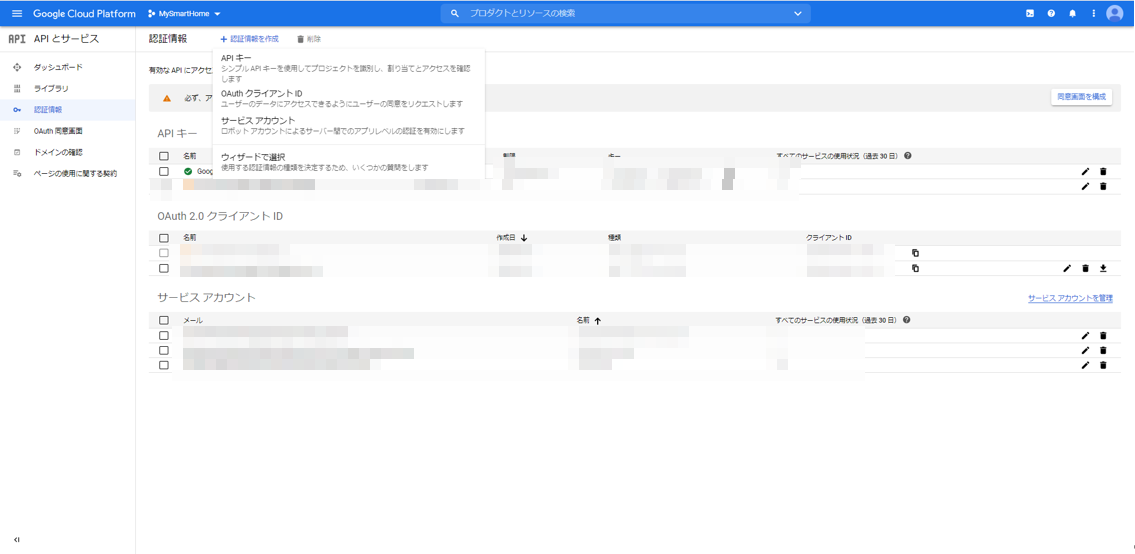
上の方にある「+認証情報の作成」をクリックし、「サービスアカウント」を選択します。
適当なサービスアカウント名を入力し、「作成」ボタンを押下します。例えば、smarthomeとか。
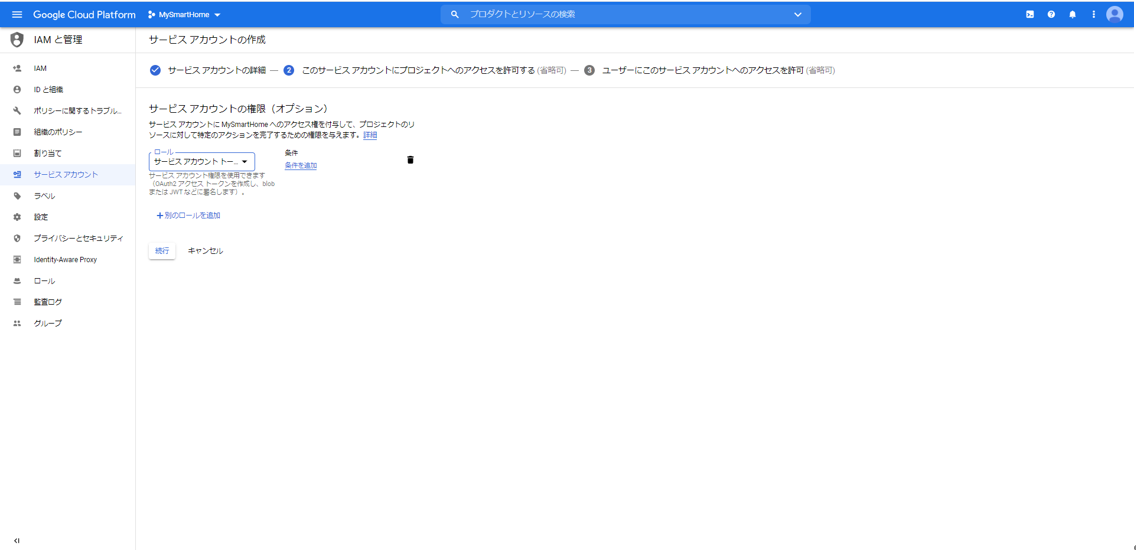
ここで、ロールとして、「Service Accounts」の「サービスアカウント トークン作成者」を選択します。「続行」ボタンを押下します。
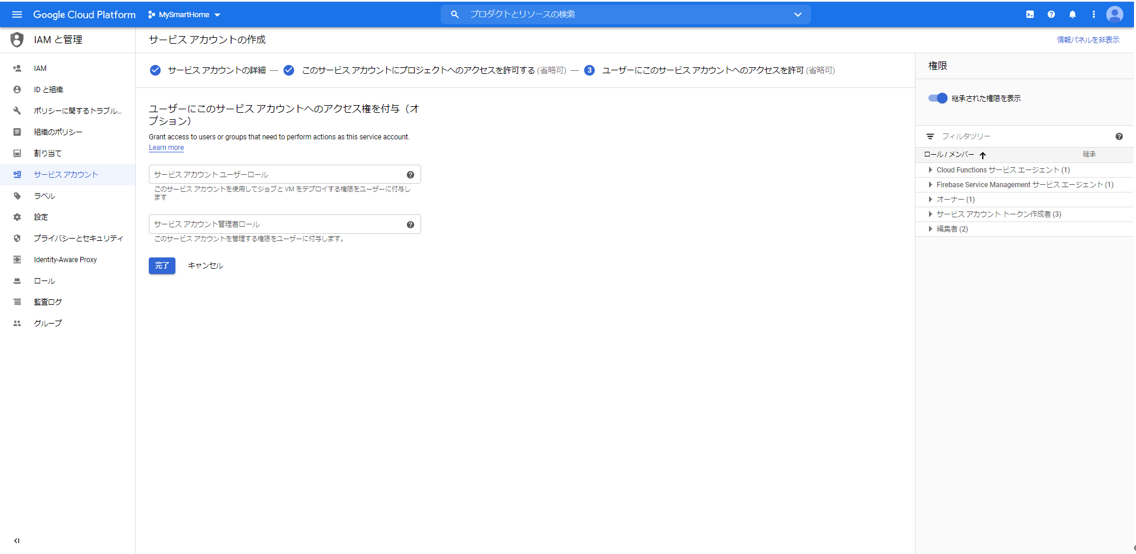
「完了」ボタンを押下します。
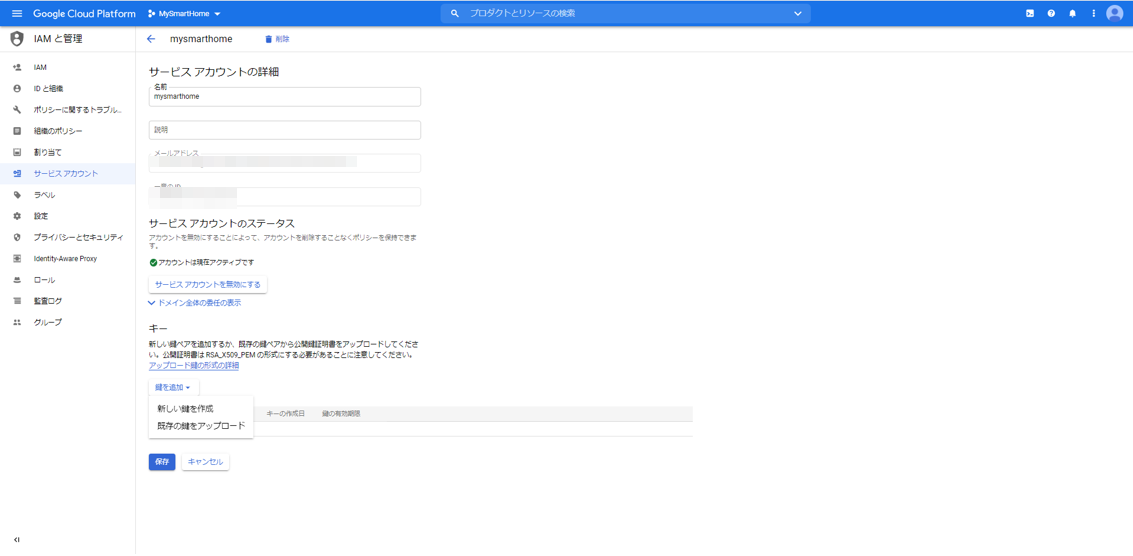
最初の画面に戻って、もう一度今作成したサービスアカウントを選択します。
「鍵を追加」から「新しい鍵を作成」を選択します。
キーのタイプとしてJSONを選択します。ファイルが生成されますので、ローカルPCにダウンロードしておきます。
〇Node.jsサーバの立ち上げ
それでは、GoogleHomeデバイスを管理するNode.jsサーバを立ち上げます。
Googleが便利なnpmモジュールを提供してくれていますので、それを使います。
actions-on-google/actions-on-google-nodejs
https://github.com/actions-on-google/actions-on-google-nodejs
Node.jsのexpressを使っているのであれば、すぐにつなげることができます。
こんな感じだそうです。
const express = require('express')
const bodyParser = require('body-parser')

// ... app code here
// Import the appropriate service
const { smarthome } = require('actions-on-google')

// Create an app instance
const app = smarthome()

const expressApp = express().use(bodyParser.json())

expressApp.post('/fulfillment', app)

expressApp.listen(3000)
原理がわかったところで、私がいつも使っているswagger-nodeを使います。
内部のフレームワークとしてexpressを選択すればつながります。
具体的には、以下のページで示している、私がいつも使っているものを使って説明します。
(GitHub)https://github.com/poruruba/swagger_template
(参考)SwaggerでLambdaのデバッグ環境を作る(1)
具体的には、GitHubサイトを開いて、CodeをZIPダウンロードします。
どこかに展開します。
まずは、以下でnpmモジュールを準備します。
また、さきほどのActions on Googleのnpmモジュールを使うので以下を実行します。
npm install -g swagger-node
npm install
npm install actions-on-google
api/swagger/swagger.yamlに以下を追加します。path: のところです。
  /smarthome:
    post:
      x-swagger-router-controller: routing
      operationId: smarthome
      parameters:
        - in: body
          name: body
          schema:
            $ref: "#/definitions/CommonRequest"
      responses:
        200:
          description: Success
          schema:
            $ref: "#/definitions/CommonResponse"

  /reportstate:
    post:
      x-swagger-router-controller: routing
      operationId: smarthome_reportstate
      parameters:
        - in: body
          name: body
          schema:
            $ref: "#/definitions/CommonRequest"
      responses:
        200:
          description: Success
          schema:
            $ref: "#/definitions/CommonResponse"
そして、api/controllers/functions.jsのfunc_tableとexpress_tableのところに、以下のように追記します。
const func_table = {
//  "test-func" : require('./test_func').handler,
//  "test-dialogflow" : require('./test_dialogflow').fulfillment,
"smarthome_reportstate" : require('./smarthome').handler,
};
・・・
const express_table = {
//  "test-express": require('./test-express').handler,
"smarthome": require('./smarthome').fulfillment,
};
次に、api/controllers/smarthomeフォルダを作成します。
そこに、keysフォルダを作成し、さきほどダウンロードしたサービスアカウントキーのJSONファイルを置きます。
さらに、以下のindex.jsを作成します。
'use strict';

const HELPER_BASE = process.env.HELPER_BASE || '../../helpers/';
const Response = require(HELPER_BASE + 'response');

const JWT_FILE_PATH = process.env.JWT_FILE_PATH || '【サービスアカウントキーファイル名】';
const DEVICE_ADDRESS = '【ESP32のIPアドレス】';
const DEVICE_PORT = 3333; // UDP受信するポート番号

const dgram = require('dgram');
const udp = dgram.createSocket('udp4');

const jwt_decode = require('jwt-decode');
const {smarthome} = require('actions-on-google');

const jwt = require(JWT_FILE_PATH);
const app = smarthome({
  jwt: jwt
});

var states_switch = {
  on: false
};

var requestId = 0;

const DEFAULT_USER_ID = process.env.DEFAULT_USER_ID || "user01";
var agentUserId = DEFAULT_USER_ID;

executeDevice('query');

app.onSync((body, headers) => {
  console.info('onSync');
  console.log('onSync body', body);

  var decoded = jwt_decode(headers.authorization);
  console.log(decoded);

  var result = {
    requestId: body.requestId,
    payload: {
      agentUserId: agentUserId,
      devices: [
        {
          id: 'switch',
          type: 'action.devices.types.SWITCH',
          traits: [
            'action.devices.traits.OnOff',
          ],
          name: {
            defaultNames: ['MyHome Switch'],
            name: 'スイッチ',
          },
          deviceInfo: {
            manufacturer: 'MyHome Devices',
          },
          willReportState: true,
        },
      ],
    },
  };

  executeDevice('query');

  console.log("onSync result", result);
  return result;
});

app.onQuery(async (body, headers) => {
  console.info('onQuery');
  console.log('onQuery body', body);

  var decoded = jwt_decode(headers.authorization);
  console.log(decoded);

  const {requestId} = body;
  const payload = {
    devices: {}
  };

  for( var i = 0 ; i < body.inputs.length ; i++ ){
    if( body.inputs[i].intent == 'action.devices.QUERY' ){
      for( var j = 0 ; j < body.inputs[i].payload.devices.length ; j++ ){
        var device = body.inputs[i].payload.devices[j];
        if( device.id == 'switch' ){
          payload.devices.switch = {
            on: states_switch.on,
            online: true,
            status: "SUCCESS"
          };
        }else
        {
          console.log('not supported');
        }
      }
    }
  }

  var result = {
    requestId: requestId,
    payload: payload,
  };

  console.log("onQuery result", result);
  return result;
});

app.onExecute(async (body, headers) => {
  console.info('onExecute');
  console.log('onExecute body', body);

  var decoded = jwt_decode(headers.authorization);
  console.log(decoded);

  const {requestId} = body;

  // Execution results are grouped by status
  var ret = {
    requestId: requestId,
    payload: {
      commands: [],
    },
  };
  for( var i = 0 ; i < body.inputs.length ; i++ ){
    if( body.inputs[i].intent == "action.devices.EXECUTE" ){
      for( var j = 0 ; j < body.inputs[i].payload.commands.length ; j++ ){
        var result = {
          ids:[],
          status: 'SUCCESS',
        };
        ret.payload.commands.push(result);
        var devices = body.inputs[i].payload.commands[j].devices;
        var execution = body.inputs[i].payload.commands[j].execution;
        for( var k = 0 ; k < execution.length ; k++ ){
          if( execution[k].command == "action.devices.commands.OnOff" ){
            for( var l = 0 ; l < devices.length ; l++ ){
              if( devices[l].id == "switch"){
                result.ids.push(devices[l].id);
                states_switch.on = execution[k].params.on;

                await executeDevice(devices[l].id);
                await reportState(devices[l].id);
              }
            }
          }
        }
      }
    }
  }

  console.log("onExecute result", ret);
  return ret;
});

app.onDisconnect((body, headers) => {
  console.info('onDisconnect');
  console.log('body', body);

  var decoded = jwt_decode(headers.authorization);
  console.log(decoded);

  // Return empty response
  return {};
});

exports.fulfillment = app;

async function executeDevice(id){
  var message;
  if( id == 'switch' ){
    message = {
      id: id,
      onoff: states_switch.on,
    };
  }else if( id == 'query' ){
    message = {
      id: 'query'
    };
  }else{
    throw 'unknown id';
  }
  var data = Buffer.from(JSON.stringify(message));
  return new Promise((resolve, reject) =>{
    udp.send(data, 0, data.length, DEVICE_PORT, DEVICE_ADDRESS, (error, bytes) =>{
      if( error ){
        console.error(error);
        return reject(error);
      }

      resolve(bytes);
    });
  });
}

async function reportState(id){
  var state;
  if( id == 'switch'){
    state = {
      requestId: String(++requestId),
      agentUserId: agentUserId,
      payload: {
        devices: {
          states:{
            [id]: {
              on: states_switch.on
            }
          }
        }
      }
    };
  }else{
    throw 'unknown id';
  }
  console.log("reportstate", state);
  await app.reportState(state);

  return state;
}

exports.handler = async (event, context, callback) => {
	var body = JSON.parse(event.body);
  console.log(body);

  if( event.path == '/reportstate'){
    try{
      if( body.id == 'switch'){
        states_switch.on = body.onoff;
      }
      var res = await reportState(body.id);
      console.log(res);
    return new Response({ message: 'OK' });
    }catch(error){
      console.error(error);
      var response = new Response();
      response.set_error(error);
      return response;
    }
  }
};
環境に合わせて以下の部分を修正します。
【ESP32のIPアドレス】
【サービスアカウントキーファイル名】
※サービスアカウントキーファイルは、keysフォルダに置いたのであれば、「./keys/*-.json」という感じになります。
また、HTTPSで立ち上げる必要があるため、フロントにHTTPSのサーバを立ち上げてProxyしてもらうか、certフォルダを作成してそこにSSL証明書を配置して、app.jsを書き換えることでHTTPSとして立ち上がります。
以下の辺りです。
  var https = require('https');
  try{
    var options = {
      key:  fs.readFileSync('./cert/privkey.pem'),
      cert: fs.readFileSync('./cert/cert.pem'),
      ca: fs.readFileSync('./cert/chain.pem')
    };
ポート番号を変えたい場合は、.envファイルを作成して、以下のように指定してください。
PORT=10080
SPORT=10443
以下のようにして立ち上げます。
> node app.js
Node.jsサーバのソースコード解説
Node.jsサーバには、実装するべきIntentが複数あります。
Intent fulfillment
https://developers.google.com/assistant/smarthome/develop/process-intents
- SYNC:Node.jsサーバが管理するGoogle Homeデバイスの情報を返します。複数のデバイスを返すことができます。ユーザがNode.jsサーバが管理するGoogle Homeデバイスを利用登録すると呼ばれます。
- QUERY:Node.jsサーバが管理するGoogle Homeデバイスの状態を返します。ユーザがGoogle Homeアプリを使ってGoogle Homeデバイスを表示されている間定期的に状態を得るためにQUERYが呼ばれてきます。
- EXECUTE:Node.jsサーバが管理するGoogle Homeデバイスに対する変更要求です。Google Home Miniスピーカから、「OK Google、スイッチをオンにして」と言われて、Node.jsが管理するGoogle Homeデバイスの状態の変更要求が来た時に呼ばれます。また、AndroidのGoogle Homeアプリから、Google Homeデバイスを操作したときにも呼ばれます。
- DISCONNECT:Google Homeデバイスがユーザから管理対象から外されたときに呼ばれます。
具体的な入出力電文のJSONフォーマットは以下を参照してください。
- https://developers.google.com/assistant/smarthome/reference/intent/sync
- https://developers.google.com/assistant/smarthome/reference/intent/query
- https://developers.google.com/assistant/smarthome/reference/intent/execute
- https://developers.google.com/assistant/smarthome/reference/intent/disconnect
受信時に呼ばれる関数は、それぞれ以下が対応します。
- app.onSync(function(body, headers));
- app.onQuery(function(body, headers));
- app.onExecute(function(body, headers));
- app.onDisconnect(function(body, headers));
外部から受け付けるエンドポイントは「/smarthome」としており、それを、functions.jsで指定したフォルダに転送し、
exports.fulfillment = app;
として受け取っています。
SYNC IntentでGoogle Homeデバイスの定義
Google Homeデバイスの定義は、SYNCに対する応答として返しています。
まず決めるのがTypeです。
Typeは、デバイスの種類を示します。機能は後ほど示すTraitsであり、それらを束ねるものと思ってもよいです。
例えば、エアコンとか、洗濯機とか、照明とか。
Smart Home Device Types
https://developers.google.com/assistant/smarthome/guides
今回は、単純にLEDの点灯だけなので、
action.devices.types.SWITCH
を選択しました。
Smart Home Switch Guide
https://developers.google.com/assistant/smarthome/guides/switch
次が、Traitsです。
GoogleHomeデバイスが持っている機能です。
Smart Home Device Traits
https://developers.google.com/assistant/smarthome/traits
今回は、点灯と消灯の2種類なので、action.devices.traits.OnOff をもっていることとしました。ちなみに、このTraitsは電源のOn/Offとして、いろんなデバイスで共通でもっている機能(Traits)です。
Smart Home OnOff Trait Schema
https://developers.google.com/assistant/smarthome/traits/onoff
上記のページに、SYNCの応答として、どのようなAttributesを返すべきかなどが記されています。
ちなみに、その他SYNC Intentで共通で返すべき情報は以下に記載されています。
action.devices.SYNC
https://developers.google.com/assistant/smarthome/reference/intent/sync
以下がその部分の抜粋です。
  var result = {
    requestId: body.requestId,
    payload: {
      agentUserId: agentUserId,
      devices: [
        {
          id: 'switch',
          type: 'action.devices.types.SWITCH',
          traits: [
            'action.devices.traits.OnOff',
          ],
          name: {
            defaultNames: ['MyHome Switch'],
            name: 'スイッチ',
          },
          deviceInfo: {
            manufacturer: 'MyHome Devices',
          },
          willReportState: true,
        },
      ],
    },
  };
agentUserIdは、接続してきたユーザのIdを指定します。本来であれば、ユニークなIDとしてユーザを区別するべきなのですが、自分しか使わないので固定にしています。
たとえば、headersに、OpenID Connectで認証したユーザのアクセストークンが入っていますので、例えばトークンの中のnameをそれに使うのがよいかと思います。
  var decoded = jwt_decode(headers.authorization);
  console.log(decoded);
QUERY IntentでGoogle Homeデバイスの状態を返す
M5StickCのLEDの点灯状態を返します。
とはいっても、M5StickCとどうやって通信するかというと、今回はUDPを使いました。
今回の実装では、QUERY Intentが来てからGoogle HomeデバイスのM5StickCに問い合わせるのではなく、LEDの点灯状態を変更したタイミングあるいは変更されたタイミングでUDPパケットを受け取るようにしておき、QUERY Intentが来たら覚えておいた状態を返すようにしています。
以下が、M5StickCから状態を取得する部分の抜粋です。
exports.handler = async (event, context, callback) => {
var body = JSON.parse(event.body);
  console.log(body);

  if( event.path == '/reportstate'){
    try{
      if( body.id == 'switch'){
        states_switch.on = body.onoff;
      }
      var res = await reportState(body.id);
      console.log(res);
      return new Response({ message: 'OK' });
    }catch(error){
      console.error(error);
      var response = new Response();
      response.set_error(error);
      return response;
    }
  }
};
外部から受け取るエンドポイントは、「/reportstate」で、functions.jsで指定されたフォルダに転送して受け取っています。
M5StickC→Node.jsの方向の通信です。一方、Node.jsからLED点灯したり状態取得を要求したりするNode.js→M5StickC方向の通信として以下の関数を作成しています。UDP送信です。
async function executeDevice(id){
  var message;
  if( id == 'switch' ){
    message = {
      id: id,
      onoff: states_switch.on,
    };
  }else if( id == 'query' ){
    message = {
      id: 'query'
    };
  }else{
    throw 'unknown id';
  }
  var data = Buffer.from(JSON.stringify(message));
  return new Promise((resolve, reject) =>{
    udp.send(data, 0, data.length, DEVICE_PORT, DEVICE_ADDRESS, (error, bytes) =>{
      if( error ){
        console.error(error);
        return reject(error);
      }

      resolve(bytes);
    });
  });
}
idとして"switch"を指定すると、M5StickCのLEDを点灯させたり消灯させたりします。一方で、"query"を指定すると、今のM5StickCのLEDの状態の取得を要求します。その応答が、さきほどの、/reqportstateのエンドポイントです。実はこの受け口はHTTP Postでして、別途もう一つ立ち上げるNode.jsサーバ(UDP)で、UDP受信・HTTP Post送信をして仲介しています。
(なぜ、UDPにこだわるかというと、Google Homeデバイスには、Local Fulfillmentという機能があるそうで、UDPが対応しているためです。次回頑張ろうと思います)
このエンドポイントには2つの意味があります。
1つ目は、先ほどのお伝えした通り、今のLEDの状態を取得するためのものです。
もう一つは、M5StickCのボタン押下でLEDを変更したときに状態変化通知を取得するためのものです。
今回、OK GoogleやGoogleHomeアプリからのLED点灯・消灯に加えて、M5StickC本体でもボタンの押下で点灯・消灯を切り替え、その状態をGoogle Homeアプリに反映するようにしました。
EXECUTE IntentでGoogle Homeデバイスの状態を変更
「OK Google、スイッチをオンにして」、と変更のリクエストを受け取るのがこのEXECUTEです。
抜粋しておきます。
app.onExecute(async (body, headers) => {
  console.info('onExecute');
  console.log('onExecute body', body);

  var decoded = jwt_decode(headers.authorization);
  console.log(decoded);

  const {requestId} = body;

  // Execution results are grouped by status
  var ret = {
    requestId: requestId,
    payload: {
      commands: [],
    },
  };
  for( var i = 0 ; i < body.inputs.length ; i++ ){
    if( body.inputs[i].intent == "action.devices.EXECUTE" ){
      for( var j = 0 ; j < body.inputs[i].payload.commands.length ; j++ ){
        var result = {
          ids:[],
          status: 'SUCCESS',
        };
        ret.payload.commands.push(result);
        var devices = body.inputs[i].payload.commands[j].devices;
        var execution = body.inputs[i].payload.commands[j].execution;
        for( var k = 0 ; k < execution.length ; k++ ){
          if( execution[k].command == "action.devices.commands.OnOff" ){
            for( var l = 0 ; l < devices.length ; l++ ){
              if( devices[l].id == "switch"){
                result.ids.push(devices[l].id);
                states_switch.on = execution[k].params.on;

                await executeDevice(devices[l].id);
                await reportState(devices[l].id);
              }
            }
          }
        }
      }
    }
  }

  console.log("onExecute result", ret);
  return ret;
});
さきほどお伝えした、executeDevice()を呼び出しているのがわかります。
ここで、関数reportState()も呼んでいます。実はさっきの/reportstateでも出てきていました。
async function reportState(id){
  var state;
  if( id == 'switch'){
    state = {
      requestId: String(++requestId),
      agentUserId: agentUserId,
      payload: {
        devices: {
          states:{
            [id]: {
              on: states_switch.on
            }
          }
        }
      }
    };
  }else{
    throw 'unknown id';
  }
  console.log("reportstate", state);
  await app.reportState(state);

  return state;
}
これは、Google Homeに状態が変わったことを伝えるためのものです。
直接Google Homeデバイスを操作して、M5StickCのLED状態を変えたときには、この関数を呼び出して、Google Homeに新しい状態を伝える必要があります。
ESP32からのUDP受信を待ち受けるNode.jsサーバ(UDP)
npmモジュールのnode-fetchを使っています。
'use strict';

var dgram = require('dgram');

const { URL, URLSearchParams } = require('url');
const fetch = require('node-fetch');
const Headers = fetch.Headers;

const base_url = "【Node.jsサーバのURL】";

var UDP_HOST = '0.0.0.0';
var UDP_PORT = 3333; //ESP32からのUDP受信を待ち受けるポート番号

var server = dgram.createSocket('udp4');

server.on('listening', function () {
  var address = server.address();
  console.log('UDP Server listening on ' + address.address + ":" + address.port);
});

server.on('message', async (message, remote) => {
  console.log(remote.address + ':' + remote.port +' - ' + message);
  var body = JSON.parse(message);

  var json = await do_post(base_url + '/reportstate', body);
  console.log(json);
});

server.bind(UDP_PORT, UDP_HOST);

function do_post(url, body) {
  const headers = new Headers({ "Content-Type": "application/json; charset=utf-8" });

  return fetch(new URL(url).toString(), {
      method: 'POST',
      body: JSON.stringify(body),
      headers: headers
    })
    .then((response) => {
      if (!response.ok)
        throw 'status is not 200';
      return response.json();
    });
}
以下の部分を環境に合わせて変更してください。
【Node.jsサーバのURL】
以下のようにして立ち上げます。
> node index.js
ESP32のソースコード
最後に、GoogleHomeデバイスであるM5StickCのソースコードです。
いきなりですが、こんな感じです。
# include <M5StickC.h>
# include <WiFi.h>
# include <ArduinoJson.h>

const char* wifi_ssid = "【WiFiアクセスポイントのSSID】";
const char* wifi_password = "【WiFiアクセスポイントのパスワード】";

const char *udp_report_host = "【Node.jsサーバ(UDP)のIPアドレス】";
# define UDP_REQUEST_PORT  3333 //Node.jsサーバからのUDP受信を待ち受けるポート番号
# define UDP_REPORT_PORT   3333 //Node.jsサーバ(UDP)へUDP送信する先のポート番号

# define LED_PIN     GPIO_NUM_10

const int capacity_request = JSON_OBJECT_SIZE(3);
const int capacity_report = JSON_OBJECT_SIZE(3);
StaticJsonDocument<capacity_request> json_request;
StaticJsonDocument<capacity_report> json_report;
# define BUFFER_SIZE   255
char buffer_request[BUFFER_SIZE];
char buffer_report[BUFFER_SIZE];
bool led_status = false;
bool isPressed = false;
WiFiUDP udp;

void wifi_connect(void){
  Serial.println("");
  Serial.print("WiFi Connenting");

  WiFi.begin(wifi_ssid, wifi_password);
  while (WiFi.status() != WL_CONNECTED) {
    Serial.print(".");
    delay(1000);
  }
  Serial.println("");
  Serial.print("Connected : ");
  Serial.println(WiFi.localIP());
  M5.Lcd.println(WiFi.localIP());
}

void setup() {
  M5.begin();
  M5.Lcd.setRotation(3);
  M5.Lcd.fillScreen(BLACK);
  M5.Lcd.setTextColor(WHITE, BLACK);
  M5.Lcd.println("[M5StickC]");

  Serial.begin(9600);
  Serial.println("setup");

  pinMode(LED_PIN, OUTPUT);
  digitalWrite(LED_PIN, HIGH);

  wifi_connect();

  Serial.println("server stated");
  udp.begin(UDP_REQUEST_PORT);
}

void reportState(){
  json_report.clear();
  json_report["id"] = "switch";
  json_report["onoff"] = led_status;

  serializeJson(json_report, buffer_report, sizeof(buffer_report));

  udp.beginPacket(udp_report_host, UDP_REPORT_PORT);
  udp.write((uint8_t*)buffer_report, strlen(buffer_report));
  udp.endPacket();
}

void loop() {
  M5.update();

  int packetSize = udp.parsePacket();
  if( packetSize > 0){
    Serial.println("UDP received");
    int len = udp.read(buffer_request, packetSize);
    DeserializationError err = deserializeJson(json_request, buffer_request, len);
    if( err ){
      Serial.println("Deserialize error");
      Serial.println(err.c_str());
      return;
    }

    const char* id = json_request["id"];
    if( strcmp(id, "query") == 0 ){
      reportState();
    }else if( strcmp(id, "switch") == 0 ){
      led_status = json_request["onoff"];
      digitalWrite(LED_PIN, led_status ? LOW : HIGH);
    }
  }

  if( M5.BtnA.isPressed() ){
    if( !isPressed ){
      isPressed = true;

      Serial.println("BtnA.Released");

      led_status = !led_status;
      digitalWrite(LED_PIN, led_status ? LOW : HIGH);

      reportState();

      delay(100);
    }
  }else if( M5.BtnA.isReleased() ){
    isPressed = false;
  }

  delay(10);
}
以下の部分は環境に合わせて変更してください。
【WiFiアクセスポイントのSSID】
【WiFiアクセスポイントのパスワード】
【Node.jsサーバ(UDP)のIPアドレス】
UDP受信したら、その内容をJSONパースして、idがswitchだったらLEDを点灯したり、消灯したりし、queryだったら状態をUDPで返しています。
また、ボタンの押下を検出したら、JSON文字列化して、状態をUDP送信します。
JSONパースおよび文字列化には、ArduinoJsonを利用しています。
使ってみる
それではさっそく、一般ユーザとして、使ってみましょう。
さきほどのNode.jsサーバやNode.jsサーバ(UDP)を立ち上げておきましょう。
まずは、AndroidからGoogle Homeアプリを立ち上げます。
Google Home MiniスマートスピーカはすでにGoogle Homeアプリで登録されている前提です。
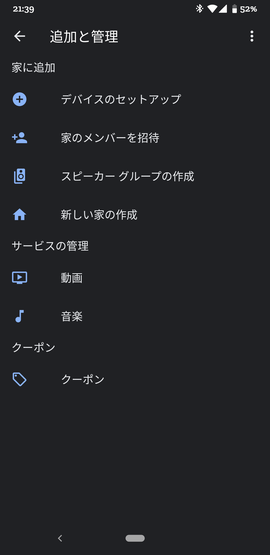
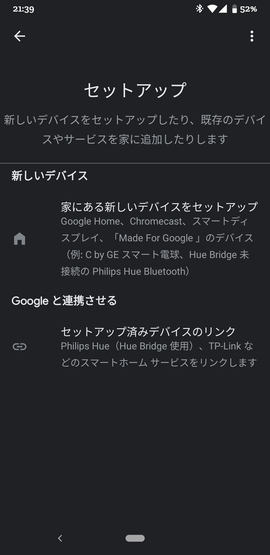
左上の「+」ボタンを押下し、次に、「デバイスのセットアップ」を選択します。
さらに、「Googleと連携させる」を選択します。
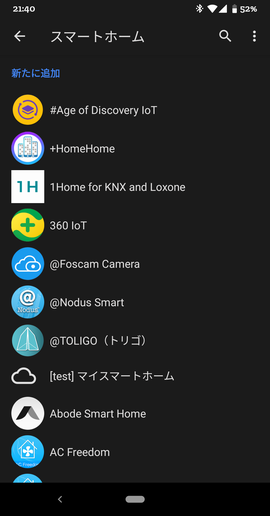
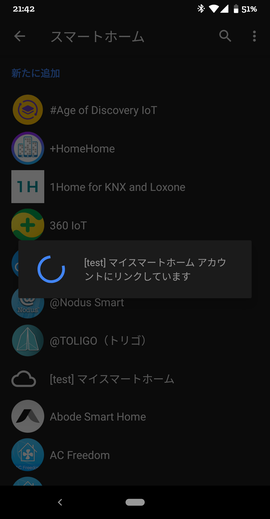
そうすると、[test]と接頭辞が付いたものが見つかります。例:[test]マイスマートホーム。
さっそくそれを選択します。
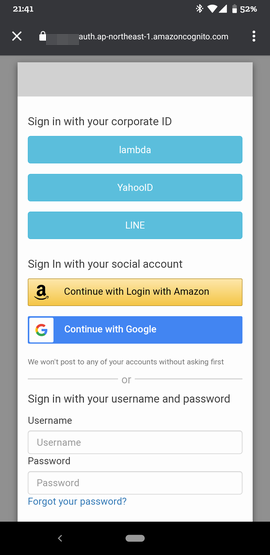
そうすると、ログイン画面が表示されます。
これは、Actions on GoogleのAccount Linkingで設定したauthorizeエンドポイントが呼び出された結果です。OpenID ConnectとしてCognitoを使ったのでCognitoのログイン画面が出ています。Cognitoの設定内容によって見え方は変わります。
アカウントログインが完了すると、
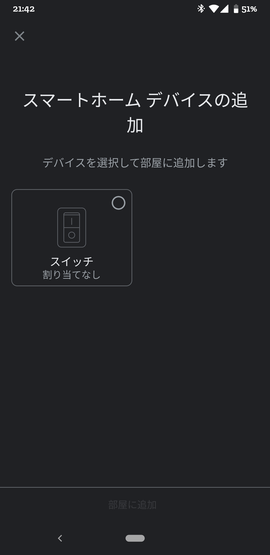
めでたく、以下のようなGoogle Homeデバイス選択画面が現れます。
選択して、部屋に追加しましょう。
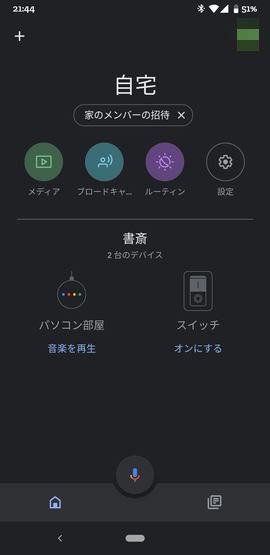
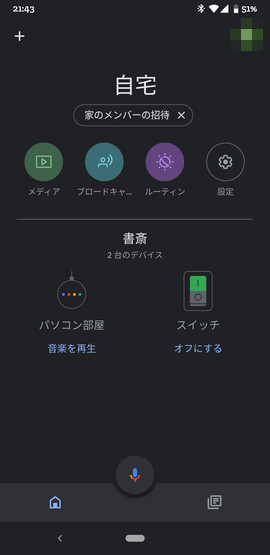
最後に完了ボタンを押すと、以下のように登録されます。
さっそく、オンにする をタップしてみましょう。
M5StickCのLEDがOnになり、画面上も緑色が付いたかと思います。Offもできます。
次は、音声で。「OK Google、スイッチをオンにして」と話してみましょう。LEDがOnになり、画面上も変わりましたでしょうか。
最後に、Android 11だけですが、電源ボタンを長押しします。
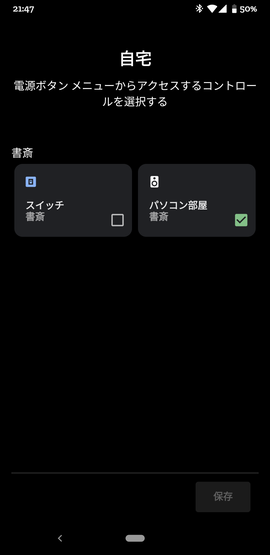
メニューボタンからコントロールを追加を選択します。
そこでスイッチのチェックボックスをOn状態にして、「保存」ボタンを押下します。
これで、ワンタッチで、M5StickCのLEDを点灯したり消灯できるようになりました!
最後に
以前、Alexaのスマートホームで、黒豆の学習リモコンを制御しました。今度はこれをGoogleHomeデバイス対応しようと思います。
スマートホームスキルを作る(1):黒豆を操作するRESTful API環境を構築する
Local Fulfillmentというのがあって、GoogleHomeでJavascriptを動かして直接GoogleHomeデバイスを制御するとか。今度調べてみようと思います。
https://developers.google.com/assistant/smarthome/concepts/local
こちらを参考にさせていただきました。ありがとうございました。
"○○のアプリにつないで"不要の Google Home 対応スマートホームアプリの実装
ご参考までにこちらもどうぞ
Google Smart HomeデバイスをAWS IoTで実装してみた
以上
