今回は、AWS IoTに対して、ローカルネットワークに立ち上げるMosquittoをブリッジとして接続し、ローカルネットワークにつながったMQTTクライアントからAWS IoTのトピックスにSubscribe/Publishしたいと思います。
AWS IoTとのクライアント認証(X.509認証)は、Mosquittoが行うので、ローカルネットワークにつながったMQTTクライアントはAWS IoTとの認証は不要となります。
(参考)
Mosquittoブリッジではなく、Cognito認証を使って接続する方法もあります。
AWS CognitoとAWS IoTを連携させてみる
AWS CognitoとAWS IoTを連携させてみる(パート2)
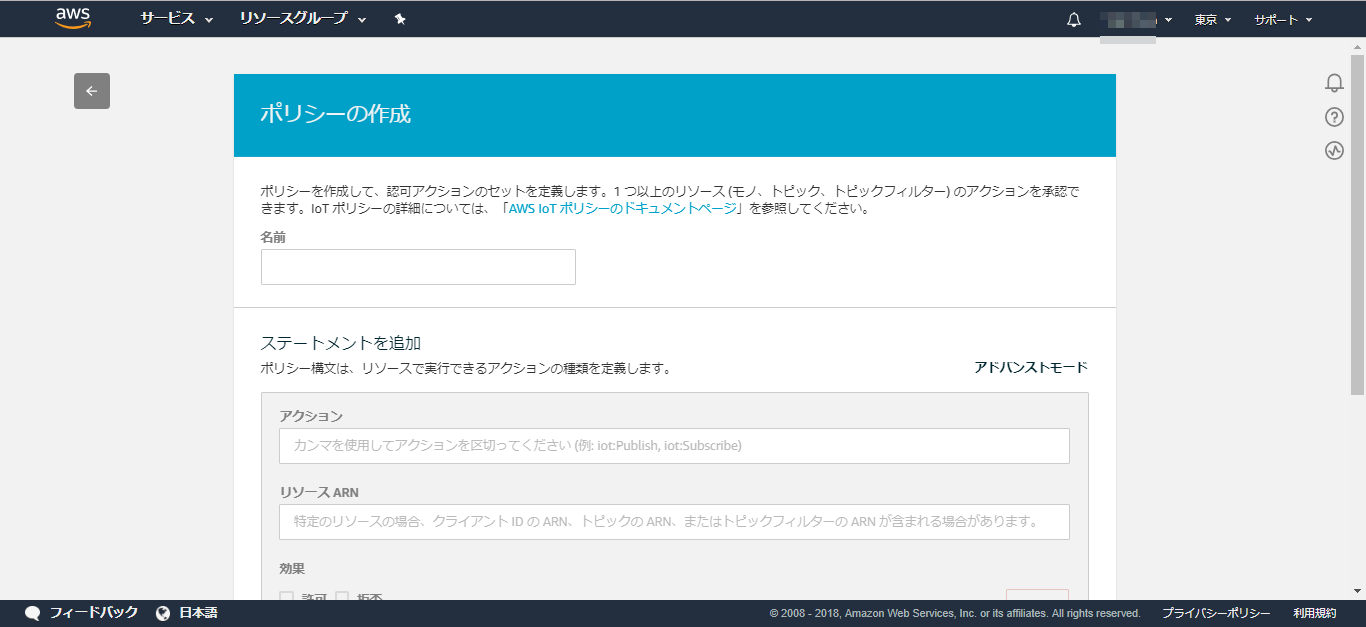
AWS IoTのポリシ作成
まずは、Mosquittoブリッジからの接続を受け付けるためのポリシを作成します。
ポリシ名は例えば「MosquittoPolicy」とでもしておきます。
ステートメント(ポリシドキュメント)は、例えば以下のようにします。
単純に、iotに関するすべての処理を許可しています。実際には、アクションを限定したり、対象トピックを限定したりして下さい。
{
  "Version": "2012-10-17",
  "Statement": [
    {
      "Effect": "Allow",
      "Action": "iot:*",
      "Resource": "*"
    }
  ]
}
次に、Mosquittoに対して払い出すX.509証明書を作成します。
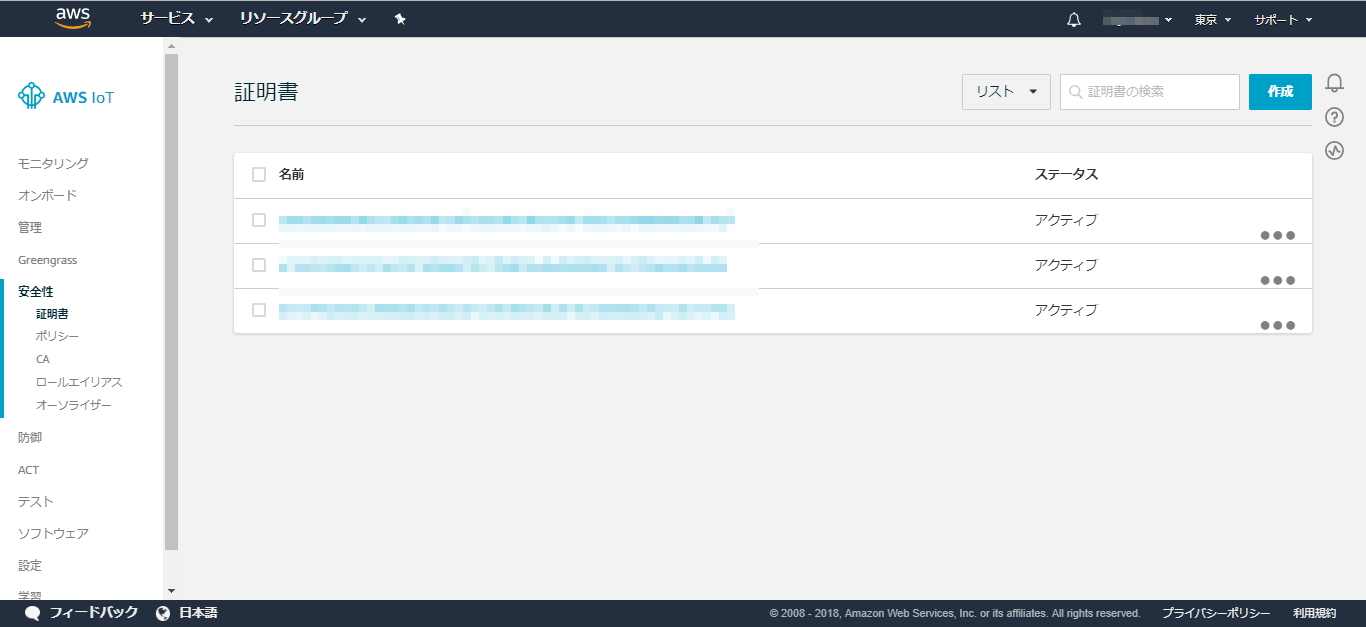
安全性 → 証明書 を開いて、右上の「作成」ボタンを押下します。
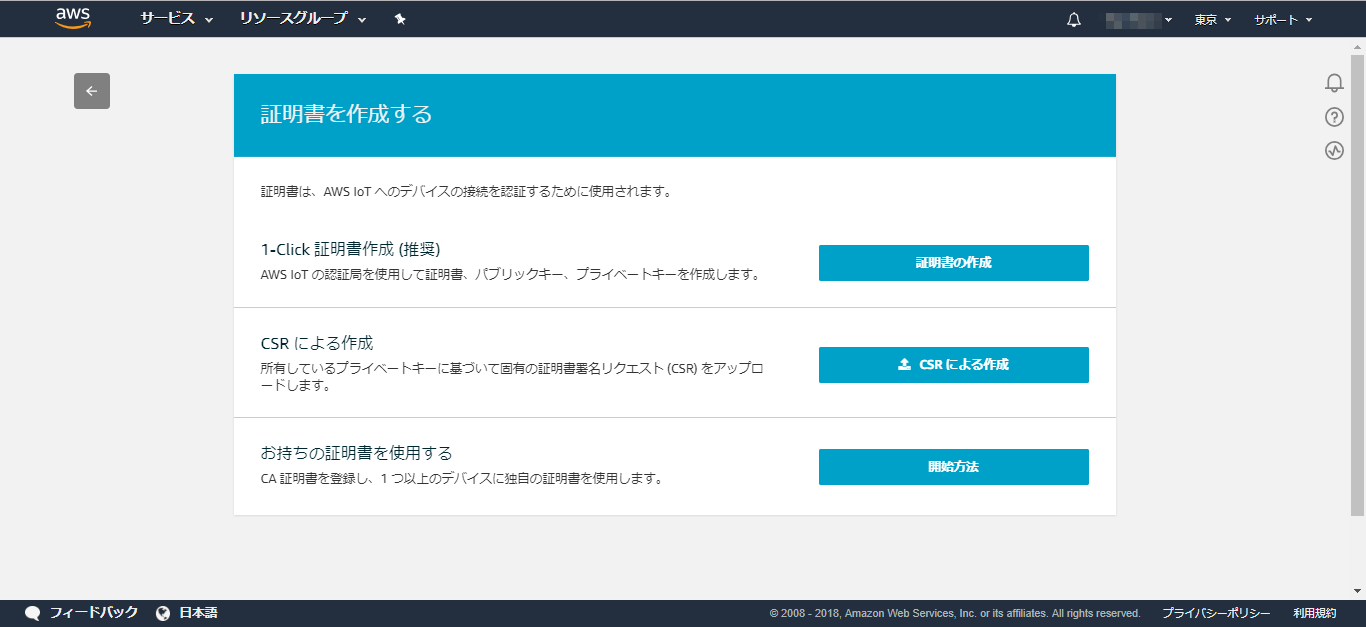
一番簡単な、「1-Click証明書作成(推奨)」で作成します。「証明書の作成」を押下します。
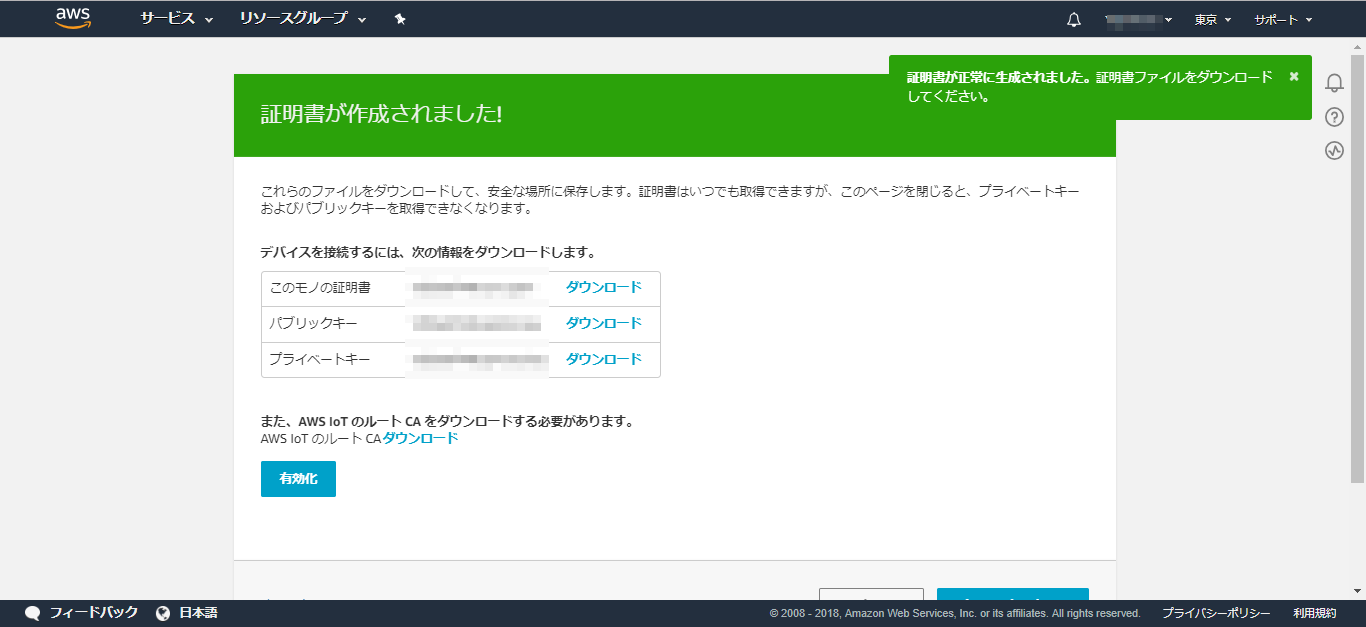
はい、作成されました。
このモノの証明書、パブリックキー、プライベートキーをダウンロードしておきます。
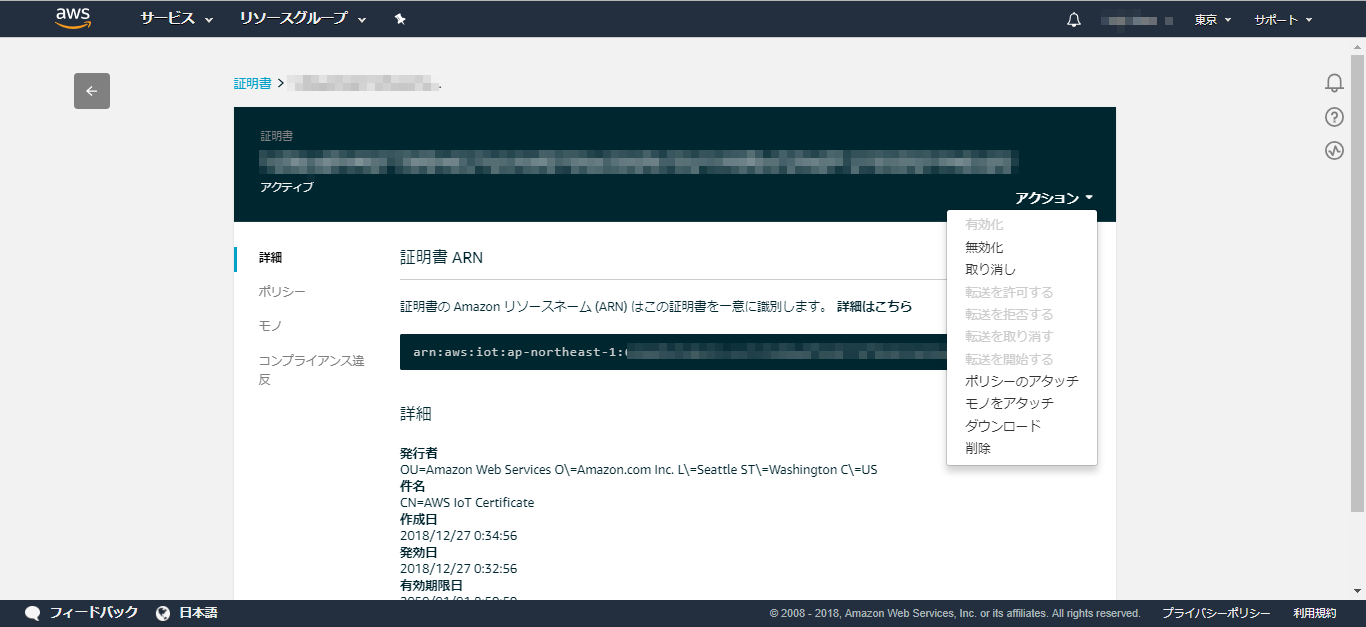
ついでに、この証明書を有効化しておきます。何もしないと無効化されているので、ここで「有効化」ボタンを押下しておきます。
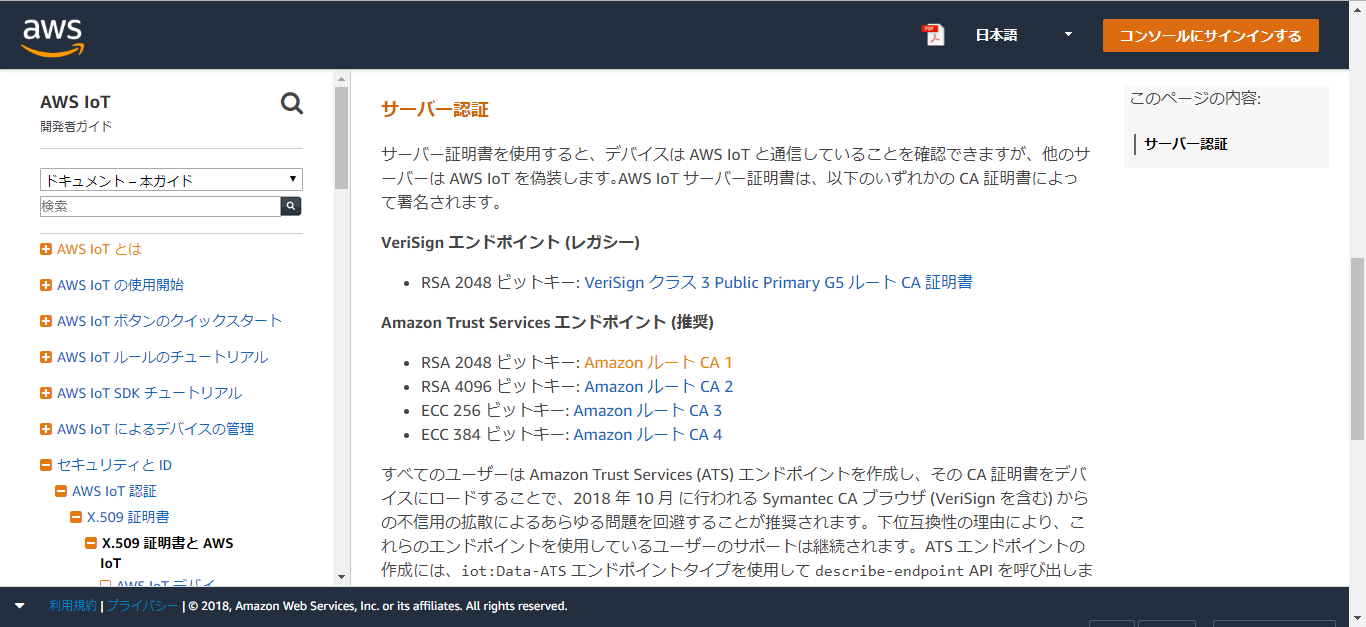
AWS IoTのルートCAもダウンロードしておきましょう。
RSA 2048ビットキー:AmazonルートCA1をダウンロードします。
「ポリシをアタッチ」ボタンを押下して、先ほど作成したポリシ(MosquittoPolicy)を証明書に割り当てます。
この作業は、安全性 → 証明書 を選択し、該当証明書 を選択して、「ポリシのアタッチ」を選択すれば同じことができます。
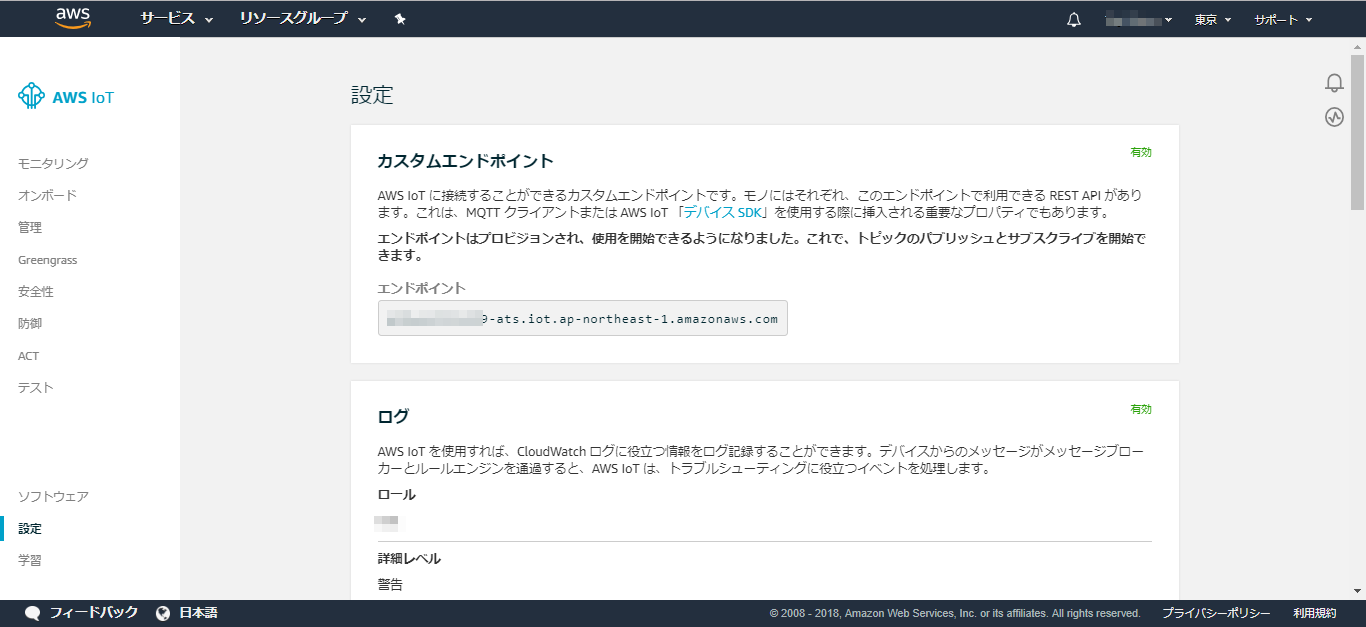
次に、左側のナビゲータから「設定」を選択し表示されるカスタムエンドポイントのエンドポイントをメモしておきます。
Mosquittoのインストール
今度は、ローカルネットワーク上のサーバ側に作業を移して、Mosquittoをインストールします。
今回は、ソースコードからのコンパイルに挑戦してみます。
以下のサイトから、tar.gzをダウンロードします。
本日(2018/12/27)時点では、1.5.5が最新のようです。
これを適当なフォルダに展開します。
> tar xzvf mosquitto-1.5.5.tar.gz
> cd mosquitto-1.5.5
コンパイルする前に、追加のモジュールのインストールが必要です。
私の環境では、以下が足りませんでしたので、インストールしました。
> apt-get install libssl-dev uuid-dev
> apt-get install libc-ares-dev
> apt-get install libwebsockets-dev
次に、ちょっとコンパイルオプションを変更しておきます。MqttとしてWebSocketも対応しておきたかったので、config.mkを変更します。
以下の部分のとおり「yes」に変更しておきます。
WITH_WEBSOCKETS:=yes
それではコンパイルしましょう。
> make
無事にコンパイルが成功したら、最後にルートアカウントでインストールします。
# make install
AWS IoTへのブリッジ接続設定
mosquitto.confの編集
Mosquittoのインストールが終わると、/etc/mosquittoフォルダに、設定ファイルのひな型がコピーされているので、それを編集します。
cd /etc/mosquitto/
cp mosquitto.conf.example mosquitto.conf
その前に、さきほどAWS IoTコンソールからダウンロードしたファイルを以下にコピーしておきます。
/etc/mosquitto/cert/*
AmazonRootCA1.pem
XXXXXXXXXX-certificate.pem.crt
XXXXXXXXXX-private.pem.key
XXXXXXXXXX-public.pem.key(※使いません)
編集します。
vi mosquitto.conf
変更箇所を以下に示しておきます。
163c163
< port 1883  ※標準のMQTTポート番号の指定
---
> #port 1883
178c178
< protocol mqtt ※MQTT用であることを指定
---
> #protocol mqtt
311d310
< listener 1884 ※WebSocket用のポート番号の指定
332d330
< protocol websockets ※WebSocket用であることの指定
500d497
< log_dest file /var/log/mosquitto/mosquitto.log ※ログファイル名の指定
693,694c690,691
< connection awsiot ※任意のブリッジの名前
< address XXXXXXXXXXXX-ats.iot.ap-northeast-1.amazonaws.com:8883 ※ブリッジからの接続先エンドポイント
---
> #connection <name>
> #address <host>[:<port>] [<host>[:<port>]]
696d692
< topic awsiot/# both 0 ※ブリッジ対象のトピック名
743d738
< cleansession true
752d746
< notifications false
779c773
< start_type automatic ※自動的に起動するように変更
---
> #start_type automatic
827d820
< bridge_cafile /etc/mosquitto/cert/AmazonRootCA1.pem ※ルートCAの証明書ファイル
832d824
< bridge_certfile /etc/mosquitto/cert/XXXXXXXXXX-certificate.pem.crt
836d827 ※X.509証明書のファイル
< bridge_keyfile /etc/mosquitto/cert/XXXXXXXXXX-private.pem.key
846d836 ※秘密鍵のファイル
< bridge_insecure false
ポイントだけ再掲すると、
- log_dest に、まさかのために出力ログファイル名を指定します。
- address にAWS IoTのエンドポイントを指定します。
- topic に、ブリッジしたいトピック名を指定します。#でワイルドカード指定ができます。
- bridge_***file にAWS IoTコンソールからダウンロードした証明書ファイル類を指定します。
次に、Mosquittoを起動するユーザを作成します。(念のため、ルートではなく専用ユーザを作成しました)
> groupadd mosquitto
> useradd mosquitto -g mosquitto
ログ出力するフォルダも作成しておきます。log_destで指定したフォルダです。
cd /var/log
mkdir mosquitto
chown mosquitto:mosquitto mosquitto
Mosquittoの自動起動設定
自動起動は、ちょっと古いかもしれませんが、init.dを使いました。
vi /etc/init.d/mosquitto
# ! /bin/sh

### BEGIN INIT INFO
# Provides:             mosquitto
# Required-Start:       $remote_fs $syslog
# Required-Stop:        $remote_fs $syslog
# Default-Start:        2 3 4 5
# Default-Stop:         0 1 6
# Short-Description:    mosquitto MQTT v3.1 message broker
# Description:
#  This is a message broker that supports version 3.1 of the MQ Telemetry
#  Transport (MQTT) protocol.
#
#  MQTT provides a method of carrying out messaging using a publish/subscribe
#  model. It is lightweight, both in terms of bandwidth usage and ease of
#  implementation. This makes it particularly useful at the edge of the network
#  where a sensor or other simple device may be implemented using an arduino for
#  example.
### END INIT INFO

set -e

PIDFILE=/var/run/mosquitto.pid
DAEMON=/usr/local/sbin/mosquitto

# /etc/init.d/mosquitto: start and stop the mosquitto MQTT message broker

test -x ${DAEMON} || exit 0

umask 022

. /lib/lsb/init-functions

# Are we running from init?
run_by_init() {
    ([ "$previous" ] && [ "$runlevel" ]) || [ "$runlevel" = S ]
}

export PATH="${PATH:+$PATH:}:/usr/local/sbin:/usr/sbin:/sbin"

case "$1" in
  start)
        if init_is_upstart; then
            exit 1
        fi
        log_daemon_msg "Starting network daemon:" "mosquitto"
        if start-stop-daemon --start --quiet --oknodo --background  --make-pidfile --pidfile ${PIDFILE} --exec ${DAEMON} -- -c /etc/mosquitto/mosquitto.conf ; then
            log_end_msg 0
        else
            log_end_msg 1
        fi
        ;;
  stop)
        if init_is_upstart; then
            exit 0
        fi
        log_daemon_msg "Stopping network daemon:" "mosquitto"
        if start-stop-daemon --stop --quiet --oknodo --pidfile ${PIDFILE}; then
            log_end_msg 0
            rm -f ${PIDFILE}
        else
            log_end_msg 1
        fi
        ;;


  reload|force-reload)
        if init_is_upstart; then
            exit 1
        fi
        log_daemon_msg "Reloading network daemon configuration:" "mosquitto"
        if start-stop-daemon --stop --signal HUP --quiet --oknodo --pidfile $PIDFILE; then
            log_end_msg 0
        else
            log_end_msg 1
        fi
        ;;

  restart)
        if init_is_upstart; then
            exit 1
        fi
        log_daemon_msg "Restarting network daemon:" "mosquitto"
        if start-stop-daemon --stop --quiet --oknodo --retry 30 --pidfile ${PIDFILE}; then
            rm -f ${PIDFILE}
        fi
        if start-stop-daemon --start --quiet --oknodo --background --make-pidfile --pidfile ${PIDFILE} --exec ${DAEMON} -- -c /etc/mosquitto/mosquitto.conf ; then
            log_end_msg 0
        else
            log_end_msg 1
        fi
        ;;

  try-restart)
        if init_is_upstart; then
            exit 1
        fi
        log_daemon_msg "Restarting Mosquitto message broker" "mosquitto"
        set +e
        start-stop-daemon --stop --quiet --retry 30 --pidfile ${PIDFILE}
        RET="$?"
        set -e
        case $RET in
            0)
                # old daemon stopped
                rm -f ${PIDFILE}
                if start-stop-daemon --start --quiet --oknodo --background --make-pidfile --pidfile ${PIDFILE} --exec ${DAEMON} -- -c /etc/mosquitto/mosquitto.conf ; then
                    log_end_msg 0
                else
                    log_end_msg 1
                fi
                ;;
            1)
                # daemon not running
                log_progress_msg "(not running)"
                log_end_msg 0
                ;;
            *)
                # failed to stop
                log_progress_msg "(failed to stop)"
                log_end_msg 1
                ;;
        esac
        ;;

  status)
        if init_is_upstart; then
            exit 1
        fi
        status_of_proc -p ${PIDFILE} ${DAEMON} mosquitto && exit 0 || exit $?
        ;;

  *)
        log_action_msg "Usage: /etc/init.d/mosquitto {start|stop|reload|force-reload|restart|try-restart|status}"
        exit 1
esac

exit 0
以下でサーバ再起動後も自動起動されるようにします。
# update-rc.d mosquitto defaults
Mosquittoの起動
それでは、Mosquittoを起動してみましょう。
# /etc/init.d/mosquitto start
[ ok ] Starting mosquitto (via systemctl): mosquitto.service.
以下の感じで、Mosquittoが起動されていますでしょうか。
> ps -aux | grep mosquitto
mosquit+ 21810  0.5  1.1   6884  5080 ?        S    12:00   0:00 /usr/local/sbin/mosquitto -c /etc/mosquitto/mosquitto.conf
root     21842  0.0  0.4   5792  1852 pts/0    S+   12:01   0:00 grep mosquitto
AWS IoTにブリッジ接続
早速、AWS IoTにブリッジ接続してみます。
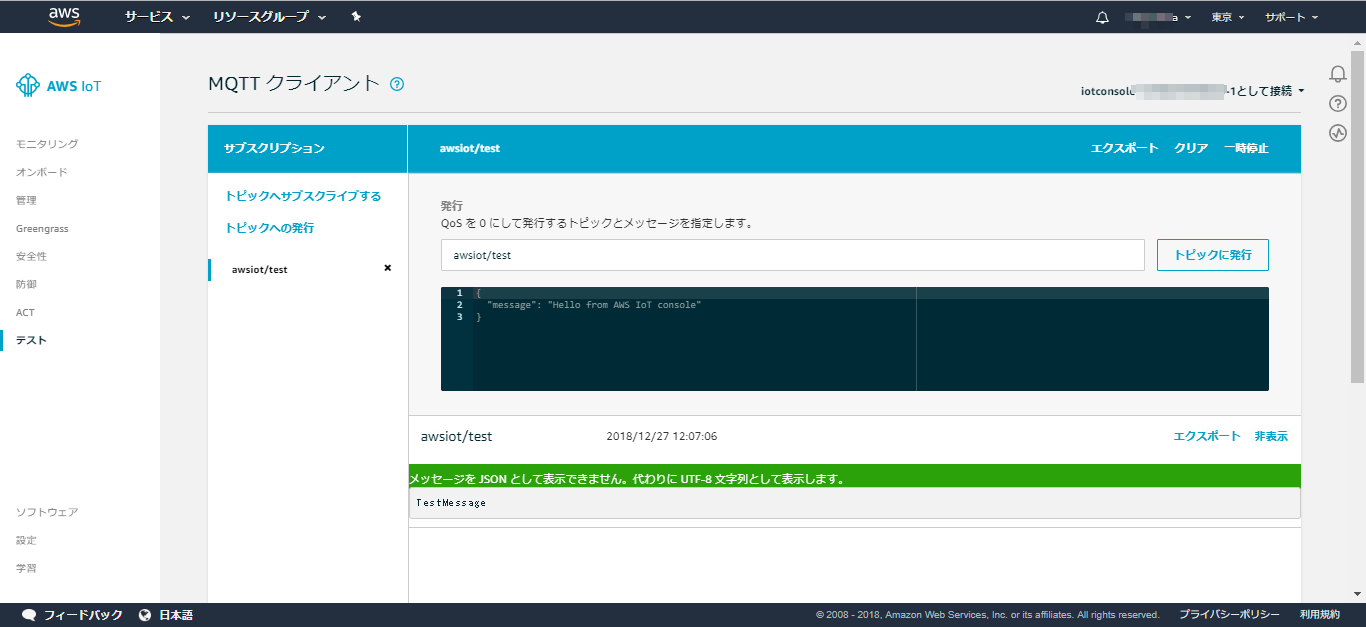
AWS IoTコンソールで、左側のナビゲータからテストを選択します。
そして、トピックのサブスクリプションにトピック名を指定して、「トピックへのサブスクライブ」ボタンを押下します。例えば、「awsiot/test」とでも指定します。このトピック名は、mosquitto.confで指定したトピック名に含まれるものにしてください。
Mosquittoをインストールしたサーバから、以下を実行します。
> mosquitto_pub -t awsiot/test -m TestMessage
そうすると、無事に、Publishされたメッセージを受信することができました。
Mosquittoをインストールしたサーバ以外の別のクライアント端末からでも同様にPublish/Subscribeできます。
その際には、MQTT接続先のホスト名は、AWS IoTのエンドポイントではなく、Mosquittoをインストールしたホスト名(ポート番号は1883)を指定してください。
以上
