今回は、ESP32をAlexa Gadgets Toolkitデバイスにしよう の続きで、カスタムインタフェースのうちのAlexa Gadgetデバイスからカスタムスキルに通知をしてみます。(一応シリーズ最後の投稿です)
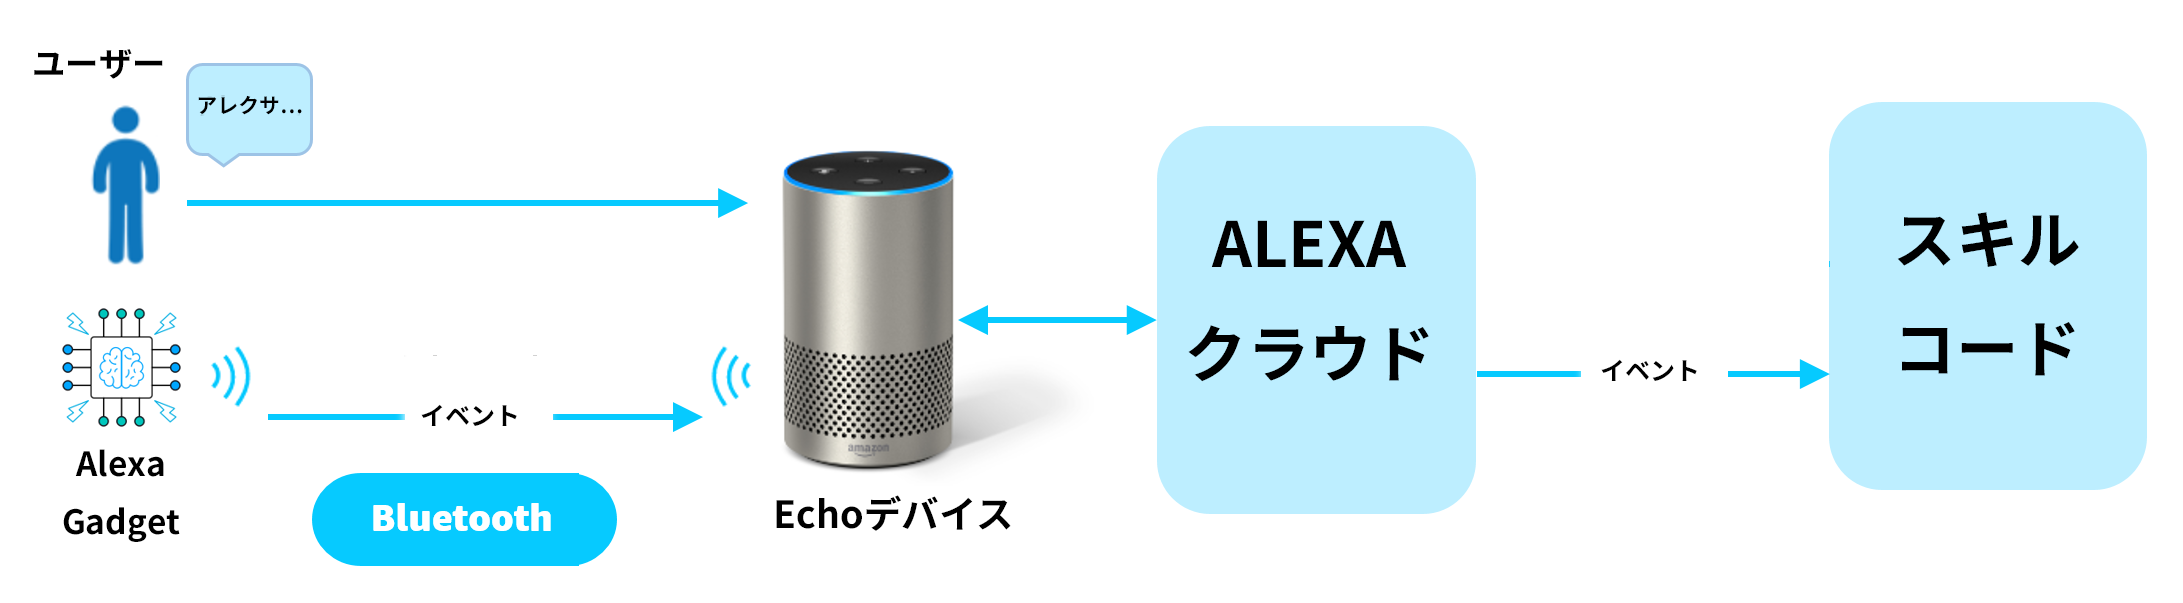
以下の図のイベントのところです。
プロトコルバッファの定義
Alexa Gadgetデバイスからのイベントは、プロトコルバッファにエンコードして送信する必要があるため、protoファイルで宣言して、エンコーダを作成する必要があります。
以前、protoファイルからエンコーダを作った環境(compile_nanos.batなど)を流用しましょう。
C:\XXXXX\Alexa-Gadgets-Embedded-Sample-Code-master\AlexaGadgetsProtobuf
mkdir custom
cd custom
vi customEvent.proto
vi customEvent.options
syntax = "proto3";

import "eventHeader.proto";

message CustomEventProto {
    Event event = 1;
    message Event {
        header.EventHeaderProto header = 1;
        string payload = 2;
    }
}
CustomEventProto.Event.payload max_size:1000
C:\XXXXX\Alexa-Gadgets-Embedded-Sample-Code-master\AlexaGadgetsProtobuf\examples に移動して、compile_nanos.batを実行しましょう。
customEvent.pb.c/.h という2つのファイルが追加で出来上がっていると思います。
これをPlatformIOのプロジェクトのsrcフォルダにコピーします。
Alexa GadgetデバイスからEchoデバイスへのイベント送信
あとは、ボタン押下のタイミングなどで、プロトコルバッファ形式にエンコードして送信するだけです。
# include "customEvent.pb.h"

  if ( M5.BtnA.wasPressed() ){
    Serial.println("M5.BtnA.wasPressed");
    if( connected ){
      BLE2902* desc = (BLE2902*)pCharacteristic_notify->getDescriptorByUUID(BLEUUID((uint16_t)0x2902));
      if( desc->getNotifications() ){
        CustomEventProto custom_event_envelope = CustomEventProto_init_default;
        strcpy(custom_event_envelope.event.header.namespacc, "Custom.Sample");
        strcpy(custom_event_envelope.event.header.name, "ButtonStatus");

        json_message.clear();
        json_message["button"] = "M5.BtnA";
        json_message["count"] = ++count;
        serializeJson(json_message, message_buffer, sizeof(message_buffer));
        strcpy(custom_event_envelope.event.payload, message_buffer);

        pb_ostream_t ostream = pb_ostream_from_buffer(gp_send_buffer, sizeof(gp_send_buffer));
        bool status = pb_encode(&ostream, CustomEventProto_fields, &custom_event_envelope);
        if (status) {
          Serial.printf("bytes_written=%d\n", ostream.bytes_written);
          sendPacket(ALEXA_STREAM, gp_send_buffer, ostream.bytes_written);
        }else{
          Serial.println("pb_encode Error");
        }
      }
    }
    delay(100);
  }
Custom.Sampleというnamespaceで、ButtonStatusというnamaeのイベントを送信しています。
中身であるpayloadはJSON.stringifyしておく必要があるため、またArduinoJsonを活用させていただいています。
インテントの追加
次は受ける側です。
まずは、とりあえず、適当なインテントを作ります。
ありがとう というと、どういたしまして と返すようにしてみます。
alexa developer consoleから、テストスキルを選択しておきます。
https://developer.amazon.com/alexa/console/ask
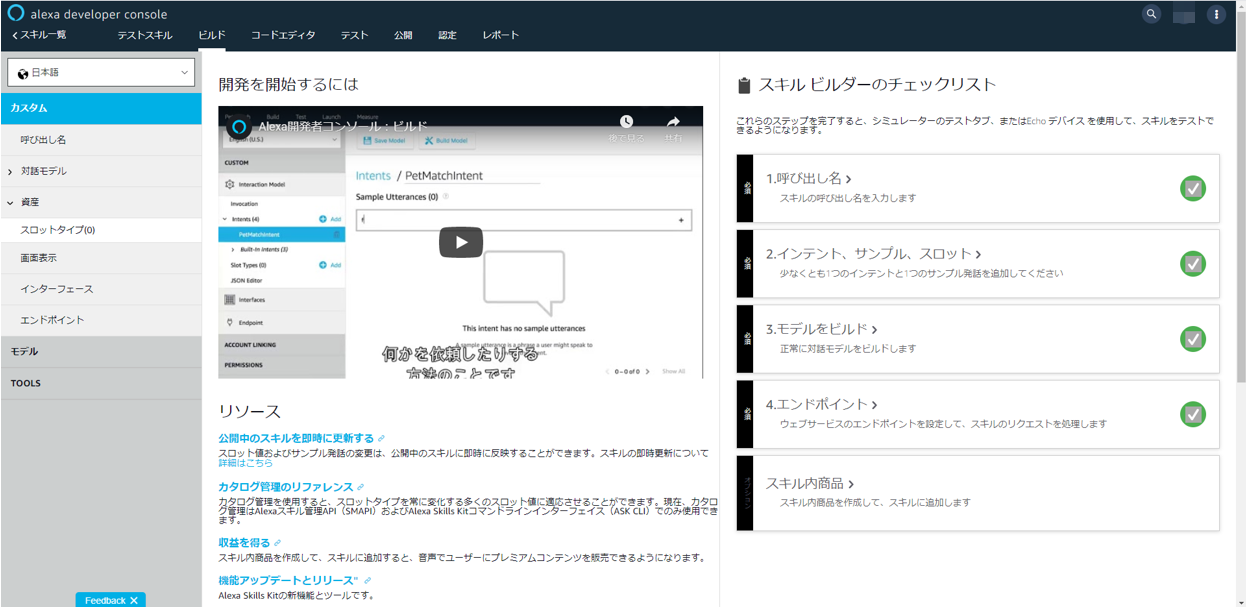
左側のナビゲーションから、対話モデル→インテントと選択し、「+インテントを追加」ボタンを押下します。
インテント名をThanksとでもしておきましょう。
で、サンプル発話に、「ありがとう」を追加すればOKです。最後に、「モデルを保存」ボタンを押下しましょう。

どういたしまして という応答は、Lambdaで処理します。
以下の感じです。前回の投稿(ESP32をAlexa Gadgets Toolkitデバイスにしよう:カスタムスキル→Alexa Gadgetデバイスへの通知) で使ったユーティリティalexa-utils.js を使っています。
const AskUtils = require(HELPER_BASE + 'alexa-utils');
const app = new AskUtils(Alexa);

app.intent('Thanks', async (handlerInput) =>{
    var builder = handlerInput.responseBuilder;
    builder.speak('どういたしまして。');
    return builder.getResponse();
});
これで、ありがとう → どういたしまして と会話はできたかと思います。
カスタムスキルでのイベント通知の受信
それではイベント受信を実装していきます。
カスタムスキル側のLambdaの実装を示します。
app.intent('Thanks', async (handlerInput) =>{
    var payload = {
        message: "Push Button",
        number: 1234
    };

    var endpointId = app.getAttributes(handlerInput).endpointId;

    var builder = handlerInput.responseBuilder;
    builder.speak('どういたしまして。ボタンを押してください');
    builder.addDirective(app.buildStartEventHandlerDirective(custom_event_token, "Custom.Sample", "ButtonStatus", { message: "ボタンが押されませんでした" }, 10000));
    builder.addDirective(app.buildCustomDirective(endpointId, 'Custom.Sample', 'Button', payload));
    return builder.getResponse();
});

app.customReceived(async (handlerInput) =>{
    if( handlerInput.requestEnvelope.request.token != custom_event_token ){
        console.log('token mismatch');
        return;
    }

    var endpointId = app.getAttributes(handlerInput).endpointId;
    for( var i = 0 ; i < handlerInput.requestEnvelope.request.events.length ; i++ ){
        if( endpointId != handlerInput.requestEnvelope.request.events[i].endpoint.endpointId ){
            console.log('endpointId mismatch');
            continue;
        }
        console.log('namespace=' + handlerInput.requestEnvelope.request.events[i].header.namespace + ' name=' + handlerInput.requestEnvelope.request.events[i].header.name);
        console.log(handlerInput.requestEnvelope.request.events[i].payload);
    }

    var builder = handlerInput.responseBuilder;
    builder.speak('ボタンが押されました');
    builder.withShouldEndSession(true);
    return builder.getResponse();
});

app.customExpired(async (handlerInput) =>{
    var builder = handlerInput.responseBuilder;
    builder.speak(handlerInput.requestEnvelope.request.expirationPayload.message);
    builder.withShouldEndSession(true);
    return builder.getResponse();
});
さきほどのapp.intentを変更しつつ、処理を追加しています。
カスタムスキルで、イベントを受信するためにはイベント受信待機の状態にする必要があります。
以下の処理で、イベント受信の待機状態になります。
builder.addDirective(app.buildStartEventHandlerDirective(custom_event_token, "Custom.Sample", "ButtonStatus", { message: "ボタンが押されませんでした" }, 10000));
Custom.SampleというnamespaceのButtonStatusというnameのイベントを受信する指定です。また、messageはイベント受信を待ちきれなかったときのpayload、10000はイベント受信を待ち受ける時間(msec)です。
そして、app.customExpiredが、イベント受信を待ちきれなかったときにコールバックされるハンドラー、app.customReaceivedがイベント受信したときにコールバックされるハンドラーの処理です。
ちなみに、customExpiredやcustomReceivedが呼ばれたとき、イベント受信待ち状態も解除されています。
変数 custom_event_token は待ち受けを開始したときと受信したときで同じトークンであることを確認するためのものです。送信のたびに変えた方がよいのですが手抜きで固定にしています。
そのあたりの実装は、以下の通りに実装しています。
https://developer.amazon.com/ja-JP/docs/alexa/alexa-gadgets-toolkit/receive-custom-event-from-gadget.html#directives-for-custom-events
詳細は前回示したユーティリティ(alexa-utils.js)でご確認ください。
ESP32をAlexa Gadgets Toolkitデバイスにしよう:カスタムスキル→Alexa Gadgetデバイスへの通知
終わりに
これで、一通り、Alexa Gadgets Toolkitで提供される機能を触ってみました。
ソースコード一式は以下にアップしておきました。
Lambda側
https://github.com/poruruba/AlexaGadget/tree/master/AlexaGadget_CustomInterface/alexa_test/api/controllers/test-alexa/lambda
ESP32側
https://github.com/poruruba/AlexaGadget/tree/master/AlexaGadget_CustomInterface/AlexaGadget
皆様のご参考になれば幸いです。
Alexaに関しては以下も投稿していますのでこちらもご参考まで。
SwaggerでLambdaのデバッグ環境を作る(4):Alexaをデバッグする
スマートホームスキルを作る(1):黒豆を操作するRESTful API環境を構築する
スマートホームスキルを作る(2):いよいよスマートホームスキルを作成する
以上