タイトルの通りですが、複数の処理を連携させていまして、結局やってることは、
①ウマ娘プリティーダービーで、ウマ娘のプロファイルを画面キャプチャし、それをLINEメッセージとして投稿
②取得した画像から、Google Cloud Vision APIでOCR(文字認識)して、ステータス値を判別
③ステータス値をLINEメッセージのレスポンスとして返す
大事なのは②です。すなわち、以下の2つです。
・LINEメッセージから画像ファイルを取得
・Google Cloud Vision APIで文字認識
ソースコードもろもろは以下に上げておきます。
poruruba/CloudVision_Test
LINEメッセージから画像ファイルを取得
以下の部分です。
    const { streamToBuffer } = require('@jorgeferrero/stream-to-buffer');

    var stream = await client.getMessageContent(event.message.id);
    var buffer = await streamToBuffer(stream);
通知されるメッセージには直接は画像ファイルは含まれず、IDが知らされるので、client.getMessageContent を呼び出して取得します。取得するとStream形式で取得されるため、有志のnpmモジュールを使ってバッファに変換しています。
上記のclientは以下で作ったものです。
const config = {
  channelAccessToken: '【LINEチャネルアクセストークン】',
  channelSecret: '【LINEチャネルシークレット】',
};
const line = require('@line/bot-sdk');
client = new line.Client(config);
LINEのnpmモジュールを使っています。
line/line-bot-sdk-nodejs
steamToBufferは、以下のnpmモジュールを使わせていただきました。
@jorgeferrero/stream-to-buffer
LINEに関する処理はユーティリティ「line-utils.js」にまとめてあります。また、LINEボットの設定やシークレット情報の取得も必要です。
詳細は以下が参考になります。
Google Cloud Vision APIで文字認識
「textdetection.js」に処理をまとめておきました。
あらかじめ、手動で画像から抽出したい文字列の場所(X,Y座標と幅と高さ)のリストを決めておき、テンプレートとします。
テンプレートというのはこんな感じの情報です。
const template = {
  name: "ウマ娘",
  image_width: 1080,
  image_height: 2220,
  base_range: { x: 417, y: 219, width: 251, height: 55, name: "タイトル", value: "ウマ娘詳細" },
  ranges: [
    { x: 521, y: 406, width: 529, height: 42, name: "馬名" },
    { x: 129, y: 546, width: 176, height: 36, name: "評価" },
    { x: 115, y: 665, width: 117, height: 40, name: "スピード" },
    { x: 316, y: 665, width: 117, height: 40, name: "スタミナ" },
    { x: 516, y: 665, width: 117, height: 40, name: "パワー" },
    { x: 716, y: 665, width: 117, height: 40, name: "根性" },
    { x: 916, y: 665, width: 117, height: 40, name: "賢さ" },
  ],
};
①ベースとなる文字列(base_range.value)を探して、Y方向の位置を特定します。
②文字列の範囲(ranges)を抽出するためのマスクを生成します。
③アスペクト比を保ったまま幅をテンプレートに合わせます。
④Google Cloud Vision APIで文字認識して文字列を抽出します。
⑤抽出した文字列を、テンプレートの場所とマッピングします。
①は、スマホによっては、ノッチの有無によって上側に黒い帯が含まれる場合があるためです。
②は、LINEでアップロードすると、画像サイズが縮小されるためです。
③は、そのまま文字認識すると、不要な文字がたくさん抽出されるし、時間もかかるためです。
⑤抽出した文字が、どの範囲から抽出された文字列なのかを特定します。
'use strict';

const vision = require('@google-cloud/vision');
const sharp = require('sharp');
//const fs = require('fs').promises;

class TextDetection{
  constructor(){
    this.client = new vision.ImageAnnotatorClient();
  }

  async detection(target_buffer, template){
    try {
	// ①ベースとなる文字列を探して、Y方向の位置を特定します。
      var sample = await sharp(target_buffer);
      var metadata = await sample.metadata();
      console.log(metadata);
      var ratio = metadata.width / template.image_width;
      console.log("ratio=" + ratio);

      const positionMask = Buffer.from(
        `<svg width="${metadata.width}" height="${metadata.height}" >
          <rect x="${Math.round(template.base_range.x * ratio)}" y="0" width="${Math.round(template.base_range.width * ratio)}" height="${metadata.height}" />
        </svg>`
      );

      var sample_buffer = await sample
        .sharpen(20)
        .composite([{
          input: positionMask,
          blend: 'dest-in',
          top: 0,
          left: 0
        }])
        .png()
        .toBuffer();

      const [position_result] = await this.client.textDetection(sample_buffer);
      var position_allResult = parse_paragraph(position_result.fullTextAnnotation);

      var base_position = position_allResult.find(item => item.str == template.base_range.value);
      if (!base_position) {
        console.log('not found');
        return [];
      }
      var offset = Math.round((base_position.max_y + base_position.min_y) / 2 / ratio - (template.base_range.y + template.base_range.height / 2));
      console.log("offset=" + offset);

	// ②文字列の範囲を抽出するためのマスクを生成します。
      const targetMask = make_mask(template.ranges, offset, template);
//      var range = await sharp(targetMask).png().toBuffer();
//      fs.writeFile("./range.png", range);

      var masked_buffer = await sharp(target_buffer)
        .resize(template.image_width) // ③アスペクト比を保ったまま幅をテンプレートに合わせます。
        .sharpen(20)
        .composite([{
          input: targetMask,
          blend: 'dest-in',
          top: 0,
          left: 0
        }])
        .png()
        .toBuffer();
//      fs.writeFile("./result.png", masked_buffer);

	// ④Google Cloud Vision APIで文字認識して文字列を抽出します。
      const [result] = await this.client.textDetection(masked_buffer);
      var allResult = parse_paragraph(result.fullTextAnnotation);

	// ⑤抽出した文字が、どの範囲から抽出された文字列なのかを特定します。
      allResult.forEach(item => {
        var center_x = Math.round((item.min_x + item.max_x) / 2);
        var center_y = Math.round((item.min_y + item.max_y) / 2);
        var found = template.ranges.find(range => {
          return (center_x >= range.x && center_x <= (range.x + range.width)) &&
            (center_y >= (range.y + offset) && center_y <= (range.y + offset + range.height))
        });
        if (found)
          item.range = found
      });
      console.log("allResult=", JSON.stringify(allResult));

      return allResult;
    } catch (error) {
      console.error(error);
      throw error;
    }
  }
}

function make_mask(ranges, offset, template) {
  var svg = `<svg width="${template.image_width}" height="${template.image_height}">`;
  for (var range of ranges) {
    svg += `<rect x="${range.x}" y="${range.y + offset}" width="${range.width}" height="${range.height}" />`
  }
  svg += `</svg>`;
  return Buffer.from(svg);
}

function parse_paragraph(annotation) {
  if (!annotation || !annotation.pages || annotation.pages.length < 1)
    return [];

  var result = [];
  var blocks = annotation.pages[0].blocks;
  for (var block of blocks) {
    for (var para of block.paragraphs) {
      var str = "";
      var min_x = Number.MAX_SAFE_INTEGER, max_x = -1, min_y = Number.MAX_SAFE_INTEGER, max_y = -1;
      for (var word of para.words) {
        for (var symbol of word.symbols) {
          str += symbol.text;
          for (var vertices of symbol.boundingBox.vertices) {
            if (vertices.x < min_x) min_x = vertices.x;
            if (vertices.x > max_x) max_x = vertices.x;
            if (vertices.y < min_y) min_y = vertices.y;
            if (vertices.y > max_y) max_y = vertices.y;
          }
        }
      }
      if (str != "")
        result.push({ str, min_x, min_y, max_x, max_y });
    }
  }

  return result;
}

module.exports = new TextDetection();
Google Cloud Vision APIの呼び出しには、課金の有効化とAPIの有効化をし、さらにサービスアカウントのクレデンシャルの作成が必要です。環境変数または.envファイルに以下の記載が必要です。
GOOGLE_APPLICATION_CREDENTIALS="【Google Cloud Vision APIのクレデンシャルファイル】"
詳細は以下を参照してください。
https://cloud.google.com/vision/docs/setup?hl=ja
以下のnpmモジュールを使っています。
@google-cloud/vision
lovell/sharp
ちなみに、文字認識は、ロゴっぽいアルファベット(芝のランクなど)はうまく検出できませんでした。
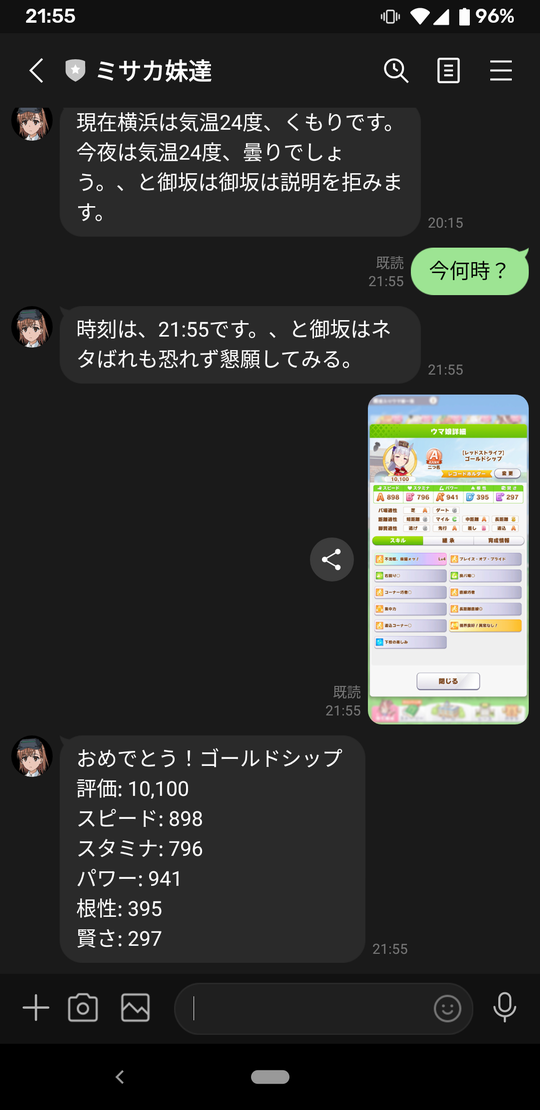
投稿の様子
LINEアプリから投稿するとこんな感じです。
その他
LINEメッセージとして、画像ではなくメッセージを受信したら、OK Googleと同様の応答を返すようにしています。
「googleassistant.js」に実装をまとめてあります。
おまけで、美琴妹の語尾もくっつけています。以下、ご参考まで。
以上