Ricty Diminishedを取得する
方法1.サイトからダウンロードする
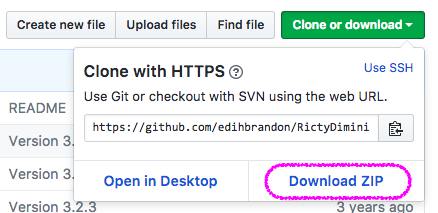
Ricty Diminishedのサイトからフォントをダウンロードして解凍する。
方法2.(Macのみ)Homebrewを使う
HomebrewでRicty Diminishedをインストールする方法 - Qiita
方法3.git cloneを使う
# 単純にcloneする
$ git clone https://github.com/edihbrandon/RictyDiminished.git
Cloning into 'RictyDiminished'...
remote: Enumerating objects: 25, done.
remote: Total 25 (delta 0), reused 0 (delta 0), pack-reused 25
Unpacking objects: 100% (25/25), done.

# RictyDiminished配下にフォントファイルを取得できる
$ find RictyDiminished/ -type f -maxdepth 1
RictyDiminished/.uuid
RictyDiminished/README.md
RictyDiminished/RictyDiminished-Bold.ttf
RictyDiminished/RictyDiminished-BoldOblique.ttf
RictyDiminished/RictyDiminished-Oblique.ttf
RictyDiminished/RictyDiminished-Regular.ttf
RictyDiminished/RictyDiminishedDiscord-Bold.ttf
RictyDiminished/RictyDiminishedDiscord-BoldOblique.ttf
RictyDiminished/RictyDiminishedDiscord-Oblique.ttf
RictyDiminished/RictyDiminishedDiscord-Regular.ttf
〇〇に設定する
まずはOSに設定する
CentOS
- 環境 : CentOS Linux release 7.6.1810 (Core)
- 参考 : CentOS/Ubuntuでフォントを追加する方法 | 俺的備忘録 〜なんかいろいろ〜
# (なかったら)フォントを格納するディレクトリを作る
$ mkdir ~/.fonts
# フォントを格納するディレクトリへ入れる
$ mv RictyDiminished*.ttf ~/.fonts/.
$ cd ~/.fonts/

# 処理中のフォントディレクトリを表示(-v)しながら全て(-f)のフォントキャッシュを更新(fc-cache)する
$ fc-cache -fv
/usr/share/fonts: caching, new cache contents: 0 fonts, 8 dirs
/usr/share/fonts/abattis-cantarell: caching, new cache contents: 4 fonts, 0 dirs
/usr/share/fonts/dejavu: caching, new cache contents: 21 fonts, 0 dirs
/usr/share/fonts/google-crosextra-caladea: caching, new cache contents: 4 fonts, 0 dirs
/usr/share/fonts/google-crosextra-carlito: caching, new cache contents: 4 fonts, 0 dirs
/usr/share/fonts/google-noto-emoji: caching, new cache contents: 1 fonts, 0 dirs
/usr/share/fonts/ipa-gothic: caching, new cache contents: 1 fonts, 0 dirs
/usr/share/fonts/liberation: caching, new cache contents: 16 fonts, 0 dirs
/usr/share/fonts/opensymbol: caching, new cache contents: 1 fonts, 0 dirs
/usr/share/X11/fonts/Type1: caching, new cache contents: 13 fonts, 0 dirs
/usr/share/X11/fonts/TTF: skipping, no such directory
/usr/local/share/fonts: skipping, no such directory
/home/ponsuke/.local/share/fonts: skipping, no such directory
/home/ponsuke/.fonts: caching, new cache contents: 8 fonts, 0 dirs
# 省略
/usr/bin/fc-cache-64: succeeded
Mac
- 環境 : macOS Mojave バージョン10.14.5
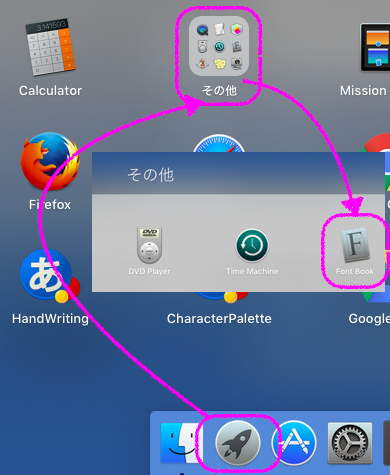
- Font Book を起動する。
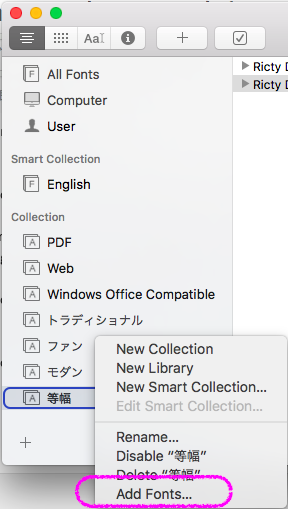
- 任意のCollectionで右クリック > [Add Fonts...]
- 解凍したフォルダを選択する
- 終わり

Windows10
- 環境 : Windows10 64bit
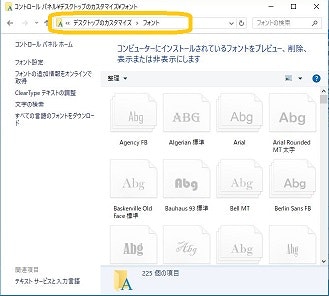
- エクスプローラを起動する
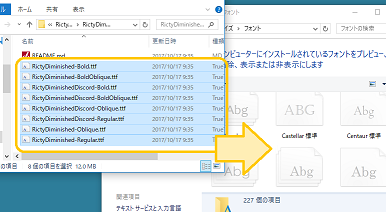
- パスの部分に
コントロール パネル\デスクトップのカスタマイズ\フォントを張り付ける - ダウンロードしたフォント(
README.md以外)をドラッグアンドドロップする
アプリに設定する
xfc4-terminal(CentOSで使っているターミナル)
- 環境 : xfc4-terminal 0.8.7.4
- 設定イメージ画像 - Qiita
- [Edit] > [Preferences...] > [Appearance]タブ
- [Use System font]にチェックが入っていたら外す
- [Use System font]の横でRicty Dimished系のフォントを選択
SublimeText3
- 環境 : Sublime Text Version 3.2.1
- [Sublime Text] > [Preference] > [Setting]で設定ファイルを開く
- [User]側に
"font_face": "Ricty Diminished",を追記する - 保存して終わり
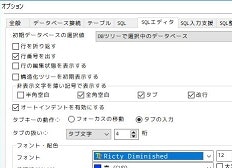
A5:SQL Mk-2

1. メニューバーの[設定] > [全般]タブ > [フォント]と[グリッドフォント] > 「Ricty Diminished」を選択する
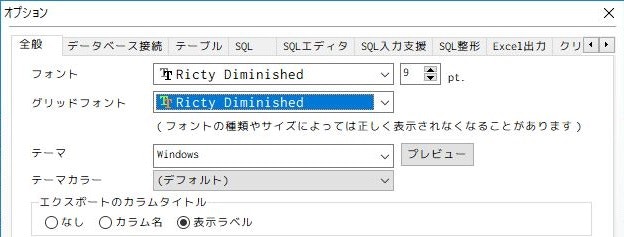
2. [SQLエディタ]タブ > [フォント] > 「Ricty Diminished」を選択する > [OK]
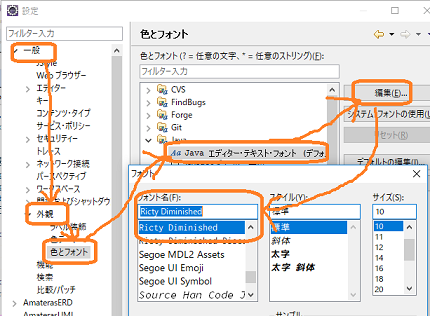
Eclipse
- Eclipse Kepler Service Release2(Windows)
- 設定ダイアログ(F10) > [一般] > [外観] > [色とフォント] > [Java エディター・テキスト・フォント] > [編集]ボタン
- 「Ricty Diminished」を選択する > [OK]
- Eclipse Version: 1.2.2.20100217-2310(CentOS7)
- [Window] > [Preferences] > [General] > [Appearance] > [Colors and Fonts] > 設定したいもの > [Edit]ボタン
- 「Ricty Diminished」を選択する > [OK]
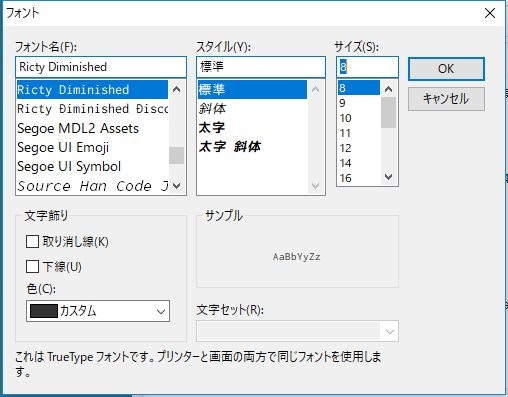
Evernote
環境
- [フォーマット] > [フォント]
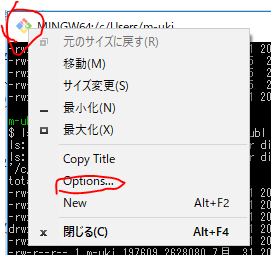
Git Bash
- ウィンドウの左上端あたりを右クリック > [Options...]でダイアログを表示
- [Text] > [Font] > [Select]ボタンでダイアログを表示
- [フォント名]で「Ricty Diminished」を選択する > [OK]
Visual Studio
- 環境 : Visual Studio Community 2017
- [ツール] > [オプション] > [環境] > [フォントおよび色]
- [フォント]で「Ricty Diminished」を選択する > [OK]