Tensorflowのバージョンを上げようとしたら、GPUの導入方法が結構変わっていたのでまとめました。
- 本記事のversion
- windows11
- Python3.11
- Tensorflow2.12.0
- GeForce RTX 3060
・追記
- 2019年: Windows10 + TF2.0.0 + GPU の環境
- 2022年: Windows11 + TF2.10(tensorflow-gpu) + GPU の環境
- 2023年: ここ
- 2025年: Windows11 + GPU + TensorFlowとPyTorch の環境
TensorFlow2.11から tensorflow-gpu がなくなった
いつもGPUは tensorflow-gpu でインストールしていたのですが、どうやらそれがなくなったらしい。
参考:TensorFlow2.11からはWindows用のGPU対応ビルドがpipで配布されないらしい
じゃあどうやって入れるかというと参考ブログでは以下3つが紹介されていました。
-
pip install tensorflow-gpu==2.10.0で過去のversionを使う - WSL2経由で使う(公式推奨方式)
-
pip install tensorflow後にpip install tensorflow-directmi-pluginをする
3はまだ開発途中なプロジェクトのことで今回は触れません。(試していません)
2の方法でインストールしてみます。
1. WSLの準備
以下を参考に進めました。
・WSL2 のインストール,WSL2 上への Ubuntu のインストールと利用(Windows 11 対応の記事)
・WSL を使用して Windows に Linux をインストールする (Microsoft)
1-1. Hyper-V の有効化
- スタートメニューから「Windowsの機能の有効化または無効化」を検索して開きます
- 以下を選択し、有効化(再起動が必要)
- 「Hyper-V」
- 「Linux 用 Windows サブシステム」
- 「仮想マシンプラットフォーム」
- ※「Linux 用 Windows サブシステム」がないというときは「Windows Subsystem for Linux」にチェックらしい
1-2. Ubuntuのインストール
1 コマンドプロンプト(またはPowerShell)を管理者で実行
2 現在インストールされているディストリビューション一覧を取得
C:\Users\poco> wsl -l -v
  NAME                   STATE           VERSION
* docker-desktop-data    Running         2
  docker-desktop         Running         2
既にDockerが入っていました。
3 インストールするディストリビューション一覧を確認する
C:\Users\poco> wsl --list --online
インストールできる有効なディストリビューションの一覧を次に示します。
'wsl --install -d <Distro>' を使用してインストールします。

NAME                                   FRIENDLY NAME
Ubuntu                                 Ubuntu
Debian                                 Debian GNU/Linux
kali-linux                             Kali Linux Rolling
Ubuntu-18.04                           Ubuntu 18.04 LTS
Ubuntu-20.04                           Ubuntu 20.04 LTS
Ubuntu-22.04                           Ubuntu 22.04 LTS
OracleLinux_8_5                        Oracle Linux 8.5
OracleLinux_7_9                        Oracle Linux 7.9
SUSE-Linux-Enterprise-Server-15-SP4    SUSE Linux Enterprise Server 15 SP4
openSUSE-Leap-15.4                     openSUSE Leap 15.4
openSUSE-Tumbleweed                    openSUSE Tumbleweed
4 インストール
C:\Users\poco> wsl --install -d Ubuntu-22.04
インストール中: Ubuntu 22.04 LTS
[                           0.0%                           ]
結構時間がかかりました。(OSインストールするぐらい?)(ずっと0.0%のままだったり…)
5 Ubuntuの初期設定
初回起動時のみユーザ名とパスワードを設定する必要があるようです。
(ログ取り忘れました…)
このパスワードはsudoコマンド使用時に必要になります。
6 インストール後のWSLのバージョン確認
C:\Users\poco> wsl --list -v
  NAME                   STATE           VERSION
* docker-desktop-data    Running         2
  Ubuntu-22.04           Stopped         2
  docker-desktop         Running         2
Versionは2でした。1の場合は以下で2にする必要があるそうです。
> wsl --set-version Ubuntu-22.04 2
7 規定のディストリビューションの変更
リストで * がついてるのが規定で起動する Linux サブシステムです。
Ubuntuに変更します。
C:\Users\poco> wsl -s Ubuntu-22.04

C:\Users\poco> wsl -l -v
  NAME                   STATE           VERSION
* Ubuntu-22.04           Running         2
  docker-desktop-data    Running         2
  docker-desktop         Running         2
1-3. WSLの基本的な使い方
WSLは素人なので基本的な使い方を見てみました。
1 linuxコマンドを実行する(規定の Linux サブシステム)
wsl コマンド で実行できるようです。
また、コマンドを実行時にWSLが止まっていた場合は自動で起動するようです。
C:\Users\poco> wsl pwd
/mnt/c/Users/poco

C:\Users\poco> wsl -l -v
  NAME                   STATE           VERSION
* Ubuntu-22.04           Running         2
  docker-desktop-data    Running         2
  docker-desktop         Running         2
2 WSLの終了方法
-t オプションで止めれるようです。
また、--shutdown ですべて止まるとの事。
C:\Users\poco>wsl -t Ubuntu-22.04

C:\Users\poco>wsl -l -v
  NAME                   STATE           VERSION
* Ubuntu-22.04           Stopped         2
  docker-desktop-data    Running         2
  docker-desktop         Running         2
3 ターミナルへの入り方
wsl をそのまま押せば中に入れます。
C:\Users\poco> wsl
To run a command as administrator (user "root"), use "sudo <command>".
See "man sudo_root" for details.

user@HOSTNAME:/mnt/c/Users/poco$
user@HOSTNAME:/mnt/c/Users/poco$
user@HOSTNAME:/mnt/c/Users/poco$ exit
logout

C:\Users\poco>
2. WSL上でGPUを使う方法
参考
・WindowsのWSL上でGPUのTensorFlow環境構築 (鷹の目週末プログラマー)
・CUDA on WSL User Guide (NVIDIA)
2-1. NVIDIA ドライバの更新
ドライバを以下からインストールし、最新にしておきます。(要再起動)
https://www.nvidia.co.jp/Download/index.aspx?lang=jp
2-2. Ubuntuの更新
一応更新しておきます。
> wsl --update
インストール中: Linux 用 Windows サブシステム
[                           0.0%                           ]
これも時間がかかったり…(0.0%から変化しません)
インストールした直後なら不要かもしれません。
> wsl --update
インストール中: Linux 用 Windows サブシステム
Linux 用 Windows サブシステム はインストールされました。
2-3. UbuntuにGPUをセットアップ
CUDAのインストール
NVIDIAのサポートページに従って入れていきます。
> wsl
$ sudo apt-key del 7fa2af80
以下サイトよりCUDAをインストールします。
https://developer.nvidia.com/cuda-toolkit-archive
バージョンですが、この記事作成時は最新の 12.1.0 を入れたらTensorflowが認識しませんでした。
(多分まだ12台のバージョンにTensorflowが対応していない?)
なので、11.8.0 を入れました。
選択は以下です。
- Operating System: Linux
- Architecture : x86_64
- Distribution : WSL-Ubuntu
- Version : 2.0
- Install Type : deb(local)
するとインストールコマンドが表示されるのでそれ通りに入力します。
$ wget https://developer.download.nvidia.com/compute/cuda/repos/wsl-ubuntu/x86_64/cuda-wsl-ubuntu.pin
$ sudo mv cuda-wsl-ubuntu.pin /etc/apt/preferences.d/cuda-repository-pin-600
$ wget https://developer.download.nvidia.com/compute/cuda/11.8.0/local_installers/cuda-repo-wsl-ubuntu-11-8-local_11.8.0-1_amd64.deb
$ sudo dpkg -i cuda-repo-wsl-ubuntu-11-8-local_11.8.0-1_amd64.deb
$ sudo cp /var/cuda-repo-wsl-ubuntu-11-8-local/cuda-*-keyring.gpg /usr/share/keyrings/
$ sudo apt-get update
$ sudo apt-get -y install cuda
確認は以下です。
$ /usr/local/cuda/bin/nvcc --version
nvcc: NVIDIA (R) Cuda compiler driver
Copyright (c) 2005-2022 NVIDIA Corporation
Built on Wed_Sep_21_10:33:58_PDT_2022
Cuda compilation tools, release 11.8, V11.8.89
Build cuda_11.8.r11.8/compiler.31833905_0
cuDNN のインストール
NVIDIA Deep Learning cuDNN Documentation 参考にしています。
まずはzlibが必要との事なので入れておきます。(多分すでに入っています)
sudo apt install zlib1g
cuDNNはWebページからダウンロードする必要があるようです。
DLページは以下です。(無料ですが、要登録)
https://developer.nvidia.com/rdp/cudnn-download
Download cuDNN v8.8.1 (March 8th, 2023), for CUDA 11.xLocal Installer for Ubuntu22.04 x86_64 (Deb)
を選択しました。
ダウンロードができたら以下でインストールします。(WSL内からもwindows側のフォルダにアクセスできます)
sudo dpkg -i /mnt/c/Users/user/Downloads/cudnn-local-repo-ubuntu2204-8.8.1.3_1.0-1_amd64.deb
sudo cp /var/cudnn-local-repo-*/cudnn-local-*-keyring.gpg /usr/share/keyrings/
sudo apt update
sudo apt -y install libcudnn8 libcudnn8-dev libcudnn8-samples
確認は以下です。
cp -r /usr/src/cudnn_samples_v8/ ~/
cd ~/cudnn_samples_v8/mnistCUDNN/
make clean && make
./mnistCUDNN
ただ、makeを実行したところ以下エラーが出ました。
$ make clean && make
rm -rf *o
rm -rf mnistCUDNN
CUDA_VERSION is 11080
Linking agains cublasLt = true
CUDA VERSION: 11080
TARGET ARCH: x86_64
HOST_ARCH: x86_64
TARGET OS: linux
SMS: 35 50 53 60 61 62 70 72 75 80 86 87 90
test.c:1:10: fatal error: FreeImage.h: No such file or directory
    1 | #include "FreeImage.h"
      |          ^~~~~~~~~~~~~
compilation terminated.
>>> WARNING - FreeImage is not set up correctly. Please ensure FreeImage is set up correctly. <<<
[@] /usr/local/cuda/bin/nvcc -I/usr/local/cuda/include -I/usr/local/cuda/include -IFreeImage/include -ccbin g++ -m64 -gencode arch=compute_35,code=sm_35 -gencode arch=compute_50,code=sm_50 -gencode arch=compute_53,code=sm_53 -gencode arch=compute_60,code=sm_60 -gencode arch=compute_61,code=sm_61 -gencode arch=compute_62,code=sm_62 -gencode arch=compute_70,code=sm_70 -gencode arch=compute_72,code=sm_72 -gencode arch=compute_75,code=sm_75 -gencode arch=compute_80,code=sm_80 -gencode arch=compute_86,code=sm_86 -gencode arch=compute_87,code=sm_87 -gencode arch=compute_90,code=sm_90 -gencode arch=compute_90,code=compute_90 -o fp16_dev.o -c fp16_dev.cu
[@] g++ -I/usr/local/cuda/include -I/usr/local/cuda/include -IFreeImage/include -o fp16_emu.o -c fp16_emu.cpp
[@] g++ -I/usr/local/cuda/include -I/usr/local/cuda/include -IFreeImage/include -o mnistCUDNN.o -c mnistCUDNN.cpp
[@] /usr/local/cuda/bin/nvcc -ccbin g++ -m64 -gencode arch=compute_35,code=sm_35 -gencode arch=compute_50,code=sm_50 -gencode arch=compute_53,code=sm_53 -gencode arch=compute_60,code=sm_60 -gencode arch=compute_61,code=sm_61 -gencode arch=compute_62,code=sm_62 -gencode arch=compute_70,code=sm_70 -gencode arch=compute_72,code=sm_72 -gencode arch=compute_75,code=sm_75 -gencode arch=compute_80,code=sm_80 -gencode arch=compute_86,code=sm_86 -gencode arch=compute_87,code=sm_87 -gencode arch=compute_90,code=sm_90 -gencode arch=compute_90,code=compute_90 -o mnistCUDNN fp16_dev.o fp16_emu.o mnistCUDNN.o -I/usr/local/cuda/include -I/usr/local/cuda/include -IFreeImage/include -L/usr/local/cuda/lib64 -L/usr/local/cuda/lib64 -L/usr/local/cuda/lib64 -lcublasLt -LFreeImage/lib/linux/x86_64 -LFreeImage/lib/linux -lcudart -lcublas -lcudnn -lfreeimage -lstdc++ -lm
以下で無事にmakeが通りました。
$ sudo apt -y install libfreeimage3 libfreeimage-dev
$ make
$ ./mnistCUDNN
Executing: mnistCUDNN
cudnnGetVersion() : 8801 , CUDNN_VERSION from cudnn.h : 8801 (8.8.1)
Host compiler version : GCC 11.3.0

There are 1 CUDA capable devices on your machine :
device 0 : sms 28  Capabilities 8.6, SmClock 1807.0 Mhz, MemSize (Mb) 12287, MemClock 7501.0 Mhz, Ecc=0, boardGroupID=0
Using device 0

(略)

Test passed!
nvidia-smi の結果は以下です。
$ nvidia-smi
+---------------------------------------------------------------------------------------+
| NVIDIA-SMI 530.41.03              Driver Version: 531.41       CUDA Version: 12.1     |
|-----------------------------------------+----------------------+----------------------+
| GPU  Name                  Persistence-M| Bus-Id        Disp.A | Volatile Uncorr. ECC |
| Fan  Temp  Perf            Pwr:Usage/Cap|         Memory-Usage | GPU-Util  Compute M. |
|                                         |                      |               MIG M. |
|=========================================+======================+======================|
|   0  NVIDIA GeForce RTX 3060         On | 00000000:01:00.0  On |                  N/A |
|  0%   41C    P8               13W / 170W|   1815MiB / 12288MiB |      3%      Default |
|                                         |                      |                  N/A |
+-----------------------------------------+----------------------+----------------------+

+---------------------------------------------------------------------------------------+
| Processes:                                                                            |
|  GPU   GI   CI        PID   Type   Process name                            GPU Memory |
|        ID   ID                                                             Usage      |
|=======================================================================================|
|    0   N/A  N/A        26      G   /Xwayland                                 N/A      |
+---------------------------------------------------------------------------------------+
2-4. pythonのインストール
初期状態では3.10.6が入っていました。
$ python
Command 'python' not found, did you mean:
  command 'python3' from deb python3
  command 'python' from deb python-is-python3
$ python3 -V
Python 3.10.6
方針ですが、python の version は alternatives で切り替えて、環境は venv で管理したいと思います。
※作った後に思いましたが、venvで直接環境を作るのでalternativesは不要です。
参考:Ubuntu 22.04にPython3.xを複数インストールして切り替える方法(PPA・apt)
まずはインストール可能なバージョンを見てみます。(リポジトリは特に追加しなくても見れました)
$ sudo apt list python3.*
Listing... Done
python3.10-dbg/jammy-updates,jammy-security 3.10.6-1~22.04.2ubuntu1 amd64
python3.10-dev/jammy-updates,jammy-security,now 3.10.6-1~22.04.2ubuntu1 amd64 [installed,automatic]
python3.10-doc/jammy-updates,jammy-security 3.10.6-1~22.04.2ubuntu1 all
python3.10-examples/jammy-updates,jammy-security 3.10.6-1~22.04.2ubuntu1 all
python3.10-full/jammy-updates,jammy-security 3.10.6-1~22.04.2ubuntu1 amd64
python3.10-minimal/jammy-updates,jammy-security,now 3.10.6-1~22.04.2ubuntu1 amd64 [installed,automatic]
python3.10-nopie/jammy-updates,jammy-security 3.10.6-1~22.04.2ubuntu1 amd64
python3.10-venv/jammy-updates,jammy-security 3.10.6-1~22.04.2ubuntu1 amd64
python3.10/jammy-updates,jammy-security,now 3.10.6-1~22.04.2ubuntu1 amd64 [installed,automatic]
python3.11-dbg/jammy-updates 3.11.0~rc1-1~22.04 amd64
python3.11-dev/jammy-updates 3.11.0~rc1-1~22.04 amd64
python3.11-doc/jammy-updates 3.11.0~rc1-1~22.04 all
python3.11-examples/jammy-updates 3.11.0~rc1-1~22.04 all
python3.11-full/jammy-updates 3.11.0~rc1-1~22.04 amd64
python3.11-minimal/jammy-updates 3.11.0~rc1-1~22.04 amd64
python3.11-nopie/jammy-updates 3.11.0~rc1-1~22.04 amd64
python3.11-venv/jammy-updates 3.11.0~rc1-1~22.04 amd64
python3.11/jammy-updates 3.11.0~rc1-1~22.04 amd64
必要なパッケージをインストールします。(pipも入っていないのでついでに入れておきます)
Python3.11を入れる例は以下です。
sudo apt install -y python3-pip
sudo apt install -y python3.10-venv
sudo apt install -y python3.11 python3.11-venv
alternatives で python のバージョン管理(オプション)
まずは各バージョンを登録していきます。
$ which python3.10
/usr/bin/python3.10
$ which python3.11
/usr/bin/python3.11
$ sudo update-alternatives --install /usr/bin/python python /usr/bin/python3.11 120
$ sudo update-alternatives --install /usr/bin/python python /usr/bin/python3.10 110
確認は以下です。
$ sudo update-alternatives --config python
There are 2 choices for the alternative python (providing /usr/bin/python).

  Selection    Path                 Priority   Status
------------------------------------------------------------
* 0            /usr/bin/python3.11   120       auto mode
  1            /usr/bin/python3.10   110       manual mode
  2            /usr/bin/python3.11   120       manual mode

Press <enter> to keep the current choice[*], or type selection number:
コマンドからも更新されていることが確認できます。
$ python -V
Python 3.11.0rc1
venv で python の環境作成
今回は3.11環境と3.10環境を作成してみます。
まずはvenvを置くディレクトリを作成します。
mkdir ~/venv
cd ~/venv
venvで専用環境を作成します。
$ python3.11 -m venv py311
$ python3.10 -m venv py310
$ ls
py310  py311
環境の出入りは以下です。
$ source ~/venv/py311/bin/activate
(py311) $ pip -V
pip 22.0.2 from /home/user/venv/py311/lib/python3.11/site-packages/pip (python 3.11)
(py311) $ python -V
Python 3.11.0rc1
(py311) $ deactivate
$
2-5. Tensorflowのインストール
環境に入りpipをするだけです。
$ source ~/venv/py311/bin/activate
(py311) $ pip install tensorflow
(py311) $ pip list | grep tensorflow
tensorflow                   2.12.0
tensorflow-estimator         2.12.0
tensorflow-io-gcs-filesystem 0.32.0
2.12.0 が入りました。
TensorflowがGPUを認識しているか確認します。
(py311) $ python -c "from tensorflow.python.client import device_lib; print(device_lib.list_local_devices())"

(略)

[name: "/device:CPU:0"
device_type: "CPU"
memory_limit: 268435456
locality {
}
incarnation: 1318579492501158653
xla_global_id: -1
, name: "/device:GPU:0"
device_type: "GPU"
memory_limit: 9970909184
locality {
  bus_id: 1
  links {
  }
}
incarnation: 15236567976728881023
physical_device_desc: "device: 0, name: NVIDIA GeForce RTX 3060, pci bus id: 0000:01:00.0, compute capability: 8.6"
xla_global_id: 416903419
]
name: "/device:GPU:0" があればGPUを認識しています。
3. VSCodeとの連携
VSCodeからWSLにリモートアクセスし、その上で作業する形で連携させる方式を取ります。
(直接WSL内のvenvをインタープリタに指定できるのが理想でしたがそういう方法はなさそう?でした)
3-1. 拡張機能WSLの追加
WSLにリモートアクセスするための拡張機能をインストールします。
VSCode上の左メニューの拡張機能から、WSL を追加します。
3-2. WSLへのリモートアクセス
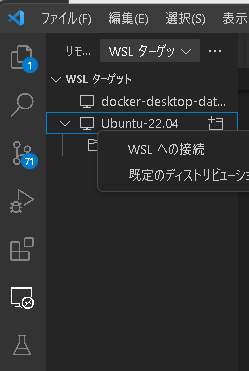
VSCode上の左メニューのリモートエクスプローラーから以下を実行します。
- WSL ターゲットをプルダウンで選択
-
Ubuntu-22.04を右クリック - WSLへの接続
新しいウィンドウが開くので、フォルダを開く から作業ディレクトリを開きます。
Windows側のディレクトリは /mnt/ 配下にマウントされているのでそこから選択できます。
3-3. 各種拡張機能のインストール
新しいウィンドウで開かれたVSCode(WSL側)はWindows側とは管理が別なようで、各種拡張機能も別途インストールする必要があります。
3-4. venvとVSCodeの紐づけ
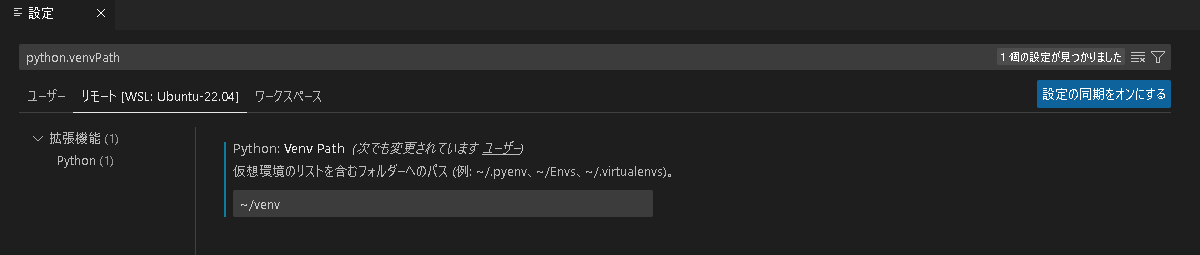
WSL側のVSCode上で ファイル → ユーザー設定 → 設定 を選択し、タブから リモート[WSL: Ubuntu-22.04] を選択します。
その後、検索欄で python.venvPath をいれて ~/venv を設定します。
(~/venv は上で作成したWSL内のvenvのパスです)
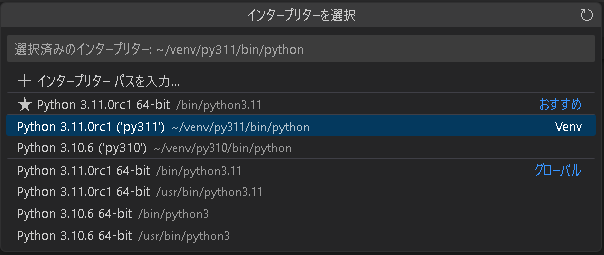
設定したらVSCodeを再起動して適当な py ファイルを開きます。
右下から venv で作成したインタープリターが見えていれば紐づけは成功です。
4. sampleプログラム
動作確認用にMNISTのサンプルプログラムを置いておきます。
(参考: Python3の環境でTensorflowのサンプルを動かす(Qiita))
import tensorflow as tf

mnist = tf.keras.datasets.mnist
(x_train, y_train), (x_test, y_test) = mnist.load_data()
x_train, x_test = x_train / 255.0, x_test / 255.0

model = tf.keras.models.Sequential(
    [
        tf.keras.layers.Flatten(),
        tf.keras.layers.Dense(512, activation=tf.nn.relu),
        tf.keras.layers.Dropout(0.2),
        tf.keras.layers.Dense(10, activation=tf.nn.softmax),
    ]
)
model.compile(optimizer="adam", loss="sparse_categorical_crossentropy", metrics=["accuracy"])

model.fit(x_train, y_train, epochs=5)
model.evaluate(x_test, y_test)
おわりに
CUDAのバージョンに少し手間取りましたが結構すんなりいけた印象です。
今後は公式ではwindowsはサポートされずにWSL経由になる流れなんでしょうかね。