Overview
In this article, we are going to cover on how we can divide the aws VPC into server zone and DMZ zone. Before diving deep, we will go through the basic understanding of VPC, Server zone, DMZ zone and AWS EC2.
what is VPC?
VPC (Virtual Private Cloud) is a service of Amazon Web Service that provide us a logically isolated sections of the AWS cloud where we can launch AWS resources in a virtual network that we define. VPC is also known as the networking layer for Amazon EC2. We can launch our Amazon EC2 instance into our VPC and configure it by modifying its IP address range, create subnets, configure route tables, network gateways and security settings.
what is server zone?
Server Zone is also known as public zone. It is a kind of network where the main server is hosted here. Any services that are going to be access through the internet will be placed here.
Example: Web Server, Mail Server and etc.
What is Amazon EC2?
AWS EC2 (Amazon Elastic Compute Cloud) is one of the Amazon Web Service that provides secure, resizable compute capacity in the cloud. It offer businesses the ability to run applications on the public cloud.
Concepts
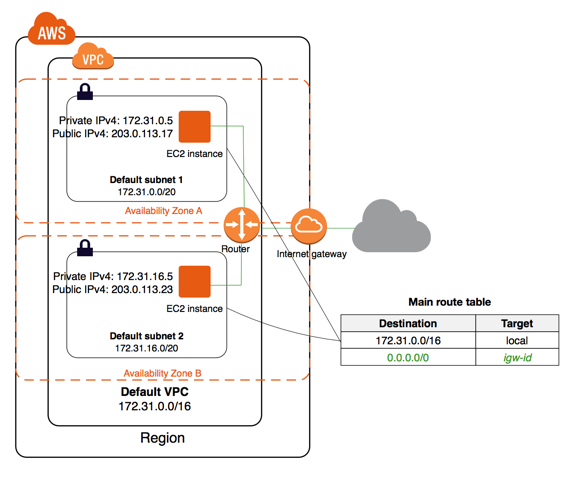
The main reason that we want to divide VPC into server zone and DMZ zone is that, if we want to run a public-facing web applications while maintaining back-end servers that are not publicly accessible.
The instances in the public subnet can send outbound traffic directly to the internet, whereas the instances in the private subnet cannot. Suppose we have a web server in a public subnet and a database server in private subnet, then the database servers can connect to the internet for software update using NAT gateway, but the internet cannot establish connections to the database servers.
- The diagram represent AWS VPC
- These are the steps to follow:
-
Create VPC
- Open the amazon VPC console at https://console.aws.amazon.com/vpc/
- In the navigation pane, choose VPC dashboard, and then choose Start VPC Wizard

- Choose the first option, VPC with a Single Public Subnet, and then choose Select
- On the configuration page, enter a name for your VPC in the VPC name field; for example, my-vpc, and enter a name for your subnet in the Subnet name field. This helps you to identify the VPC and subnet in the Amazon VPC console after you've created them. For this exercise, you can leave the rest of the configuration settings on the page, and choose Create VPC

-
Create Subnet
- We create two subnets for public zone and private zone
- Private zone
 Its IP range is /19. So it has 8000+ available IP address for private network.
 - Public zone
 Its IP address range is /20. Because the private network is using the all the IP address from range 172.21.0.0 till 172.21.31.255.
- Private zone
- We create two subnets for public zone and private zone
-
Create Internet Gateway
- In the navigation pane, choose Internet Gateway, and then choose Create Internet Gateway

- In the navigation pane, choose Internet Gateway, and then choose Create Internet Gateway
-
Create Public Route Table
- In the navigation pane, choose Route Table, and then choose Create Route Table

After creating the Route Table, we need to assign rules for them. In the configuration pane, navigate to Route Tab and click on Edit, after that click on Add another rule and add as following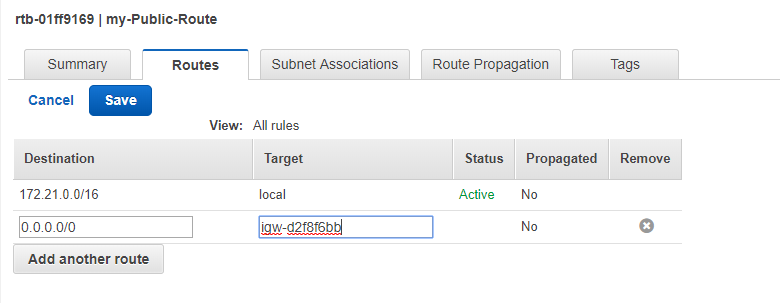
After that, we have to associate this route table with the server zone's subnet. By doing so, the server zone will become public.
- In the navigation pane, choose Route Table, and then choose Create Route Table
-
Create a NAT Gateway
- We create NAT gateway to enable the private network for accessing the internet connection.
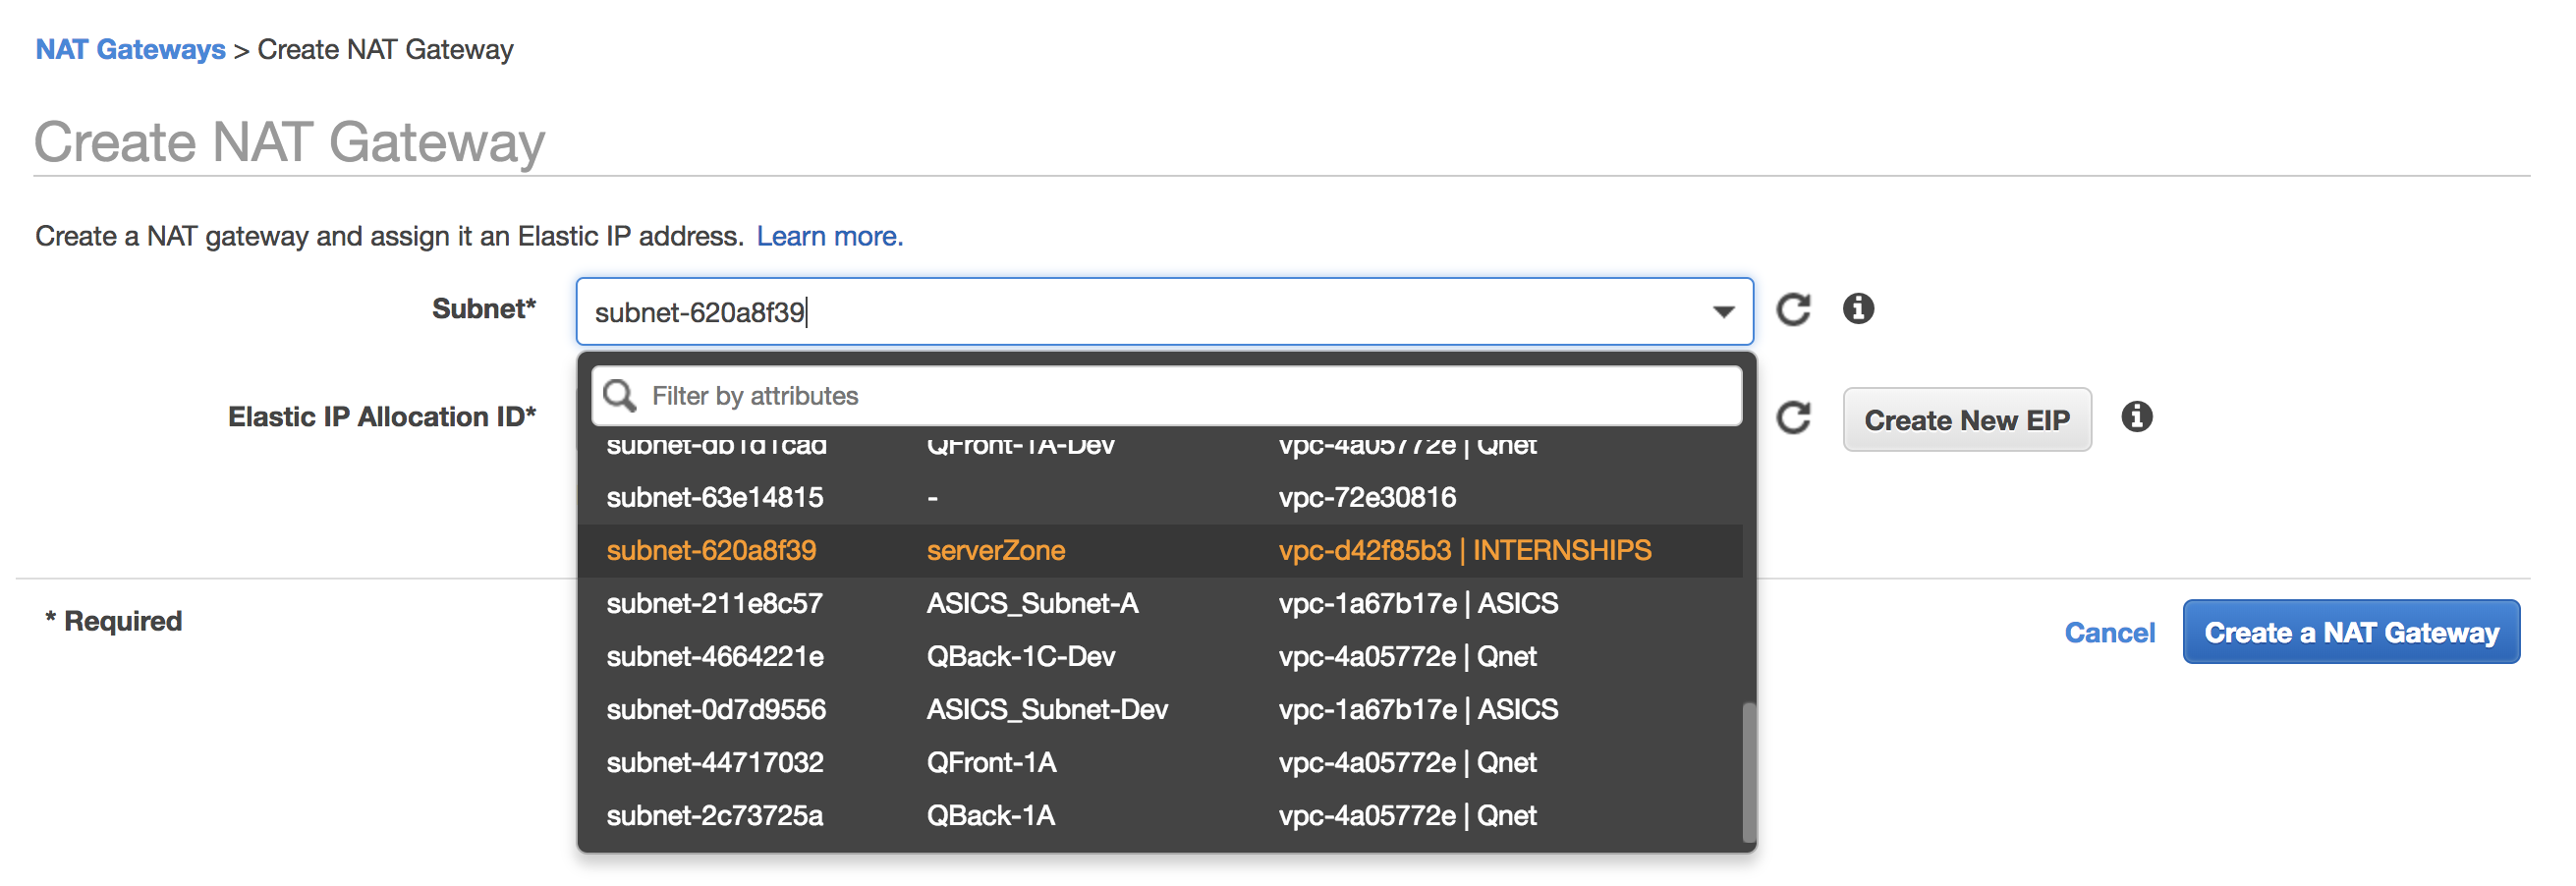
- We create NAT gateway to enable the private network for accessing the internet connection.
-
Create a private Route Table
- In the navigation pane, choose Route Table, and then choose Create Route Table

In the configuration tab assign rule to its and choose NAT that we just created above. After that associate with the private subnet.
- In the navigation pane, choose Route Table, and then choose Create Route Table
-
Reference AWS DOCS