
🧑💻 まえがき
■やること
- dart&flutterにて、必要最低限の実装内容で TODO アプリを作成
■やらないこと
- 画面遷移、ルーティング変更
- TODO の編集、削除、並び替え
- MVC モデル、MVVM モデル、BLoC パターン
- ライブラリの追加
- 永続化
- etc
■作業概要
- STEP1:お掃除
- 余分なコメントとコードの削除
- アプリタイトルとテーマカラーの変更
- STEP2:実装
- TODOの一覧を入れる変数の宣言
- TextField用のコントローラーを用意
- 背景色の変更
- bodyにColumnWidgetの設定
- TextFieldの設定
- RaisedButtonの設定
- ListViewの設定
- Listの見た目を調整
- STEP3:動作確認
■下記の症状に効能があります
- とりあえず最低限の実装で動く TODO アプリを作りたい
- よく使う widget と property を使ってみたい
■環境
- editer:VScode
- flutter:1.17.5
- Dart:2.8.4
■広告
codmonで働いてます。デザイナーさん&エンジニアさん積極採用中。
子育て環境をよりよくしたいかたwanted!
最近、モバイルアプリの採用もはじめました!
qiita見ました!っと言ってくれるとお祝い金がでるかも。
https://www.wantedly.com/projects/468828
■完成コード
import 'package:flutter/material.dart';
// アプリの起動
void main() {
runApp(MyApp());
}
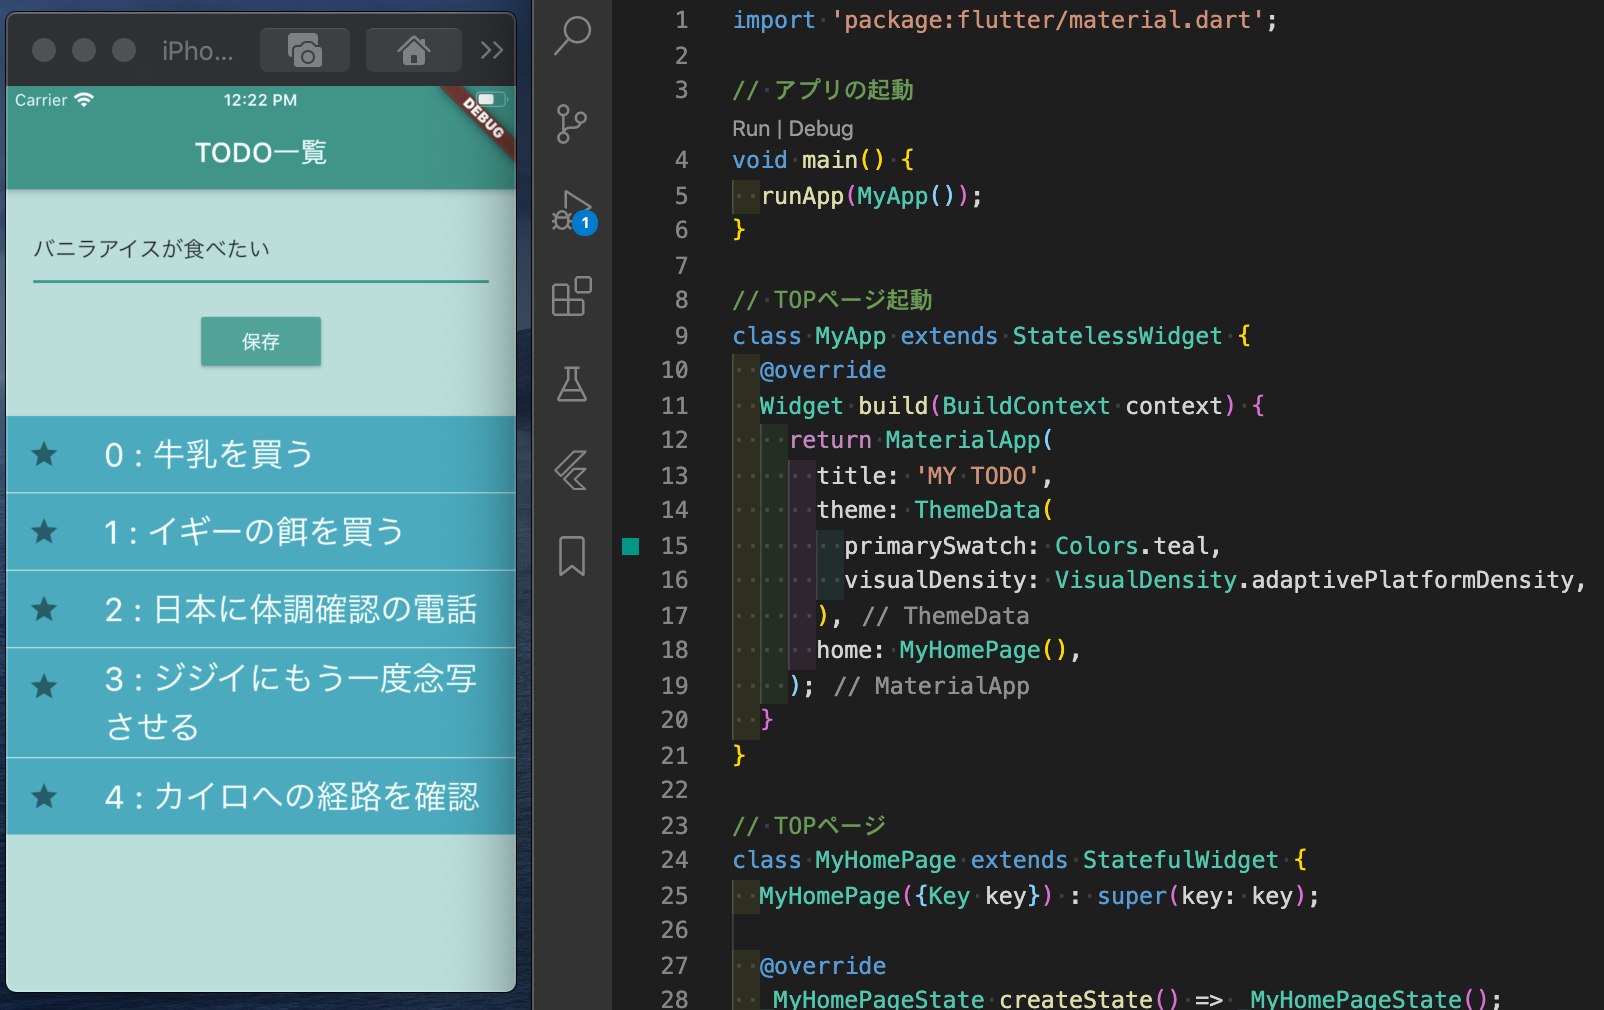
// TOPページ起動
class MyApp extends StatelessWidget {
@override
Widget build(BuildContext context) {
return MaterialApp(
title: 'MY TODO',
theme: ThemeData(
primarySwatch: Colors.teal,
visualDensity: VisualDensity.adaptivePlatformDensity,
),
home: MyHomePage(),
);
}
}
// TOPページ
class MyHomePage extends StatefulWidget {
MyHomePage({Key key}) : super(key: key);
@override
_MyHomePageState createState() => _MyHomePageState();
}
// TOPページのステータス管理
class _MyHomePageState extends State<MyHomePage> {
// todoの一覧リスト変数を用意
List<String> todoList = [];
// テキストフィールドのコントローラー設定
// コントローラーの宣言
TextEditingController _todoInputController;
// コントローラーの初期化
void initState() {
super.initState();
_todoInputController = TextEditingController();
}
// statefulオブジェクトが削除されるときに、参照を削除してくれる
void dispose() {
super.dispose();
_todoInputController.dispose();
}
@override
Widget build(BuildContext context) {
// scaffoldは画面構成の基本widget
return Scaffold(
// アプリ上部のコンテンツ設定
backgroundColor: Colors.teal[100],
appBar: AppBar(
title: Text("TODO一覧"),
),
// アプリのコンテンツ部分の設定
body: Column(
// column widgetにwidgetのセットを配列で渡す
children: <Widget>[
Padding(
padding: EdgeInsets.all(20.0),
child: TextField(
controller: _todoInputController,
decoration: InputDecoration(hintText: '入力してください'),
autofocus: true,
),
),
Padding(
padding:
EdgeInsets.only(top: 0.0, right: 0.0, bottom: 30.0, left: 0.0),
child: RaisedButton(
color: Colors.teal[400],
textColor: Colors.white,
child: Text('保存'),
onPressed: () {
// 変数の変化をリアルタイムに通知する
setState(
() {
// 何かしらの入力があるときだけ実行
if (_todoInputController.text.length > 0) {
// 配列に入力値を追加
todoList.add(_todoInputController.text);
// テキストボックスを初期化
_todoInputController.clear();
}
},
);
},
),
),
Expanded(
child: ListView.builder(
// リストの長さを計算
itemCount: todoList.length,
itemBuilder: (BuildContext context, int index) {
return Container(
padding: EdgeInsets.only(
top: 0.0, right: 0.0, bottom: 0.0, left: 0.0),
margin: EdgeInsets.only(
top: 1.0, right: 0.0, bottom: 0.0, left: 0.0),
color: Colors.cyan[600],
child: ListTile(
leading: Icon(Icons.star),
title: Text(
// リストに表示する文字列を設定
("$index : ${todoList[index]}"),
style: TextStyle(
fontFamily: 'OpenSans',
fontSize: 24,
color: Colors.white,
),
),
),
);
},
),
),
],
),
);
}
}
■事前準備はこちらを参照
- Flutter開発環境構築
- Flutterの新規プロジェクトの作成
🧹STEP1:お掃除
■余分なコメントとコードの削除
- 初期状態だと、コメントがたくさん入ってるので削除
- 今回の実装に関係ないところも削除
お掃除前
import 'package:flutter/material.dart';

void main() {
  runApp(MyApp());
}

class MyApp extends StatelessWidget {
  // This widget is the root of your application.
  @override
  Widget build(BuildContext context) {
    return MaterialApp(
      title: 'Flutter Demo',
      theme: ThemeData(
        // This is the theme of your application.
        //
        // Try running your application with "flutter run". You'll see the
        // application has a blue toolbar. Then, without quitting the app, try
        // changing the primarySwatch below to Colors.green and then invoke
        // "hot reload" (press "r" in the console where you ran "flutter run",
        // or simply save your changes to "hot reload" in a Flutter IDE).
        // Notice that the counter didn't reset back to zero; the application
        // is not restarted.
        primarySwatch: Colors.blue,
        // This makes the visual density adapt to the platform that you run
        // the app on. For desktop platforms, the controls will be smaller and
        // closer together (more dense) than on mobile platforms.
        visualDensity: VisualDensity.adaptivePlatformDensity,
      ),
      home: MyHomePage(title: 'Flutter Demo Home Page'),
    );
  }
}

class MyHomePage extends StatefulWidget {
  MyHomePage({Key key, this.title}) : super(key: key);

  // This widget is the home page of your application. It is stateful, meaning
  // that it has a State object (defined below) that contains fields that affect
  // how it looks.

  // This class is the configuration for the state. It holds the values (in this
  // case the title) provided by the parent (in this case the App widget) and
  // used by the build method of the State. Fields in a Widget subclass are
  // always marked "final".

  final String title;

  @override
  _MyHomePageState createState() => _MyHomePageState();
}

class _MyHomePageState extends State<MyHomePage> {
  int _counter = 0;

  void _incrementCounter() {
    setState(() {
      // This call to setState tells the Flutter framework that something has
      // changed in this State, which causes it to rerun the build method below
      // so that the display can reflect the updated values. If we changed
      // _counter without calling setState(), then the build method would not be
      // called again, and so nothing would appear to happen.
      _counter++;
    });
  }

  @override
  Widget build(BuildContext context) {
    // This method is rerun every time setState is called, for instance as done
    // by the _incrementCounter method above.
    //
    // The Flutter framework has been optimized to make rerunning build methods
    // fast, so that you can just rebuild anything that needs updating rather
    // than having to individually change instances of widgets.
    return Scaffold(
      appBar: AppBar(
        // Here we take the value from the MyHomePage object that was created by
        // the App.build method, and use it to set our appbar title.
        title: Text(widget.title),
      ),
      body: Center(
        // Center is a layout widget. It takes a single child and positions it
        // in the middle of the parent.
        child: Column(
          // Column is also a layout widget. It takes a list of children and
          // arranges them vertically. By default, it sizes itself to fit its
          // children horizontally, and tries to be as tall as its parent.
          //
          // Invoke "debug painting" (press "p" in the console, choose the
          // "Toggle Debug Paint" action from the Flutter Inspector in Android
          // Studio, or the "Toggle Debug Paint" command in Visual Studio Code)
          // to see the wireframe for each widget.
          //
          // Column has various properties to control how it sizes itself and
          // how it positions its children. Here we use mainAxisAlignment to
          // center the children vertically; the main axis here is the vertical
          // axis because Columns are vertical (the cross axis would be
          // horizontal).
          mainAxisAlignment: MainAxisAlignment.center,
          children: <Widget>[
            Text(
              'You have pushed the button this many times:',
            ),
            Text(
              '$_counter',
              style: Theme.of(context).textTheme.headline4,
            ),
          ],
        ),
      ),
      floatingActionButton: FloatingActionButton(
        onPressed: _incrementCounter,
        tooltip: 'Increment',
        child: Icon(Icons.add),
      ), // This trailing comma makes auto-formatting nicer for build methods.
    );
  }
}
上記から下記の内容をお掃除
- 既存コメントを削除
- floatingActionButtonのwidgetと関連ロジック部分を削除
- ページタイトルの設定部分を削除
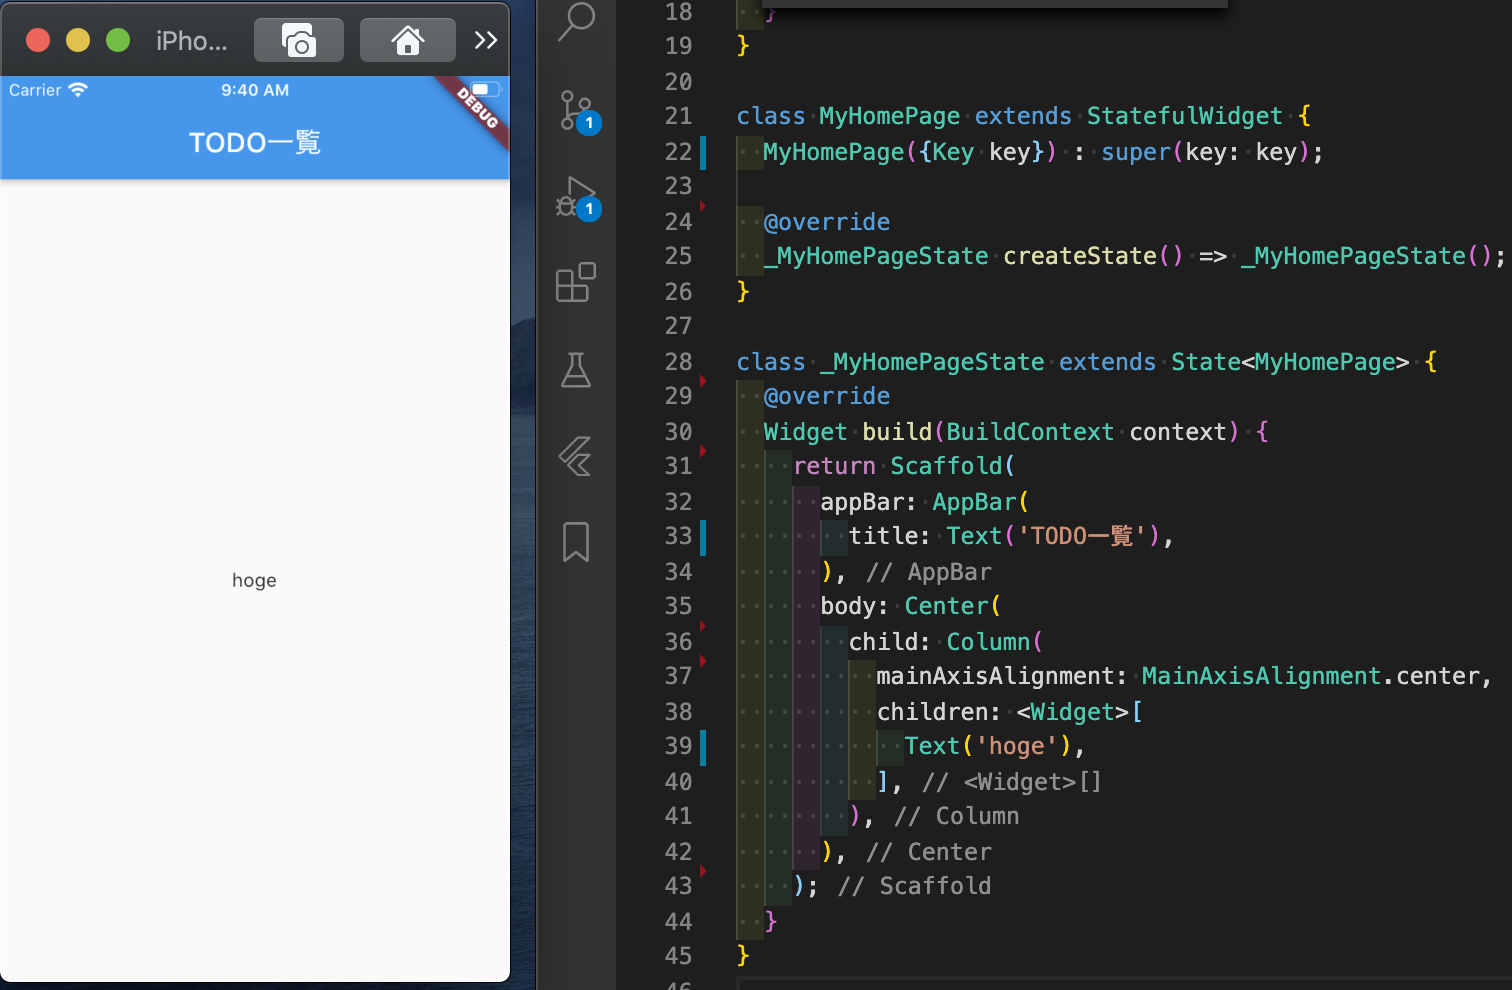
お掃除後
import 'package:flutter/material.dart';

void main() {
  runApp(MyApp());
}

class MyApp extends StatelessWidget {
  @override
  Widget build(BuildContext context) {
    return MaterialApp(
      title: 'Flutter Demo',
      theme: ThemeData(
        primarySwatch: Colors.blue,
        visualDensity: VisualDensity.adaptivePlatformDensity,
      ),
      home: MyHomePage(),
    );
  }
}

class MyHomePage extends StatefulWidget {
  MyHomePage({Key key}) : super(key: key);

  @override
  _MyHomePageState createState() => _MyHomePageState();
}

class _MyHomePageState extends State<MyHomePage> {
  @override
  Widget build(BuildContext context) {
    return Scaffold(
      appBar: AppBar(
        title: Text('TODO一覧'),
      ),
      body: Center(
        child: Column(
          mainAxisAlignment: MainAxisAlignment.center,
          children: <Widget>[
            Text('hoge'),
          ],
        ),
      ),
    );
  }
}
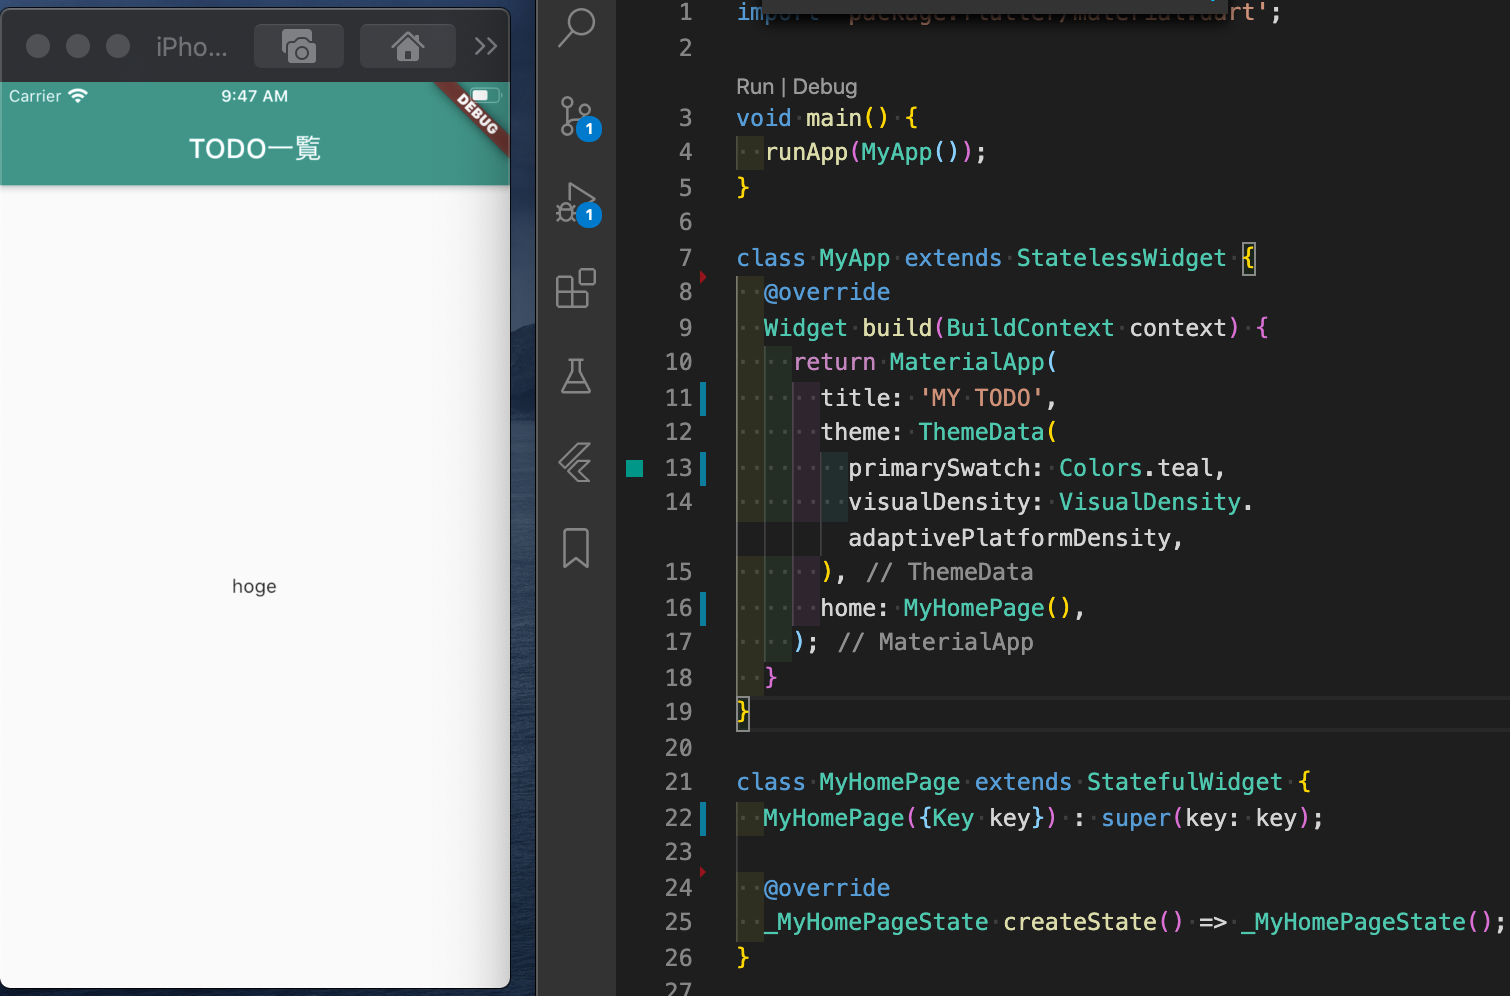
■アプリタイトルとテーマカラーの変更
dart
class MyApp extends StatelessWidget {
  @override
  Widget build(BuildContext context) {
    return MaterialApp(
      title: 'Flutter Demo',
      theme: ThemeData(
        primarySwatch: Colors.blue,
        visualDensity: VisualDensity.adaptivePlatformDensity,
      ),
      home: MyHomePage(),
    );
  }
}

↓

class MyApp extends StatelessWidget {
  @override
  Widget build(BuildContext context) {
    return MaterialApp(
      title: 'MY TODO',
      theme: ThemeData(
        primarySwatch: Colors.teal,
        visualDensity: VisualDensity.adaptivePlatformDensity,
      ),
      home: MyHomePage(),
    );
  }
}
🛠STEP2:実装
■TODOの一覧を入れるリスト型変数の宣言
- TODOの一覧を入れる変数の宣言
- SrtingのList型で空配列を宣言
- <string>の部分はいわゆるジェネリック
class _MyHomePageState extends State<MyHomePage> {
+  // todoの一覧リスト変数を用意
+  List<String> todoList = [];
■TextField 用のコントローラーを用意
- TextFieldを操作するためのコントローラーを設定してあげます
- コントローラーの設定と初期化、終了処理はワンセットみたいです
- ちょっと実装方法に自信がないので、もっとこうしたほうがいいよ!みたいなのあったら是非コメントください
- リファレンス https://flutter.dev/docs/cookbook/forms/text-field-changes
class _MyHomePageState extends State<MyHomePage> {
  // todoの一覧リスト変数を用意
  List<String> todoList = [];

+  // テキストフィールドのコントローラー設定
+  // コントローラーの宣言
+  TextEditingController _todoInputController;
+
+  // コントローラーの初期化
+  void initState() {
+    super.initState();
+    _todoInputController = TextEditingController();
+  }
+
+  // statefulオブジェクトが削除されるときに、参照を削除してくれる
+  void dispose() {
+    super.dispose();
+    _todoInputController.dispose();
+  }
■背景色の変更
- 画面全体の背景色を変更してみます。
- Scaffoldは基本的な画面構成を作るwidgetです
- backgroundColorプロパティに色を指定します
- リファレンス https://api.flutter.dev/flutter/material/Scaffold-class.html
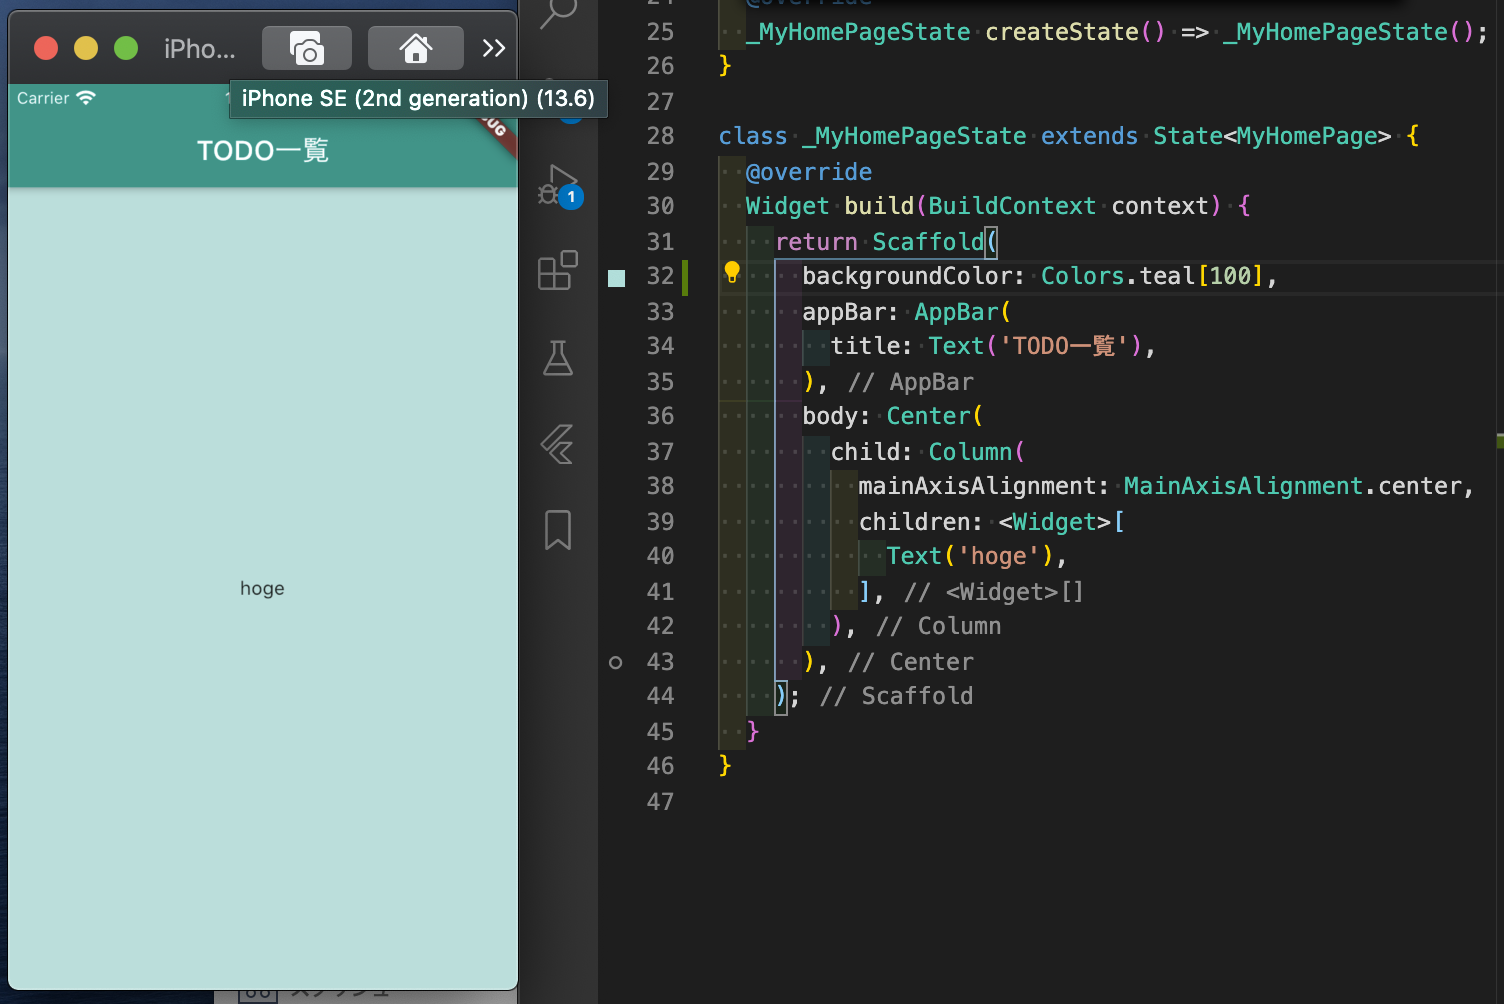
  @override
  Widget build(BuildContext context) {
    // scaffoldは画面構成の基本widget
    return Scaffold(
      // アプリ上部のコンテンツ設定
+     backgroundColor: Colors.teal[100],
■body に ColumnWidget の設定
- sampleにもともと含まれてるので、中身をお掃除
- mainAxisAlignmentを削除
- 削除すると上下中央指定が外れて上方向につめて表示される
- widget[]の中身を空にする
- リファレンス https://api.flutter.dev/flutter/widgets/Column-class.html
class _MyHomePageState extends State<MyHomePage> {
  @override
  Widget build(BuildContext context) {
    return Scaffold(
      backgroundColor: Colors.teal[100],
      appBar: AppBar(
        title: Text('TODO一覧'),
      ),
      body: Center(
+        child: Column(
+          children: <Widget>[],
+        ),
      ),
    );
  }
}
■TextField の設定
- Columnに渡す配列にwidgetを追加していく
- textfieldをpadding widgetで包んであげるとバランスが整う
- EdgeInsets.all()で値を設定すると全方向にpaddingが適用される
- TextFieldのプロパティを設定してあげる
- controller:コントローラーの紐付けを宣言
- 先ほど設定したコントローラーをわたす
- decoration:修飾関係の設定。今回はヒントテキストを設定しています
- autofocus:画面を開いたときにすでにフォーカスが当たっている状態にします
- controller:コントローラーの紐付けを宣言
- リファレンス https://api.flutter.dev/flutter/material/TextField-class.html
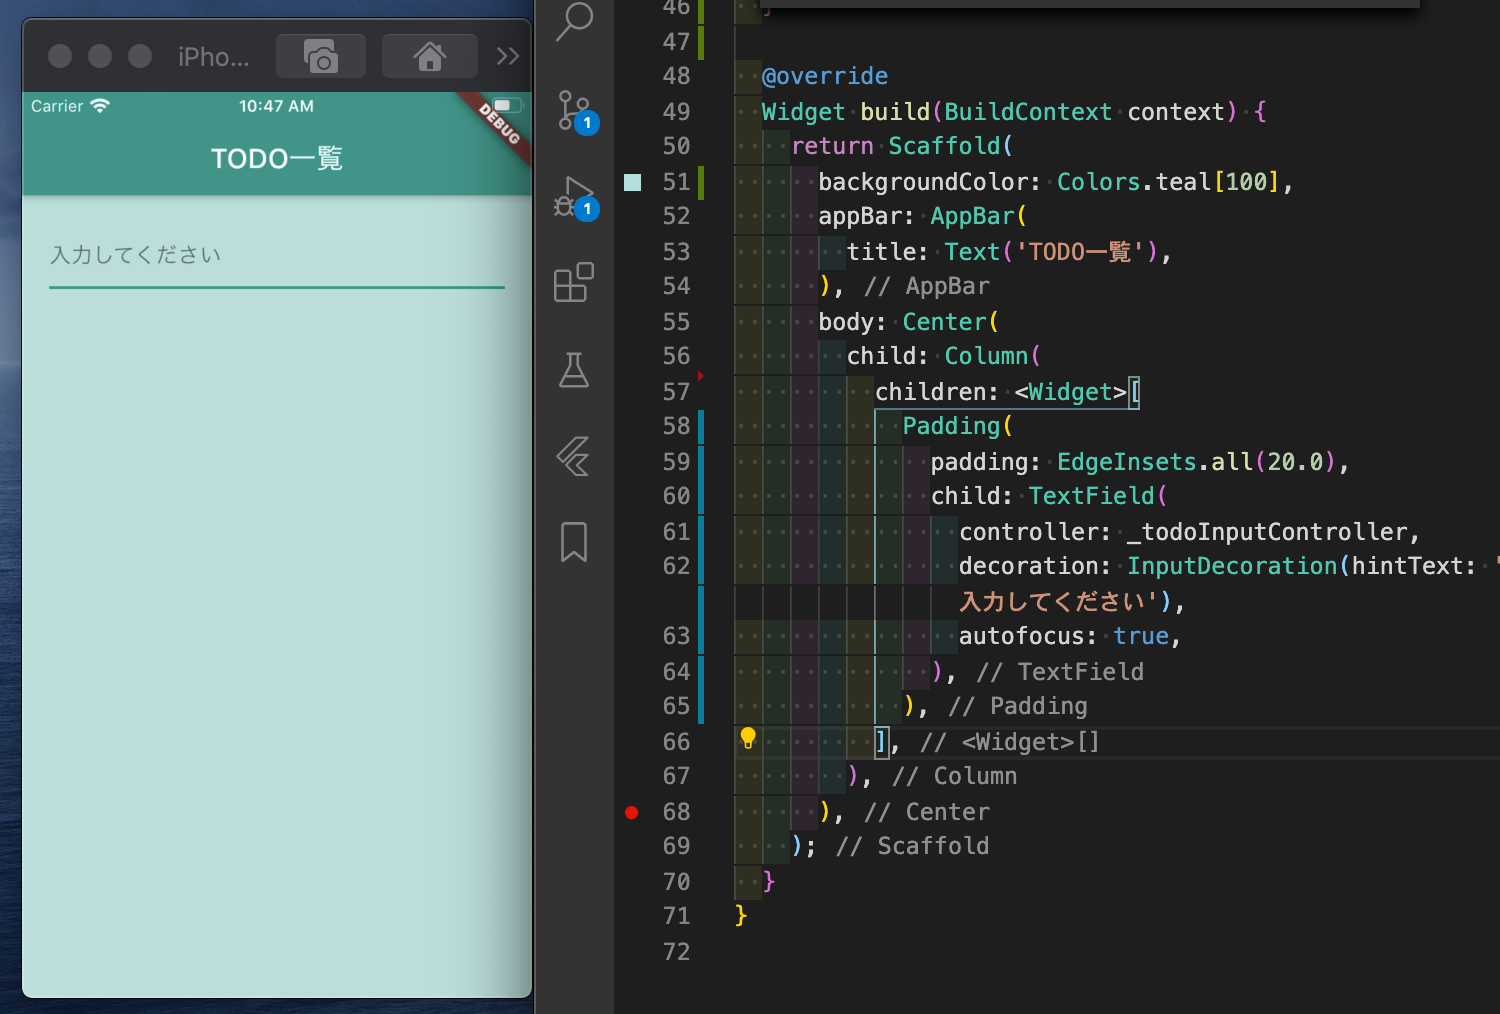
child: Column(
   children: <Widget>[
+    Padding(
+        padding: EdgeInsets.all(20.0),
+        child: TextField(
+          controller: _todoInputController,
+          decoration: InputDecoration(hintText: '入力してください'),
+          autofocus: true,
+        ),
+    ),
   ],
),
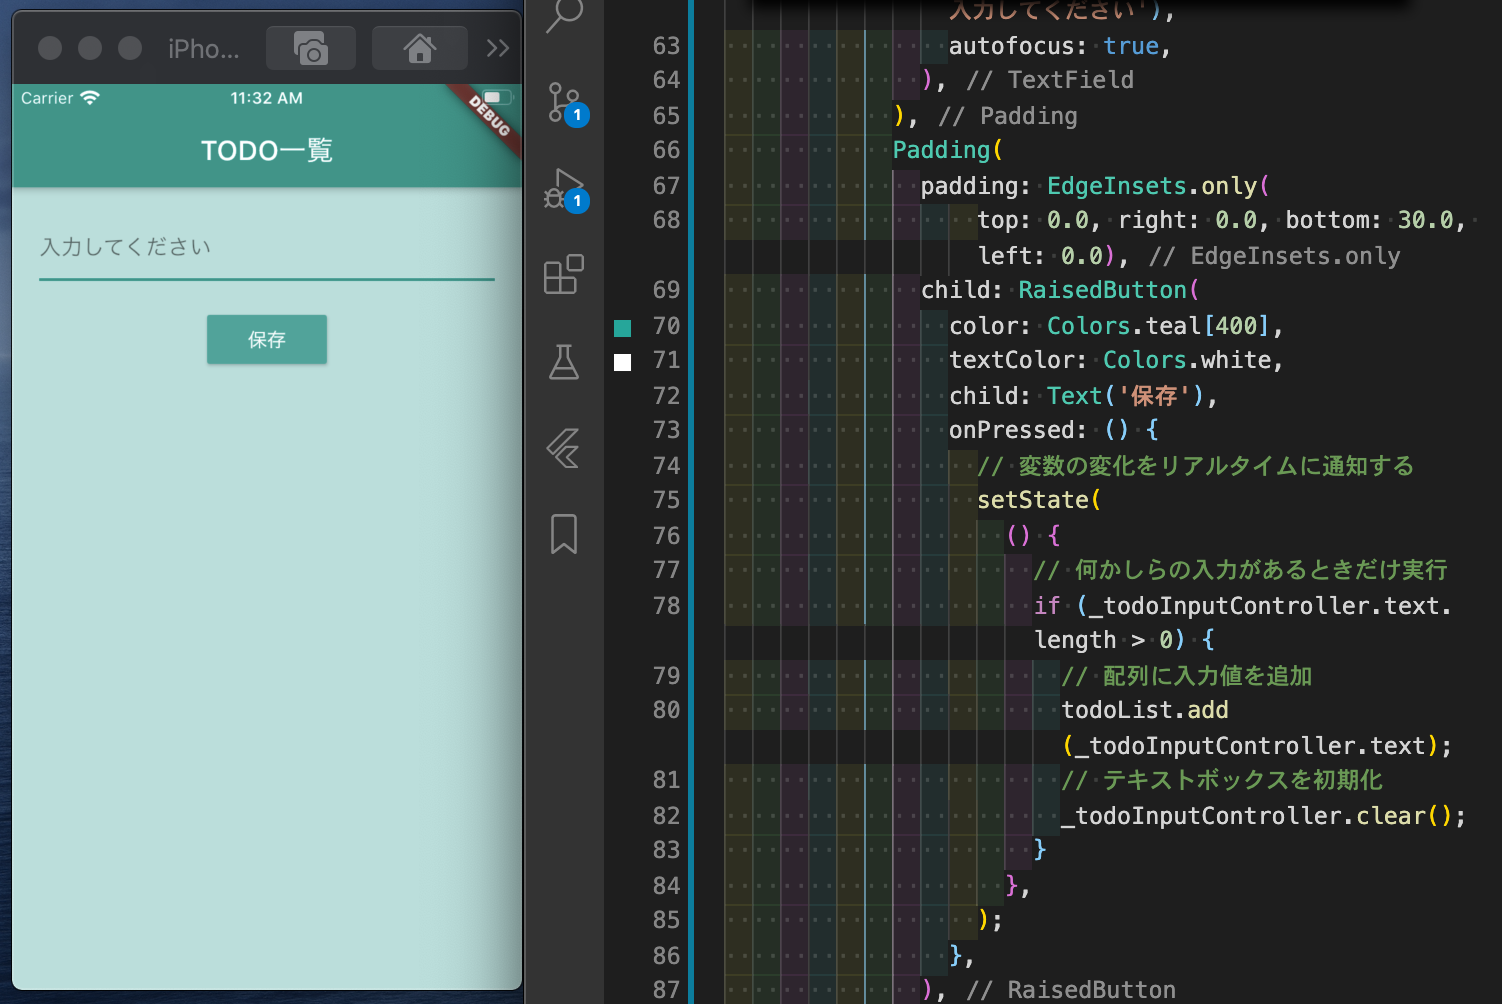
■RaisedButton の設定
- textfield同様Columnに渡す配列にwidgetを追加していく
- テキストフィールドの内容を保存するボタンを作る
- バランスを調整するため、下方向のみにpaddingを設定
- RaisedButtonに各種プロパティを設定
- color:ボタンの色を変更出来る。Color.tealにkeyを指定することでさらに細かい色の指定ができる
- textColor:テキストの色をしてする。textWidgetで指定することも出来るが、こちらで指定した方がdisableなどステータスによって色を変更することが出来る
- onPressed:ボタンをクリックした際の挙動を指定。今回は更に中でsetStateを呼んでいる
- リファレンス https://api.flutter.dev/flutter/material/RaisedButton-class.html
+ Padding(
+     padding:
+         EdgeInsets.only(top: 0.0, right: 0.0, bottom: 30.0, left: 0.0),
+     child: RaisedButton(
+         color: Colors.teal[400],
+         textColor: Colors.white,
+         child: Text('保存'),
+         onPressed: () {
+         // 変数の変化をリアルタイムに通知する
+         setState(
+             () {
+             // 何かしらの入力があるときだけ実行
+             if (_todoInputController.text.length > 0) {
+                 // 配列に入力値を追加
+                 todoList.add(_todoInputController.text);
+                 // テキストボックスを初期化
+                 _todoInputController.clear();
+             }
+             },
+         );
+         },
+     ),
+ ),
■ListView の設定
- Columnに渡す配列にListView widgetを追加していく
- ListViewを直接渡すと、描画範囲が定義されていないためエラーが起こる
- Expanded widgetで包んであげればok
- https://www.it-swarm.dev/ja/flutter/832868186/
- itemCount:リストのアイテムが何個あるかを定義する。必須
- itemBuilder:リストのアイテムとして何を渡すかを定義する。必須
- 一旦、簡単なtext widgetを返している
- 文字列内で変数を使用する場合は下記の2パターン
- $変数名:簡単に利用出来る
- ${変数名}:文字列の内容によってどこからどこまでが変数なのかを区別したいときに用いる
- このままだと、見た目が悪いので次のステップで見た目を整える
- リファレンス https://api.flutter.dev/flutter/widgets/ListView-class.html

+ Expanded(
+   child: ListView.builder(
+     // リストの長さを計算
+     itemCount: todoList.length,
+     itemBuilder: (BuildContext context, int index) {
+       return Text(
+         // リストに表示する文字列を設定
+         ("$index : ${todoList[index]}"),
+       );
+     },
+   ),
+ ),
■ListView の見た目を調整
- Listの見た目をカッコよくしていきます
- Container:Container Widgetで包むことでアイテムのpaddingとmargin、背景色を設定できるようにする
- htmlでいうところのdiv的な動き
- *本来はListTileだけで事足りるが、今回はpaddinとmarginを使用したかったのでこちらで代用
- padding:アイテム内の余白の設定
- margin:アイテム外の余白の設定
- color:背景色を設定
- ListTile widget:アイコンを簡単に配置できる。もっと細かく設定できるので簡単にそれっぽいtileを作ることができる
- leading:tileの先頭位置にアイテムを配置することができる
- Icon:Icons.starのstar部分を他のものにすると簡単にアイコンを設置できる
- TextStyle:テキストに関する修飾を設定することができる
Expanded(
  child: ListView.builder(
    // リストの長さを計算
    itemCount: todoList.length,
    itemBuilder: (BuildContext context, int index) {
      return Container(
+        padding: EdgeInsets.only(
+            top: 0.0, right: 0.0, bottom: 0.0, left: 0.0),
+        margin: EdgeInsets.only(
+            top: 1.0, right: 0.0, bottom: 0.0, left: 0.0),
+        color: Colors.cyan[600],
+        child: ListTile(
+          leading: Icon(Icons.star),
+          title: Text(
+            // リストに表示する文字列を設定
+            ("$index : ${todoList[index]}"),
+            style: TextStyle(
+              fontFamily: 'OpenSans',
+              fontSize: 24,
+              color: Colors.white,
+            ),
          ),
        ),
      );
    },
  ),
),
🙌STEP3:動作確認
- これで完成!
- flutter run で動作確認をしましょう!
🎊🤸🎉Congratulations!🎉🤸🎊
完成したら、いいね!&コメントに「ワッフルワッフル」と叫んでください😆✨
📱サンプルはこちら📱
💾 https://github.com/TD3P/flutter_mytodo/tree/singleViewTodo/prod
📗参考資料📗
- Flutter公式ドキュメント
- マテリアルデザインドキュメント
🌟ご指摘大歓迎🌟
ここちゃうで!!っていうとこあったら、教えてもらえると嬉しいです!!
シリーズ情報
📱Flutterで基本のTODOアプリを作ってみよう
https://qiita.com/pe-ta/items/b3b7458059c1fd7efcf0
📱Flutterでページ遷移するTODOアプリを作ってみよう
https://qiita.com/pe-ta/items/e547c4cf460319f5093c
📱Flutter x Firestore で気軽に永続化してオラオラする方法
https://qiita.com/pe-ta/items/ccd49fc396b063a821af