1. はじめに
こちらは自作のストップウォッチのプログラムで修正したバグを供養するの続編です。4.2 ユニットテストで取り上げたArduinoUnitを試します。バージョンはArduino IDE 1.8.9、ArduinoUnit 3.0.4を使用しました。
2. ArduinoUnitのインストール
Getting Startedに従い、Arduino IDEのメニューをスケッチ→ライブラリをインクルード→ライブラリを管理...とたどり、ライブラリマネージャの検索窓で"arduinounit"を検索し、インストールします1。
3. Unit Testを作成する
ストップウォッチを使う性能テストを実ステップ300行に満たない自動テストシステムで自動化するに掲載のプログラム(ArduinoUnoStopWatchV2.ino)をもとに関数calc_duration()のUnit Testを作成します。
3.1 Unit Testを作成する
calc_duration()はtime_startとtime_endの2つの引数を取ります。下記3パターンのテストコードを作成します。
- time_start < time_end
- time_start = time_end
- time_start > time_end (time_startとtime_endのあいだにmillis()のカウンタのオーバーフローが発生した場合を想定したもの)
Unit Testの実行はUARTからコマンド"t"を入力して行います。FAQで"Make sure you call Test::run() in your loop()."とありますのでwhile(1)で無限ループさせています。
/***********************************************************************
 * Copyright 2019 ka's@pbjpkas
 *
 * Licensed under the Apache License, Version 2.0 (the "License");
 * you may not use this file except in compliance with the License.
 * You may obtain a copy of the License at
 *
 *     http://www.apache.org/licenses/LICENSE-2.0
 *
 * Unless required by applicable law or agreed to in writing, software
 * distributed under the License is distributed on an "AS IS" BASIS,
 * WITHOUT WARRANTIES OR CONDITIONS OF ANY KIND, either express or implied.
 * See the License for the specific language governing permissions and
 * limitations under the License.
 ***********************************************************************/
# line 17 "ArduinoUnitSample1.ino"
# include <ArduinoUnit.h>

unsigned long calc_duration(unsigned long *time_start, unsigned long *time_end)
{
    unsigned long duration = 0;

    if(*time_start <= *time_end)
    {
        duration = *time_end - *time_start;
    }
    else
    {
        duration = ( 0xffffffff - *time_start ) + *time_end;
    }

    return duration;
}

test(calc_duration_start_lt_end)
{
    unsigned long test_time_start = 1400;
    unsigned long test_time_end   = 1800;
    unsigned long duration = calc_duration(&test_time_start, &test_time_end);
    assertEqual(400, duration);
}

test(calc_duration_start_eq_end)
{
    unsigned long test_time_start = 1400;
    unsigned long test_time_end   = 1400;
    unsigned long duration = calc_duration(&test_time_start, &test_time_end);
    assertEqual(0, duration);
}

test(calc_duration_start_gt_end)
{
    unsigned long test_time_start = 0xffffffff-1200;
    unsigned long test_time_end   = 1200;
    unsigned long duration = calc_duration(&test_time_start, &test_time_end);
    assertEqual(2400, duration);
}

void print_help(void)
{
    Serial.print( F("This is ") );
    Serial.print( F(__FILE__) );
    Serial.print( F(" ") );
    Serial.print( F("Build at ") );
    Serial.print( F(__DATE__) );
    Serial.print( F(" ") );
    Serial.print( F(__TIME__) );
    Serial.print( F("\r\n") );
    Serial.print( F("t : run Unit Test\r\n") );
}

void setup()
{
    Serial.begin(115200);
}

void loop()
{
    char buf;

    while(1)
    {
        if(Serial.available())
        {
            buf = Serial.read();
            if(buf == 't')
            {
                while(1){ Test::run(); }
            }
            if(buf == '?')
            {
                print_help();
            }
        }
    }
}
以下に実行例を示します。3つのテストがいずれもpassしたことがわかります。
3.2 わざと失敗させてみる
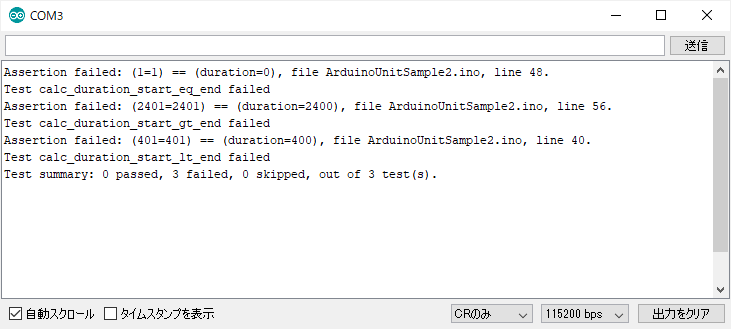
テストコードの期待値をわざと間違った値にしてUnit Testをfailさせてみます。
test(calc_duration_start_lt_end)
{
    unsigned long test_time_start = 1400;
    unsigned long test_time_end   = 1800;
    unsigned long duration = calc_duration(&test_time_start, &test_time_end);
    assertEqual(401, duration);//fail
}

test(calc_duration_start_eq_end)
{
    unsigned long test_time_start = 1400;
    unsigned long test_time_end   = 1400;
    unsigned long duration = calc_duration(&test_time_start, &test_time_end);
    assertEqual(1, duration);//fail
}

test(calc_duration_start_gt_end)
{
    unsigned long test_time_start = 0xffffffff-1200;
    unsigned long test_time_end   = 1200;
    unsigned long duration = calc_duration(&test_time_start, &test_time_end);
    assertEqual(2401, duration);//fail
}
以下に実行例を示します。意図した通りfailしていることがわかります。
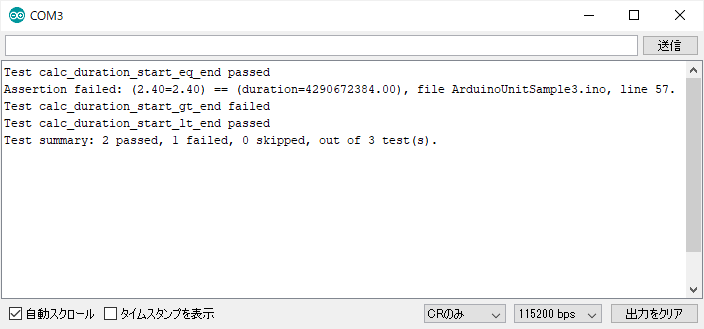
3.3 "2つめのバグ"を検出する
自作のストップウォッチのプログラムで修正したバグを供養するに掲載している修正前のプログラムはcalc_duration()のelse側にバグがあり、3.2 2つめのバグで取り上げています。このバグをUnit Testで検出させます。
double calc_duration(double *time_start, double *time_end)
{
    double duration = 0;

    if(*time_start <= *time_end)
    {
        duration = *time_end - *time_start;
    }
    else
    {
        duration = ( 0xffffffff - *time_start ) + *time_end;
    }

    return duration;
}

test(calc_duration_start_lt_end)
{
    double test_time_start = 1400/1000.0;
    double test_time_end   = 1800/1000.0;
    double duration = calc_duration(&test_time_start, &test_time_end);
    //assertEqual(0.40, duration);//fail
    assertNear(0.40, duration, 0.0001);
}

test(calc_duration_start_eq_end)
{
    double test_time_start = 1400/1000.0;
    double test_time_end   = 1400/1000.0;
    double duration = calc_duration(&test_time_start, &test_time_end);
    assertEqual(0.00, duration);
}

test(calc_duration_start_gt_end)
{
    double test_time_start = (0xffffffff-1200)/1000.0;
    double test_time_end   = 1200/1000.0;
    double duration = calc_duration(&test_time_start, &test_time_end);
    assertEqual(2.40, duration);
}
実行結果を以下に示します。修正前のプログラムにおいてはmillis()で取得したミリ秒の値を1000.0で割って秒に換算した値がtime_startおよびtime_endに与えられるためcalc_duration()のelse側の処理は正しい値にならず、Unit Testもfailします。

4. おわりに
ROM 32キロバイト、RAM 2キロバイト、クロック16MHzの8ビットマイコンであってもUnit Testのフレームワークがあるのはありがたいですね。Unit Testで品質を担保するだけでなく、ここはロジックのみの部分を切り出してUnit Testでチェックする、ここは実機で確認するといったテストを意識したソフトウェア設計をしやすくなると思いました。
-
一つ下のArduinoUnitとGoogle Testにインスパイアされたという"AUnit"も気になりますね。 ↩


