Parallel Communication Patterns
- MAP : 1対1, 例(ピクセルに1を足す)
Transpose:1対1 - Gather:n対1, 例(blur)
- Scatter:1対n, 出力先を計算する
- Stencil:sevral対1, 配列(2d von neumann, 2d moore, ...)から入力を読み込む
Example
float out[], in[];
int i = threadIdx.x;
int j = trheadIdx.y;
const float pi = 3.1415;
// Map
out[i] = pi * in[i];
// Transpose
out[i + j*128] = out[j + i*128];
if (i % 2) {
   // Scatter
   out[i-1] += pi * in[i];
   out[i+1] += pi * in[i];
   // Gather
   out[i] = (in[i] + in[i-1] + in[i+1]) * pi / 3.0f;
}
Streaming Multiprocessor
GPUはSMで構成されている。
SMはプロセッサとメモリで構成されている。
GPUはブロック(スレッドを含む)をSMに割り当てて処理する。
(SMは複数のブロックを処理できる)
各SMは並列で動作する。
GPU Memory Model
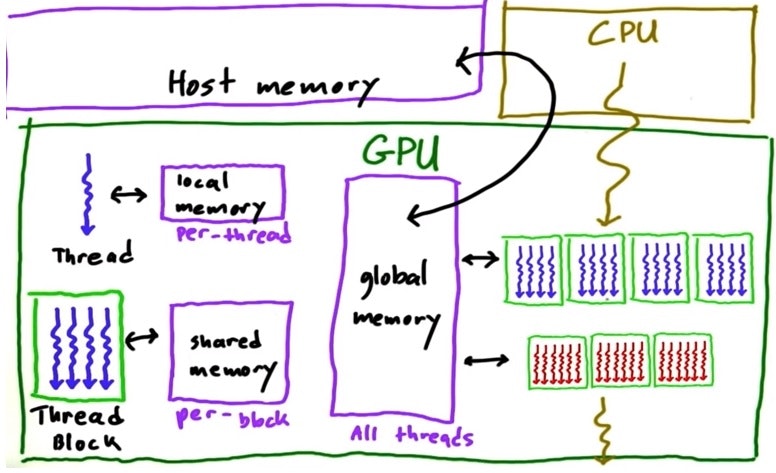
Memory speed
local > shared >> global >> CPU "host"
Coalesce global memory accesses
global memoryを読むとき、chunk単位で読むので読むデータが
配列上chunkの中に納まらない離れた場所にあると読み込む速度が遅くなる。
できるだけ連続した配列のデータが読めるようにした方が早い。
Synchronization
以下のコードは誤り
int idx = threadIdx.x;
__shared__ int array[128];
array[idx] = threadIdx.x;
if (idx < 127)
   //並列処理なのでここで問題発生
   array[idx] = array[idx+1];
たとえば、idx = 1のとき、array[1] = array[2]になる。
同時にidx = 2のとき、array[2] = array[3]になる。
同期化をしないまま、スレッド(idx = 2)が先に終わってしまうと、
スレッド(idx = 1)で結果的にarray[1] = array[3]となり、誤った結果となる。
以下は問題解決のため、同期化コードを入れた例
int idx = threadIdx.x;
__shared__ int array[128];
array[idx] = threadIdx.x;
// 同期化コード(すべてのスレッドの処理が終わるのを待つ)
__syncthreads();
if (idx < 127) {
   int temp = array[idx+1];
   // 同期化コード
   __syncthreads();
   array[idx] = temp;
}
Atomic Memory Operation
atomic演算にするとその演算が終わるまで使用中のメモリは他のスレッドがアクセスできない。
__global__ void increment_atomic(int *g) {
  int i = blockIdx.x * blockDim.x + threadIdx.x;
  i = i % ARRAY_SIZE;
  atomicAdd(&g[i], 1) //g[i] = g[i] + 1;
}
atomicにするとその分負荷がかかり、演算が遅くなる。
Efficient GPU programming
- メモリーアクセスの高速化(※GPU Memory Model)
- スレッド分岐を回避
Practice : ProblemSet2
Lessonの最後にProblemが出題される。以下でダウンロード可能。
https://github.com/udacity/cs344/tree/master/Problem%20Sets
今回は__syncthreadsを学んだのでこれを使ってGatherパターンに応用して見る。
Gatherパターンの対象としてこの問題で挙げたのはblur(画像ぼかし)の関数を作ること。
本来のコードはcudaErrorCheckなどしっかりしているが、
私のような初心者としては逆に分かり辛いので、
とにかく動作することを目的としてコードを簡単に修正してみた。
画像の読み込み、ガウシアンボケカーネルなど使うためにはopencvが必要。
opencvもgpu libraryがあるので、後で自分で作った関数と比較してみたい。
# include <iostream>
# include <cmath>
# include <opencv2/core/core.hpp>
# include <opencv2/imgproc.hpp>
# include <opencv2/highgui/highgui.hpp>
# include <cuda.h>
# include <cuda_runtime.h>

using namespace std;
using namespace cv;

// cuda関数と連携
void gaussian_blur(uchar3 *d_bgrImage, uchar3 *d_blurImage, float *d_kernel,
    size_t numRows, size_t numCols, int paddedRows, int paddedCols,
    int threadDim, int filterSize);

int main(int argc, char** argv) {
    //入力画像
    if (argc < 2) {
        cout << "画像ファイルのpathを入力してください。" << endl;
        return 0;
    }
    Mat imageBGR = imread(argv[1], CV_LOAD_IMAGE_COLOR);
    //出力画像の初期化
    Mat imageBlur(imageBGR.rows, imageBGR.cols, CV_8UC3);

    //フィルターサイズの指定
    int filterSize = 9;
    if (filterSize % 2 == 0) {
        cout << "filterSize奇数に指定してください。" << endl;
        return 0;
    }
    int border = filterSize / 2;
    //padding (入力画像の境界でfilteringするため、BORDER_REFLECT(border : 2) : ab|abcdef|fe)
    copyMakeBorder(imageBGR, imageBGR, border, border, border, border, BORDER_REFLECT);
    //入力画像のpadding結果のサイズ(後でcuda連携関数の引数になる予定)
    int numRows = imageBGR.rows;
    int numCols = imageBGR.cols;

    //threadsPerBlockを(32, 32)にする予定
    //numBlocksの設定のため、32で割り切れるようにする
    int threadDim = 32;
    int paddedRows = ceil(numRows / float(threadDim)) * threadDim;
    int paddedCols = ceil(numCols / float(threadDim)) * threadDim;
    int paddingRows = paddedRows - imageBGR.rows;
    int paddingCols = paddedCols - imageBGR.cols;
    copyMakeBorder(imageBGR, imageBGR, 0, paddingRows, 0, paddingCols, BORDER_CONSTANT, 0);

    //input, output配列の初期化(Host, device)
    uchar3 *h_inImg, *d_inImg;
    uchar3 *h_outImg, *d_outImg;
    h_inImg = (uchar3 *)imageBGR.ptr<unsigned char>(0);
    h_outImg = (uchar3 *)imageBlur.ptr<unsigned char>(0);

    //2d Gaussian kernelを作る、gpuはfloat演算が早い、
    //sigmaが大きいとフーリエ変換でデルタ関数に近くなるため、filteringすると高周波情報が無くなる
    Mat GkernelX = getGaussianKernel(filterSize, 10, CV_32F);
    Mat GkernelY = getGaussianKernel(filterSize, 10, CV_32F);
    Mat GkernelXY = GkernelX * GkernelY.t();
    //kernel用配列の初期化(Host, device)
    float *h_kernel, *d_kernel;
    h_kernel = (float *)GkernelXY.ptr<float>(0);
    //kernel (host -> device)
    cudaMalloc(&d_kernel, sizeof(float) * filterSize * filterSize);
    cudaMemcpy(d_kernel, h_kernel, sizeof(float) * filterSize * filterSize, cudaMemcpyHostToDevice);

    //input, output image (host -> device)
    size_t numPixels = imageBGR.rows * imageBGR.cols;
    cudaMalloc(&d_inImg, sizeof(uchar3) * numPixels);
    cudaMemcpy(d_inImg, h_inImg, sizeof(uchar3) * numPixels, cudaMemcpyHostToDevice);
    numPixels = imageBlur.rows * imageBlur.cols;
    cudaMalloc(&d_outImg, sizeof(uchar3) * numPixels);

    //kernel (host -> device)
    gaussian_blur(d_inImg, d_outImg, d_kernel, numRows, numCols, paddedRows, paddedCols, threadDim, filterSize);
    //スレッドの同期
    cudaDeviceSynchronize();

    //output image (device -> host)
    cudaMemcpy(h_outImg, d_outImg, sizeof(uchar3) * numPixels, cudaMemcpyDeviceToHost);

    //結果の表示
    namedWindow("Display window", WINDOW_AUTOSIZE);
    imshow("Display window", imageBlur);
    waitKey(0);

    //free device memory
    cudaFree(d_inImg);
    cudaFree(d_outImg);
    cudaFree(d_kernel);

    return 0;
}
# include <cuda.h>
# include <cuda_runtime.h>

__global__
void cuda_gaussian_blur(uchar3 *bgrImage, uchar3 *blurImage, float *kernel,
	size_t numRows, size_t numCols, int paddedCols, int dstCols, int filterSize) {
    //処理するピクセルの計算
	int x = blockIdx.x * blockDim.x + threadIdx.x;
	int y = blockIdx.y * blockDim.y + threadIdx.y;

    //原画像の境界の外(paddingした部分)の領域は無視
	int border = filterSize / 2;
	if (x <= border || x > numRows - border ||
		y <= border || y > numCols - border) {
		return;
	}
	int idx = 0;
	float sum_b = 0;
	float sum_g = 0;
	float sum_r = 0;
    //Gaussian filtering
	for (int i = 0; i < filterSize; i++) {
		for (int j = 0; j < filterSize; j++) {
			idx = (y + i - border) + (x + j - border) * paddedCols;
			__syncthreads();
			sum_b += float(bgrImage[idx].x) * kernel[j + i * filterSize];
			sum_g += float(bgrImage[idx].y) * kernel[j + i * filterSize];
			sum_r += float(bgrImage[idx].z) * kernel[j + i * filterSize];
		}
	}
	__syncthreads();
    //出力画像のピクセルを計算
	int target_idx = (y - border - 1) + (x - border - 1) * dstCols;
	blurImage[target_idx].x = sum_b;
	blurImage[target_idx].y = sum_g;
	blurImage[target_idx].z = sum_r;
}

void gaussian_blur(uchar3 *d_bgrImage, uchar3 *d_blurImage, float *d_kernel,
	size_t numRows, size_t numCols, int paddedRows, int paddedCols, int threadDim, int filterSize) {
	dim3 threadsPerBlock(threadDim, threadDim);
	dim3 numBlocks(paddedRows / threadsPerBlock.x, paddedCols / threadsPerBlock.y);
    //原画像の幅サイズの計算
	int dstCols = numCols - filterSize / 2 * 2;
	cuda_gaussian_blur <<<numBlocks, threadsPerBlock>>> (d_bgrImage, d_blurImage, d_kernel, numRows, numCols, paddedCols, dstCols, filterSize);
}
1. windows
nvcc -w gblur.cpp gblur.cu opencv_world341.lib -I C:\opencv\build\install\include -L C:\opencv\build\install\x64\vc15\lib
2. ubuntu
nvcc -w gblur.cpp gblur.cu `pkg-config --cflags --libs opencv`
以下がlenna.pngのgaussianボケ結果