はじめに
Desktop Duplication API はWindows8から利用できるモニタ単位で画面をキャプチャするAPIです。
これをDelphiで利用したいと思います。
このAPIではマウスカーソルを取得するには手数がかかります。今回はマウスカーソルなしでのキャプチャをやります。
今回はFMXで実装します。
開発環境
- Delphi 11.2
インライン変数宣言を使っていますので,10.3以降で利用できると思います。 - Windows 10(21H2)
準備するもの
既にVCLでの実装をされている方は,編集をしたファイルがそのまま使えます。
Desktop Duplication APIを利用するためのヘッダーファイルをダウンロードしておきます。
より,ダウンロードします。このヘッダーファイルのライセンスはApache License 2.0です。
プロジェクトを作成
新規プロジェクトの作成
ファイル-新規作成ーマルチデバイス アプリケーション - Delphi を選択し,空のアプリケーションを選択して新規プロジェクトを作成し,保存します。
ターゲットプラットフォームはWindows 32bitと64bitだけ残して,後は削除してください。
DX12ヘッダーファイルの追加
既にVCLでの実装をされている方は,作業する必要はありません。編集したものをFMXでそのまま利用できます。
GitHubよりダウンロードしたDelphiDX12ヘッダーのZIPファイルにあるUnitフォルダから以下のファイルを新規プロジェクトと同じフォルダにコピーし,新規プロジェクトに追加します。
- DX12.D3D11.pas
- DX12.D3DCommon.pas
- DX12.DXGI.pas
- DX12.DXGI1_2.pas
DX12ヘッダーファイルの修正
既にVCLでの実装をされている方は,作業する必要はありません。編集したものをFMXでそのまま利用できます。
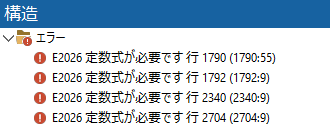
IDEで追加したファイルを開くと,E2026エラーが8か所で出ますので修正します。

このエラーの詳しい回避方法については Delphi 10.3以降: 列挙型で順序値を割り当てたときに起きるE2026エラーを回避する でご確認ください。
以下の3つのファイルについて以下のように修正します。
1790:        D3D11_STANDARD_MULTISAMPLE_PATTERN = int32($ffffffff),
1791:        D3D11_CENTER_MULTISAMPLE_PATTERN = int32($fffffffe)
2339:        D3D11_VIDEO_PROCESSOR_ITELECINE_CAPS_OTHER = int32($80000000)
2703:        D3D11_BUS_IMPL_MODIFIER_NON_STANDARD = int32($80000000)
260:    DXGI_FORMAT_FORCE_UINT = INT32($ffffffff));
433:    DXGI_COLOR_SPACE_CUSTOM = INT32($FFFFFFFF));
684:    DXGI_ADAPTER_FLAG_FORCE_DWORD = INT32($ffffffff)
109: DXGI_ALPHA_MODE_FORCE_DWORD = INT32($ffffffff)
修正が済んだら,構文チェックをして修正がうまくできたか確認してください。
ヘッダファイルを利用するクラスを作成
ファイルー新規作成ーユニット - Delphi でユニットを作成し,uFMXDesktopDuplication.pasとして保存します。
以下のように編集してください。
unit uFMXDesktopDuplication;

interface

uses
  System.Types, System.UITypes,
  Winapi.Windows,
  DX12.DXGI, DX12.DXGI1_2, DX12.D3DCommon, DX12.D3D11,
  FMX.Utils, FMX.Graphics;

type
  TFMXDesktopDuplication = class(TObject)
  private
    { Private 宣言 }
    FFeatureLevel:TD3D_FEATURE_LEVEL;
    FDuplicate:   IDXGIOutputDuplication;
    FDevice:      ID3D11Device;
    FContext:     ID3D11DeviceContext;
    FisCreated:   boolean;
    FBitmap:      TBitmap;
  public
    constructor CreateParamMonitor(AMonitorNum:integer);
    destructor Destroy; override;
    function  FrameGet: Boolean;
    property isCreated:boolean read FisCreated;
    property Bitmap:TBitmap read FBitmap;
  end;

implementation

{ TThreadDesktopDuplication }

constructor TFMXDesktopDuplication.CreateParamMonitor(AMonitorNum: integer);
var
  LDevice:  IDXGIDevice;
  LAdapter: IDXGIAdapter;
  LOutput:  IDXGIOutput;
  LOutput1: IDXGIOutput1;
begin
  FisCreated:=False;
  if Failed(D3D11CreateDevice(               // https://learn.microsoft.com/en-us/windows/win32/api/d3d11/nf-d3d11-d3d11createdevice
    nil,                                     // *pAdapter,
    D3D_DRIVER_TYPE_HARDWARE,                // DriverType,
    0,                                       // Software,
    Ord(D3D11_CREATE_DEVICE_SINGLETHREADED), // Flags,
    nil,                                     // *pFeatureLevels,
    0,                                       // FeatureLevels,
    D3D11_SDK_VERSION,                       // SDKVersion,
    FDevice,                                 // **ppDevice,
    FFeatureLevel,                           // *pFeatureLevel,
    @FContext)                               // **ppImmediateContext
  ) then Exit;
  if Failed(FDevice.QueryInterface(          // System.IInterface.QueryInterface
    IID_IDXGIDevice,                         // const IID: TGUID;
    LDevice)                                 // out Obj
  ) then Exit;
  if Failed(LDevice.GetParent(               // DX12.DXGI.IDXGIObject.GetParent
    IID_IDXGIAdapter,                        // const riid: TGUID
    Pointer(LAdapter))                       // out ppParent: Pointer
  ) then Exit;
  if Failed(LAdapter.EnumOutputs(            // DX12.DXGI.IDXGIAdapter.EnumOutputs
    AMonitorNum,                             // Output: UINT  ( Monitor )
    LOutput)                                 // out ppOutput: IDXGIOutput
  ) then Exit;
  if Failed(LOutput.QueryInterface(          // System.IInterface.QueryInterface
    IID_IDXGIOutput1,                        // const IID: TGUID;
    LOutput1)                                // out Obj
  ) then Exit;
  if Failed(LOutput1.DuplicateOutput(        // DX12.DXGI1_2.IDXGIOutput1.DuplicateOutput
    FDevice,                                 // pDevice: IUnknown
    FDuplicate)                              // out ppOutputDuplication: IDXGIOutputDuplication
  ) then Exit;
  FBitmap:=TBitmap.Create;
  FisCreated:=True;
end;

destructor TFMXDesktopDuplication.Destroy;
begin
  FBitmap.Free;
  inherited;
end;

function TFMXDesktopDuplication.FrameGet: Boolean;
var
  LResource: IDXGIResource;
  LFrameInfo:TDXGI_OUTDUPL_FRAME_INFO;
  LTx2D:     ID3D11Texture2D;
begin
  Result:=False;
  if Failed(FDuplicate.AcquireNextFrame(0, LFrameInfo, LResource)) then Exit;
  if LFrameInfo.TotalMetadataBufferSize > 0 then begin
    if Failed(LResource.QueryInterface(IID_ID3D11Texture2D, LTx2D)) then Exit;
    // FBitmapに描画
    var LDesc:     TD3D11_TEXTURE2D_DESC;
    var LTx2DTemp: ID3D11Texture2D;
    var LMappedRes:TD3D11_MAPPED_SUBRESOURCE;
    var i:         Integer;
    var LPByte:    PByte;
    var LWidth:     UInt;
    var LOffset:    UInt;
    var LBitmapData:TBitmapData;
    LTx2D.GetDesc(LDesc);
    LDesc.BindFlags := 0;
    LDesc.CPUAccessFlags := Ord(D3D11_CPU_ACCESS_READ) or Ord(D3D11_CPU_ACCESS_WRITE);
    LDesc.Usage := D3D11_USAGE_STAGING;
    LDesc.MiscFlags := 0;
    if Failed(FDevice.CreateTexture2D(LDesc, nil, LTx2DTemp)) then Exit;
    FContext.CopyResource(LTx2DTemp, LTx2D);
    FContext.Map(LTx2DTemp, 0, D3D11_MAP_READ_WRITE, 0, LMappedRes);
    LPByte := LMappedRes.pData;
    FBitmap.SetSize(LDesc.Width, LDesc.Height);
    LWidth:=4*LDesc.Width;
    FBitmap.Map(TMapAccess.Write, LBitmapData);
    LOffset:=LBitmapData.Pitch div SizeOf(TAlphaColor);
    for i:=0 to LDesc.Height-1 do begin
      Move(LPByte^, PAlphaColorArray(LBitmapData.Data)^[i*LOffset], LWidth);
      Inc(LPByte, LWidth);
    end;
    FBitmap.Unmap(LBitmapData);
    Result := True;
  end;
  FDuplicate.ReleaseFrame;
end;

end.
Form1のデザイン編集
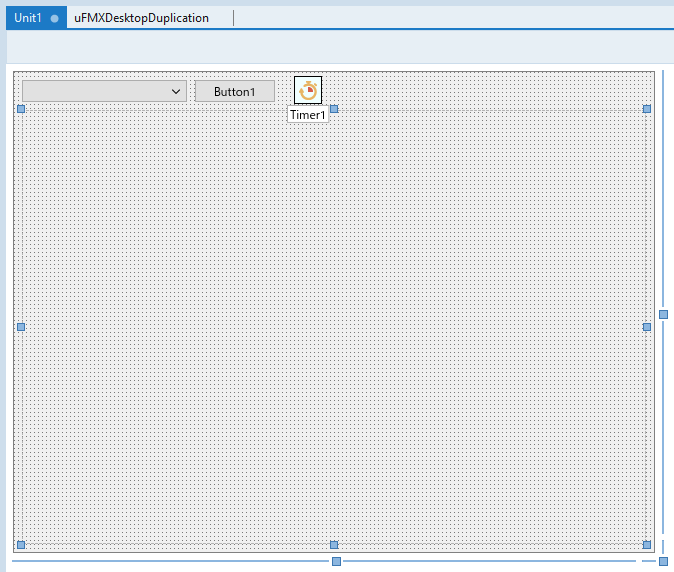
以下のように,Form1にTComboBox, TButton, TImage, TTimerを追加します。

Image1のデザイン編集
Image1のオブジェクトインスペクタで
AnchorsのakRightとakBotomをTrueに変更します。
MarginWrapModeをFitに変更します。
Timer1のデザイン編集
Timer1のオブジェクトインスペクタでEnabledをFalseに変更します。
Form1でuFMXDesktopDupulicationを利用する
uFMXDesktopDuplicationをinterfaceのusesに追加し,TForm1のprivateにFDuplicationを追加します。
FDuplicationを追加のコードは以下のようになります。
type
  TForm1 = class(TForm)
    ComboBox1: TComboBox;
    Button1: TButton;
    Image1: TImage;
    Timer1: TTimer;
  private
    { private 宣言 }
     DesktopDuplication: TFMXDesktopDuplication;
  public
    { public 宣言 }
  end;
Form1にイベントを追加する
Form1にOnCreateとOnDestroyを追加
Form1のオブジェクトインスペクタでOnCreateイベントを追加して以下のように編集します。
procedure TForm1.FormCreate(Sender: TObject);
var
  i:integer;
begin
  ComboBox1.Items.Clear;
  for i:=0 to Screen.DisplayCount-1 do begin
    ComboBox1.Items.Add(
      Screen.Displays[i].Index.ToString+': '
     +Screen.Displays[i].BoundsRect.Width.ToString+'x'
     +Screen.Displays[i].BoundsRect.Height.ToString
    );
  end;
  ComboBox1.ItemIndex:=0;
  DesktopDuplication:=nil;
end;
Form1のオブジェクトインスペクタでOnDestroyイベントを追加して以下のように編集します。
procedure TForm1.FormDestroy(Sender: TObject);
begin
  DesktopDuplication.Free;
end;
Button1にOnClickを追加
Button1のオブジェクトインスペクタでOnClickイベントを追加して以下のように編集します。
procedure TForm1.Button1Click(Sender: TObject);
begin
  DesktopDuplication.Free;
  DesktopDuplication := TFMXDesktopDuplication.CreateParamMonitor(ComboBox1.ItemIndex);
  Timer1.Enabled := DesktopDuplication.isCreated;
end;
Timer1にOnTimerイベントを追加
Timer1のオブジェクトインスペクタでOnTimerイベントを追加して以下のように編集します。
procedure TForm1.Timer1Timer(Sender: TObject);
begin
  if DesktopDuplication.FrameGet then begin
    Image1.Bitmap.Assign(DesktopDuplication.Bitmap);
  end;
end;
ここまでのUnit1.pasの編集結果
Unit1.pasは以下のようになります。このコードだけを張り付けてもフォームのイベントとつながらないので,必ずフォームのオブジェクトインスペクタのイベントタブからイベントのメソッド書くようにしてください。
unit Unit1;

interface

uses
  System.SysUtils, System.Types, System.UITypes, System.Classes, System.Variants,
  FMX.Types, FMX.Controls, FMX.Forms, FMX.Graphics, FMX.Dialogs, FMX.Objects,
  FMX.Controls.Presentation, FMX.StdCtrls, FMX.ListBox,
  uFMXDesktopDuplication;

type
  TForm1 = class(TForm)
    ComboBox1: TComboBox;
    Button1: TButton;
    Image1: TImage;
    Timer1: TTimer;
    procedure FormCreate(Sender: TObject);
    procedure FormDestroy(Sender: TObject);
    procedure Button1Click(Sender: TObject);
    procedure Timer1Timer(Sender: TObject);
  private
    { private 宣言 }
     DesktopDuplication: TFMXDesktopDuplication;
  public
    { public 宣言 }
  end;

var
  Form1: TForm1;

implementation

{$R *.fmx}

procedure TForm1.Button1Click(Sender: TObject);
begin
  DesktopDuplication.Free;
  DesktopDuplication := TFMXDesktopDuplication.CreateParamMonitor(ComboBox1.ItemIndex);
  Timer1.Enabled := DesktopDuplication.isCreated;
end;

procedure TForm1.FormCreate(Sender: TObject);
var
  i:integer;
begin
  ComboBox1.Items.Clear;
  for i:=0 to Screen.DisplayCount-1 do begin
    ComboBox1.Items.Add(
      Screen.Displays[i].Index.ToString+': '
     +Screen.Displays[i].BoundsRect.Width.ToString+'x'
     +Screen.Displays[i].BoundsRect.Height.ToString
    );
  end;
  ComboBox1.ItemIndex:=0;
  DesktopDuplication:=nil;
end;

procedure TForm1.FormDestroy(Sender: TObject);
begin
  DesktopDuplication.Free;
end;

procedure TForm1.Timer1Timer(Sender: TObject);
begin
  if DesktopDuplication.FrameGet then begin
    Image1.Bitmap.Assign(DesktopDuplication.Bitmap);
  end;
end;

end.
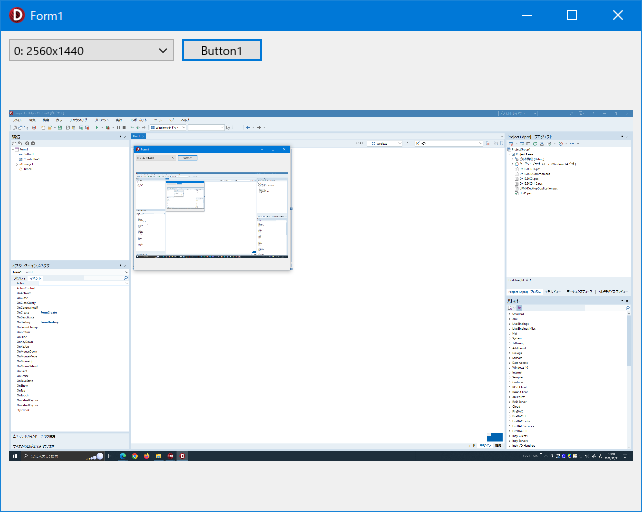
実行して,ComboBox1でキャプチャしたいモニターを選択し,Button1をクリックするとキャプチャが始まります。1秒間隔で更新されます。

Timer1のIntervalを短くするとより細かい動きを表示できます。
Windows8より古いOSで起動した場合動作しないので,その処理を追加したほうが良いと思います。
今回はマウスカーソルは取得しませんでしたがそれ以外についてもLearn Microsoftの記事を読めばできるのではないかと思います。
謝辞(引用元および参考文献)
以下のリンクが参考になりました。
- Microsoft Learn - デスクトップ重複 API Desktop Duplication API について詳しく知ることができます。
- GitHub - CMCHTPC / DelphiDX12 DX12ヘッダファイル
- Desktop Duplication API in Delphi The Code Project Open License(CPOL)です。
- Embarcadero Rad Studop DockWiki - 複数ディスプレイのサポート FMX キャプチャをするモニターを取得するために利用しました。
- Mr.XRAY - Windows のバージョンの取得 バージョンチェックする際に有用な情報です。
貴重な情報を提供してくださった皆様,ありがとうございます。感謝します。