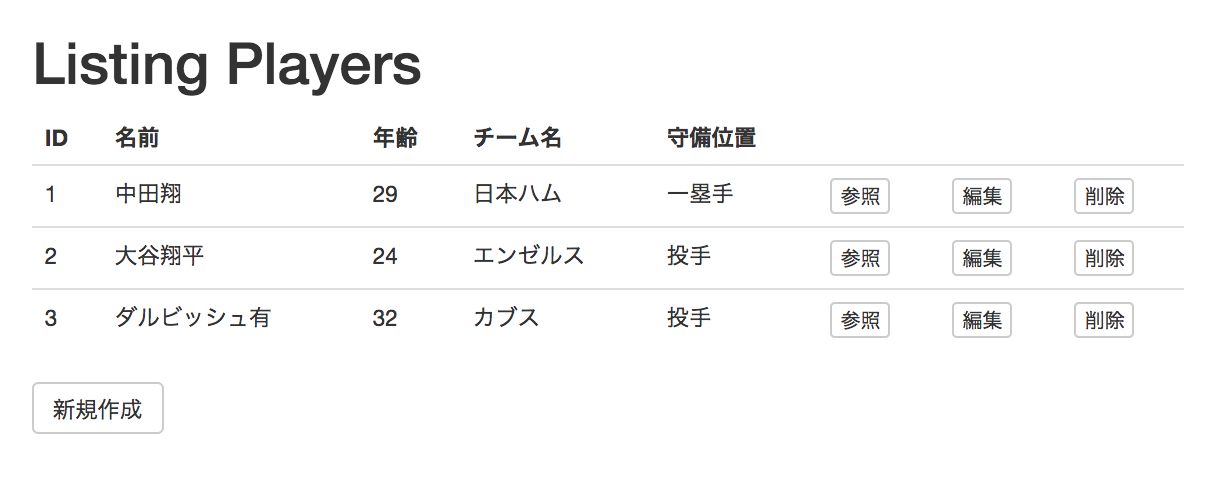
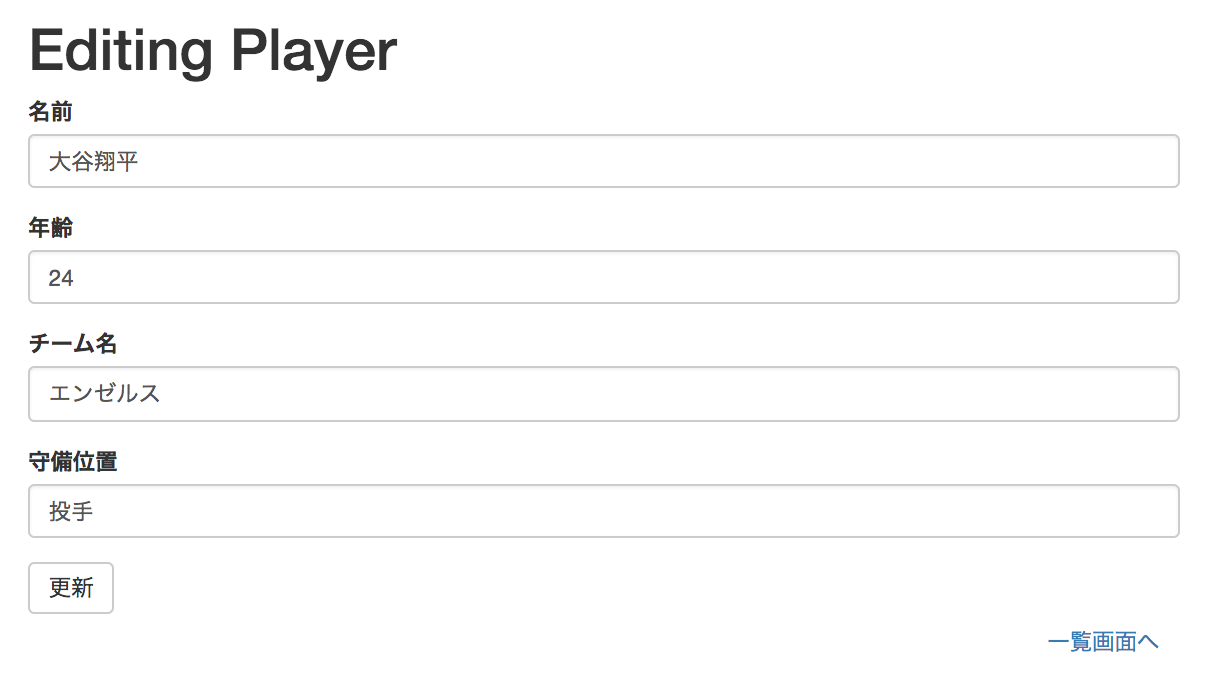
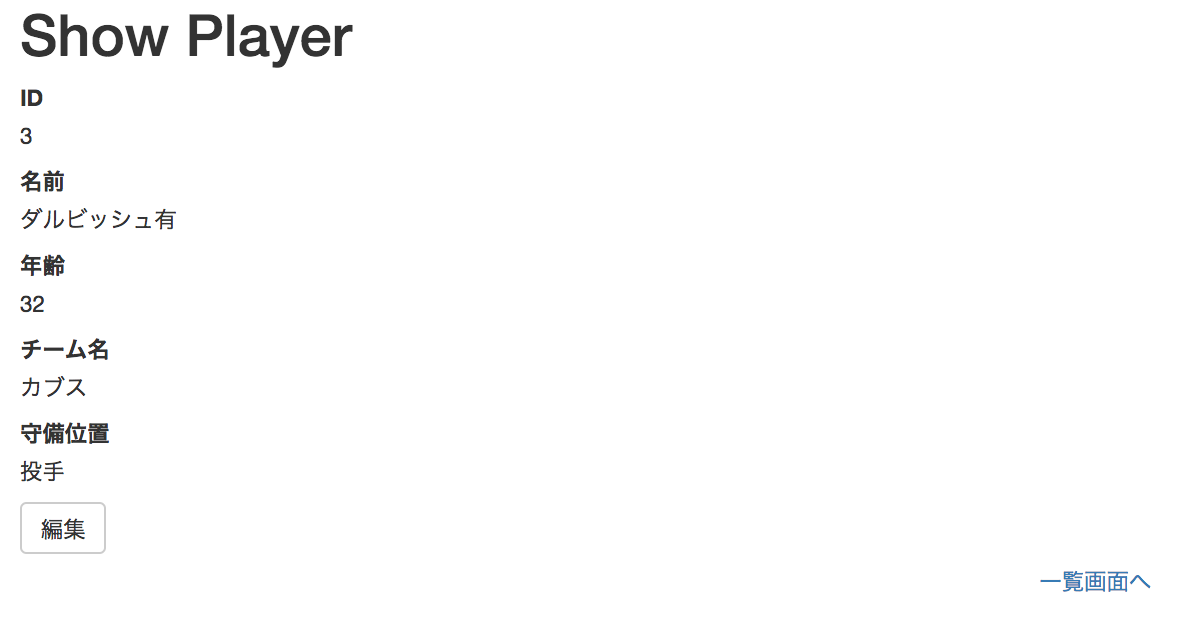
内容
- 前回の続き
- SpringBootで簡単なCRUDアプリを作る
- 今回は以下の4画面を一通り作成して処理を通すところまで
- 一覧画面
- 新規作成画面
- 編集画面
- 参照画面
開発する機能
- 選手の情報を保存するplayerテーブルを作る
- JPAを使ってplayerテーブルの操作をできるようにする
- playerに関するエンドポイントの作成
- 各画面のテンプレート作成
1. 選手の情報を保存するplayerテーブルを作る
- SpringBootとJPAを使っていればEntityクラスを作ると自動的にテーブルを生成してくれるのでSQLをたたく必要はない
- playerの情報を保存する
Player.javaをsrc/main/java/com/example/baseball/domainに作成する
src/main/java/com/example/baseball/domain/Player.java
package com.example.baseball.domain;

import javax.persistence.Entity;
import javax.persistence.GeneratedValue;
import javax.persistence.GenerationType;
import javax.persistence.Id;

@Entity // ①
public class Player {
    @Id // ②
    @GeneratedValue(strategy = GenerationType.IDENTITY) // ③
    private Long id;
    private String name;
    private Integer age;
    private String team;
    private String position;

    public Long getId() {
        return id;
    }
    public void setId(Long id) {
        this.id = id;
    }
    public String getName() {
        return name;
    }
    public void setName(String name) {
        this.name = name;
    }
    public Integer getAge() {
        return age;
    }
    public void setAge(Integer age) {
        this.age = age;
    }
    public String getTeam() {
        return team;
    }
    public void setTeam(String team) {
        this.team = team;
    }
    public String getPosition() {
        return position;
    }
    public void setPosition(String position) {
        this.position = position;
    }

    @Override
    public String toString() {
        return "Player [id=" + id + ", name=" + name + ", age=" + age + ", team=" + team + ", position=" + position + "]";
    }
}
- ①:
@EntityをつけることでDBのテーブルと紐づく - ②:
@Idを付けた変数がテーブルのプライマーキーになる - ③:
@GeneratedValueをつけると連番が自動で振られるようになる
2. JPAを使ってplayerテーブルの操作をできるようにする
- テーブルへアクセスするための基本的な処理はJPAが用意してくれているのでSQLを書かなくてよい
- JPAのJpaRepositoryを継承したinterfaceを作成することで利用できる
- findAllやsave等用意されている典型的な操作以外のことをしたくなったら、repositoryに追記していくことになる
-
src/main/java/com/example/baseball/repositoryにPlayerRepository.java作成する
src/main/java/com/example/baseball/repository/PlayerRepository.java
package com.example.baseball.repository;

import org.springframework.data.jpa.repository.JpaRepository;
import org.springframework.stereotype.Repository;

import com.example.baseball.domain.Player;

@Repository
public interface PlayerRepository extends JpaRepository<Player, Long> {

}
- repositoryの処理を呼び出すserviceを作成する
- serviceにはビジネスロジックを書いて、repositoryはDBアクセスのみという棲み分け
- DBにアクセスするような処理を行いたい時はserviceのメソッドを呼ぶようにする
- 現段階ではビジネスロジックはないのでrepositoryのメソッドを呼ぶ処理だけ書いておく
-
src/main/java/com/example/baseball/serviceにPlayerService.java作成する
src/main/java/com/example/baseball/service/PlayerService.java
package com.example.baseball.service;

import java.util.List;

import org.springframework.beans.factory.annotation.Autowired;
import org.springframework.stereotype.Service;

import com.example.baseball.domain.Player;
import com.example.baseball.repository.PlayerRepository;

@Service
public class PlayerService {
    // ①
    @Autowired
    private PlayerRepository playerRepository;

    public List<Player> findAll() {
        return playerRepository.findAll();
    }

    public Player findOne(Long id) {
        return playerRepository.findOne(id);
    }

    public Player save(Player player) {
        return playerRepository.save(player);
    }

    public void delete(Long id) {
        playerRepository.delete(id);
    }
}
- ①:
@Autowiredを付けて宣言するとBeanをインジェクトしてくれるのでnewしなくても使うことができる
3. playerに関するエンドポイントの作成
- ユーザがアクセスするURLに紐づくメソッドを作成する
- 作成するエンドポイントは以下の6種類
| HTTPメソッド | URL | Controllerのメソッド | 概要 |
|---|---|---|---|
| GET | /players | index() | 一覧画面の表示 |
| POST | /players | create() | データの保存 |
| GET | /players/new | newPlayer() | 新規作成画面の表示 |
| GET | /players/1/edit | edit() | 編集画面の表示 |
| GET | /players/1 | show() | 参照画面の表示 |
| PUT | /players/1 | update() | データの更新 |
| DELETE | /players/1 | destroy() | データの削除 |
-
src/main/java/com/example/baseball/controllerにPlayerController.java作成する
src/main/java/com/example/baseball/controller/PlayerController.java
package com.example.baseball.controller;

import java.util.List;

import org.springframework.beans.factory.annotation.Autowired;
import org.springframework.stereotype.Controller;
import org.springframework.ui.Model;
import org.springframework.web.bind.annotation.DeleteMapping;
import org.springframework.web.bind.annotation.GetMapping;
import org.springframework.web.bind.annotation.ModelAttribute;
import org.springframework.web.bind.annotation.PathVariable;
import org.springframework.web.bind.annotation.PostMapping;
import org.springframework.web.bind.annotation.PutMapping;
import org.springframework.web.bind.annotation.RequestMapping;

import com.example.baseball.domain.Player;
import com.example.baseball.service.PlayerService;

@Controller
@RequestMapping("/players") // ①
public class PlayerController {
    @Autowired
    private PlayerService playerService;

    @GetMapping
    public String index(Model model) { // ②
        List<Player> players = playerService.findAll();
        model.addAttribute("players", players); // ③
        return "players/index"; // ④
    }

    @GetMapping("new")
    public String newPlayer(Model model) {
        return "players/new";
    }

    @GetMapping("{id}/edit")
    public String edit(@PathVariable Long id, Model model) { // ⑤
        Player player = playerService.findOne(id);
        model.addAttribute("player", player);
        return "players/edit";
    }

    @GetMapping("{id}")
    public String show(@PathVariable Long id, Model model) {
        Player player = playerService.findOne(id);
        model.addAttribute("player", player);
        return "players/show";
    }

    @PostMapping
    public String create(@ModelAttribute Player player) { // ⑥
        playerService.save(player);
        return "redirect:/players"; // ⑦
    }

    @PutMapping("{id}")
    public String update(@PathVariable Long id, @ModelAttribute Player player) {
        player.setId(id);
        playerService.save(player);
        return "redirect:/players";
    }

    @DeleteMapping("{id}")
    public String destroy(@PathVariable Long id) {
        playerService.delete(id);
        return "redirect:/players";
    }
}
- ①:クラスに対して
@RequestMappingを付けておくと、クラス内のメソッド全てに適用される- つまりこのクラスのメソッドは全て、
http://localhost:8080/playersから始まるURLにマッピングされている
- つまりこのクラスのメソッドは全て、
- ②:メソッドの引数に
Model型の値を設定するとModelのインスタンスが自動的に渡される - ③:②で受け取ったmodelに値を詰めることで、テンプレートに値を渡すことができる
- ここでは
playersというキー名でplayerのListを設定している
- ここでは
- ④:returnしている文字列を元に、
src/main/resources/templates/配下からファイルを見つけてユーザに返している- ここでは
src/main/resources/templates/players/index.htmlが返されている
- ここでは
- ⑤:メソッドの引数に
@PathVariableを設定するとURL上の値を取得することができる- ここでは、
http://localhost/players/1にアクセスされるとidには1が入る
- ここでは、
- ⑥:メソッドの引数に
@ModelAttributeをつけると送信されたリクエストのbodyの情報を取得できる - ⑦:"redirect:/players"とすると
/playersにリダイレクトされる- createメソッドの処理が終わった後に
http://localhost:8080/playersに勝手にアクセスされる感じ
- createメソッドの処理が終わった後に
4. 各画面のテンプレート作成
- 今回作成するのはplayerに関するテンプレートなので
src/main/resources/templates/players以下に作成していく - 作成するのは以下の4画面分のファイル
- index.html(一覧画面)
- new.html(新規作成画面)
- edit.html(編集画面)
- show.html(参照画面)
静的ファイルの配置
- テンプレートを作る前にcssとjavascriptのファイルを準備しておく
- 今回はBootstrapを使用する
- 最新版は4系だけど今回は3系を使う
-
ここからダウンロードして、以下のファイルを配置する
- cssフォルダ内の
bootstrap.cssを、src/main/resources/static/cssフォルダにコピー - jsフォルダ内の
bootstrap.jsをsrc/main/resources/static/jsフォルダにコピー
- cssフォルダ内の
- Bootstrapが依存するjQueryをダウンロードして配置する
- jQueryはここからダウンロード
- ソースが直接出てしまう場合は右クリックで名前をつけて保存する
-
src/main/resources/static/jsフォルダにjquery.jsという名前で配置

index.html
- playerの一覧をテーブルで表示する
-
src/main/resources/templates/playersにindex.htmlを作成する

src/main/resources/templates/players/index.html
<!DOCTYPE html>
<html xmlns:th="http://www.thymeleaf.org">
  <head>
    <meta charset="utf-8" />
    <title>Listing Players - baseball</title>
    <!-- ① -->
    <link rel="stylesheet" href="/css/bootstrap.css" />
    <script src="/js/jquery.js"></script>
    <script src="/js/bootstrap.js"></script>
  </head>
  <body>
    <div class="container">
      <h1>Listing Players</h1>
      <table class="table">
        <thead>
          <tr>
            <th>ID</th>
            <th>名前</th>
            <th>年齢</th>
            <th>チーム名</th>
            <th>守備位置</th>
            <th></th>
            <th></th>
            <th></th>
          </tr>
        </thead>
        <tbody>
          <!-- ② -->
          <tr th:each="player:${players}" th:object="${player}">
            <!-- ③ -->
            <td th:text="*{id}"></td>
            <td th:text="*{name}"></td>
            <td th:text="*{age}"></td>
            <td th:text="*{team}"></td>
            <td th:text="*{position}"></td>
            <!-- ④ -->
            <td><a class="btn btn-default btn-xs" th:href="@{/players/{id}(id=*{id})}">参照</a></td>
            <td><a class="btn btn-default btn-xs" th:href="@{/players/{id}/edit(id=*{id})}">編集</a></td>
            <td>
              <!-- ⑤ -->
              <form th:action="@{/players/{id}(id=*{id})}" th:method="delete">
                <input class="btn btn-default btn-xs" type="submit" value="削除" />
              </form>
            </td>
          </tr>
        </tbody>
      </table>
      <a class="btn btn-default" href="/players/new">新規作成</a>
    </div>
  </body>
</html>
- ①:cssとjavascriptのファイルを読み込む
- ②:Controllerから渡された
playersに対してループ処理を行っている-
th:each="player:${players}"のようにすることでループ処理を記述できる - ここの例ではListであるplayersの数だけループを回し、List内の各要素をplayerという変数名で扱う
-
- ③:
th:object="${player}"とすることで、このタグより子供の要素で、${player.xxx}を*{xxx}と省略して書けるようになる - ④:
th:href="xxx"とすることでhref属性に設定する値を動的にすることができる-
/players/{id}の部分がhref属性に設定される値。{id}の部分は変数を埋め込むことができて、後続の(id=*{id})で値を設定している
-
- ⑤:削除の処理はHTTPメソッドをDELETEにしてアクセスしたいので、formタグにして
th:method="delete"を付けている
new.html
- playerの新規作成画面
-
src/main/resources/templates/playersにnew.htmlを作成する

src/main/resources/templates/players/new.html
<!DOCTYPE html>
<html xmlns:th="http://www.thymeleaf.org">
  <head>
    <meta charset="utf-8" />
    <title>New Player - baseball</title>
    <link rel="stylesheet" href="/css/bootstrap.css" />
    <script src="/js/jquery.js"></script>
    <script src="/js/bootstrap.js"></script>
  </head>
  <body>
    <div class="container">
      <h1>New Player</h1>
      <form th:action="@{/players}" th:method="post">
        <div class="form-group">
          <label class="control-label">名前</label>
          <input class="form-control" type="text" name="name" />
        </div>
        <div class="form-group">
          <label class="control-label">年齢</label>
          <input class="form-control" type="number" name="age" />
        </div>
        <div class="form-group">
          <label class="control-label">チーム名</label>
          <input class="form-control" type="text" name="team" />
        </div>
        <div class="form-group">
          <label class="control-label">守備位置</label>
          <input class="form-control" type="text" name="position" />
        </div>
        <button class="btn btn-default" type="submit">作成</button>
      </form>
      <div class="pull-right">
        <a class="btn btn-link" href="/players">一覧画面へ</a>
      </div>
    </div>
  </body>
</html>
edit.html
- URLに含まれる値とidが一致するplayerの編集をする画面
-
src/main/resources/templates/playersにedit.htmlを作成する

src/main/resources/templates/players/edit.html
<!DOCTYPE html>
<html xmlns:th="http://www.thymeleaf.org">
  <head>
    <meta charset="utf-8" />
    <title>Editing Player - baseball</title>
    <link rel="stylesheet" href="/css/bootstrap.css" />
    <script src="/js/jquery.js"></script>
    <script src="/js/bootstrap.js"></script>
  </head>
  <body>
    <div class="container">
      <h1>Editing Player</h1>
      <form th:action="@{/players/{id}(id=*{id})}" th:method="put" th:object="${player}">
        <div class="form-group">
          <label class="control-label">名前</label>
          <!-- ① -->
          <input class="form-control" type="text" th:field="*{name}" />
        </div>
        <div class="form-group">
          <label class="control-label">年齢</label>
          <input class="form-control" type="number" th:field="*{age}" />
        </div>
        <div class="form-group">
          <label class="control-label">チーム名</label>
          <input class="form-control" type="text" th:field="*{team}" />
        </div>
        <div class="form-group">
          <label class="control-label">守備位置</label>
          <input class="form-control" type="text" th:field="*{position}" />
        </div>
        <button class="btn btn-default" type="submit">更新</button>
      </form>
      <div class="pull-right">
        <a class="btn btn-link" href="/players">一覧画面へ</a>
      </div>
    </div>
  </body>
</html>
- ①:
th:fieldに設定した値は、name属性id属性に変数名、value属性に値が設定される-
th:field="*{age}"として*{age}の値が20の場合、name="age" id="age" value="20"が自動的に設定されている
-
show.html
- URLに含まれる値とidが一致するplayerの情報を参照する画面
-
src/main/resources/templates/playersにshow.htmlを作成する

src/main/resources/templates/players/show.html
<!DOCTYPE html>
<html xmlns:th="http://www.thymeleaf.org">
  <head>
    <meta charset="utf-8" />
    <title>Show Player - baseball</title>
    <link rel="stylesheet" href="/css/bootstrap.css" />
    <script src="/js/jquery.js"></script>
    <script src="/js/bootstrap.js"></script>
  </head>
  <body>
    <div class="container">
      <h1>Show Player</h1>
      <div th:object="${player}">
        <div>
          <label>ID</label>
          <p th:text="*{id}"></p>
        </div>
        <div>
          <label>名前</label>
          <p th:text="*{name}"></p>
        </div>
        <div>
          <label>年齢</label>
          <p th:text="*{age}"></p>
        </div>
        <div>
          <label>チーム名</label>
          <p th:text="*{team}"></p>
        </div>
        <div>
          <label>守備位置</label>
          <p th:text="*{position}"></p>
        </div>
      </div>
      <div>
        <a class="btn btn-default" th:href="@{/players/{id}/edit(id=*{id})}">編集</a>
      </div>
      <div class="pull-right">
        <a class="btn btn-link" href="/players">一覧画面へ</a>
      </div>
    </div>
  </body>
</html>
動作確認
- ここまでできて、http://localhost:8080/players にアクセスすると以下のような機能ができている
次回
- 続きはこちら
