2019/12/24 更新###
Raspberry Pi 4 B 4GB版を入手した為、KIOSK端末化の手順をRaspbian Buster対応版にアップグレードしました。無線LANおよびDHCPの設定部分が大きく変更になっています。
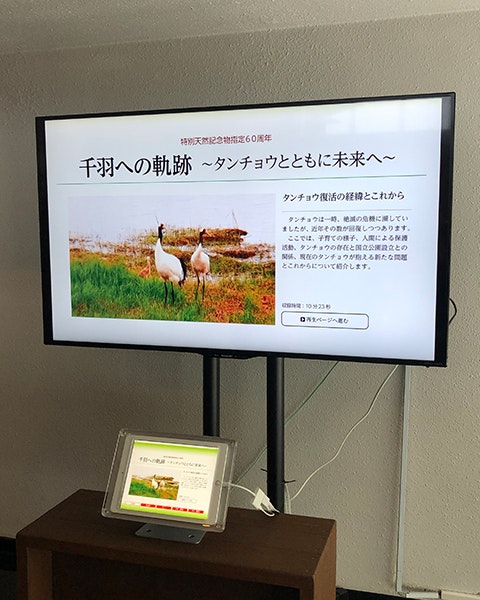
とある博物館から動画展示機の更新のお仕事を頂いた。その際に構築したRaspberry Pi 3 B+とiPad(およびHDMI経由で接続した液晶テレビ)によるKIOSK端末について、構築手順などを記録する。
なお、USBストレージから起動できるRaspberry Pi 3B+を用い、USBメモリを起動ストレージとして運用、USBメモリの寿命延長を目的としてSWAPメモリの停止とログファイルをRAMDISKへ退避した。
設置したKIOSK端末
KIOSK端末として必要とする機能
- インターネット接続を必要とせず、単独で運用できること
- 操作端末となるiPadとはWi-Fi接続できること
- PCの操作に詳しくない学芸員による管理運用が行えること
- 長期連続稼働が前提となる為、ストレージおよび端末本体の保守性を考慮すること
ハードウェアの選定
前提条件を満たすハードウェア構成として、
1. Raspberry Pi 3B+とiPadをWi-Fi接続
2. 手元にあるiPadを操作
3. lightning端子からHDMI経由で接続した大型液晶テレビにもミラーリング表示される
構成とした。具体的なハードウェアのリストは以下(リスト以外に液晶テレビ・HDMIケーブルも必要)。
- サーバ
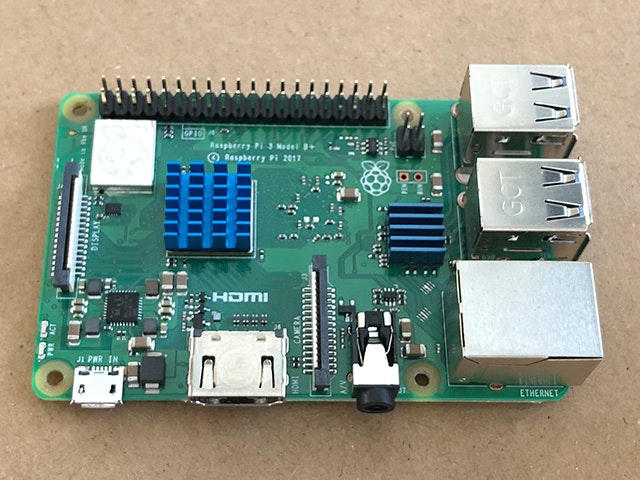
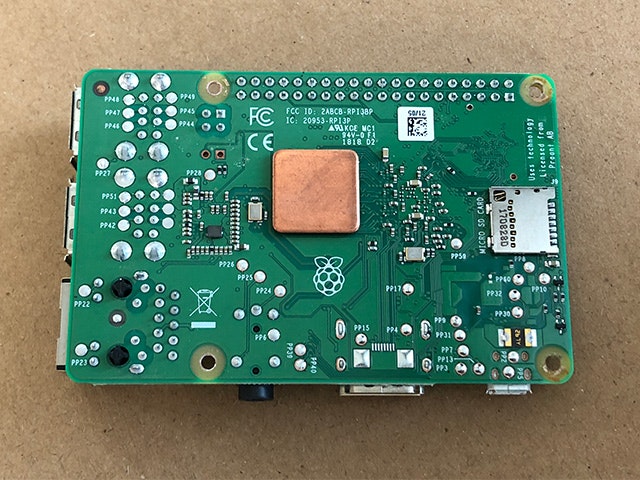
- Raspberry Pi 3 Model B+
- サーバケース
- Piケース アルミ Leg V2 with FAN for 3B+/3/2/B+
- サーバ電源
- USB電源アダプター 5V/3A 1.5m microUSBコネクター
- サーバストレージ(USBメモリ)
- USM16W3B
- ヒートシンク
- Raspberry Pi 2/3 Model B 用 ヒートシンク3点
- 操作用パネルスイッチ
-
薄膜パネルスイッチ [HC-543-3]
ジャンパワイヤ - 操作端末
-
iPad Wi-Fi版
Lightning - Digital AVアダプタ
サーバの構築
OSの準備
サーバ機となるRaspberry Pi 3 B+のOSとしてRaspbianをインストールする。OSイメージを公式サイトからダウンロード(RASPBIAN STRETCH LITE)、USBメモリにOSを書き込む(以下母艦となるmacOS環境下のterminalにて操作)。
- USBメモリを母艦にマウントする。
- terminalにてマウント状況を確認。
$ diskutil list
~略~
/dev/disk4 (external, physical):
   #:                       TYPE NAME                    SIZE       IDENTIFIER
   0:     FDisk_partition_scheme                        *15.5 GB    disk4
   1:             Windows_FAT_32 SONY_16W3               15.5 GB    disk4s1
- パーティションのマウントを解除
$ sudo diskutil umountDisk /dev/disk4s1
Password:
Unmount of all volumes on disk4 was successful
- OSを書き込む
$ sudo dd bs=1m if=/Users/ユーザ名/Downloads/2018-06-27-raspbian-stretch-lite.img of=/dev/rdisk4
1776+0 records in
1776+0 records out
1862270976 bytes transferred in 66.405962 secs (28043732 bytes/sec)
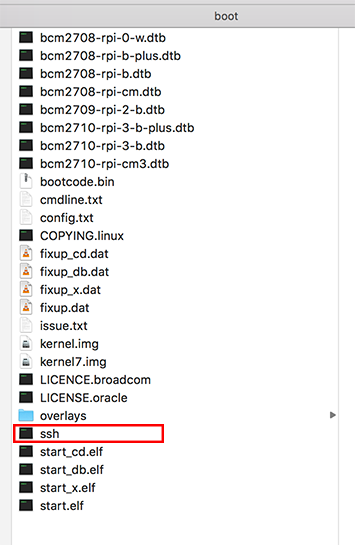
- ヘッドレスにて構築する為にSSH接続を有効化する。USBメモリ内
/bootパーティション内に空ファイルsshを作成。
Raspberry Pi 3 B+の準備
Raspberry Piの初期設定
Raspberry PiにLANケーブルとOSを書き込んだUSBメモリ、電源コードを接続し起動する。
以下、母艦のterminalから操作。
$ ssh pi@raspberrypi.local
The authenticity of host 'raspberrypi.local (fe80::edfa:92c4:e947:f053%en0)' can't be established.
ECDSA key fingerprint is SHA256:ZPh3Lzdp57sq/w0ylPlwLDdkwNdSgL0atatms7jZ284.
Are you sure you want to continue connecting (yes/no)? yes
Warning: Permanently added 'raspberrypi.local,fe80::edfa:92c4:e947:f053%en0' (ECDSA) to the list of known hosts.
pi@raspberrypi.local's password:
Linux raspberrypi 4.14.50-v7+ #1122 SMP Tue Jun 19 12:26:26 BST 2018 armv7l

The programs included with the Debian GNU/Linux system are free software;
the exact distribution terms for each program are described in the
individual files in /usr/share/doc/*/copyright.

Debian GNU/Linux comes with ABSOLUTELY NO WARRANTY, to the extent
permitted by applicable law.

SSH is enabled and the default password for the 'pi' user has not been changed.
This is a security risk - please login as the 'pi' user and type 'passwd' to set a new password.


Wi-Fi is disabled because the country is not set.
Use raspi-config to set the country before use.

pi@raspberrypi:~ $
今回は閉鎖環境下での運用であり、アクセスするユーザも限定されることからユーザの新規追加は行わず、デフォルトユーザpiのパスワードを変更する。
pi@raspberrypi:~ $ sudo passwd pi
Enter new UNIX password:
Retype new UNIX password:
passwd: password updated successfully
pi@raspberrypi:~ $
システムの初期設定やアップデートなどを行う。
pi@raspberrypi:~ $ sudo raspi-config

┌────────────────┤ Raspberry Pi Software Configuration Tool (raspi-config) ├────────────────┐
│                                                                                           │
│    1 Change User Password Change password for the current user                            │
│    2 Network Options      Configure network settings                                      │
│    3 Boot Options         Configure options for start-up                                  │
│    4 Localisation Options Set up language and regional settings to match your location    │
│    5 Interfacing Options  Configure connections to peripherals                            │
│    6 Overclock            Configure overclocking for your Pi                              │
│    7 Advanced Options     Configure advanced settings                                     │
│    8 Update               Update this tool to the latest version                          │
│    9 About raspi-config   Information about this configuration tool                       │
│                                                                                           │
│                                                                                           │
│                        <Select>                           <Finish>                        │
│                                                                                           │
└───────────────────────────────────────────────────────────────────────────────────────────┘
raspi-configで最低限必要な設定は以下4点。Finishを選択すると再起動する。
- 4 Localisation Options
-
I4 Change Wi-fi Country
- JP Japan(※ Wi-Fiを使用するために使用国を設定する)
-
I4 Change Wi-fi Country
- 7 Advanced Options
- A1 Expand Filesystem(※ ファイルシステムの最適化(為念))
-
A3 Memory Split
- 2(※ 今回は用途としてGPUは使用しない為、メモリ割り当てを最低に設定する)
- 8 Update
aptコマンドを用いて環境のアップデート。
pi@raspberrypi:~ $ sudo apt-get update
pi@raspberrypi:~ $ sudo apt-get upgrade
pi@raspberrypi:~ $ sudo apt-get dist-upgrade
Raspberry Piに表面実装されているLEDはpowerLED(赤)とaccessLED(緑)の2つ。サーバの稼働状況が判別しやすいよう、powerLEDをheartbeatモード(ここでは「powerLEDが1秒ごとに2回点滅する」ことを指す)に変更する。
適当なエディタで/boot/config.txtを開き、以下2行を追加する。
# turn power LED into heartbeat
dtparam=pwr_led_trigger=heartbeat
サーバの再起動後、powerLEDがheartbeatモードに変更されていれば完了。
サーバアプリケーションのインストール
apache2
pi@raspberrypi:~ $ sudo apt-get install apache2
以下コマンドでapache2の稼働状況を確認する(Active: active (running) )。
pi@raspberrypi:~ $ systemctl status apache2
● apache2.service - The Apache HTTP Server
   Loaded: loaded (/lib/systemd/system/apache2.service; enabled; vendor preset: enabled)
   Active: active (running) since Tue 2018-08-14 06:28:53 UTC; 58s ago
~以下略~
適当なエディタで/etc/apache2/apache2.confを開き、以下当該箇所を修正する。
<Directory /var/www/>
    Options Indexes FollowSymLinks
    AllowOverride None
    Require all granted
</Directory>
     ↓
<Directory /var/www/>
   Options FollowSymLinks
   AllowOverride All
   Require all granted
</Directory>
apache2を再起動後(sudo service apache2 restart)、母艦のブラウザからhttp://raspberrypi.localにアクセスしapache2デフォルト画面が表示されたら完了。

samba
ウェブコンテンツの更新作業をネットワーク経由で行うべく、sambaをインストールする。
pi@raspberrypi:~ $ sudo apt-get install samba
適当なエディタで/etc/samba/smb.confを開き、以下7行を追加する。
[httpd root]
  comment = localWeb folder
  path = /var/www
  guest ok = yes
  read only = no
  public = yes
  browseable = yes
以下コマンドを実行しsambaを再起動、稼働状況を確認する(Active: active (running))。
pi@raspberrypi:~ $ sudo service smbd restart
pi@raspberrypi:~ $ sudo service nmbd restart
pi@raspberrypi:~ $ systemctl status smbd
pi@raspberrypi:~ $ systemctl status nmbd
同様に以下コマンドを実行し、ウェブコンテンツの保存先フォルダーへ書き込み属性を追加する。
pi@raspberrypi:~ $ cd /var/www
pi@raspberrypi:~ $ sudo chmod 0755 *
pi@raspberrypi:~ $ cd html
pi@raspberrypi:~ $ sudo chmod 0644 *
Wi-Fi アクセスポイント化
pi@raspberrypi:~ $ sudo apt-get install hostapd dnsmasq
※ 今回dnsmasqは簡易DHCPサーバとしてのみ使用する。
適当なエディタで/etc/dhcpcd.confを開き、以下14行を追加する。
# define static profile
profile static_eth0
static ip_address=192.168.1.50
static routers=192.168.1.1
static domain_name_servers=192.168.1.1
# fallback to static profile on eth0
interface eth0
fallback static_eth0
denyinterfaces wlan0
interface wlan0
static ip_address=172.24.1.1/24
static routers=172.24.1.1
static domain_name_servers=172.24.1.1
static broadcast 172.24.1.255
適当なエディタで/etc/hostapd/hostapd.confを新規ファイルとして作成、以下15行を書き込む。
interface=wlan0
driver=nl80211
ssid=your-own-unique-SSID
hw_mode=g
channel=6
ieee80211n=1
wmm_enabled=1
ht_capab=[HT40][SHORT-GI-20][DSSS_CCK-40]
macaddr_acl=0
auth_algs=1
ignore_broadcast_ssid=0
wpa=2
wpa_key_mgmt=WPA-PSK
wpa_passphrase=your-own-unique-passphrase
rsn_pairwise=CCMP
なおssid=your-own-unique-SSIDとwpa_passphrase=your-own-unique-passphraseは適宜適切な内容に変更する事。
適当なエディタで/etc/default/hostapdを開き、以下1行を書き込む。
DAEMON_CONF="/etc/hostapd/hostapd.conf"
以下コマンドを実行し、デフォルトの設定ファイルを別名保存する。
pi@raspberrypi:~ $ sudo mv /etc/dnsmasq.conf /etc/dnsmasq.conf.orig
適当なエディタで/etc/dnsmasq.confを新規ファイルとして作成、以下7行を書き込む。
interface=wlan0
listen-address=172.24.1.1
# bind-interfaces removed:2019/05/24
server=8.8.8.8
domain-needed
bogus-priv
dhcp-range=172.24.1.50,172.24.1.100,12h
適当なエディタで/etc/rc.localを開き、exit 0の前の行に以下3行を書き込む。
service dnsmasq stop
sleep 10
service dnsmasq start
自動起動の設定を行う。
pi@raspberrypi:~ $ sudo systemctl enable hostapd
なお、上記sleep 10はdnsmasqの終了待ちウェイトとなる。
サーバの再起動後、設定したSSID/パスフレーズでのWi-Fi接続を確認する事。
SWAPの無効化とログファイルをRAMDISKへ退避
SWAP停止
USBメモリへの書き込み回数を低減させる目的でSWAPメモリの無効化とログファイルの保存先をRAMDISKへ変更する。
以下一連のコマンドでSWAPメモリの無効化sudo swapoff --allとアンインストールsudo apt-get remove dphys-swapfileを行う。
pi@raspberrypi:~ $ free(SWAPメモリの確認)
              total        used        free      shared  buff/cache   available
Mem:        1000184       39280      869368       13336       91536      898628
Swap:        102396           0      102396

pi@raspberrypi:~ $ sudo swapoff --all(SWAPメモリの無効化)

pi@raspberrypi:~ $ free(SWAPメモリの再確認)
              total        used        free      shared  buff/cache   available
Mem:        1000184       38928      869032       13336       92224      899012
Swap:             0           0           0

pi@raspberrypi:~ $ sudo apt-get remove dphys-swapfile
サーバの再起動後、SWAPメモリが無効化されたのを確認する事。
ログファイルをRAMDISKへ退避
適当なエディタで/etc/fstabを開き、各種ログファイルの保存先をRAMDISK化する設定(以下4行)を書き込む。
tmpfs /tmp tmpfs defaults,size=32m 0 0
tmpfs /var/tmp tmpfs defaults,size=16m 0 0
tmpfs /var/log tmpfs defaults,size=32m 0 0
tmpfs /var/www/mrtg tmpfs defaults,size=2m 0 0
サーバの再起動後df -hでtmpfsがマウントされているのを確認する。
pi@raspberrypi:~ $ df -h
Filesystem      Size  Used Avail Use% Mounted on
/dev/root        15G  1.6G   13G  12% /
devtmpfs        484M     0  484M   0% /dev
tmpfs           489M     0  489M   0% /dev/shm
tmpfs           489M   19M  470M   4% /run
tmpfs           5.0M  4.0K  5.0M   1% /run/lock
tmpfs           489M     0  489M   0% /sys/fs/cgroup
tmpfs            16M     0   16M   0% /var/tmp         ←←←
tmpfs           2.0M     0  2.0M   0% /var/www/mrtg    ←←←
tmpfs            32M  156K   32M   1% /var/log         ←←←
tmpfs            32M     0   32M   0% /tmp             ←←←
/dev/sda1        43M   22M   21M  52% /boot
tmpfs            98M     0   98M   0% /run/user/1000
システム起動時にテンポラリ上のログ格納ディレクトリを自動作成するスクリプトを以下内容で作成する。
# !/bin/bash
#
### BEGIN INIT INFO
# Provides:		  make-varlog-files
# Default-Start:	 2 3 4 5
# Default-Stop:	  0 1 6
# Required-Start:
# Required-Stop:
# Short-Description: Create /var/log/... files on tmpfs at startup
# Description:	   Create /var/log/... files needed by system daemon
### END INIT INFO

#
# main()
#
case "${1:-''}" in
	'start')

	############################
	# prepare /var/log subdir for ramdisk init on every boot

	mkdir -p /var/log/ConsoleKit
	mkdir -p /var/log/apache2
	mkdir -p /var/log/apt
	mkdir -p /var/log/fsck
	mkdir -p /var/log/ntpstats
	mkdir -p /var/log/samba

	chown root.adm /var/log/apache2
	chmod 750 /var/log/apache2
	chown ntp.ntp /var/log/ntpstats
	chown root.adm /var/log/samba

	############################
	# prepare /var/log file for ramdisk init on every boot

	touch /var/log/lastlog
	touch /var/log/wtmp
	touch /var/log/btmp
	touch /var/log/apache2/access.log
	touch /var/log/apache2/error.log
	touch /var/log/apache2/other_vhosts_access.log
	touch /var/log/apache2/ssl_access.log

	chown root.adm  /var/log/apache2
	chown root.adm /var/log/apache2/access.log
	chmod 640 /var/log/apache2/access.log
	chown root.adm /var/log/apache2/error.log
	chmod 640 /var/log/apache2/error.log
	chown root.utmp /var/log/lastlog
	chown root.utmp /var/log/wtmp
	chown root.utmp /var/log/btmp
	;;
	'stop')
	;;
	'restart')
	;;
	'reload'|'force-reload')
	;;
	'status')
	;;
	*)
	echo "Usage: $SELF start"
	exit 1
	;;
esac
スクリプトへ実行権限を付与、起動リンクを作成する。
pi@raspberrypi:~ $ sudo chmod 755 /etc/init.d/make-varlog-files

pi@raspberrypi:~ $ sudo update-rc.d make-varlog-files defaults 01 10
作成したスクリプトのランレベルをapache2より先にする。以下の例ではS01apache2、S01make-varlog-filesと同順となっているのでsudo mv S01apache2 S03apache2とし、ランレベルをS03とした。
pi@raspberrypi:~ $ cd /etc/rc2.d

pi@raspberrypi:/etc/rc2.d $ ls -la
total 8
drwxr-xr-x  2 root root 4096 Aug 14 08:01 .
drwxr-xr-x 95 root root 4096 Aug 14 07:47 ..
lrwxrwxrwx  1 root root   29 Aug 14 06:28 K01apache-htcacheclean -> ../init.d/apache-htcacheclean
lrwxrwxrwx  1 root root   17 Aug 14 06:28 S01apache2 -> ../init.d/apache2
lrwxrwxrwx  1 root root   22 Jun 27 00:28 S01avahi-daemon -> ../init.d/avahi-daemon
lrwxrwxrwx  1 root root   19 Jun 27 00:26 S01bluetooth -> ../init.d/bluetooth
lrwxrwxrwx  1 root root   26 Jun 27 00:25 S01console-setup.sh -> ../init.d/console-setup.sh
lrwxrwxrwx  1 root root   14 Jun 27 00:11 S01cron -> ../init.d/cron
lrwxrwxrwx  1 root root   14 Jun 27 00:25 S01dbus -> ../init.d/dbus
lrwxrwxrwx  1 root root   16 Jun 27 00:30 S01dhcpcd -> ../init.d/dhcpcd
lrwxrwxrwx  1 root root   17 Aug 14 07:18 S01dnsmasq -> ../init.d/dnsmasq
lrwxrwxrwx  1 root root   24 Jun 27 00:27 S01dphys-swapfile -> ../init.d/dphys-swapfile
lrwxrwxrwx  1 root root   17 Aug 14 07:18 S01hostapd -> ../init.d/hostapd
lrwxrwxrwx  1 root root   27 Aug 14 08:01 S01make-varlog-files -> ../init.d/make-varlog-files
lrwxrwxrwx  1 root root   14 Aug 14 06:49 S01nmbd -> ../init.d/nmbd
lrwxrwxrwx  1 root root   17 Jun 27 00:11 S01paxctld -> ../init.d/paxctld
lrwxrwxrwx  1 root root   18 Jun 27 00:06 S01plymouth -> ../init.d/plymouth
lrwxrwxrwx  1 root root   22 Jun 27 00:17 S01raspi-config -> ../init.d/raspi-config
lrwxrwxrwx  1 root root   15 Jun 27 00:23 S01rsync -> ../init.d/rsync
lrwxrwxrwx  1 root root   17 Jun 27 00:11 S01rsyslog -> ../init.d/rsyslog
lrwxrwxrwx  1 root root   21 Aug 14 06:49 S01samba-ad-dc -> ../init.d/samba-ad-dc
lrwxrwxrwx  1 root root   14 Aug 14 06:48 S01smbd -> ../init.d/smbd
lrwxrwxrwx  1 root root   13 Jun 27 00:28 S01ssh -> ../init.d/ssh
lrwxrwxrwx  1 root root   22 Jun 27 00:17 S01triggerhappy -> ../init.d/triggerhappy

pi@raspberrypi:/etc/rc2.d $ sudo mv S01apache2 S03apache2

pi@raspberrypi:/etc/rc2.d $ ls -la
total 8
drwxr-xr-x  2 root root 4096 Aug 14 08:03 .
drwxr-xr-x 95 root root 4096 Aug 14 07:47 ..
lrwxrwxrwx  1 root root   29 Aug 14 06:28 K01apache-htcacheclean -> ../init.d/apache-htcacheclean
lrwxrwxrwx  1 root root   22 Jun 27 00:28 S01avahi-daemon -> ../init.d/avahi-daemon
lrwxrwxrwx  1 root root   19 Jun 27 00:26 S01bluetooth -> ../init.d/bluetooth
lrwxrwxrwx  1 root root   26 Jun 27 00:25 S01console-setup.sh -> ../init.d/console-setup.sh
lrwxrwxrwx  1 root root   14 Jun 27 00:11 S01cron -> ../init.d/cron
lrwxrwxrwx  1 root root   14 Jun 27 00:25 S01dbus -> ../init.d/dbus
lrwxrwxrwx  1 root root   16 Jun 27 00:30 S01dhcpcd -> ../init.d/dhcpcd
lrwxrwxrwx  1 root root   17 Aug 14 07:18 S01dnsmasq -> ../init.d/dnsmasq
lrwxrwxrwx  1 root root   24 Jun 27 00:27 S01dphys-swapfile -> ../init.d/dphys-swapfile
lrwxrwxrwx  1 root root   17 Aug 14 07:18 S01hostapd -> ../init.d/hostapd
lrwxrwxrwx  1 root root   27 Aug 14 08:01 S01make-varlog-files -> ../init.d/make-varlog-files
lrwxrwxrwx  1 root root   14 Aug 14 06:49 S01nmbd -> ../init.d/nmbd
lrwxrwxrwx  1 root root   17 Jun 27 00:11 S01paxctld -> ../init.d/paxctld
lrwxrwxrwx  1 root root   18 Jun 27 00:06 S01plymouth -> ../init.d/plymouth
lrwxrwxrwx  1 root root   22 Jun 27 00:17 S01raspi-config -> ../init.d/raspi-config
lrwxrwxrwx  1 root root   15 Jun 27 00:23 S01rsync -> ../init.d/rsync
lrwxrwxrwx  1 root root   17 Jun 27 00:11 S01rsyslog -> ../init.d/rsyslog
lrwxrwxrwx  1 root root   21 Aug 14 06:49 S01samba-ad-dc -> ../init.d/samba-ad-dc
lrwxrwxrwx  1 root root   14 Aug 14 06:48 S01smbd -> ../init.d/smbd
lrwxrwxrwx  1 root root   13 Jun 27 00:28 S01ssh -> ../init.d/ssh
lrwxrwxrwx  1 root root   22 Jun 27 00:17 S01triggerhappy -> ../init.d/triggerhappy
lrwxrwxrwx  1 root root   17 Aug 14 06:28 S03apache2 -> ../init.d/apache2
サーバを再起動しスクリプトを実行しておく。
ホスト名を変更
適当なエディタで/etc/hostnameおよび/etc/hostsの内容を適宜変更する。
raspberrypi
 ↓
your-own-hostname
127.0.1.1       raspberrypi
 ↓
127.0.1.1       your-own-hostname
サーバを再起動しホスト名が変更になったこと(sshでの接続先が変更)を確認する。
終了/再起動/起動ボタンを実装する
薄膜パネルスイッチ [HC-543-3]の各ボタンへ以下のように機能を割り当てる。
- 赤: シャットダウン
- 黄: リセット
- 緑: 再開
薄膜パネルスイッチとRaspberry PiのGPIOを以下のように接続する。同時にケースへ格納する。
- GND:薄膜パネルスイッチ1番ピン(共通ピン):ジャンパワイヤ(黒)
- GPI003:薄膜パネルスイッチ2番ピン(再開ボタン):ジャンパワイヤ(緑)
- GPIO19:薄膜パネルスイッチ3番ピン(リセットボタン)ジャンパワイヤ(オレンジ)
- GPIO26:薄膜パネルスイッチ4番ピン(シャットダウンボタン)ジャンパワイヤ(赤)
- GPIO02:ケースファン(赤)
- GND:ケースファン(黒)
以下写真を参照の事。

GND:薄膜パネルスイッチ1番ピン(共通ピン):ジャンパワイヤ(黒)
GPI003:薄膜パネルスイッチ2番ピン(再開ボタン):ジャンパワイヤ(緑)

GPIO19:薄膜パネルスイッチ3番ピン(リセットボタン)ジャンパワイヤ(オレンジ)
GPIO26:薄膜パネルスイッチ4番ピン(シャットダウンボタン)ジャンパワイヤ(赤)

GPIO02:ケースファン(赤)
GND:ケースファン(黒)

ケースを閉じた状態(薄膜パネルスイッチは両面テープで貼付済)
以下コマンドを実行し、GPIOを制御するライブラリをインストールする。
pi@your-own-hostname:~ $ sudo apt-get install libi2c-dev git-core

pi@your-own-hostname:~ $ git clone git://git.drogon.net/wiringPi

pi@your-own-hostname:~ $ cd wiringPi

pi@your-own-hostname:~/wiringPi $ ./build
適当なエディタで~/shutdown.pyおよび~/reboot.pyを新規ファイルとして作成、それぞれに以下内容を書き込む。
# !/usr/bin/python
# coding:utf-8
import time
import RPi.GPIO as GPIO
import os

GPIO.setmode(GPIO.BCM)

# GPIO26pinを入力モードとし、pull up設定とします
GPIO.setup(26,GPIO.IN,pull_up_down=GPIO.PUD_UP)

GPIO.wait_for_edge(26, GPIO.FALLING)

os.system("sudo shutdown -h now")

GPIO.cleanup()
# !/usr/bin/python
# coding:utf-8
import time
import RPi.GPIO as GPIO
import os

GPIO.setmode(GPIO.BCM)

# GPIO19pinを入力モードとし、pull up設定とします
GPIO.setup(19,GPIO.IN,pull_up_down=GPIO.PUD_UP)

GPIO.wait_for_edge(19, GPIO.FALLING)

os.system("sudo shutdown -r now")

GPIO.cleanup()
~/shutdown.pyおよび~/reboot.pyへ実行権限を付与、サービスとして登録する。
pi@your-own-hostname:~ $ sudo chmod 0755 ~/shudtown.py
pi@your-own-hostname:~ $ sudo chmod 0755 ~/reboot.py

pi@your-own-hostname:~ $ sudo mkdir /usr/lib/systemd/system
適当なエディタで/usr/lib/systemd/system/shutdown_by_button.serviceおよび/usr/lib/systemd/system/reboot_by_button.serviceを新規ファイルとして作成、それぞれに以下内容を書き込む。
[Unit]
Description=Shutdown raspberry pi by GPIO button input
Wants=network.target

[Service]
ExecStart=/home/pi/shutdown.py
Restart=on-failure
RestartSec=10s

[Install]
WantedBy=multi-user.target
[Unit]
Description=Reboot raspberry pi by GPIO button input
Wants=network.target

[Service]
ExecStart=/home/pi/reboot.py
Restart=on-failure
RestartSec=10s

[Install]
WantedBy=multi-user.target
以下コマンドによりdaemonのリロードとサービスの実行を行う。
pi@your-own-hostname:~ $ sudo systemctl daemon-reload
pi@your-own-hostname:~ $ sudo systemctl start shutdown_by_button
pi@your-own-hostname:~ $ sudo systemctl enable shutdown_by_button
pi@your-own-hostname:~ $ sudo systemctl start reboot_by_button
pi@your-own-hostname:~ $ sudo systemctl enable reboot_by_button
以下コマンドによりシャットダウン/リブートサービスが稼働している(Active: active (running))ことを確認する。
pi@your-own-hostname:~ $ sudo systemctl status shutdown_by_button
pi@your-own-hostname:~ $ sudo systemctl status reboot_by_button
同様に、赤ボタンを押下しシステムの終了、緑ボタンを押下しシステムの再開、黄ボタンを押下しシステムのリブートが行われることを確認する。
watchdog(死活監視)の有効化
運用方法次第ではあるが、念のためwatchdogを有効化しておく。
pi@your-own-hostname:~ $ sudo apt-get install watchdog
適当なエディタで/boot/config.txt、/etc/modprobe.d/bcm2835-wdt.conf(新規ファイル)、/etc/systemd/system.confを開き、 それぞれの内容を修正する。
設定内容としては5秒ごとにheartbeatを発生、10秒間heartbeatが発生しなければ再起動となる。
dtparam=watchdog=on
options bcm2835_wdt heartbeat=10 nowayout=0
RuntimeWatchdogSec=5
サーバの再起動後、watchdogの有効化を確認する。
pi@your-own-hostname:~ $ dmesg | grep bcm2835-wdt
コンテンツ作成上の問題点
iPadを操作端末とした場合、ウェブサイト上で以下UIを制限したい。
- ピンチイン/ピンチアウトによる拡大縮小
- ダブルタップによる拡大
- コンテンツ上端/下端でのバウンススクロール
ピンチインピンチアウトによる拡大縮小とダブルタップによる拡大はそれぞれ以下スクリプトで制限を行った。
/* ピンチインピンチアウトによる拡大縮小を禁止 */
document.documentElement.addEventListener('touchstart', function (e) {
  if (e.touches.length >= 2) {e.preventDefault();}
}, false);
/* ダブルタップによる拡大を禁止 */
var t = 0;
document.documentElement.addEventListener('touchend', function (e) {
  var now = new Date().getTime();
  if ((now - t) < 350){
    e.preventDefault();
  }
  t = now;
}, false);
コンテンツ上端/下端でのバウンススクロールはiNoBounceを導入する事により禁止する事が可能となった。
iOS上でvideoタグによる自動再生は(音声が含まれている場合)行えない為、再生ボタンを明示的に設置し再生を促す必要がある。同様に、動画フィアル1コマ目を画像化しposterに設定、動画の再生が終了したら0フレーム目に移動するようスクリプトを組んだ。
htmlのbodyタグ及び動画再生用のjavascriptのサンプルは以下。
<body>
<article class="mainContentsArticle">
<video id="video" class="video1920" width="100%;" poster="./media/1920-1080_poster.png" src="./media/aspectSample_1920-1080.mp4" type="video/mp4" /></video>
<div id="control">
<p class="controlsP"><button id="play">再生</button> <button id="pause">一時停止</button> <button id="back">戻る</button></p>
</div>
</article>
<script src="./js/moviePlayer.js"></script>
</body>
// videoの取得
var video = document.getElementById('video');
// 自動再生
video.autoplay = false;
// ループ
video.loop = false;

// ビデオのダウンロードが完了したとき
video.addEventListener('canplaythrough', function() {
      video.currentTime = 0;
});

// 再生状態になったとき
video.addEventListener('play', function() {
    console.log('再生中');
});
// 停止状態になったとき
video.addEventListener('pause', function() {
    console.log('停止中');
    video.currentTime = 0;
});

// playボタンを押した時
var play = document.getElementById('play');
play.addEventListener('click', function () {
    video.play();
});

// pauseボタンを押した時
var pause = document.getElementById('pause');
pause.addEventListener('click', function () {
    video.pause();
});

// 戻るボタンを押した時
var back = document.getElementById('back');
back.addEventListener('click', function () {
    window.history.back(-1);
});
コンテンツのPWA化##
コンテンツページへのブックマークをホーム画面上に保存すると、疑似的なPWA(Progressive Web Apps)として扱う事が出来る。その場合、html内に以下metaデータを登録する必要がある。
2019/12/25 更新
iPad OS 13.3 環境下では、HTTPS通信環境およびmanifest.jsonによるPWAの実現を行わない場合、2ページ目以降の表示に支障が発生する。
その解決方法を以下に投稿した。
Raspberry Pi および iPad による PWA コンテンツの作成
<meta name="apple-mobile-web-app-capable" content="yes" />
<meta name="apple-mobile-web-app-status-bar-style" content="default" />
<link rel="apple-touch-icon" href="./img/apple-touch-icon-152x152.png" />
<meta name="viewport" content="width=device-width,initial-scale=1.0,minimum-scale=1.0,maximum-scale=1.0,user-scalable=no">
参考としたウェブサイト
デジタルサイネージを作ったので学んだことを晒してみる Part.1-Qiita
videoタグの再生終了後にposterを表示させる方法
JavaScriptでvideoを操作する
ファン付きアルミ製Raspberry Pi用ケース(黒)
Raspberry Pi 3でウェブサーバーを建てる ③ Apache編 - 気まま研究所ブログ
Raspberry Pi 3 にファイル共有「Samba」をインストール
iNoBounce
Raspberry PiのログをRAMDISKに置く方法 | キュア子の開発ブログ
Raspberry Pi 3 にシャットダウン/リブート/再開ボタンを追加する - はむ!の空想具現化したいブログ
Pi 3をWifi AccessPoint化(Raspbian stretch Lite 2018) - new_western_elec
Raspberry Pi 3/ Zero / Zero W等で watchdogを有効化する - Qiita


