概要
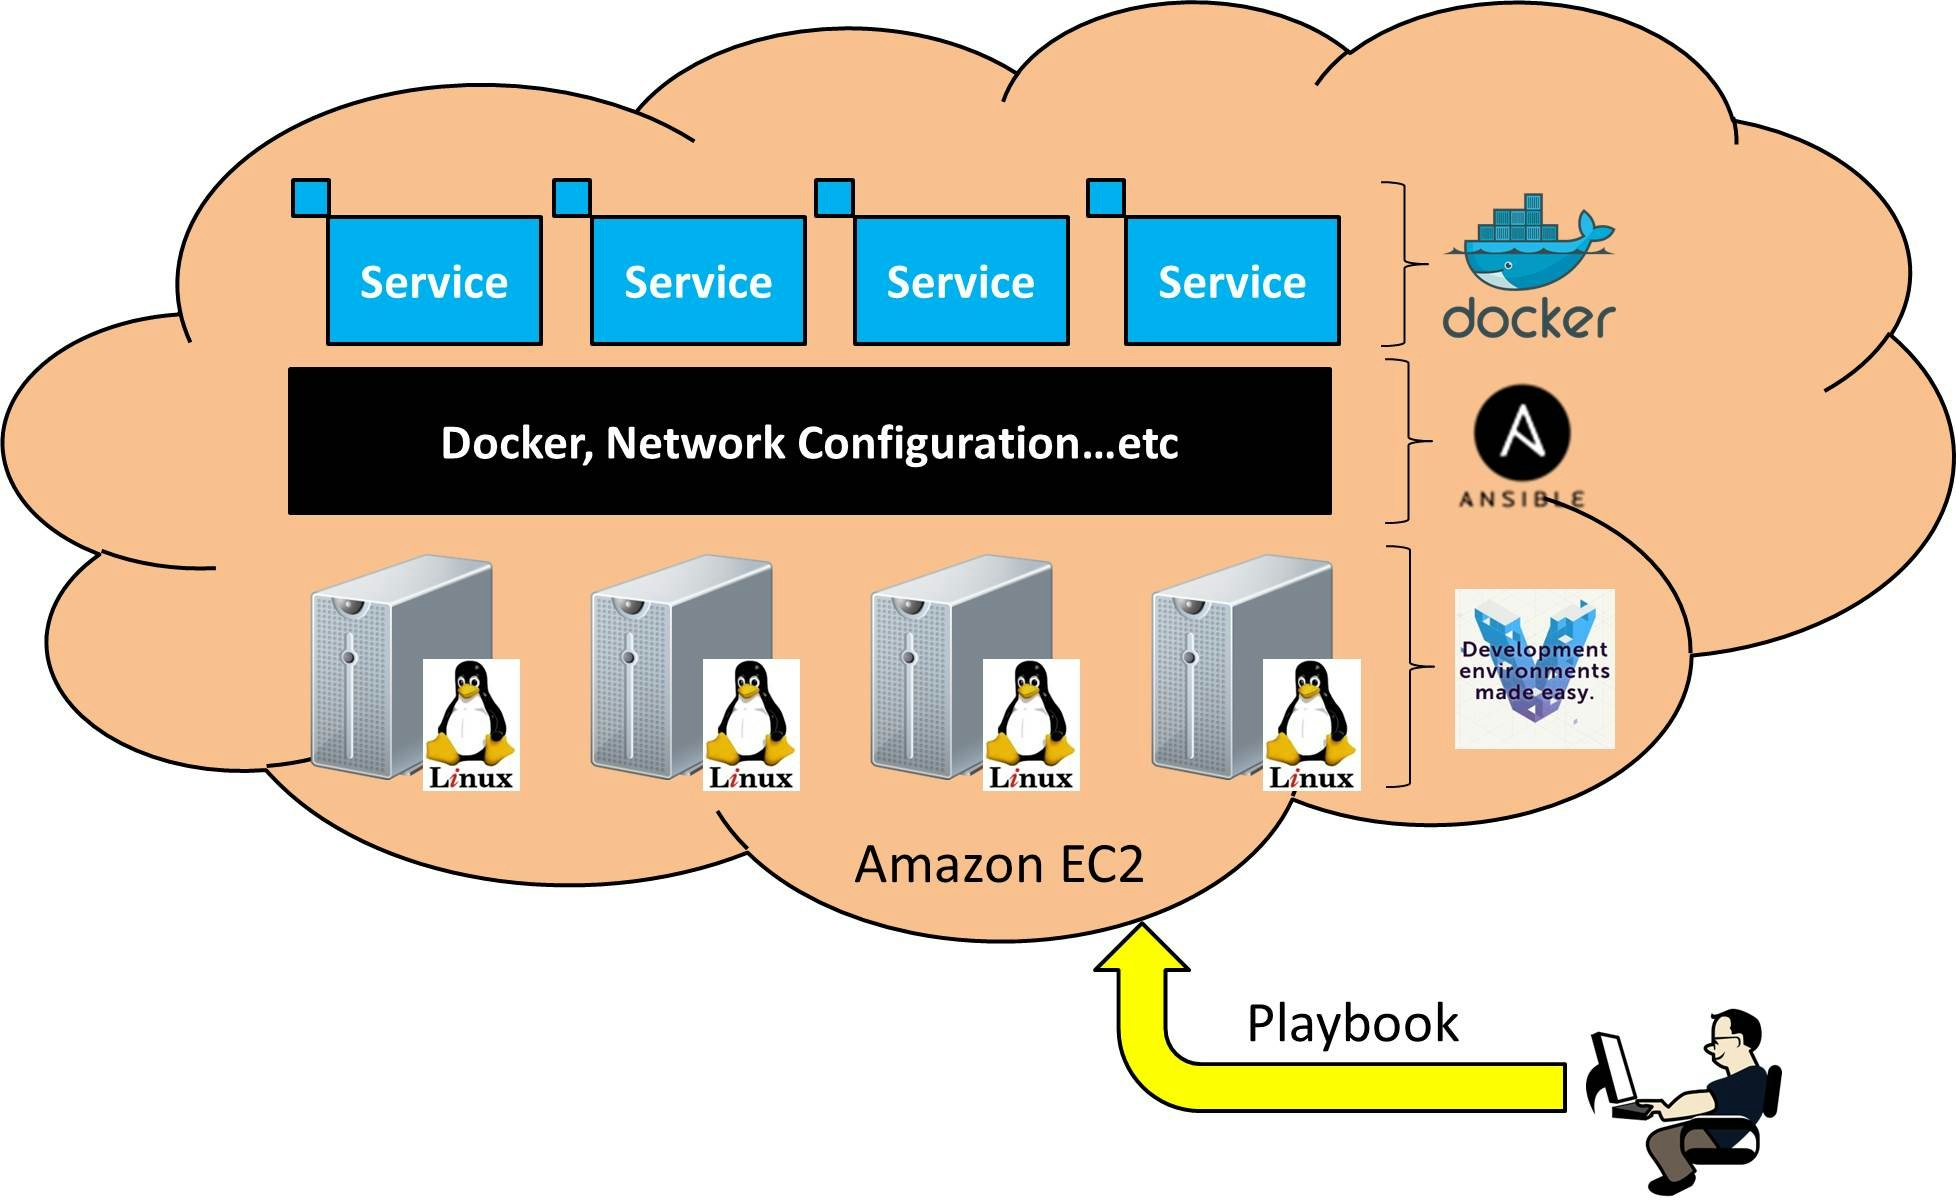
最近話題の構成管理ツールAnsibleを使ってAmazon EC2上でDocker環境を構築する。
なぜAnsible+Docker?
本音としては、単に両方使ってみたかったから。
ただ、Ansible単体でやらない言い訳みたいなのもある。
- 色んなサービスの設定ファイルをサーバに直接混ぜて配置したくない
- サービス単体でアップデートや環境を破壊とかしたい
- 各サービスに合わせてミドルウェアの整合性合わせてって作業が面倒くさい
実施内容
- AmazonEC2 + Vagrantの導入(実施済み)
- AnsibleのPlaybooks作成
- Vagrantfileの修正
- Dockerの動作確認
AmazonEC2 + Vagrantの導入
こっちを参照
AnsibleのPlaybooks作成
[公式]:Dockerのインストール方法を参考に以下を作成
$ tree
.
├── README.md
├── Vagrantfile
├── docs
│   └── ec2
│       └── setup.md
└── setup
    └── provision
        └── docker.yml

4 directories, 4 files
docker.yml
- hosts: all
  become: yes
  tasks:
    - name: apt-get install packages
      apt: pkg={{ item }} state=present update_cache=yes
      with_items:
        - curl
        - apt-transport-https
        - ca-certificates

    - name: set dockers official gpg key
      apt_key:
          url: "https://download.docker.com/linux/ubuntu/gpg"
          state: present
      register: set_key

    - name: set up the stable repository
      apt_repository:
        repo: deb [arch=amd64] https://download.docker.com/linux/ubuntu {{ ansible_distribution_release }} stable
        state: present
      when: set_key
      register: set_repo

    - name: install docker-ce
      apt: pkg=docker-ce state=present update_cache=yes
      when:  set_repo
Vagrantfileの修正
要点は2つ
- サーバ側にAnsibleのPlaybookを送信する
- Provisionにansible_localを設定し、サーバでAnsibleのインストール+実行を行う
Vagrantfile
  Dotenv.load

  Vagrant.configure("2") do |config|
    # Vagrant Box
    config.vm.box = "dummy"

+   # Rsync Directory
+   config.vm.synced_folder "setup", "/vagrant", type: "rsync"

+   # Ansible
+   config.vm.provision "ansible_local" do |ansible|
+     ansible.playbook = "provision/docker.yml"
+   end

    # AWS
    config.vm.provider :aws do |aws, override|
        ## 省略...
    end
  end
Dockerの動作確認
$ vagrant up
Bringing machine 'default' up with 'aws' provider...
==> default: Warning! The AWS provider doesn't support any of the Vagrant
==> default: high-level network configurations (`config.vm.network`). They
==> default: will be silently ignored.
==> default: Launching an instance with the following settings...
==> default:  -- Type: t2.micro
==> default:  -- AMI: ami-c68fc7a1
==> default:  -- Region: ap-northeast-1
==> default:  -- Availability Zone: ap-northeast-1c
==> default:  -- Keypair: default
==> default:  -- Subnet ID: subnet-594ac601
==> default:  -- Elastic IP: true
==> default:  -- User Data: yes
==> default:  -- Security Groups: ["sg-8897d1ef"]
==> default:  -- User Data: sed -i -e 's/^\(Defaults.*requiretty\)/#\1/' /etc/sudoers
==> default:  -- Block Device Mapping: []
==> default:  -- Terminate On Shutdown: false
==> default:  -- Monitoring: false
==> default:  -- EBS optimized: false
==> default:  -- Source Destination check:
==> default:  -- Assigning a public IP address in a VPC: true
==> default:  -- VPC tenancy specification: default
==> default: Waiting for instance to become "ready"...
==> default: Waiting for SSH to become available...
==> default: Machine is booted and ready for use!
==> default: Rsyncing folder: /mnt/c/Users/kazuyoshi/aws-training/setup/ => /vagrant
==> default: Running provisioner: ansible_local...
    default: Installing Ansible...
    default: Running ansible-playbook...

PLAY [all] *********************************************************************

TASK [setup] *******************************************************************
ok: [default]

TASK [apt-get install packages] ************************************************
ok: [default] => (item=[u'curl', u'apt-transport-https', u'ca-certificates'])

TASK [set dockers official gpg key] ********************************************
changed: [default]

TASK [set up the stable repository] ********************************************
changed: [default]

TASK [install docker-ce] *******************************************************
changed: [default]

PLAY RECAP *********************************************************************
default                    : ok=5    changed=3    unreachable=0    failed=0
$ vagrant ssh
Welcome to Ubuntu 16.04.2 LTS (GNU/Linux 4.4.0-64-generic x86_64)

 * Documentation:  https://help.ubuntu.com
 * Management:     https://landscape.canonical.com
 * Support:        https://ubuntu.com/advantage

  Get cloud support with Ubuntu Advantage Cloud Guest:
    http://www.ubuntu.com/business/services/cloud

10 packages can be updated.
0 updates are security updates.


$ sudo docker run hello-world
Unable to find image 'hello-world:latest' locally
latest: Pulling from library/hello-world
78445dd45222: Pull complete
Digest: sha256:c5515758d4c5e1e838e9cd307f6c6a0d620b5e07e6f927b07d05f6d12a1ac8d7
Status: Downloaded newer image for hello-world:latest

Hello from Docker!
This message shows that your installation appears to be working correctly.

To generate this message, Docker took the following steps:
 1. The Docker client contacted the Docker daemon.
 2. The Docker daemon pulled the "hello-world" image from the Docker Hub.
 3. The Docker daemon created a new container from that image which runs the
    executable that produces the output you are currently reading.
 4. The Docker daemon streamed that output to the Docker client, which sent it
    to your terminal.

To try something more ambitious, you can run an Ubuntu container with:
 $ docker run -it ubuntu bash

Share images, automate workflows, and more with a free Docker ID:
 https://cloud.docker.com/

For more examples and ideas, visit:
 https://docs.docker.com/engine/userguide/

$ exit
logout
所感
本格的にAnsibleを使っていこうとするとAnsible Documentationを読み込まないと良いPlaybooksが書けないかも。
ただ、冪等性とかを考えないならcommandやshellでshellscriptで書いてたものを移植すれば良いので簡単に扱える
次は、サービスのDockerをしてからホストサーバのマルチ化かな?
インフラのサービス化として、本格的に検証環境作っていくのはまだまだ先か
