This article is the 1st day of the JPOUG Advent Calendar 2021 and OCI Advent Calendar 2021 part 2.
The Advent Calendar is a little empty, so I'm writing an article retroactively.
:)
Oracle Cloud Infrastructure Advent Calendar 2021
https://qiita.com/advent-calendar/2021/oci
This is an English translation of the following Japanese article.
CMAN(Oracle Connection Manager) と ロールベース・サービス/NLB で
OCI DBCS Data Guard構成 の Primary接続 を シングル・エンドポイント化してみる。
(Oracle Database, Oracle Cloud Infrastructure)
https://qiita.com/ora_gonsuke777/items/9460b784a2a34240fe80
CMAN (Oracle Connection Manager) is a proxy server for Oracle Database.
10 Configuring Oracle Connection Manager
https://docs.oracle.com/en/database/oracle/oracle-database/19/netag/configuring-oracle-connection-manager.html
Oracle Connection Manager is a proxy server that forwards connection requests to databases or other proxy servers.
In this article, CMAN, the Data Guard role-based service, and NLB (Network Load Balancer) to create a single endpoint for the Data Guard configuration of OCI DBCS.
1. Review of past articles and what I want to achieve in this article
This article is a sequel to the following article.
Try to enable Data Guard on OCI DBCS VM and configure role-based services to transparently connect to PRIMARY roles. (Oracle Cloud Infrastructure)
https://qiita.com/ora_gonsuke777/items/7f705f29fb65050bf295
The above configuration still provides a transparent connection to the Primary role, but the disadvantage is that it requires the following complex connection string to be written on the Client side.
AYUDBCS_PRIMARY2=(
  DESCRIPTION_LIST=
    (LOAD_BALANCE=OFF)(FAILOVER=ON)
    (
      DESCRIPTION=
        (CONNECT_TIMEOUT=5)(TRANSPORT_CONNECT_TIMEOUT=5)(RETRY_DELAY=3)(RETRY_COUNT=3)(ENABLE=BROKEN)
        (ADDRESS_LIST=
          (ADDRESS=(PROTOCOL=TCP)(HOST=ayudbcs1-scan.ayuprvsubnet2.ayuvcn1.oraclevcn.com)(PORT=1521))
        )
        (CONNECT_DATA=(SERVER=DEDICATED)(SERVICE_NAME=ayudbcs_primary2.ayuprvsubnet2.ayuvcn1.oraclevcn.com))
    )
    (
      DESCRIPTION=
        (CONNECT_TIMEOUT=5)(TRANSPORT_CONNECT_TIMEOUT=5)(RETRY_DELAY=3)(RETRY_COUNT=3)(ENABLE=BROKEN)
        (ADDRESS_LIST=
          (ADDRESS=(PROTOCOL=TCP)(HOST=ayudbcs2-scan.ayuprvsubnet2.ayuvcn1.oraclevcn.com)(PORT=1521))
        )
        (CONNECT_DATA=(SERVER=DEDICATED)(SERVICE_NAME=ayudbcs_primary2.ayuprvsubnet2.ayuvcn1.oraclevcn.com))
    )
)
As mentioned earlier, in this article I will try to hide the physical configuration of Data Guard with CMAN/Role-Based Service/NLB and make it a single endpoint.
The single endpoint simplifies the connection string on the Client side.
2. connection topology
Connect the PC to the Data Guard Primary with the following configuration
The reason why there are two CMAN Compute units is that they are redundant for fault tolerance, but if you don't need fault tolerance, there is no problem with one unit.
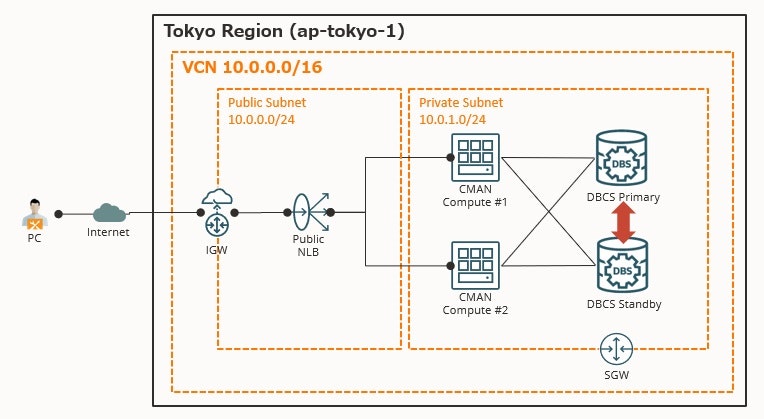
The configuration of each OCI resource is as follows.
Compute: E4 flex oCPU 1 * 2 units (for CMAN)
OS : Oracle Linux 7.9
Oracle Client 19c(19.3, Not Instant Client, Custom Install)
DBCS : VM Standard2.2, EEHP, Version 19c(19.12), 1node * 2 sets (Primary and Standby for Data Guard)
Network Load Balancer * 1 unit
3. OCI DBCS Data Guard configuration and role-based services registration.
The details are omitted in this article.
Configure the OCI DBCS to Data Guard configuration as described in the following article, and register the role-based service.
Try to enable Data Guard on OCI DBCS VM and configure role-based services to transparently connect to PRIMARY roles. (Oracle Cloud Infrastructure)
https://qiita.com/ora_gonsuke777/items/7f705f29fb65050bf295
# In the primary
srvctl add service -db ayucdb3_nrt1rt -service ayudbcs_primary -pdb ayupdb3 -role PRIMARY
# In the Standby
srvctl add service -db ayucdb3_nrt1gh -service ayudbcs_primary -pdb ayupdb3 -role PRIMARY
# Service started in the Primary
srvctl start service -db ayucdb3_nrt1rt -service ayudbcs_primary

# Verify Service Registration at the listener
lsnrctl status
:
Service "ayudbcs_primary.ayuprvsubnet02.ayuvcn01.oraclevcn.com" has 1 instance(s).
  Instance "AYUCDB3", status READY, has 2 handler(s) for this service...
:
4. Installing Oracle Client 19c (Not Instant Client, custom installation required)
Install Oracle Client 19c (Not Instant Cliet) on CMAN Compute.
The details are omitted in this article. Please refer to the following article.
Please note that you need to install CMAN and Network Listener in your custom installation.
Installing Oracle Connection Manager
https://qiita.com/sa_to_ru13/items/c49366ee61afec045455How to create a database link from Oracle Autonomous Database to a private on-premise DB
https://qiita.com/RexZheng/items/92fb55686fff9811bfbe
5. Open the DB connection port of CMAN Compute (firewall-cmd)
CMAN Compute will launch the CMAN process and listen to the DB connection port (1521 in this article).
It needs to open the port on OS Firewall.
I forgot this and wasted about 3 hours on it...
firewall-cmd --add-port=1521/tcp --zone=public --permanent
firewall-cmd --reload
firewall-cmd --list-all
:
public (active)
  target: default
  icmp-block-inversion: no
  interfaces: ens3
  sources:
  services: dhcpv6-client ssh
  ports: 1521/tcp ***this!!!
:
Open port on both CMAN Compute.
6. CMAN configuration (edit cman.ora) and CMAN startup
Edit cman.ora to configure CMAN. I refer to the aforementioned article.
sudo su - oracle
cd /u01/app/oracle/product/19.0.0/client_1/network/admin
vi cman.ora
The contents of cman.ora are as follows. It's OK almost copy and paste.
Modify only the host part with the Compute host name (FQDN).
cman_listener = (configuration=
  (address=(protocol=tcp)(host=ayu-cman01.ayuprvsubnet02.ayuvcn01.oraclevcn.com)(port=1521))
  (parameter_list =
    (log_level=ADMIN)
    (max_connections=1024)
    (idle_timeout=0)
    (registration_invited_nodes = *)
    (inbound_connect_timeout=0)
    (session_timeout=0)
    (outbound_connect_timeout=0)
    (max_gateway_processes=16)
    (min_gateway_processes=2)
    (remote_admin=on)
    (trace_level=off)
    (max_cmctl_sessions=4)
    (event_group=init_and_term,memory_ops)
  )
  (rule_list=
    (rule=
       (src=*)(dst=*)(srv=*)(act=accept)
    )
  )
)
Start CMAN with the following command.
export ORACLE_HOME=/u01/app/oracle/product/19.0.0/client_1
export PATH=${ORACLE_HOME}/bin:${PATH}
export TNS_ADMIN=${ORACLE_HOME}/network/admin
cmctl startup -c cman_listener
:
CMCTL for Linux: Version 19.0.0.0.0 - Production on 12-DEC-2021 12:10:20

Copyright (c) 1996, 2019, Oracle.  All rights reserved.

Current instance cman_listener is not yet started
Connecting to (DESCRIPTION=(address=(protocol=tcp)(host=ayu-cman01.ayuprvsubnet02.ayuvcn01.oraclevcn.com)(port=1521)))
Starting Oracle Connection Manager instance cman_listener. Please wait...
CMAN for Linux: Version 19.0.0.0.0 - Production
Status of the Instance
----------------------
Instance name             cman_listener
Version                   CMAN for Linux: Version 19.0.0.0.0 - Production
Start date                12-DEC-2021 12:10:20
Uptime                    0 days 0 hr. 0 min. 9 sec
Num of gateways started   2
Average Load level        0
Log Level                 ADMIN
Trace Level               OFF
Instance Config file      /u01/app/oracle/product/19.0.0/client_1/network/admin/cman.ora
Instance Log directory    /u01/app/oracle/diag/netcman/ayu-cman01/cman_listener/alert
Instance Trace directory  /u01/app/oracle/diag/netcman/ayu-cman01/cman_listener/trace
The command completed successfully.
It can check the running status of CMAN with cmctl show status and cmctl show services.
cmctl show status -c cman_listener
cmctl show services -c cman_listener
To shut down, use cmctl shutdown.
cmctl shutdown -c cman_listener
7. Edit tnsnames.ora and REMOTE_LISTENER in DBCS, and register the service.
Edit tnsnames.ora in DBCS to add the entry for CMAN.
sudo su - oracle
cd $ORACLE_HOME/network/admin
vi tnsnames.ora
The following are the entries to be added. Set the CMAN listening point (host name or IP + port number).
CMAN01 =
  (ADDRESS = (PROTOCOL = TCP)(HOST = ayu-cman01.ayuprvsubnet02.ayuvcn01.oraclevcn.com)(PORT = 1521))

CMAN02 =
  (ADDRESS = (PROTOCOL = TCP)(HOST = ayu-cman02.ayuprvsubnet02.ayuvcn01.oraclevcn.com)(PORT = 1521))
After adding the entry to tnsnames.ora, edit the REMOTE_LISTENER parameter to register and activate the entry.
sqlplus /nolog
CONNECT /AS SYSDBA
ALTER SYSTEM SET REMOTE_LISTENER="CMAN01,CMAN02" SCOPE=BOTH SID='*';
ALTER SYSTEM REGISTER;
SHOW PARAMETER REMOTE_LISTENER

System altered.
System altered.

NAME                                 TYPE        VALUE
------------------------------------ ----------- ------------------------------
remote_listener                      string      CMAN01,CMAN02
Please execute the above on both Primary and Standby.
If all goes well, the DB service will be registered in the CMAN equivalent to REMOTE LISTENER.
Check the registration status of the DB service on the CMAN side.
sudo su - oracle
export ORACLE_HOME=/u01/app/oracle/product/19.0.0/client_1
export PATH=${ORACLE_HOME}/bin:${PATH}
export TNS_ADMIN=${ORACLE_HOME}/network/admin
cmctl show status -c cman_listener
cmctl show services -c cman_listener
:
Service "ayudbcs_primary.ayuprvsubnet02.ayuvcn01.oraclevcn.com" has 1 instance(s).
  Instance "AYUCDB3", status READY, has 1 handler(s) for this service...
    Handler(s):
      "DEDICATED" established:0 refused:0 state:ready
         REMOTE SERVER
         (DESCRIPTION=(CONNECT_DATA=(SERVICE_NAME=))(ADDRESS=(PROTOCOL=tcp)(HOST=10.0.1.82)(PORT=1521)))
:
It can see that the role-based service has been registered in CMAN.
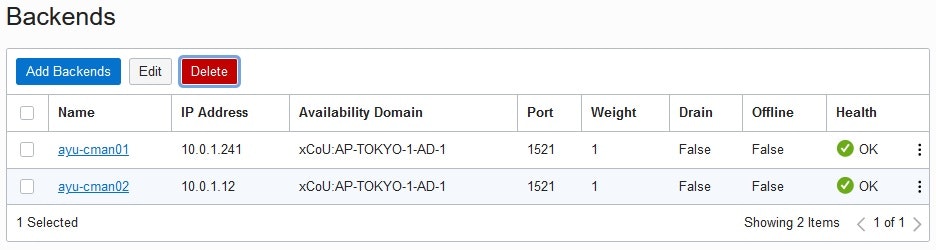
8. Configuring NLB (Network Load Balancer)
The details are omitted in this article.
Please refer to the following article and set CMAN Compute to Backends of NLB(Network Load Balancer).
Try to connect to the DBCS created in the Private Subnet via the Network Load Balancer in the Public Subnet. (Oracle Cloud Infrastructure)
https://qiita.com/ora_gonsuke777/items/e20357387dfa6f12d2b7
In this case, we have configured CMAN Compute as NLB Backends as follows.
9. Connecting from client PC.(SQL*Plus, EZCONNECT)
Let's try to connect from the client (PC).
First, let's try to connect using PowerShell's sqlplus (Instant Client).
Editing the connection string in the Host Name(or IP):Port/Service-Name of the EZCONNECT.
For the hostname part, specify the public IP of the Network Load Balancer.
$env:ORACLE_HOME = "C:\tools\OracleInstantClient19c"
cd C:\tools\OracleInstantClient19c
./sqlplus /nolog
CONNECT AYSHIBAT/xxxxxxxx@1xx.1xx.1xx.1xx:1521/ayudbcs_primary.ayuprvsubnet02.ayuvcn01.oraclevcn.com
SET LINESIZE 120;
COLUMN HOST_NAME FORMAT A40;
COLUMN INSTANCE_NAME FORMAT A40;
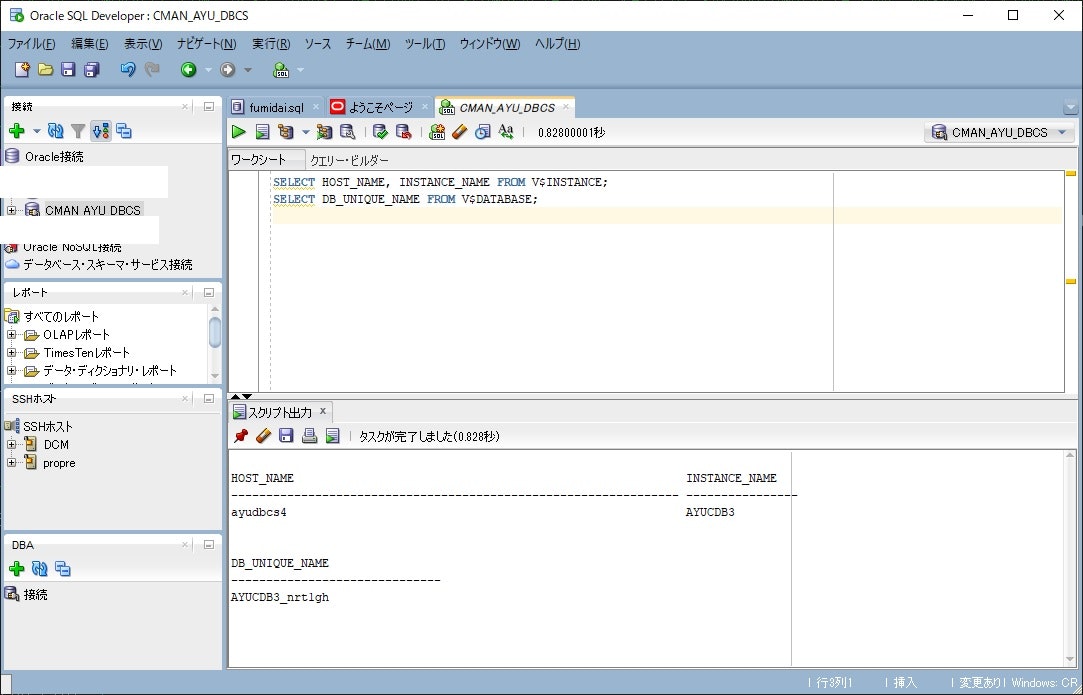
SELECT HOST_NAME, INSTANCE_NAME FROM V$INSTANCE;
SELECT DB_UNIQUE_NAME FROM V$DATABASE;
Connected.
HOST_NAME INSTANCE_NAME
---------------------------------------- ----------------------------------------
ayudbcs3 AYUCDB3
SQL> SELECT DB_UNIQUE_NAME FROM V$DATABASE;
DB_UNIQUE_NAME
------------------------------
AYUCDB3_nrt1rt
Now it is a successful connection, let's try to switchover to the Data Guard Association in the OCI Console.
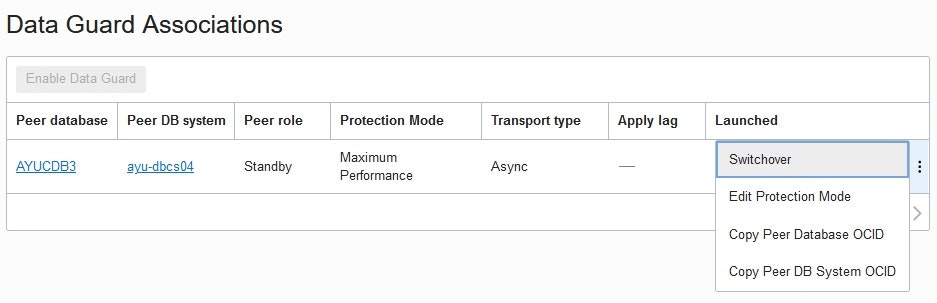
After the Data Guard switchover is complete, try the same connection again.
$env:ORACLE_HOME = "C:\tools\OracleInstantClient19c"
cd C:\tools\OracleInstantClient19c
./sqlplus /nolog

CONNECT AYSHIBAT/xxxxxxxx@1xx.1xx.1xx.1xx:1521/ayudbcs_primary.ayuprvsubnet02.ayuvcn01.oraclevcn.com

SET LINESIZE 120;
COLUMN HOST_NAME FORMAT A40;
COLUMN INSTANCE_NAME FORMAT A40;
SELECT HOST_NAME, INSTANCE_NAME FROM V$INSTANCE;
SELECT DB_UNIQUE_NAME FROM V$DATABASE;

Connected.

HOST_NAME                                INSTANCE_NAME
---------------------------------------- ----------------------------------------
ayudbcs4                                 AYUCDB3

SQL> SELECT DB_UNIQUE_NAME FROM V$DATABASE;

DB_UNIQUE_NAME
------------------------------
AYUCDB3_nrt1gh
It is a success connected to the Old-Standby (Primary after Switchover).
10. Connection from client PC. (SQL Developer, JDBC URL, EZCONNECT)
Next, let's try to connect from SQL Developer on the client PC.
Editing the following EZCONNECT string in the JDBC URL (JDBC connection string).
jdbc:oracle:thin:@//NLB Public IP:port/role-based service name
Set the custom JDBC URL as shown below.
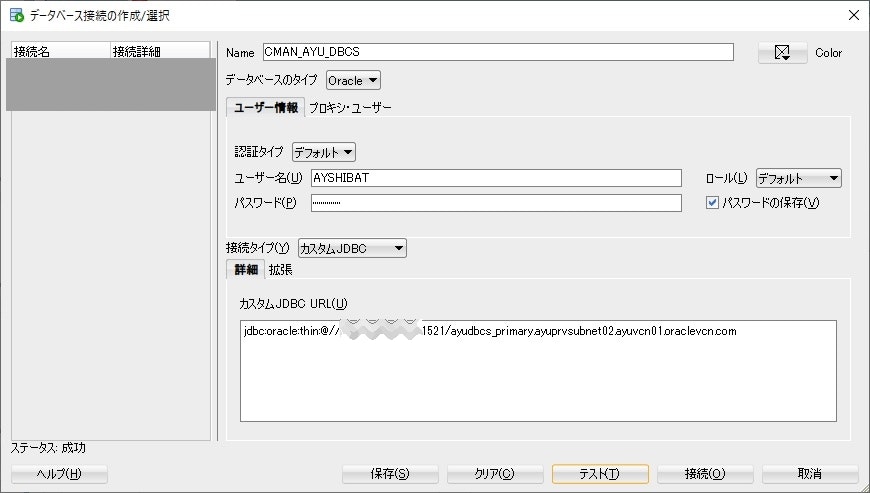
The results of the SQL execution after connecting are as follows.
Data Guard switchover again and try to reconnect and re-execute SQL.
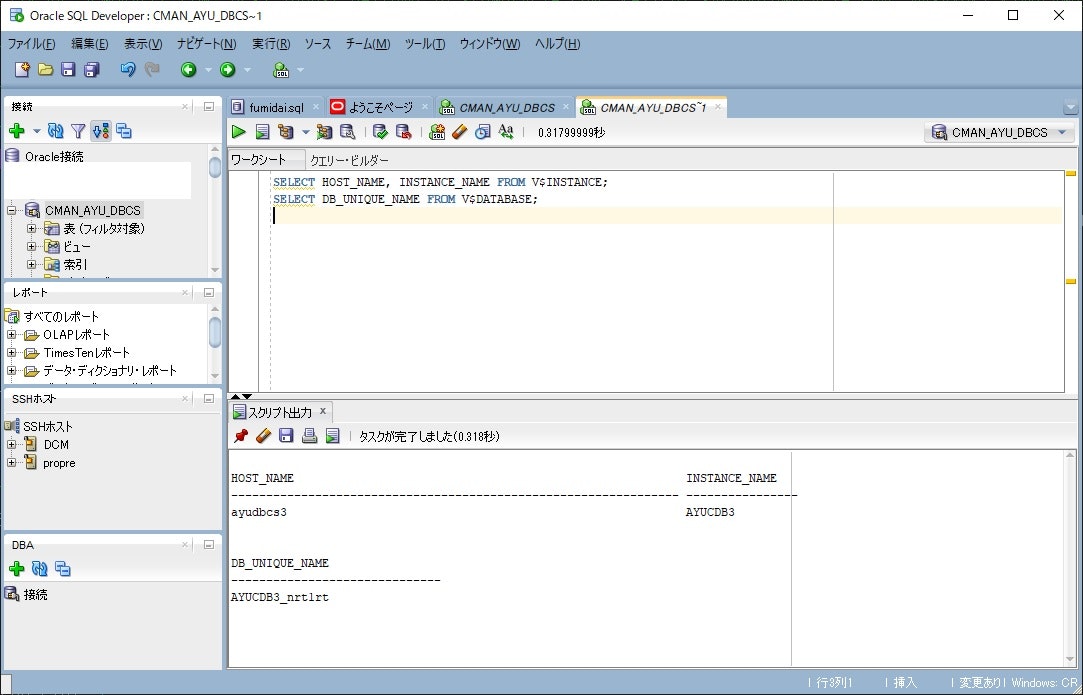
It is success connects to the Primary instance after the switchover.
11. Notes and Improvement Points
First of all, CMAN is started manually in this article.
It is better to register in systemd and launch automatically after the OS starts.
I ran out of steam this time.
In addition, the Network Load Balancer is a SPOF.
NLB is self-healing, but the SLA is not 100%.
If you want to increase the fault tolerance here, it is recommended to make the NLB redundant as well.
12. Summary
This article has abstracted the DBCS (Oracle Database) Data Guard configuration into a single endpoint.
In this article, it is connected to the Primary role, but since role-based services can also be configured on the Standby role, it is also possible to configure ...... to connect to the Read-Only Standby role of Active Data Guard.
The configuration of this article is rather tedious.
I would like to see CMAN provided as a Managed Cloud Service in the OCI.
Nevertheless, the configuration of this article may also be useful.
I hope everyone will make use of it!