Backgroud
The database link is an efficient way to connect Oracle Database to other databases. It is used in many real scenarios to help customers to integrate their numerous databases.
Like other Oracle Database, Oracle Autonomous Database also supports outgoing database links to other databases, including Oracle ADB instances, Oracle DBCS instances, OCI DB instances(image from the market place, or set up by yourself), or even the on-premise database instance, as long as 1) the target database is accessible for the Oracle Autonomous Database and 2) the target of the database link is TCPS enabled.
Another thing we need to concern about is that... generally, the customer's on-premise database is always put in a private and secured network environment. That means they don't have public IP addresses. In such cases, can we still create a database link from Oracle Autonomous Database to a private on-premise database? The answer is YES, because we have Oracle Connection Manager.
By using Oracle Connection Manager as an intermediate server between the Oracle Autonomous Database and the private on-premise database, we can still make the connections.
Infrastructure
Since the focus of this solution is how to make database link from ADB to private OnP DB, instead of how to make the connection from a private on-premise network to OCI(Oracle Cloud Infrastructure), so I will use an OCI DB instance in another region to simulate the private on-premise DB, and use a remote peering connection to simulate the VPN connection. Please check below architecture chart to have a clear view.
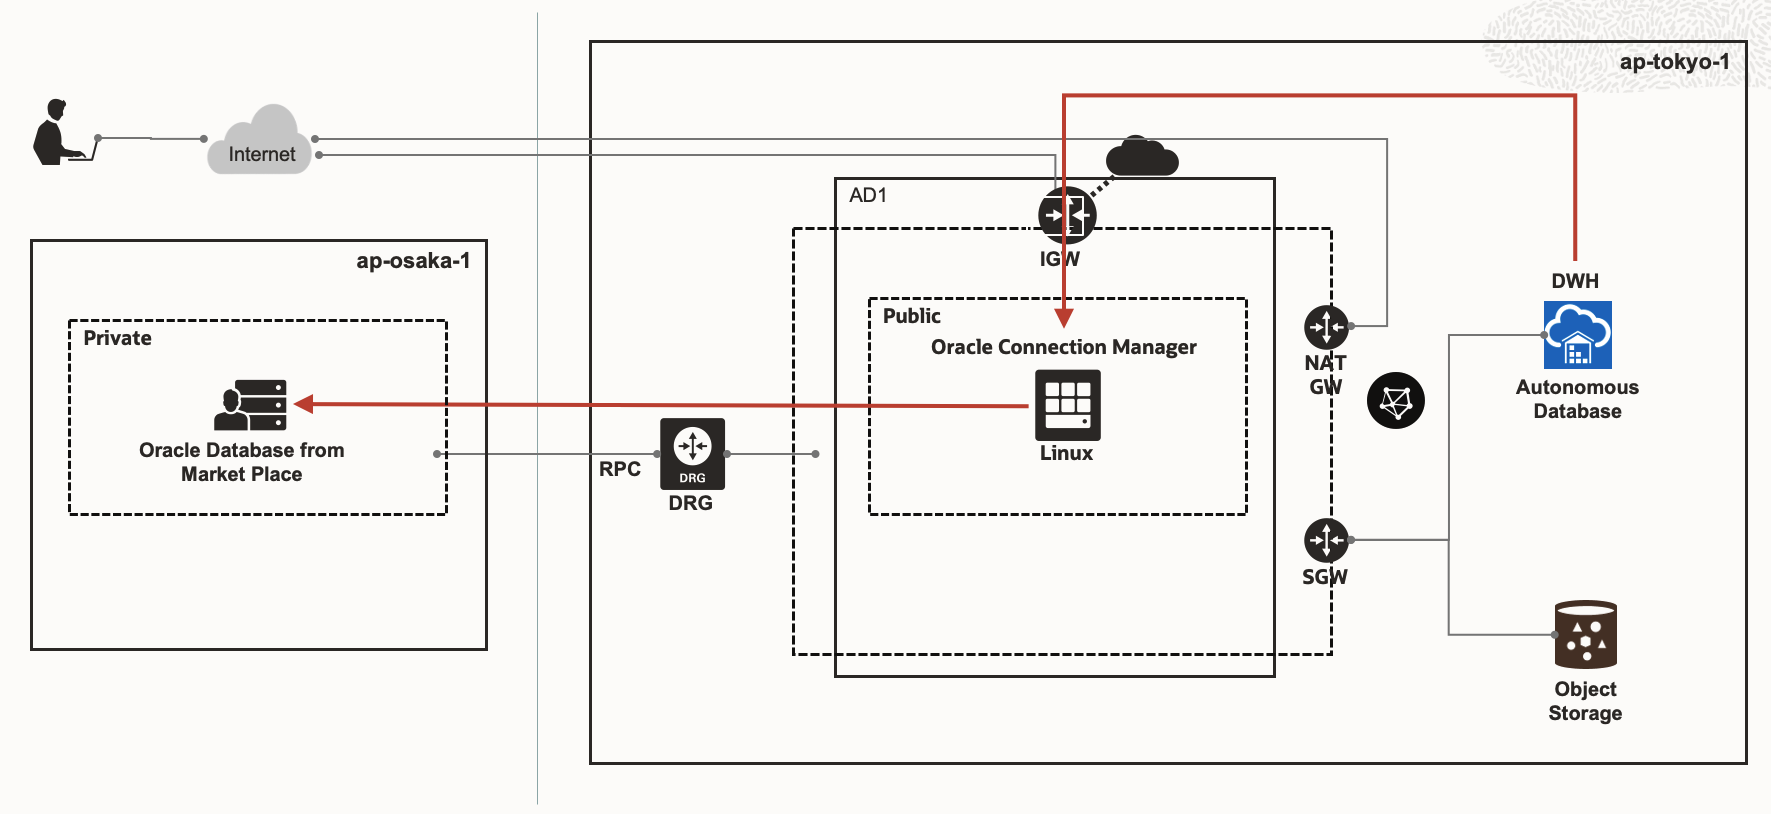
Osaka Region
- OCI DB instance in a private subnet to simulate the private on-premise database
- IP address: 192.168.0.2
- Database version: 19
Tokyo Region
-
Compute instance in a public subnet, works as an intermediate server. Oracle Connection Manager is deployed in this instance.
- Public IP address: 158.101.136.3
- Private IP address: 10.0.0.18
- Oracle Connection Manager version: 19
-
ADW instance, in which we will create the database link
- Database version: 19
For how to construct the remote peering connection between the two VCNs(Virtual Cloud Network) in the Osaka region and Tokyo region respectively, please refer to this post.
Oracle Connection Manager
A brief introduction of Oracle Connection Manager extracted from the official documentation:
Oracle Connection Manager is a proxy server that forwards connection requests to databases or other proxy servers. It operates on the session level. It usually resides on a computer separate from the database server and client computers. Oracle Connection Manager is available for installation with Oracle Database 12c Enterprise Edition. It is a custom installation option on the Client disk.
The primary functions of Oracle Connection Manager are:
- Access control: To use rule-based configuration to filter user-specified client requests and accept others.
- Session multiplexing: To funnel multiple client sessions through a network connection to a shared server destination.
No worries if you still feel confused about what CMAN(Oracle Connection Manager) is and what it can do. Basically, you could understand CMAN as a LISTENER in front of the database instance. This LISTENER could not only listen to the incoming connections but also perform access control or multiplex against the connections. So CMAN could even work as a firewall to provide an additional security layer to the database.
Basic setup
Prerequisites
CMAN is packaged in the Oracle Client, so anyone can download it freely and deploy it in your environment. The only requirement is that the database needs to be an enterprise edition.
Please refer here for the license requirement.
Download
As mention above, CMAN is included in the Oracle Database Client. We could download it from here. Since we are going to deploy it to an OCI compute instance which is a 64bit Linux 7.8 system, so we choose the LINUX.X64_193000_client.zip

Put this zip file to the compute instance, then we could start to set it up.
Install
Log into the compute instance and install the prerequisites for the Oracle database.
sudo su -
yum install oracle-database-preinstall-19c.x86_64
Create the standard directory structure for the Oracle database.
mkdir -p /u01/app/oracle/product/cman1930
chown -R oracle:oinstall /u01
Unzip the Database Client zip file to some folder, such as /tmp/cman1930
sudo su - oracle
mkdir -p $HOME/cman1930
cd $HOME/cman1930
unzip /tmp/LINUX.X64_193000_client.zip
Create a response file for the silent installation. Otherwise, we would have to deal with the GUI configuration of the compute instance.
cat <<EOF > $HOME/cman1930.rsp
oracle.install.responseFileVersion=/oracle/install/rspfmt_clientinstall_response_schema_v19.0.0
ORACLE_HOSTNAME=$(hostname)
UNIX_GROUP_NAME=oinstall
INVENTORY_LOCATION=/u01/app/oraInventory
SELECTED_LANGUAGES=en
ORACLE_HOME=/u01/app/oracle/product/cman1930
ORACLE_BASE=/u01/app/oracle
oracle.install.client.installType=Custom
oracle.install.client.customComponents="oracle.sqlplus:19.0.0.0.0","oracle.network.client:19.0.0.0.0","oracle.network.cman:19.0.0.0.0","oracle.network.listener:19.0.0.0.0"
EOF
Now, we could start to install the CMAN silently.
$HOME/cman1930/client/runInstaller -silent -responseFile $HOME/cman1930.rsp ORACLE_HOME_NAME=cman1930
At the end of the installation, follow the instructions to execute the following scripts as root.
/u01/app/oraInventory/orainstRoot.sh
/u01/app/oracle/product/cman1930/root.sh
Configure
As we only use CMAN for demo purpose and focus on the "proxy" function, so we configure it as simple as possible. If you want to know more about the configuration for complicated scenarios, please refer to the official documentation. You will find a complete description of all the parameters.
sudo su - oracle

# set environment variables
export ORACLE_HOME=/u01/app/oracle/product/cman1930
export TNS_ADMIN=/u01/app/oracle/network/admin/
export PATH=$PATH:/u01/app/oracle/product/cman1930/bin

# create CMAN configuration file
cat <<EOF > $TNS_ADMIN/cman.ora
cman = (configuration=
  (address=(protocol=tcp)(host=10.0.0.18)(port=1521))
  (parameter_list =
    (log_level=ADMIN)
    (max_connections=1024)
    (idle_timeout=0)
    (registration_invited_nodes = *)
    (inbound_connect_timeout=0)
    (session_timeout=0)
    (outbound_connect_timeout=0)
    (max_gateway_processes=16)
    (min_gateway_processes=2)
    (remote_admin=on)
    (trace_level=off)
    (max_cmctl_sessions=4)
    (event_group=init_and_term,memory_ops)
  )
  (rule_list=
    (rule=
       (src=*)(dst=*)(srv=*)(act=accept)
  ) )
)
EOF
Startup / show status / shutdown
Once we created the basic configuration in cman.ora, we should be able to execute command cmctl startup -c cman to startup CMAN.
And check the status or shut it down by using cmctl show status -c cman and cmctl shutdown -c cman.
[oracle@vm-rex-tokyo admin]$ cmctl startup -c cman

CMCTL for Linux: Version 19.0.0.0.0 - Production on 22-JUN-2020 07:09:07

Copyright (c) 1996, 2019, Oracle.  All rights reserved.

Current instance cman is not yet started
Connecting to (DESCRIPTION=(address=(protocol=tcp)(host=10.0.0.18)(port=1521)))
Starting Oracle Connection Manager instance cman. Please wait...
CMAN for Linux: Version 19.0.0.0.0 - Production
Status of the Instance
----------------------
Instance name             cman
Version                   CMAN for Linux: Version 19.0.0.0.0 - Production
Start date                22-JUN-2020 07:09:07
Uptime                    0 days 0 hr. 0 min. 9 sec
Num of gateways started   2
Average Load level        0
Log Level                 ADMIN
Trace Level               OFF
Instance Config file      /u01/app/oracle/network/admin/cman.ora
Instance Log directory    /u01/app/oracle/diag/netcman/vm-rex-tokyo/cman/alert
Instance Trace directory  /u01/app/oracle/diag/netcman/vm-rex-tokyo/cman/trace
The command completed successfully.
[oracle@vm-rex-tokyo admin]$
Configure CMAN as a remote listener
Add remote listener information into tnsnames.ora
Add the following into the tnsnames.ora file of the private database.
CMAN_LISTENER =
  (DESCRIPTION =
    (ADDRESS_LIST =
      (ADDRESS = (PROTOCOL = TCP)(HOST = 10.0.0.18)(PORT = 1521))
    )
  )
Register database services to the remote listener
By performing the following SQL command, we can register the services of the private database to the remote listener - CMAN.
SQL> alter system set remote_listener='CMAN_LISTENER';

System altered.

SQL> select type, value from v$listener_network;

TYPE                 VALUE
-------------------- ----------------------------------------------------------------------------------------------------
LOCAL LISTENER       (ADDRESS=(PROTOCOL=TCP)(HOST=db19rex1.subnetprivate.vcnrexosaka.oraclevcn.com)(PORT=1521))
REMOTE LISTENER      (DESCRIPTION=(ADDRESS=(PROTOCOL=TCP)(HOST=10.0.0.18)(PORT=1521)))
SERVICE NAME         ORCL
SERVICE NAME         orclpdb

SQL>
We should also see the service register information in the CMAN trace log as below.
tail -f /u01/app/oracle/diag/netcman/vm-rex-tokyo/cman/trace/cman.log

2020-06-22T07:29:04.919877+00:00
22-JUN-2020 07:29:04 * (ADDRESS=(PROTOCOL=tcp)(HOST=192.168.0.2)(PORT=55394)) * service_register * ORCL * 0
2020-06-22T07:29:33.457926+00:00
22-JUN-2020 07:29:33 * service_update * cman * 0
Update the local listener host name
By default, in the local listener information, HOST is represented by the Internal FQDN.
SQL> select type, value from v$listener_network;

TYPE                 VALUE
-------------------- ----------------------------------------------------------------------------------------------------
LOCAL LISTENER       (ADDRESS=(PROTOCOL=TCP)(HOST=db19rex1.subnetprivate.vcnrexosaka.oraclevcn.com)(PORT=1521))
Because CMAN cannot recognize this FQDN, when we try to make a connection to the private database through CMAN, we will get an error as below.
[oracle@vm-rex-tokyo admin]$ sqlplus OSAKA_PRIVATE/Ora_DB4U@(DESCRIPTION=(ADDRESS=(PROTOCOL=TCP)(HOST=10.0.0.18)(PORT=1521))(CONNECT_DATA=(SERVER=DEDICATED)(SERVICE_NAME=orclpdb)))

SQL*Plus: Release 19.0.0.0.0 - Production on Mon Jun 22 15:44:39 2020
Version 19.3.0.0.0

Copyright (c) 1982, 2019, Oracle.  All rights reserved.

ERROR:
ORA-12529: TNS:connect request rejected based on current filtering rules
To fix this issue, we just need to update the HOST to be the IP address of the private instance.
SQL> ALTER SYSTEM SET LOCAL_LISTENER='(ADDRESS=(PROTOCOL=TCP)(HOST=192.168.0.2)(PORT=1521))';

System altered.

SQL> select type, value from v$listener_network;

TYPE                 VALUE
-------------------- ----------------------------------------------------------------------------------------------------
LOCAL LISTENER       (ADDRESS=(PROTOCOL=TCP)(HOST=192.168.0.2)(PORT=1521))
REMOTE LISTENER      (DESCRIPTION=(ADDRESS=(PROTOCOL=TCP)(HOST=10.0.0.18)(PORT=1521)))
SERVICE NAME         ORCL
SERVICE NAME         orclpdb

SQL>
It is recommended to update the local listener information in the tnsnames.ora as well.
Verify the remote listener
As of now, CMAN as a remote listener should work as expected. Let's use sqlplus to verify that.
Note: OSAKA_PRIVATE/Ora_DB4U is the user and password I created to perform the verification, you could use system or create any other user as you like.
sqlplus OSAKA_PRIVATE/Ora_DB4U@(DESCRIPTION=(ADDRESS=(PROTOCOL=TCP)(HOST=10.0.0.18)(PORT=1521))(CONNECT_DATA=(SERVER=DEDICATED)(SERVICE_NAME=orclpdb)))
In the above command, we use the private IP address of the CMAN instance, we should be able to use the public IP address and get the same result.
ADB will also use this public IP address to create DB Link as well.
sqlplus OSAKA_PRIVATE/Ora_DB4U@(DESCRIPTION=(ADDRESS=(PROTOCOL=TCP)(HOST=158.101.136.3)(PORT=1521))(CONNECT_DATA=(SERVER=DEDICATED)(SERVICE_NAME=orclpdb)))
Enable TCPS connection
As I mentioned above, to create DB Link from ADB to other databases, an SSL enabled connection(TCPS) is required. In the previous section, we have started CMAN and registered the private database services to it. But according to our configuration, CMAN is only providing TCP connections. To enable TPCS connections, we need to do some further configurations.
This part highly references to the Oracle Database blog post How to Create a Database Link from an Autonomous Data Warehouse to a Database Cloud Service Instance which is created by senior product manager Can Tuzla.
Create wallets(server & client) with self signed certificates
As part of enabling TCPS authentication, we need to create individual wallets for the server and the client. Each of these wallets has to have their own certificates that they will exchange with one another. Since we are in a controlled environment, self-signed certificates should be sufficient for authentication. The wallets can be generated by server and client respectively, but both of the wallets are generated on the server-side and then transfer the client wallet to the client is a better way to make the process be simple.
- On the CMAN instance, set up wallet directories with the
rootuser
sudo su -
mkdir -p /u01/server_wallet
mkdir -p /u01/client_wallet
mkdir -p /u01/certificate
chown -R oracle:oinstall /u01/server_wallet
chown -R oracle:oinstall /u01/client_wallet
chown -R oracle:oinstall /u01/certificate
- Create the server and client wallets with the
oracleuser
# set environment variables
export PATH=$PATH:/u01/app/oracle/product/cman1930/bin

# server wallet
orapki wallet create -wallet /u01/server_wallet/ -pwd Oracle123456 -auto_login

# client wallet
orapki wallet create -wallet /u01/client_wallet/ -pwd Oracle123456 -auto_login
- Create the server and client certificates with the
oracleuser
# server
orapki wallet add -wallet /u01/server_wallet/ -pwd Oracle123456 -dn "CN=CMAN" -keysize 1024 -self_signed -validity 3650 -sign_alg sha256

# client
orapki wallet add -wallet /u01/client_wallet/ -pwd Oracle123456 -dn "CN=ADB" -keysize 1024 -self_signed -validity 3650 -sign_alg sha256
- Export the server and client certificate with the oracle user
# server
orapki wallet export -wallet /u01/server_wallet/ -pwd Oracle123456 -dn "CN=CMAN" -cert /u01/certificate/server.crt

# client
orapki wallet export -wallet /u01/client_wallet/ -pwd Oracle123456 -dn "CN=ADB" -cert /u01/certificate/client.crt
- Check the content of the wallets
# server
orapki wallet display -wallet "/u01/server_wallet" -pwd Oracle123456

# client
orapki wallet display -wallet "/u01/client_wallet" -pwd Oracle123456
- Exchange the certificates between server and client wallets
# import the client certificate into the server wallet
orapki wallet add -wallet /u01/server_wallet -pwd Oracle123456 -trusted_cert -cert /u01/certificate/client.crt

# import the server certificate into the client wallet
orapki wallet add -wallet /u01/client_wallet -pwd Oracle123456 -trusted_cert -cert /u01/certificate/server.crt
- Check the content of the wallet again, you should see the changes.
# server
orapki wallet display -wallet "/u01/server_wallet" -pwd Oracle123456

# client
orapki wallet display -wallet "/u01/client_wallet" -pwd Oracle123456
- Change permissions for the server wallet with the oracle user
chmod 640 /u01/server_wallet/cwallet.sso
Add the server wallet location into the cman.ora configuratiion file
Besides adding the wallet location into cman.ora, we also configure TCPS connection on port 1523.
After the edit, the cman.ora should look like below. TCP connection is on port 1521 and TCPS connection is on port 1523.
cman = (configuration=
  (address=(protocol=tcp)(host=10.0.0.18)(port=1521))
  (address=(protocol=tcps)(host=10.0.0.18)(port=1523))
  (parameter_list =
    (log_level=ADMIN)
    (max_connections=1024)
    (idle_timeout=0)
    (registration_invited_nodes = *)
    (inbound_connect_timeout=0)
    (session_timeout=0)
    (outbound_connect_timeout=0)
    (max_gateway_processes=16)
    (min_gateway_processes=2)
    (remote_admin=on)
    (trace_level=off)
    (max_cmctl_sessions=4)
    (event_group=init_and_term,memory_ops)
  )
  (rule_list=
    (rule=
       (src=*)(dst=*)(srv=*)(act=accept)
  ) )
)

WALLET_LOCATION =
   (SOURCE =
     (METHOD = FILE)
     (METHOD_DATA =
       (DIRECTORY = /u01/server_wallet)
     )
   )
- Startup CMAN with the new configuration
[oracle@vm-rex-tokyo admin]$ cmctl startup -c cman

CMCTL for Linux: Version 19.0.0.0.0 - Production on 22-JUN-2020 09:31:13

Copyright (c) 1996, 2019, Oracle.  All rights reserved.

Current instance cman is not yet started
Connecting to (DESCRIPTION=(address=(protocol=tcp)(host=10.0.0.18)(port=1521))(address=(protocol=tcps)(host=10.0.0.18)(port=1523)))
Starting Oracle Connection Manager instance cman. Please wait...
CMAN for Linux: Version 19.0.0.0.0 - Production
Status of the Instance
----------------------
Instance name             cman
Version                   CMAN for Linux: Version 19.0.0.0.0 - Production
Start date                22-JUN-2020 09:31:13
Uptime                    0 days 0 hr. 0 min. 9 sec
Num of gateways started   2
Average Load level        0
Log Level                 ADMIN
Trace Level               OFF
Instance Config file      /u01/app/oracle/network/admin/cman.ora
Instance Log directory    /u01/app/oracle/diag/netcman/vm-rex-tokyo/cman/alert
Instance Trace directory  /u01/app/oracle/diag/netcman/vm-rex-tokyo/cman/trace
The command completed successfully.
[oracle@vm-rex-tokyo admin]$
Verify the TCPS connection
- Edit the
sqlnet.oraandtnsnames.oraon client-side and verify the TCPS connection
sqlnet.ora should look like below.
WALLET_LOCATION =
   (SOURCE =
     (METHOD = FILE)
     (METHOD_DATA =
       (DIRECTORY = /u01/client_wallet)
     )
   )

SSL_SERVER_DN_MATCH=(ON)
tnsanmes.ora should look like below.
cman-tcp =
  (DESCRIPTION =
    (ADDRESS = (PROTOCOL = TCP)(HOST = 10.0.0.18)(PORT = 1521))
    (CONNECT_DATA =
      (SERVER = DEDICATED)
      (SERVICE_NAME = orclpdb)
    )
  )

cman-tcps =
  (DESCRIPTION =
    (ADDRESS = (PROTOCOL = TCPS)(HOST = 158.101.136.3)(PORT = 1523))
    (CONNECT_DATA =
      (SERVER = DEDICATED)
      (SERVICE_NAME = orclpdb)
    )
    (SECURITY=
        (SSL_SERVER_CERT_DN="CN=CMAN")
    )
  )
Perform following commands to verify the TCP/TCPS connections
# use alias
sqlplus OSAKA_PRIVATE/Ora_DB4U@cman-tcp
sqlplus OSAKA_PRIVATE/Ora_DB4U@cman-tcps

# use connection string and private IP address
sqlplus OSAKA_PRIVATE/Ora_DB4U@(DESCRIPTION=(ADDRESS=(PROTOCOL=TCPS)(HOST=10.0.0.18)(PORT=1523))(CONNECT_DATA=(SERVER=DEDICATED)(SERVICE_NAME=orclpdb))(SECURITY=(MY_WALLET_DIRECTORY=/u01/client_wallet)(SSL_SERVER_DN_MATCH=TRUE)(SSL_SERVER_CERT_DN="CN=CMAN")))

# use connection string and public IP address
sqlplus OSAKA_PRIVATE/Ora_DB4U@(DESCRIPTION=(ADDRESS=(PROTOCOL=TCPS)(HOST=158.101.136.3)(PORT=1523))(CONNECT_DATA=(SERVER=DEDICATED)(SERVICE_NAME=orclpdb))(SECURITY=(MY_WALLET_DIRECTORY=/u01/client_wallet)(SSL_SERVER_DN_MATCH=TRUE)(SSL_SERVER_CERT_DN="CN=CMAN")))
Oracle Autonomous Database
Load the client wallet cwallet.sso into ADB instance
When we create DB Link from ADB to the CMAN instance, we will need to specify the client wallet file to do the TCPS authentication. According to the current approach provided officially, we need to put the wallet file into DATA_PUMP_DIR directory.
The following steps show you how to make it done.
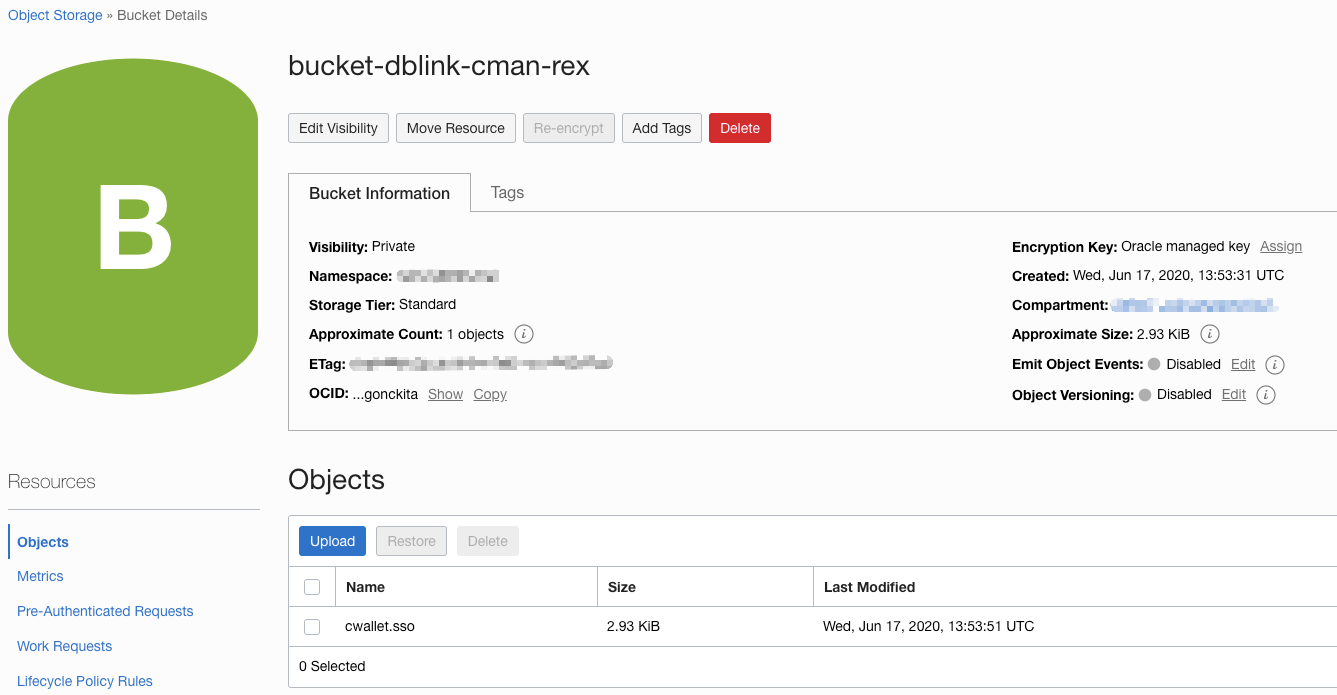
Upload the client wallet cwallet.sso to Oracle Object Storage
Just create a bucket in Object Storage and upload the cwallet.sso into the bucket.
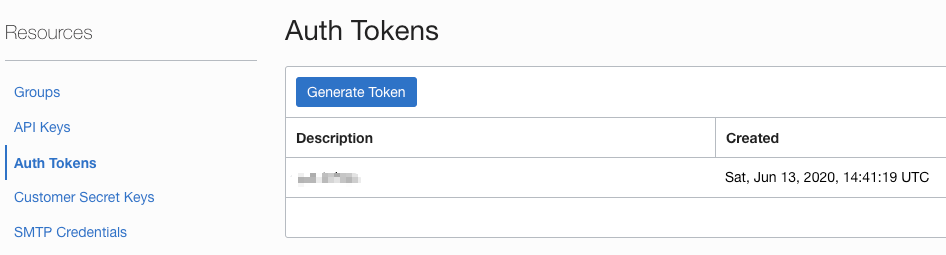
Create Auth Token
The auth token will be used for creating the credential in ADB to access object storage and get the cwallet.sso.
Create credential in ADB
Use the provided procedure CREATE_CREDENTIAL to create a credential to access Object Storage.
BEGIN
  DBMS_CLOUD.CREATE_CREDENTIAL(
    credential_name => 'REX_CRED',
    username => '<YOUR OCI USER NAME>',
    password => '<AUTH TOKEN>'
  );
END;
/
Get cwallet.sso from Object Storage to DATA_PUMP_DIR in ADB
BEGIN
  DBMS_CLOUD.GET_OBJECT(
    credential_name => 'REX_CRED',
    object_uri => '<URI OF cwallet.sso>',
    directory_name => 'DATA_PUMP_DIR');
END;
/
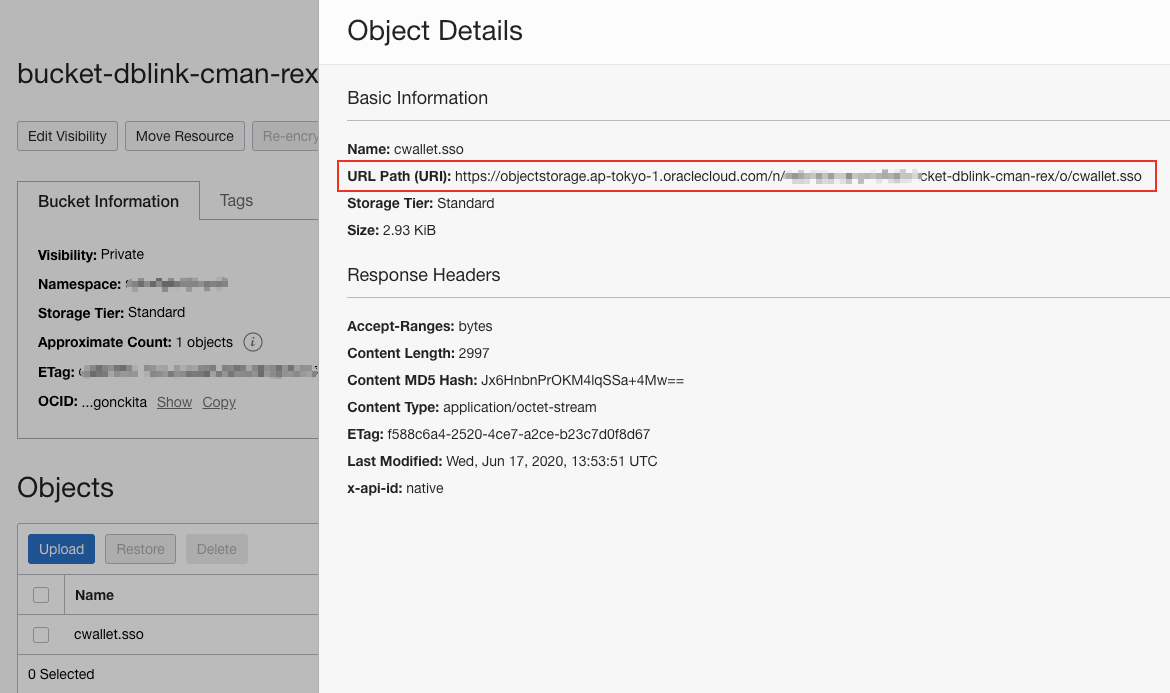
Get URI of the cwallet.sso from the Object Details page.
Verify that cwallet.sso has been loaded into ADB DATA_PUMP_DIR.
SELECT * FROM DBMS_CLOUD.LIST_FILES('DATA_PUMP_DIR');
Create credential for DB Link
This credential is used for creating the DB Link. Once the DB Link is created, the connection to the target private database is through this user.
BEGIN
  DBMS_CLOUD.CREATE_CREDENTIAL(
    credential_name => 'OSAKA_LINK_CRED',
    username => 'OSAKA_PRIVATE',
    password => 'Ora_DB4U');
END;
/
Create DB Link
TCPS is enabled on the CMAN instance 158.101.136.3 and port # is 1523.
We just created OSAKA_LINK_CRED as the credential for DB Link.
Client wallet file cwallet.sso has been put into the default directory DATA_PUMP_DIR.
Now we should be able to create the DB Link by using procedure DBMS_CLOUD_ADMIN.CREATE_DATABASE_LINK with all the necessary information.
BEGIN
  DBMS_CLOUD_ADMIN.CREATE_DATABASE_LINK(
    db_link_name => 'CMAN_LINK',
    hostname => '158.101.136.3',
    port => '1523',
    service_name => 'orclpdb',
    ssl_server_cert_dn => 'CN=CMAN',
    credential_name => 'OSAKA_LINK_CRED');
END;
/
More about CREATE_DATABASE_LINK Procedure
Verify the created DB Link in ADB
Check the content of the create DB Link
SQL> select owner, db_link, credential_name, host from DBA_DB_LINKS where db_link = 'CMAN_LINK';

OWNER      DB_LINK                        CREDENTIAL_NAME      HOST
---------- ------------------------------ -------------------- --------------------------------------------------------------------------------
ADMIN      CMAN_LINK                      OSAKA_LINK_CRED      (DESCRIPTION=(ADDRESS=(PROTOCOL=tcps)(HOST=158.101.136.3)(PORT=1523))(CONNECT_DA
                                                               TA=(SERVICE_NAME=orclpdb))(SECURITY=(MY_WALLET_DIRECTORY=/u03/dbfs/A7A1F884D6C04
                                                               D72E0531518000A4948/data/dpdump)(SSL_SERVER_DN_MATCH=TRUE)(SSL_SERVER_CERT_DN="C
                                                               N=CMAN")))
Get a message from the private database.
SQL> select * from msg@CMAN_LINK;

CONTENT
----------------------------------------------------------------------------------------------------
message from Osaka private DB: orclpdb
About the future
Access to private IP addresses from ADB-S is on the roadmap, maybe in the near future, we don't even need Oracle Connection Manager to create a DB Link from ADB to any private on-premise database. But CMAN provides us an efficient way to build flexible architecture.