OCI API Gateway には認証機能が付いています。今回は API Gateway の認証機能を使用して OCI Functions を保護(認証)してみますやで。
彡(゚)(゚)
1. やりたい事&元ネタ
元ネタは下記の記事となります。
Oracle Functionsを利用したAPI Gatewayの認証
https://oracle-japan.github.io/ocitutorials/cloud-native/functions-apigateway-for-intermediates/
上記記事の 認証用Functions を改変して、リクエストヘッダーにセットした文字列(トークン) と OCI Vault のシークレットを突合する、以下のような処理を実装してみます。
(1). API Gateway の エンドポイント をコールする。
(2). API Gateway から認証用の Functions がコールされる。
(3). 認証用Functions で OCI Vault のシークレットを取り出して、ヘッダーの文字列(トークン)と突合する。
(4). ヘッダーの文字列(トークン) と OCI Vault のシークレット が一致した場合は本体の Functions をコールする。
接続トポロジは以下の通りです。

2. シンプルな Functions の作成
詳細は省略します。下記記事を参照して下さい。
下記の結果が得られるように少し改変してみました。wai ga AYU ya!彡(^)(^)
$ fn invoke ayu-functions1 ayu-app
Hello, wai ga AYU ya!
3. API Gateway から OCI Functions の呼び出し設定
これも詳細は省略します。下記記事を参照してシンプルな Functions を API Gateway からコールできるようにしておいて下さい。
4. OCI Vault, キー, シークレットの作成
下記記事を参照して、認証に使用する文字列(トークン)を OCI Vault のシークレットとして登録して下さい。
作成したシークレットの OCID はこの後使用するので、メモしておいて下さい。

5. 認証用Functions のダウンロード(git clone)と YAML編集、ビルド
認証用Functions のサンプルを下記に置いておきました。
Functions の Cloud Shell から git clone でダウンロードします。
git clone https://github.com/gonsuke777/Functions
ダウンロード後に func.yaml を編集して、シークレットの OCID を登録したものに書き換えて下さい。
cd Functions/hello-java/
vi vi
schema_version: 20180708
name: hello-java
version: 0.0.46
runtime: java
build_image: fnproject/fn-java-fdk-build:jdk17-1.0.146
run_image: fnproject/fn-java-fdk:jre17-1.0.146
cmd: com.example.fn.HelloFunction::handleRequest
timeout: 60
config:
  SECRET1_ID: ocid1.vaultsecret.oc1.ap-tokyo-1.xxxxxxxxxxxxxxxxxxxxxxxxxxxxxxxxxxxxxxxxxxxxxxxxxxxxxx
yaml編集後にビルド&デプロイします。
fn -v deploy --app ayu-functions1
デプロイされた Functions の OCID を控えておきます。

6. 動的グループの作成と Functions からの OCI Vault読取ポリシー(権限)付与(リソース・プリンシプル)
認証用Functions が OCI Vault のシークレットを読み取れるように権限を付与します。(リソース・プリンシプル)
- 動的グループ(ayu-dynamic-group2)のマッチングルール ※Functions の OCID を指定
All {resource.id = 'ocid1.fnfunc.oc1.ap-tokyo-1.xxxxxxxxxxxxxxxxxxxxxxxxxxxxxxxxxxxxxxxxxxxxxxxxxxxx'}
- 動的グループ(ayu-dynamic-group2)に付与したポリシー(権限) ※シークレットの読み取り権限を付与
allow dynamic-group ayu-dynamic-group2 to read secret-family in compartment xxxxx_compartment
- OCI Vault のポリシー(権限)をコンパートメントに付与
allow service VaultSecret to use vaults in compartment ayu_compartment
allow service VaultSecret to use keys in compartment ayu_compartment
その他、本記事のメインではありませんが API Gateway用に下記の動的グループ/ポリシー(権限)を付与しています。
- 動的グループ(ayu-dynamic-group1)のマッチングルール ※API Gateway の OCID を指定
ALL {resource.type = 'ApiGateway', resource.id = 'ocid1.apigateway.oc1.ap-tokyo-1.xxxxxxxxxxxxxxxxxxxxxxxxxxxxxxxxxxxxx'}
- 動的グループ(ayu-dynamic-group1)に付与したポリシー(権限) ※API Gateway に Functions の実行権限を付与
ALLOW any-user to use functions-family in compartment ayu_compartment where ALL { request.principal.type= 'ApiGateway', request.resource.compartment.id = 'ocid1.compartment.oc1..xxxxxxxxxxxxxxxxxxxxxxxxxxxxxxxxxxxxx' }
7. 認証用Functions の動作確認(Cloud Shell)
Functions の Cloud Shell からデプロイした認証用Functions の動作確認をしてみます。
# Case1...No token.
fn invoke ayu-functions1 hello-java
# Case2...Invalid token
echo "{\"type\":\"TOKEN\",\"token\":\"xxxxxxxxx\"}" | fn invoke ayu-functions1 hello-java | jq -a
# Case3...Correct token
echo "{\"type\":\"TOKEN\",\"token\":\"yyyyyyyyy\"}" | fn invoke ayu-functions1 hello-java | jq -a
ビルドや権限付与が上手く行っていれば、それぞれ異なる結果を返却します。
$ fn invoke ayu-functions1 hello-java
Error invoking function. status: 502 message: function failed

$ echo "{\"type\":\"TOKEN\",\"token\":\"xxxxxxxxx\"}" | fn invoke ayu-functions1 hello-java | jq -a
{
  "active": false,
  "principal": null,
  "scope": null,
  "expiresAt": "2020-04-30T10:15:30+01:00",
  "wwwAuthenticate": "Bearer realm=\"example.com\", error=\"invalid token\", error_description=\"token should be \"Bearer eyJ0eXAiOiJKV1QiLCJhbGciOiJSUzI1nHyDtTwR3SEJ3z489...\"\"",
  "clientId": null,
  "context": {
    "email": "john.doe@example.com"
  }
}

$ echo "{\"type\":\"TOKEN\",\"token\":\"yyyyyyyyy\"}" | fn invoke ayu-functions1 hello-java | jq -a
{
  "active": true,
  "principal": "https://example.com/users/jdoe",
  "scope": [
    "list:hello",
    "read:hello",
    "create:hello",
    "update:hello",
    "delete:hello",
    "someScope"
  ],
  "expiresAt": "2022-04-10T09:47:16.703Z",
  "wwwAuthenticate": null,
  "clientId": "host123",
  "context": {
    "email": "john.doe@example.com"
  }
}
$
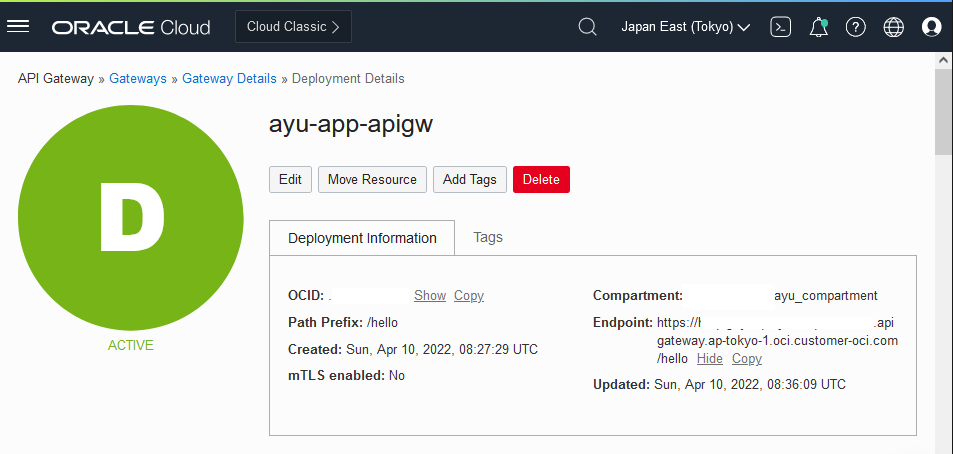
8. API Gateway Deployment の作成
API Gateway の Deployment を作成します。この時に認証用Functionsを指定します。
| 変数名 | 入力する値 |
|---|---|
| NAME | 任意の名前 |
| PATH PREFIX | 任意のPREFIXを指定 |
| AUTHENTICATION TYPE | Custorm |
| CONPARTMENT | 認証用Functionsを作成したコンパートメント |
| FUNCTION NAME | デプロイ済みの認証用Functions |
| AUTHENTICATION TOKEN | ヘッダー |
| HEADER NAME | token |
| PATH | 任意のアプリケーションパス |
| METHODS | 今回は GET を指定 |
| TYPE | Oracle Functions を選択 |
| APPPLICATION IN xxx_COMPARTMENT | 本体のFunctionsを指定 |
| FUNCTION NAME | 呼び出す本体のFunctions |


9. ソースコードの簡単な解説
Functions の初期化処理(FnConfigurationアノテーション)で yaml からシークレットの OCID を取得しています。
    @FnConfiguration
    public void setUp(RuntimeContext ctx) throws Exception {
        config = ctx.getConfiguration();
        secret1Id = config.get("SECRET1_ID");
        String version = System.getenv("OCI_RESOURCE_PRINCIPAL_VERSION");
        if( version != null ) {
            provider = ResourcePrincipalAuthenticationDetailsProvider.builder().build();
        } else {
            try {
                provider = new ConfigFileAuthenticationDetailsProvider("~/.oci/config", "DEFAULT");
            }
            catch (IOException e) {
                e.printStackTrace();
            }
        }
    }
Autonomous Database に Functions で接続する記事のソースをほぼ流用させて頂いています。OCID を基にシークレットに格納されたトークン(文字列)を取得しています。認証用Functions には前述の通りリソース・プリンシプルでシークレットの読取権限(ポリシー)を付与しています。
    private String getSecret(String secretOcid) {
        try (SecretsClient secretsClient = new SecretsClient(provider)) {
            //region setting
            secretsClient.setRegion(Region.AP_TOKYO_1);
            GetSecretBundleRequest getSecretBundleRequest = GetSecretBundleRequest
                .builder()
                .secretId(secretOcid)
                .stage(GetSecretBundleRequest.Stage.Current)
                .build();
            GetSecretBundleResponse getSecretBundleResponse = secretsClient
                .getSecretBundle(getSecretBundleRequest);
            Base64SecretBundleContentDetails base64SecretBundleContentDetails =
                (Base64SecretBundleContentDetails) getSecretBundleResponse.
                        getSecretBundle().getSecretBundleContent();
            byte[] secretValueDecoded = Base64.decodeBase64(base64SecretBundleContentDetails.getContent());
            return new String(secretValueDecoded);
        } catch (Exception e) {
            throw new RuntimeException("Couldn't get content from secret - " + e.getMessage(), e);
        }
    }
ヘッダーのトークンとシークレットの文字列を比較して、合致した場合は正常終了の結果を返却しています。
        if (secret1.equals(input.token)) {
            result = trueResult();
        } else {
            result.wwwAuthenticate = "Bearer realm=\"example.com\", error=\"invalid token\", error_description=\"token should be \"Bearer eyJ0eXAiOiJKV1QiLCJhbGciOiJSUzI1nHyDtTwR3SEJ3z489...\"\"";
            return result;
        }
結果を返却する部分は元ネタをそのまま流用しています。
    private Result trueResult() {
        Result trueResult = new Result();
        trueResult.active = true;
        trueResult.principal = "https://example.com/users/jdoe";
        trueResult.scope = new String[]{"list:hello", "read:hello", "create:hello", "update:hello", "delete:hello", "someScope"};
        trueResult.clientId = "host123";
        trueResult.expiresAt = new Date().toInstant().plusMillis(60000).toString();
        Map<String, Object> contextMap = new HashMap<>();
        contextMap.put("email", "john.doe@example.com");
        trueResult.context = contextMap;
        return trueResult;
    }

    private Result falseResult() {
        Result falseResult = new Result();
        falseResult.active = false;
        falseResult.expiresAt = "2020-04-30T10:15:30+01:00";
        Map<String, Object> contextMap = new HashMap<>();
        contextMap.put("email", "john.doe@example.com");
        falseResult.context = contextMap;
        falseResult.wwwAuthenticate = "Bearer realm=\"example.com\"";
        return falseResult;
    }
10. PC端末 の PowerShell から API Gateway Deployment のエンドポイント(URL)をコール
API Gateway Deployment画面から作成した Deployment のエンドポイント(URL)をコピーします。
※画面からコピーできるのはPREFIXまでなので、APIGWデプロイ時のアプリケーションパスを追加しておきます。
PowerShell から API Gateway Deployment エンドポイント(URL) をコールしてみます。
# Case1...No header
$headers = @{}
curl -Headers $headers https://xxxxxxxxxxxxxxxxxxxxxxxxxx.apigateway.ap-tokyo-1.oci.customer-oci.com/hello/ayuapp

# Case2...No token
$headers = @{}
$headers["type"] = "TOKEN"
curl -Headers $headers https://xxxxxxxxxxxxxxxxxxxxxxxxxx.apigateway.ap-tokyo-1.oci.customer-oci.com/hello/ayuapp

# Case3...Invalid token
$headers = @{}
$headers["type"] = "TOKEN"
$headers["token"] = "xxxxxxxx"
curl -Headers $headers https://xxxxxxxxxxxxxxxxxxxxxxxxxx.apigateway.ap-tokyo-1.oci.customer-oci.com/hello/ayuapp

# Case4...Correct token
$headers = @{}
$headers["type"] = "TOKEN"
$headers["token"] = "yyyyyyyy"
curl -Headers $headers https://xxxxxxxxxxxxxxxxxxxxxxxxxx.apigateway.ap-tokyo-1.oci.customer-oci.com/hello/ayuapp
以下のように、正しいトークンを指定すると本体のFunctionsの実行結果("Hello, wai ga AYU ya!")を得られました。
PS C:\Users\AYSHIBAT> $headers = @{}
PS C:\Users\AYSHIBAT> curl -Headers $headers https://xxxxxxxxxxxxxxxxxxxxxxxxxx.apigateway.ap-tokyo-1.oci.customer-oci.com/hello/ayuapp
curl : リモート サーバーがエラーを返しました: (401) 許可されていません
発生場所 行:1 文字:1
+ curl -Headers $headers https://xxxxxxxxxxxxxxxxxxxxxxxxxx.apigateway. ...
+ ~~~~~~~~~~~~~~~~~~~~~~~~~~~~~~~~~~~~~~~~~~~~~~~~~~~~~~~~~~~~~~~~~~~~~
    + CategoryInfo          : InvalidOperation: (System.Net.HttpWebRequest:HttpWebRequest) [Invoke-WebRequest]、WebException


PS C:\Users\AYSHIBAT> $headers = @{}
PS C:\Users\AYSHIBAT> $headers["type"] = "TOKEN"
PS C:\Users\AYSHIBAT> curl -Headers $headers https://xxxxxxxxxxxxxxxxxxxxxxxxxx.apigateway.ap-tokyo-1.oci.customer-oci.com/hello/ayuapp
curl : リモート サーバーがエラーを返しました: (401) 許可されていません
発生場所 行:1 文字:1
+ curl -Headers $headers https://xxxxxxxxxxxxxxxxxxxxxxxxxx.apigateway. ...
+ ~~~~~~~~~~~~~~~~~~~~~~~~~~~~~~~~~~~~~~~~~~~~~~~~~~~~~~~~~~~~~~~~~~~~~
    + CategoryInfo          : InvalidOperation: (System.Net.HttpWebRequest:HttpWebRequest) [Invoke-WebRequest]、WebException
    + FullyQualifiedErrorId : WebCmdletWebResponseException,Microsoft.PowerShell.Commands.InvokeWebRequestCommand


PS C:\Users\AYSHIBAT> $headers = @{}
PS C:\Users\AYSHIBAT> $headers["type"] = "TOKEN"
PS C:\Users\AYSHIBAT> $headers["token"] = "xxxxxxxx"
PS C:\Users\AYSHIBAT> curl -Headers $headers https://xxxxxxxxxxxxxxxxxxxxxxxxxx.apigateway.ap-tokyo-1.oci.customer-oci.com/hello/ayuapp
curl : リモート サーバーがエラーを返しました: (401) 許可されていません
発生場所 行:1 文字:1
+ curl -Headers $headers https://xxxxxxxxxxxxxxxxxxxxxxxxxx.apigateway. ...
+ ~~~~~~~~~~~~~~~~~~~~~~~~~~~~~~~~~~~~~~~~~~~~~~~~~~~~~~~~~~~~~~~~~~~~~
    + CategoryInfo          : InvalidOperation: (System.Net.HttpWebRequest:HttpWebRequest) [Invoke-WebRequest]、WebException
    + FullyQualifiedErrorId : WebCmdletWebResponseException,Microsoft.PowerShell.Commands.InvokeWebRequestCommand

PS C:\Users\AYSHIBAT> $headers = @{}
PS C:\Users\AYSHIBAT> $headers["type"] = "TOKEN"
PS C:\Users\AYSHIBAT> $headers["token"] = "yyyyyyyy"
PS C:\Users\AYSHIBAT> curl -Headers $headers https://xxxxxxxxxxxxxxxxxxxxxxxxxx.apigateway.ap-tokyo-1.oci.customer-oci.com/hello/ayuapp


StatusCode        : 200
StatusDescription : OK
Content           : Hello, wai ga AYU ya!
RawContent        : HTTP/1.1 200 OK
                    Connection: keep-alive
                    opc-request-id: /7516FB0E1242D7AB12CE7F9DFEAACCBB/708B115FEB126E2B96E78CE9E87376C6
                    X-XSS-Protection: 1; mode=block
                    Strict-Transport-Security: max-age=3153600...
Forms             : {}
Headers           : {[Connection, keep-alive], [opc-request-id, /7516FB0E1242D7AB12CE7F9DFEAACCBB/708B115FEB126E2B96E78
                    CE9E87376C6], [X-XSS-Protection, 1; mode=block], [Strict-Transport-Security, max-age=31536000]...}
Images            : {}
InputFields       : {}
Links             : {}
ParsedHtml        : mshtml.HTMLDocumentClass
RawContentLength  : 21


PS C:\Users\AYSHIBAT>
11. まとめ
リクエストのヘッダーに文字列を埋め込むだけというとても簡易的な実装ですが、API Gateway と OCI Vault の機能で Functions を保護(認証)できました。
次回はもう少し凝った実装をしてみたいですやね。彡(^)(^)
12. 参考
下記の記事やマニュアルを参考にしました。
- APIデプロイメントへの認証と認可の追加
- 認可プロバイダ・ファンクションを使用したAPIデプロイメントへの認証および認可の追加
- Oracle Functionsを利用したAPI Gatewayの認証
- OCI API Gateway の認証・認可機能について
- [OCI] OCIシークレットを使ってOracle FunctionsからAutonomous DBに接続してみた。