ムーディ勝山インスタンス彡(゚)(゚)
という訳で、表題の通り OCI VCN でパケットを右から左に受け流すだけの Linux Compute を作ってみます。
1. 背景
お仕事で IPS/WAF を Compute に導入する案件が有り、ルート表のルーティング設定検証の必要性に迫られました。
IPS/WAFそのものは有償で検証目的では導入できないため、疑似IPS/WAF として冒頭のような Linux Compute を作成します。
2. ネットワーク構成図
ネットワーク構成図は以下の通りです。Computeインスタンスは全て Oracle Linux 8 で作成します。
Compute1 から Compute3 にアクセスする時に、Compute2 を透過的に経由するように OCI Network や Compute2 を構成します。
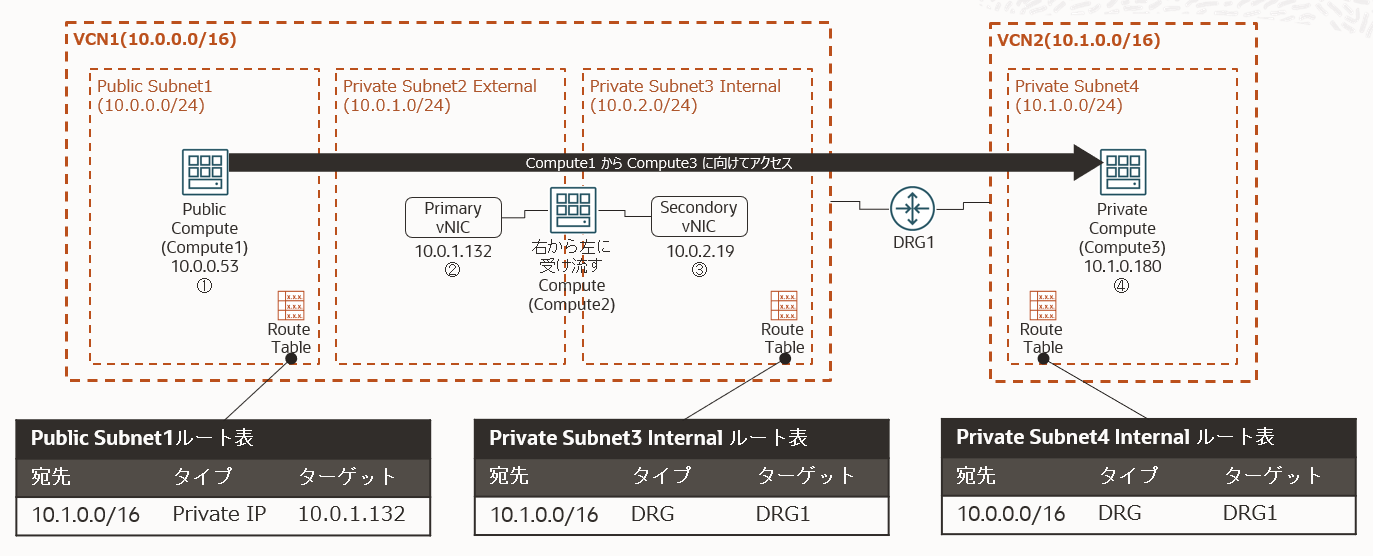
ポイントは Public Subnet1 のルート表で Public Subnet1 から VCN2(10.1.0.0/16)宛先 のパケットを
Compute2 の Primary VNIC IP(10.0.1.132) にルーティングしているところでしょうか。
3. VCN/Subnet/Compute/DRG の作成と接続
詳細は省略します。以下のような記事を参照して、VCN/Subnet/Compute/DRG等を作成・接続して下さい。
検証によく使う Oracle Cloud Infrastructure(OCI) の 環境構成(VCN, Seculity List, 各種Gateway, Route Table, Subnet, Compute)まとめ
https://qiita.com/ora_gonsuke777/items/08e4781af8c4f7e114ff
検証によく使う Oracle Cloud Infrastructure(OCI)環境を Terraform で作成してみる。
https://qiita.com/ora_gonsuke777/items/8651c4075ec6bf436c4f
[Oracle Cloud] 複数のVCN越しに疎通できるようにしてみた
https://qiita.com/nomu_kyou/items/4f369dd491d0ac5150d4
4. Secondory VNIC の追加と設定
Compute2 に VNIC の追加と設定を行います。
まずは VNIC の追加から、該当Computeインスタンスの左サイドメニュー → Attached VNICs → Create VNICボタンをクリックします。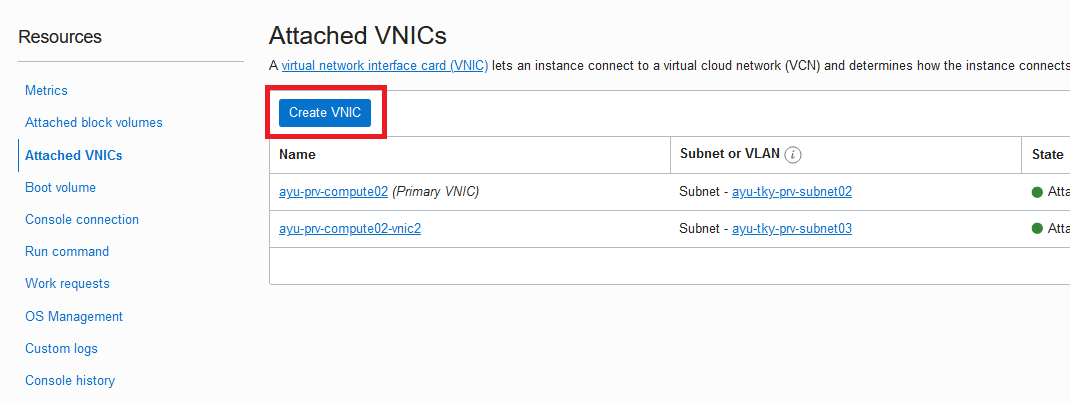
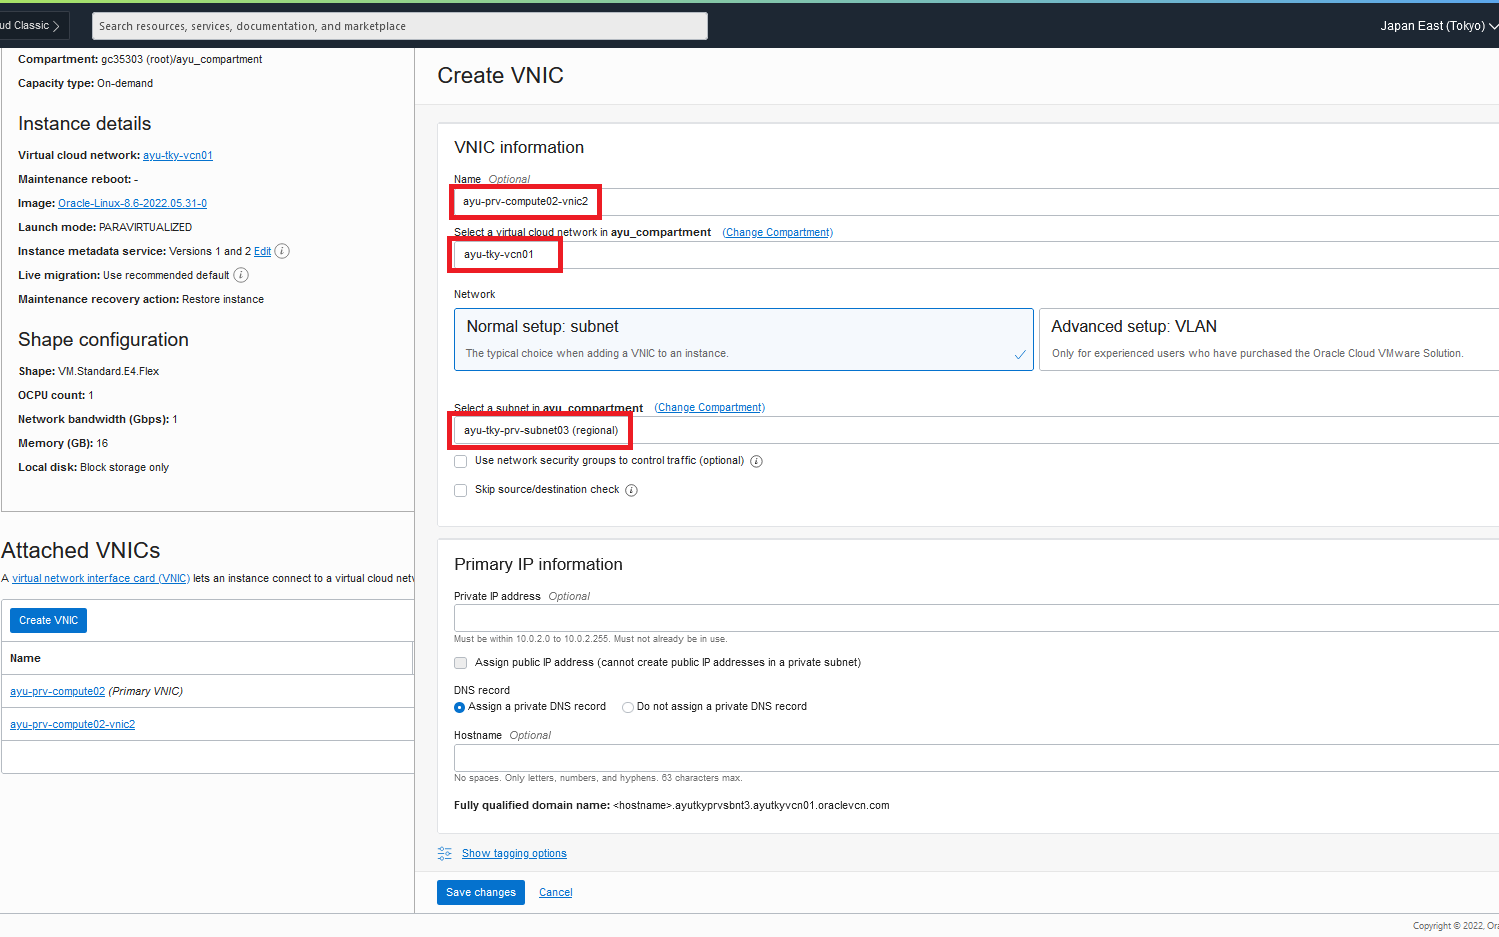
名前は適当に入力して、VCN/Subnet を選択します。これらを入力後、Save Changes をクリックします。
VNIC の追加後に Compute2 にアクセスして secondary_vnic_al_configure.sh を wget して実行します。
インターネットに疎通しない場合は、必要に応じて NAT GW をアタッチして wget して下さい。
wget https://docs.oracle.com/ja-jp/iaas/Content/Resources/Assets/secondary_vnic_all_configure.sh
chmod 750 secondary_vnic_all_configure.sh
./secondary_vnic_all_configure.sh -c
結果は以下の通りです。
[root@ayu-prv-compute02 sysctl.d]# ./secondary_vnic_all_configure.sh -c
Info: adding IP config for VNIC MAC 02:00:17:00:f0:a3 with id ocid1.vnic.oc1.ap-tokyo-1.xxxxxxxxxxxxxxxxxxxxxxxxxxxxxxxx
Info: added IP address 10.0.2.19 on interface ens5 with MTU 9000
Info: added rule for routing from 10.0.2.19 lookup ort1 with default via 10.0.2.1
参考:
How to add a secondary VNIC to Linux Compute in three steps
https://blogs.oracle.com/cloud-infrastructure/post/how-to-add-a-secondary-vnic-to-linux-compute-in-three-steps
※本Shell(secondary_vnic_all_configure.sh)の実行手順は現時点では古いかもしれません。要確認。
5. Linux Compute の IPフォワーディング/IPマスカレード/静的ルーティング設定
VNIC を追加したら、IPフォワーディング/IPマスカレード/静的ルーティングの設定を行います。
コマンドは全てrootユーザーか sudo で実行して下さい。
IPフォワーディングの設定は以下の通りです。
echo "net.ipv4.ip_forward = 1" > /etc/sysctl.d/net.ipv4.ip_forward.conf
cat /etc/sysctl.d/net.ipv4.ip_forward.conf
sysctl -p /etc/sysctl.d/net.ipv4.ip_forward.conf
sysctl -a | grep -i ip_forward
結果は以下の通りです。
[root@ayu-prv-compute02 sysctl.d]# echo "net.ipv4.ip_forward = 1" > /etc/sysctl.d/net.ipv4.ip_forward.conf
[root@ayu-prv-compute02 sysctl.d]# cat /etc/sysctl.d/net.ipv4.ip_forward.conf
net.ipv4.ip_forward = 1
[root@ayu-prv-compute02 sysctl.d]# sysctl -p /etc/sysctl.d/net.ipv4.ip_forward.conf
net.ipv4.ip_forward = 1
[root@ayu-prv-compute02 sysctl.d]# sysctl -a | grep -i ip_forward
net.ipv4.ip_forward = 1 ★設定されている。
net.ipv4.ip_forward_update_priority = 1
net.ipv4.ip_forward_use_pmtu = 0
[root@ayu-prv-compute02 sysctl.d]#
IPマスカレードの設定は以下の通りです。
firewall-cmd --add-masquerade
firewall-cmd --runtime-to-permanent
firewall-cmd --list-all
結果は以下の通りです。
[root@ayu-prv-compute02 tmp]# firewall-cmd --add-masquerade
success
[root@ayu-prv-compute02 tmp]# firewall-cmd --runtime-to-permanent
success
[root@ayu-prv-compute02 tmp]# firewall-cmd --list-all
public (active)
  target: default
  icmp-block-inversion: no
  interfaces: ens3
  sources:
  services: ssh
  ports:
  protocols:
  forward: no
  masquerade: yes *コレ
  forward-ports:
  source-ports:
  icmp-blocks:
  rich rules:
[root@ayu-prv-compute02 tmp]#
最後に静的ルーティングを設定します。VCN2(10.1.0.0/16)宛先のパケットを、追加した Secondory VNIC にルーティングするように設定します。設定コマンドは以下の通りです。CIDR/サブネットマスク/ゲートウェイ/インタフェース名は適宜読み替えて下さい。
route add -net 10.1.0.0 netmask 255.255.0.0 gw 10.0.2.1 ens5
route
結果は以下の通りです。10.1.0.0/16宛先のパケットが追加した VNIC にルーティングされています。
[root@ayu-prv-compute02 tmp]# route add -net 10.1.0.0 netmask 255.255.0.0 gw 10.0.2.1 ens5
[root@ayu-prv-compute02 tmp]# route
Kernel IP routing table
Destination     Gateway         Genmask         Flags Metric Ref    Use Iface
default         _gateway        0.0.0.0         UG    0      0        0 ens3
default         _gateway        0.0.0.0         UG    100    0        0 ens3
10.0.1.0        0.0.0.0         255.255.255.0   U     0      0        0 ens3
10.0.1.0        0.0.0.0         255.255.255.0   U     100    0        0 ens3
10.0.2.0        0.0.0.0         255.255.255.0   U     0      0        0 ens5
10.1.0.0        _gateway        255.255.0.0     UG    0      0        0 ens5 ★コレ
link-local      0.0.0.0         255.255.0.0     U     0      0        0 ens3
link-local      0.0.0.0         255.255.0.0     U     100    0        0 ens3
[root@ayu-prv-compute02 tmp]#
ゲートウェイのIP を <Subnetのネットワークアドレス>.1 にしていますが、これは OCIマニュアル に下記の通り記載があります。
Oracle使用のための予約IPアドレス
https://docs.oracle.com/ja-jp/iaas/Content/Network/Concepts/overview.htm#Reserved各サブネットにある3つのIPアドレス
これらのアドレスの構成は:・CIDRの最初のIPアドレス(ネットワーク・アドレス)
・CIDRの最後のIPアドレス(ブロードキャスト・アドレス)
・CIDRの最初のホスト・アドレス(サブネットのデフォルト・ゲートウェイ・アドレス) ★コレたとえば、CIDR 192.168.0.0/24のサブネットでは、次のアドレスが予約されます:
・192.168.0.0 (ネットワーク・アドレス)
・192.168.0.255 (ブロードキャスト・アドレス)
・192.168.0.1 (サブネットのデフォルト・ゲートウェイ・アドレス) ★コレ
6. Primary VNIC の設定変更 と OCIルート表の静的ルーティング設定
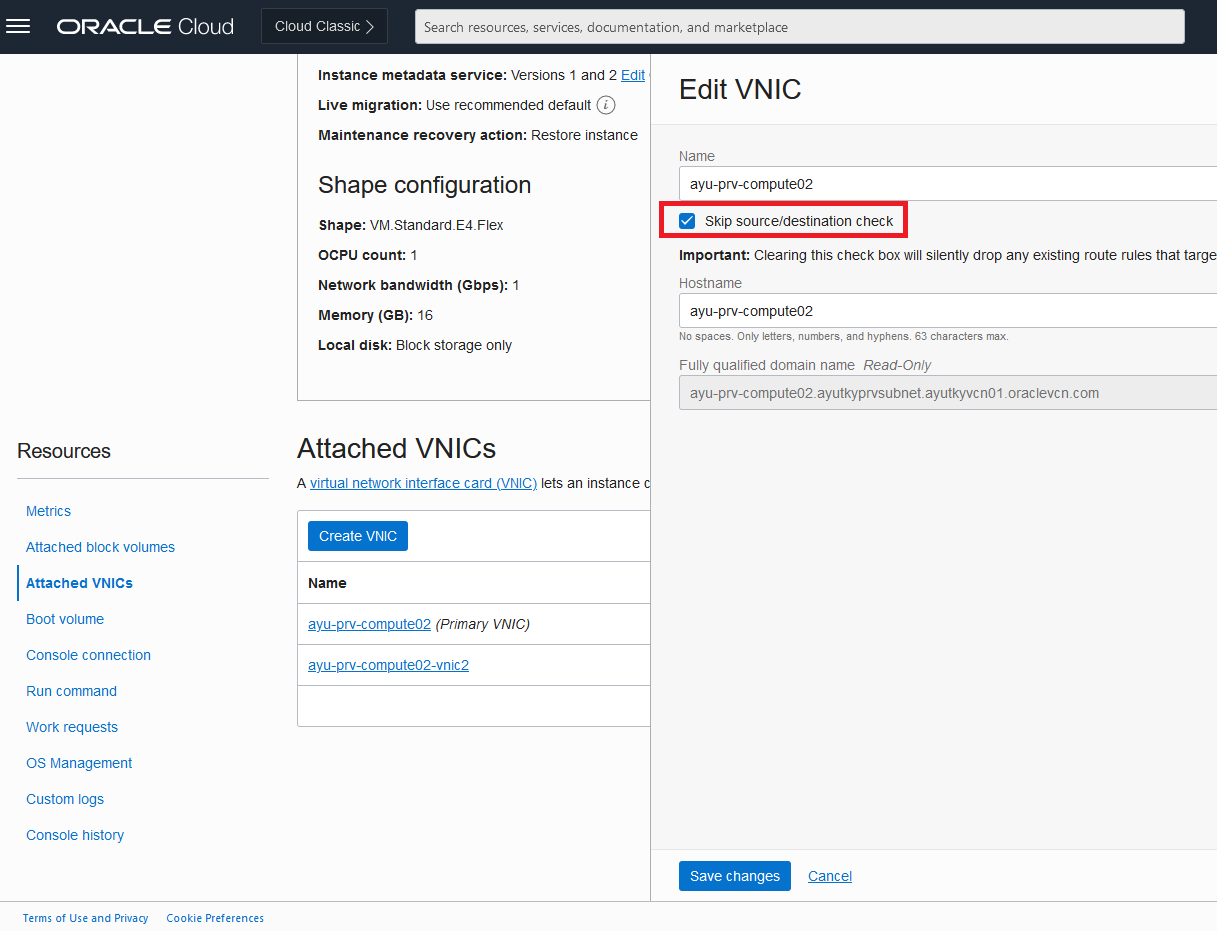
Compute2 の Primary VNIC の設定を変更します。Compute → Attached VNICs → 該当VNIC の Edit で "Skip source/destination check" にチェックをいれて保存します。この設定はこの後の静的ルーティングに必要となります。
Public Subnet1 のルート表に Compute2 Primary VNIC への静的ルーティングを追加します。
Public Subnet1 のルート表に遷移して、以下のようなルート・ルールを追加します。
※Important: の表記の通り、Private IP をターゲットにする場合は "Skip source/destination check" を予めセットする必要があります。
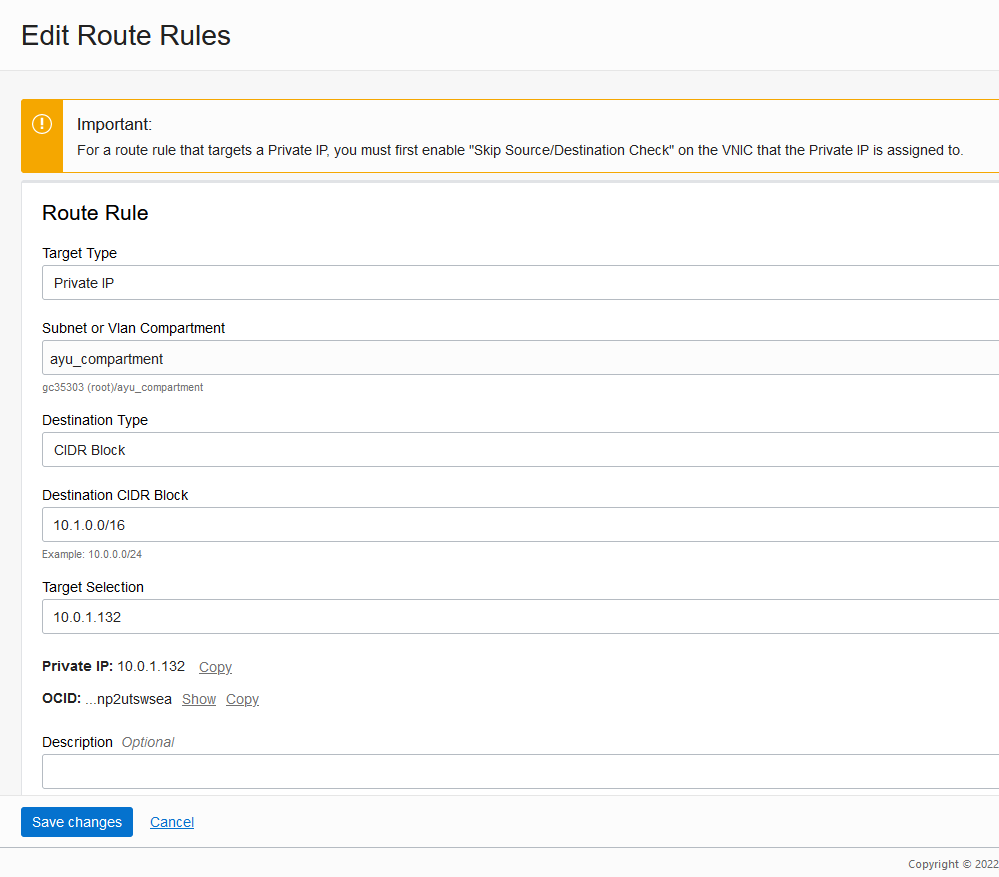
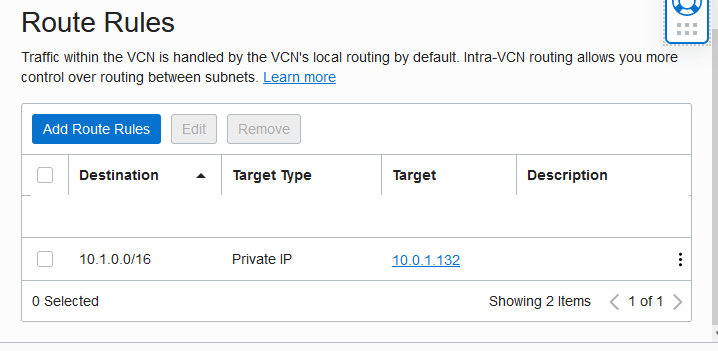
成功すれば下記のように Compute2 Primary VNIC へのルーティングが追加されています。
7. nping による疎通と tcpdump によるパケット確認
Compute1 から Compute3 への疎通を確認します。
この時パケットの通過を確認するために、構成図の③と④のインターフェースで tcpdump を仕掛けておきます。
Compute1 から Compute3 に以下のコマンド(nping)でパケットを飛ばします。
ポートはファイヤーウォール(Security List/NSG)で許可されていれば何でも良いですが、今回は 1521 で疎通してみます。
nping --tcp -p 1521 10.1.0.180
Compute2 の ③ のインタフェースに仕掛ける tcpdump は以下のコマンドです。インタフェース名は適宜読み替えて下さい。
tcpdump -i ens5 port 1521
Compute3 の ④ のインタフェースに仕掛ける tcodump は以下のコマンドとなります。インタフェース名は適宜読み替えて下さい。
tcpdump -i ens3 port 1521
結果は以下の通りです。上手く行きましたやで!彡(^)(^)
Compute1 の nping の結果(成功)
[root@ayu-pub-compute01 ~]# nping --tcp -p 1521 10.1.0.180

Starting Nping 0.6.40 ( http://nmap.org/nping ) at 2022-06-24 02:07 GMT
SENT (0.0102s) TCP 10.0.0.53:12695 > 10.1.0.180:1521 S ttl=64 id=42380 iplen=40  seq=3807307751 win=1480
RCVD (0.2068s) ICMP [10.1.0.180 > 10.0.0.53 Destination host 10.1.0.180 administratively prohibited (type=3/code=10) ] IP [ttl=62 id=14983 iplen=68 ]
SENT (1.0107s) TCP 10.0.0.53:12695 > 10.1.0.180:1521 S ttl=64 id=42380 iplen=40  seq=3807307751 win=1480
RCVD (1.0388s) ICMP [10.1.0.180 > 10.0.0.53 Destination host 10.1.0.180 administratively prohibited (type=3/code=10) ] IP [ttl=62 id=15563 iplen=68 ]
SENT (2.0118s) TCP 10.0.0.53:12695 > 10.1.0.180:1521 S ttl=64 id=42380 iplen=40  seq=3807307751 win=1480
RCVD (2.0788s) ICMP [10.1.0.180 > 10.0.0.53 Destination host 10.1.0.180 administratively prohibited (type=3/code=10) ] IP [ttl=62 id=16242 iplen=68 ]
SENT (3.0138s) TCP 10.0.0.53:12695 > 10.1.0.180:1521 S ttl=64 id=42380 iplen=40  seq=3807307751 win=1480
RCVD (3.1188s) ICMP [10.1.0.180 > 10.0.0.53 Destination host 10.1.0.180 administratively prohibited (type=3/code=10) ] IP [ttl=62 id=17173 iplen=68 ]
SENT (4.0158s) TCP 10.0.0.53:12695 > 10.1.0.180:1521 S ttl=64 id=42380 iplen=40  seq=3807307751 win=1480
RCVD (4.1588s) ICMP [10.1.0.180 > 10.0.0.53 Destination host 10.1.0.180 administratively prohibited (type=3/code=10) ] IP [ttl=62 id=17581 iplen=68 ]

Max rtt: 196.615ms | Min rtt: 28.097ms | Avg rtt: 107.920ms
Raw packets sent: 5 (200B) | Rcvd: 5 (340B) | Lost: 0 (0.00%)
Nping done: 1 IP address pinged in 4.17 seconds
[root@ayu-pub-compute01 ~]#
Compute2 の ③ のインタフェースに仕掛けた tcpdump
[root@ayu-prv-compute02 tmp]# tcpdump -i ens5 port 1521
dropped privs to tcpdump
tcpdump: verbose output suppressed, use -v or -vv for full protocol decode
listening on ens5, link-type EN10MB (Ethernet), capture size 262144 bytes
02:07:08.247235 IP ayu-prv-compute02.12695 > 10.1.0.180.ncube-lm: Flags [S], seq 3807307751, win 1480, length 0
02:07:09.247731 IP ayu-prv-compute02.12695 > 10.1.0.180.ncube-lm: Flags [S], seq 3807307751, win 1480, length 0
02:07:10.248873 IP ayu-prv-compute02.12695 > 10.1.0.180.ncube-lm: Flags [S], seq 3807307751, win 1480, length 0
02:07:11.250839 IP ayu-prv-compute02.12695 > 10.1.0.180.ncube-lm: Flags [S], seq 3807307751, win 1480, length 0
02:07:12.252835 IP ayu-prv-compute02.12695 > 10.1.0.180.ncube-lm: Flags [S], seq 3807307751, win 1480, length 0
Compute3 の ④ のインターフェースに仕掛けた tcpdump
[root@ayu-prv-compute04 ~]# tcpdump -i ens3 port 1521
tcpdump: verbose output suppressed, use -v or -vv for full protocol decode
listening on ens3, link-type EN10MB (Ethernet), capture size 262144 bytes
02:07:08.247347 IP 10.0.2.19.12695 > ayu-prv-compute04.xxxxxxxxxxxxxxx.oraclevcn.com.ncube-lm: Flags [S], seq 3807307751, win 1480, length 0
02:07:09.247832 IP 10.0.2.19.12695 > ayu-prv-compute04.xxxxxxxxxxxxxxx.oraclevcn.com.ncube-lm: Flags [S], seq 3807307751, win 1480, length 0
02:07:10.248976 IP 10.0.2.19.12695 > ayu-prv-compute04.xxxxxxxxxxxxxxx.oraclevcn.com.ncube-lm: Flags [S], seq 3807307751, win 1480, length 0
02:07:11.250934 IP 10.0.2.19.12695 > ayu-prv-compute04.xxxxxxxxxxxxxxx.oraclevcn.com.ncube-lm: Flags [S], seq 3807307751, win 1480, length 0
02:07:12.252941 IP 10.0.2.19.12695 > ayu-prv-compute04.xxxxxxxxxxxxxxx.oraclevcn.com.ncube-lm: Flags [S], seq 3807307751, win 1480, length 0
8. まとめ
実はIPマスカレードでNATしているので、パケットを右から左に受け流していません。
Compute3 の ④ の tcpdump の通り、IPアドレス が Secondory VNIC のものに付け替わっています。
看板に偽り有りでゴメンナサイ
とまれやりたい事は実現できました。冒頭のムーディ勝山さんはエンタの神様でブレイクしたわけですが、再ブレイクの兆し有りらしい?ので、氏の右から左へ受け流す動画で〆といたしましょう!彡(^)(^)
Appendix. 参考ドキュメント
Red Hat Enterprise Linux 8 におけるネットワークの設定と管理に関するガイド
https://access.redhat.com/documentation/ja-jp/red_hat_enterprise_linux/8/html-single/configuring_and_managing_networking/index
7.8.2. IP アドレスのマスカレードの設定
https://access.redhat.com/documentation/ja-jp/red_hat_enterprise_linux/8/html/securing_networks/configuring-ip-address-masquerading_assembly_configuring-nat-using-firewalld