本記事では、ハンズオンでの実施を想定して、StepZen を使用して、REST API とリレーショナルデータベースから GraphQL API を作成します。また、複数のデータソースを使用した GraphQL API の作成も体験します。
詳細については、公式ドキュメント(StepZen Product Documentation)を確認ください。
0. StepZen のセッティング
0.1 アカウント作成
まず始めに、StepZen のウェブサイトにアクセスして、アカウントを作成しましょう。

0.2 StepZen CLI インストール
StepZen CLI を使用すると、ローカルマシンから StepZen サービスに直接アクセスできます。CLI をインストールするには、次の npm コマンドを実行します。(Node.jsがインストールされていることを前提としています。)
npm install -g stepzen
0.2 StepZen CLI でログイン
インストール後、以下のコマンドを使って StepZen にログインします。
stepzen login
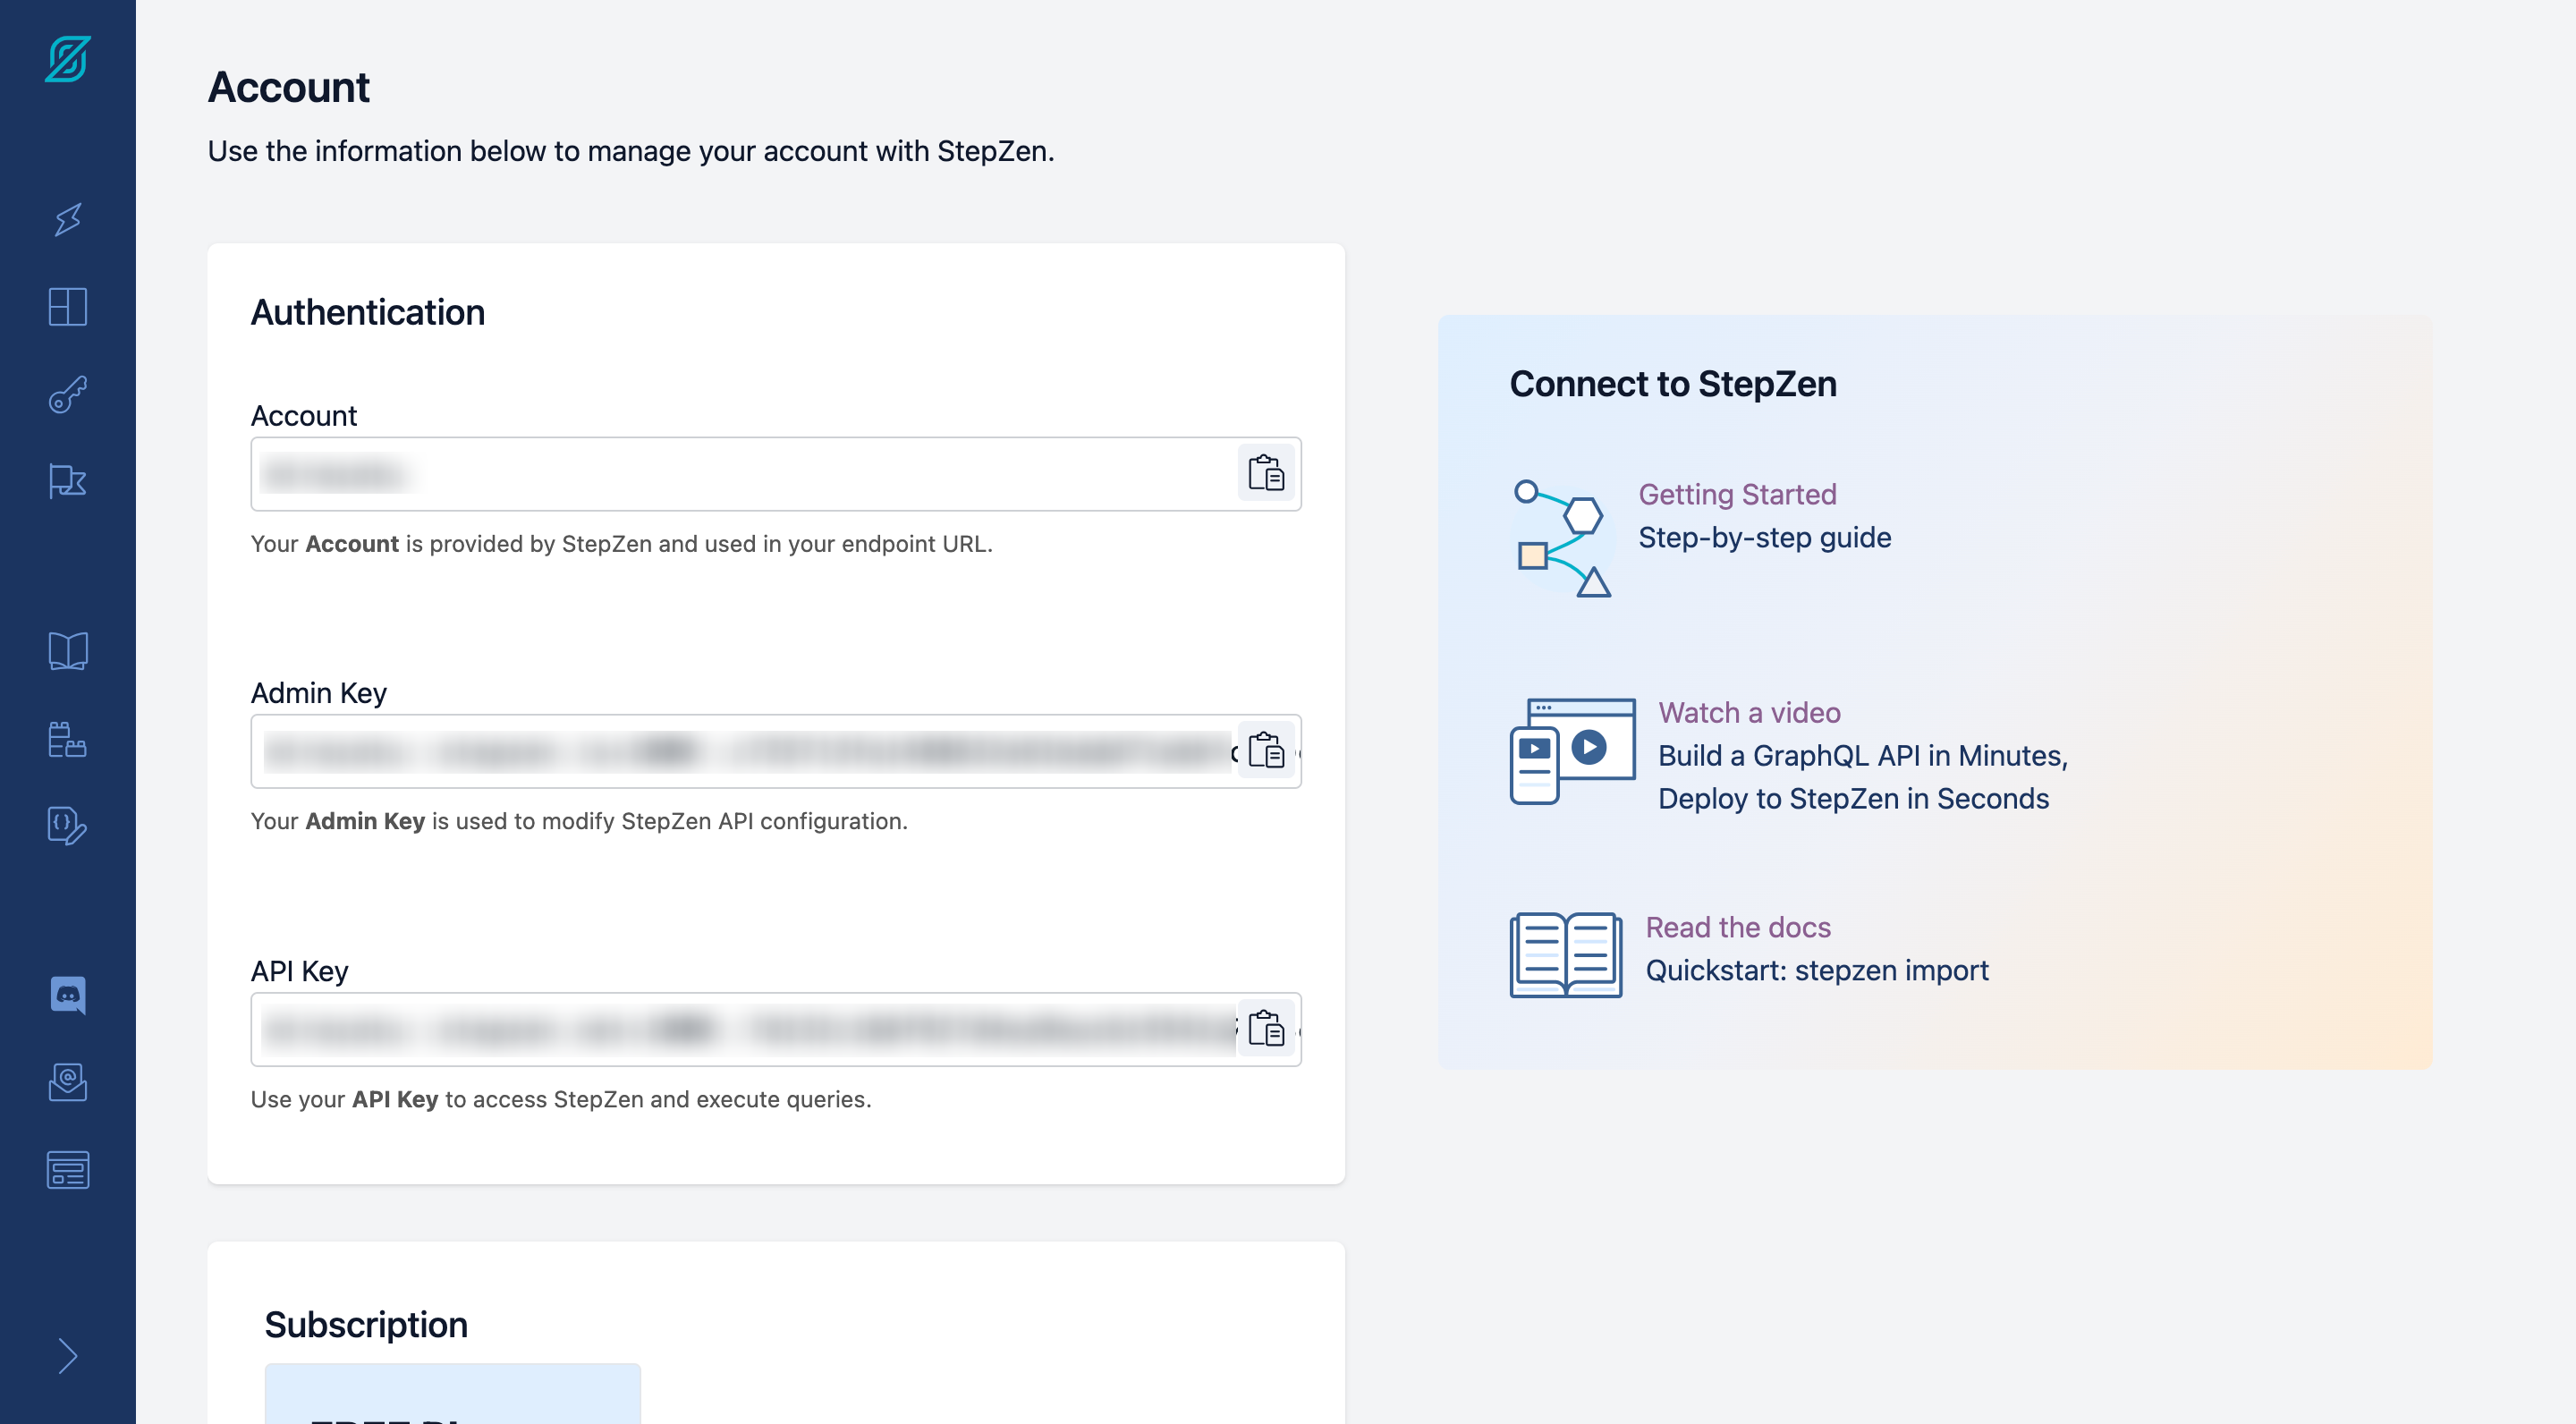
下記プロンプトが出てくるので、それぞれStepZen Dashboardの Account ページから取得したアカウント名と Admin Key を入力ください。
What is your account name?: ACCOUNT_NAME
What is your admin key?: ADMIN_KEY
これで StepZen のセッティングが完了しました。
0.3 GraphQL Playground のインストール
必要に応じて、デバッグ用にクライアントアプリをインストールします。
ブラウザからもクエリできるので、必須ではありません。
また、他のクライアントアプリでも構いません。
下記サイトを参考に以下のコマンドを実行して、GraphQL のクライアントアプリである GraphQL Playground をインストールします。(HomebrewをすでにインストールしているMac ユーザーを想定しています)
graphql/graphql-playground: 🎮 GraphQL IDE for better development workflows (GraphQL Subscriptions, interactive docs & collaboration)
brew install --cask graphql-playground
1. GraphQL でクエリ
1.1 Snowtooth GraphQL API での操作
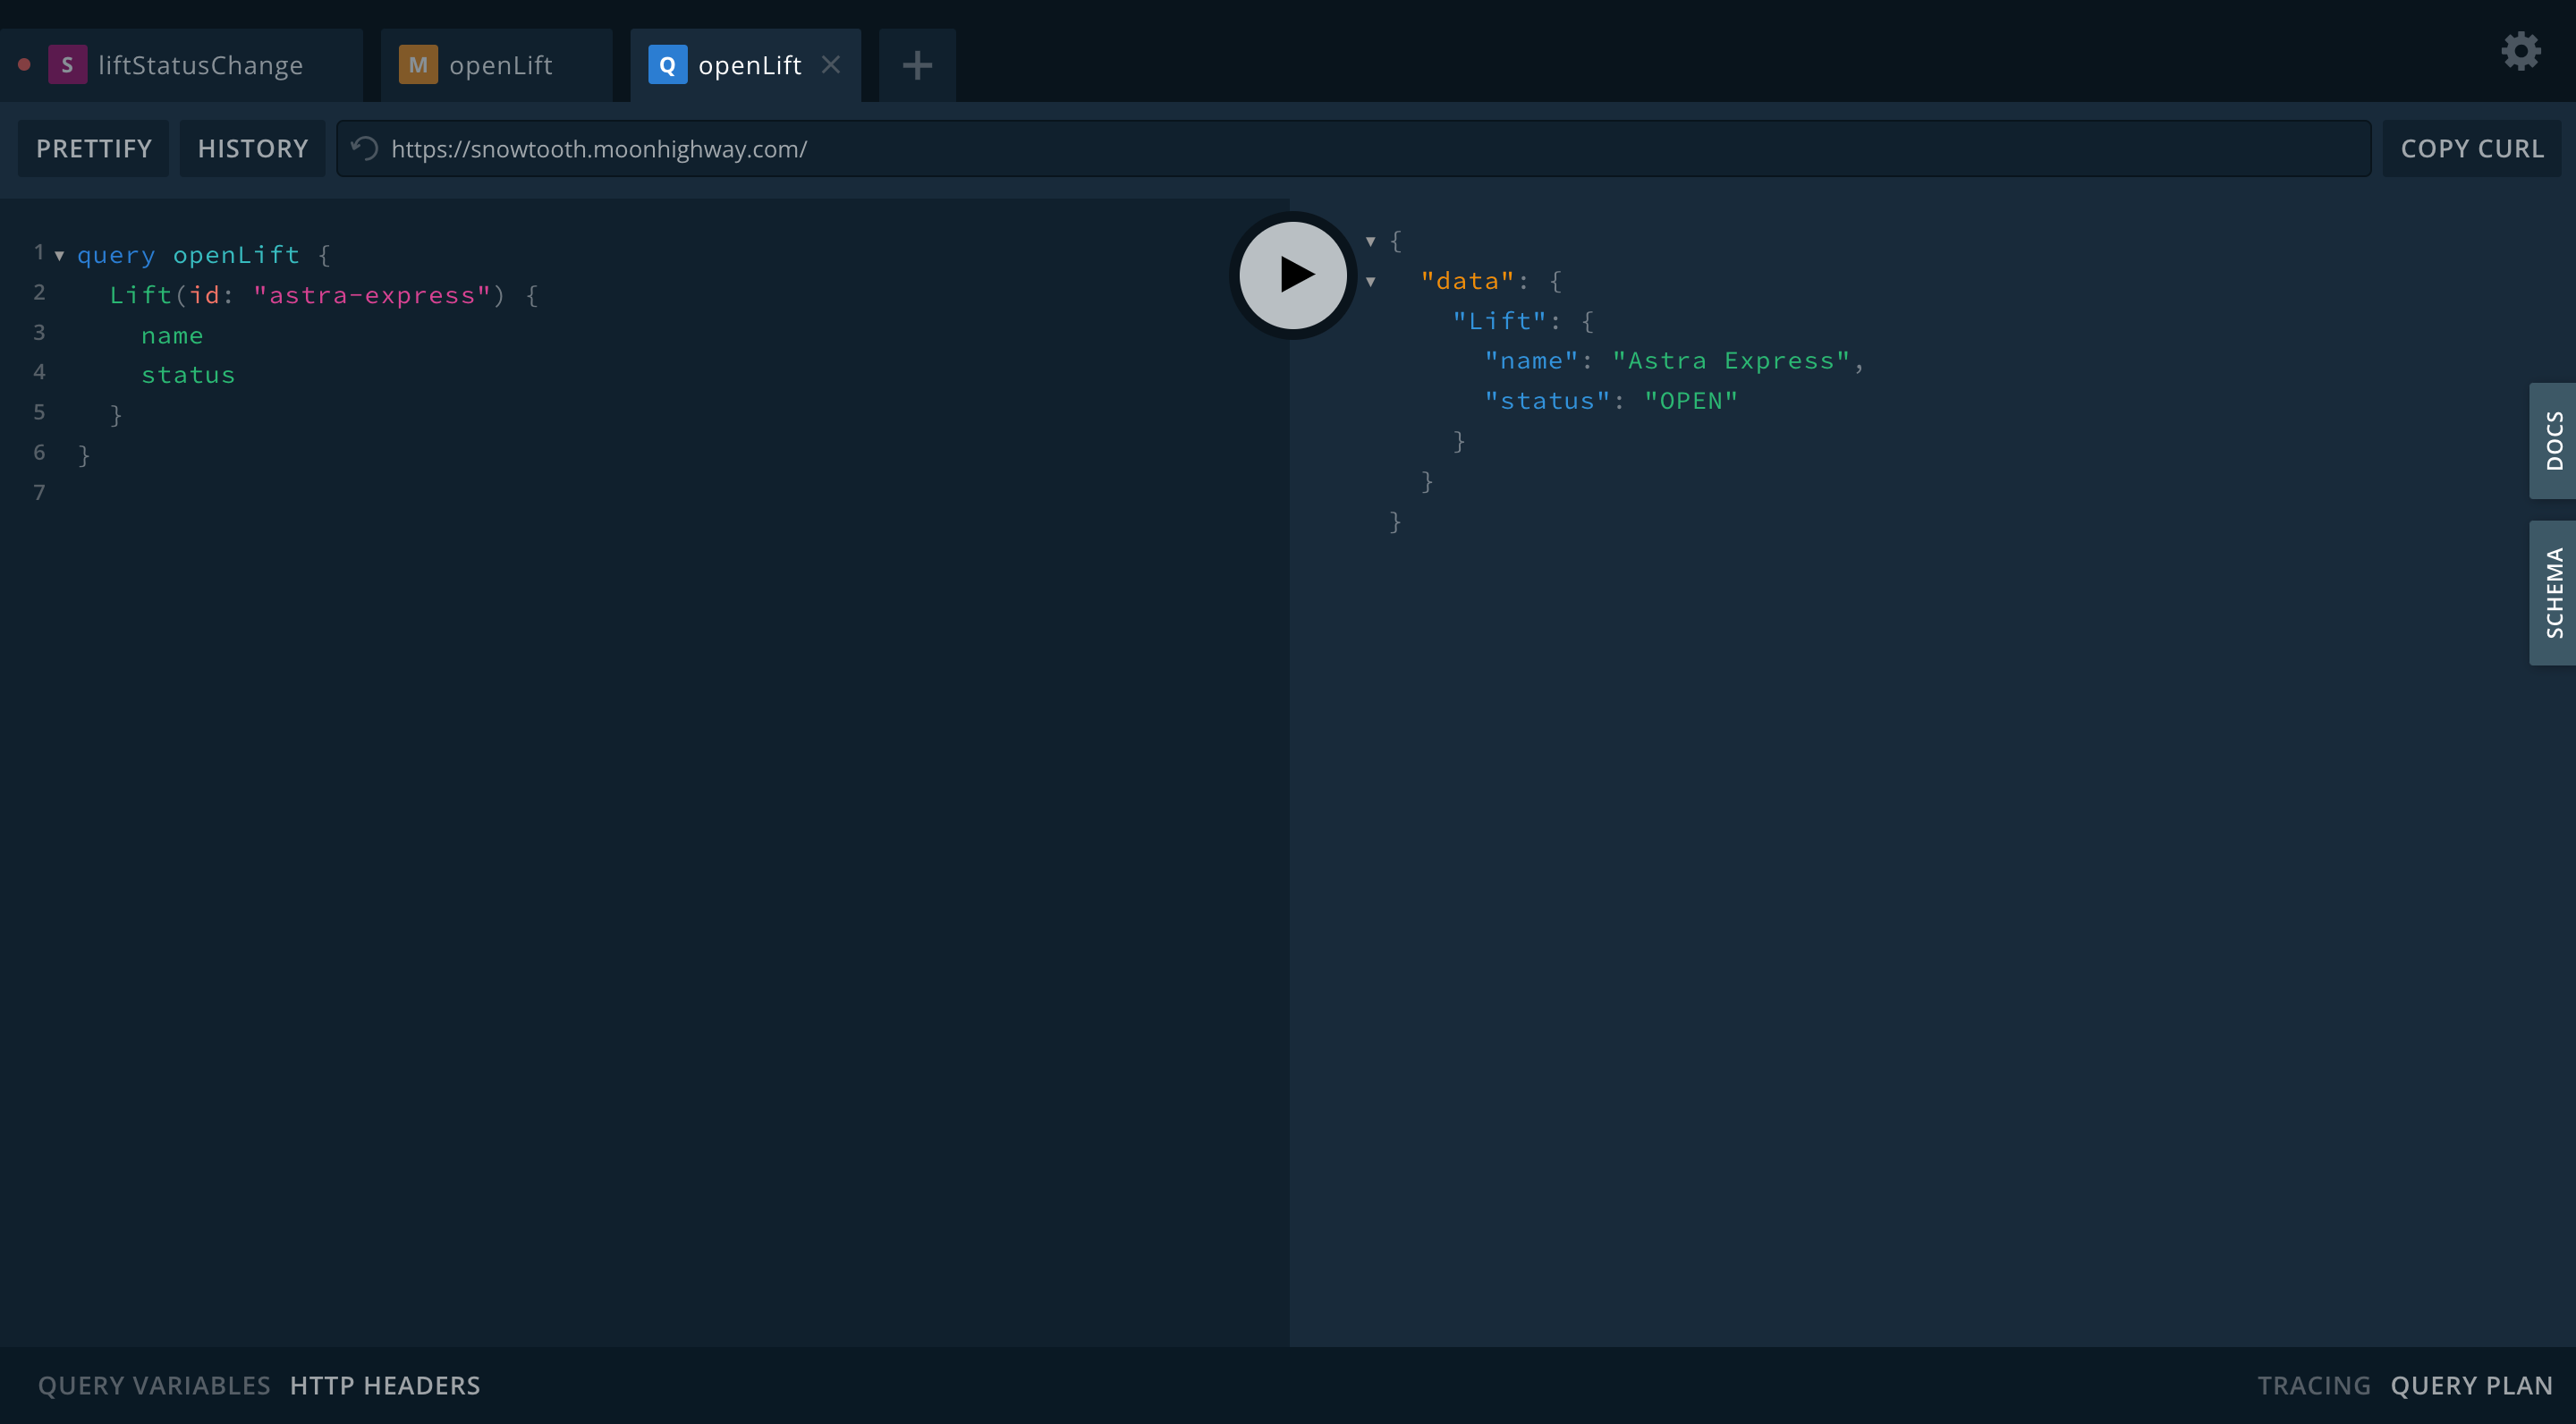
まず、架空のゲレンデのリフト情報とトレイル情報を管理している Snowtooth GraphQL API(https://snowtooth.moonhighway.com/ )にアクセスします。ここで、以下を参考にGraphQL の基本的な操作、Query、Mutation、Subscription を試してみましょう。
query {
  Lift(id: "astra-express") {
    name
    status
  }
}
mutation {
  setLiftStatus(id: "astra-express" status: CLOSED) {
    name
    status
  }
}

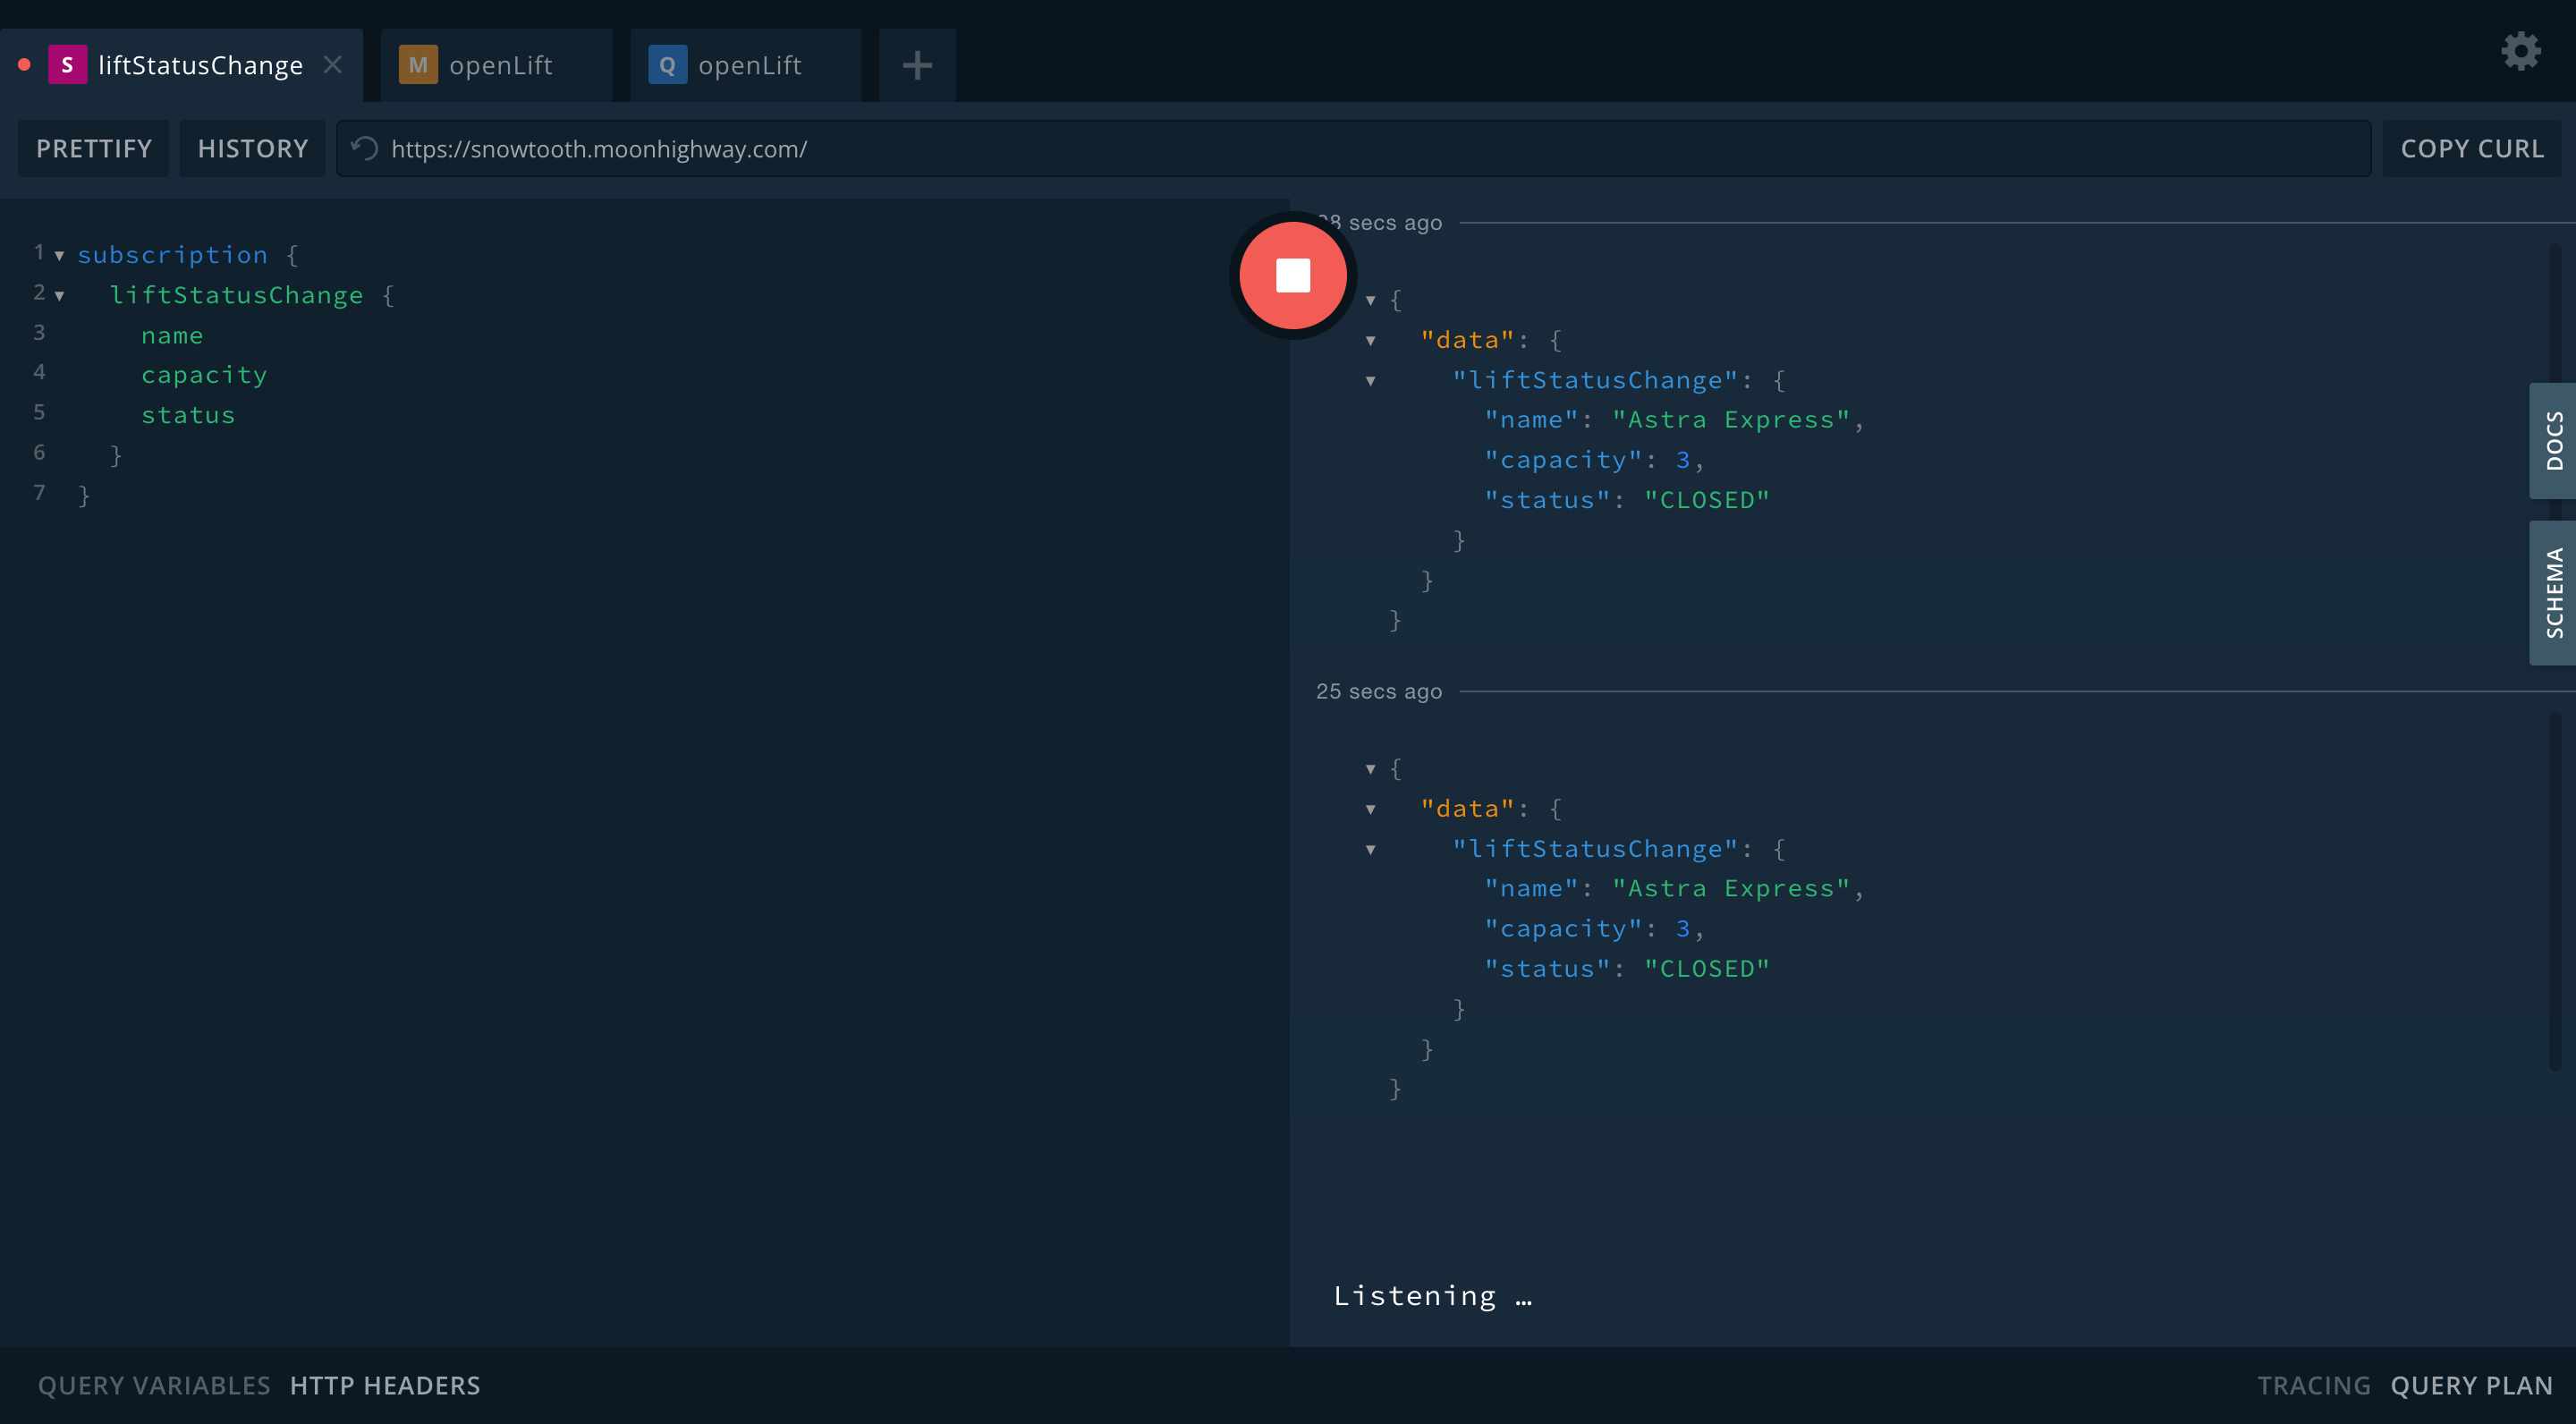
subscription {
  liftStatusChange {
    name
    capacity
    status
  }
}
1.2 curl での操作
ここで、GraphQLがREST APIと同様にHTTPで通信していることを理解するために、curlでデータを取得してみます。(Subscriptionはwebsocketを使用していますが。)
Snowtooth GraphQL API の Playground (https://snowtooth.moonhighway.com/ )の右上にCOPY CURLボタンがあり、それを押すことで下記のような curl コマンドをコピーできます。ターミナルに貼り付けて実行することで、Playground と同じようにデータを取得できます。
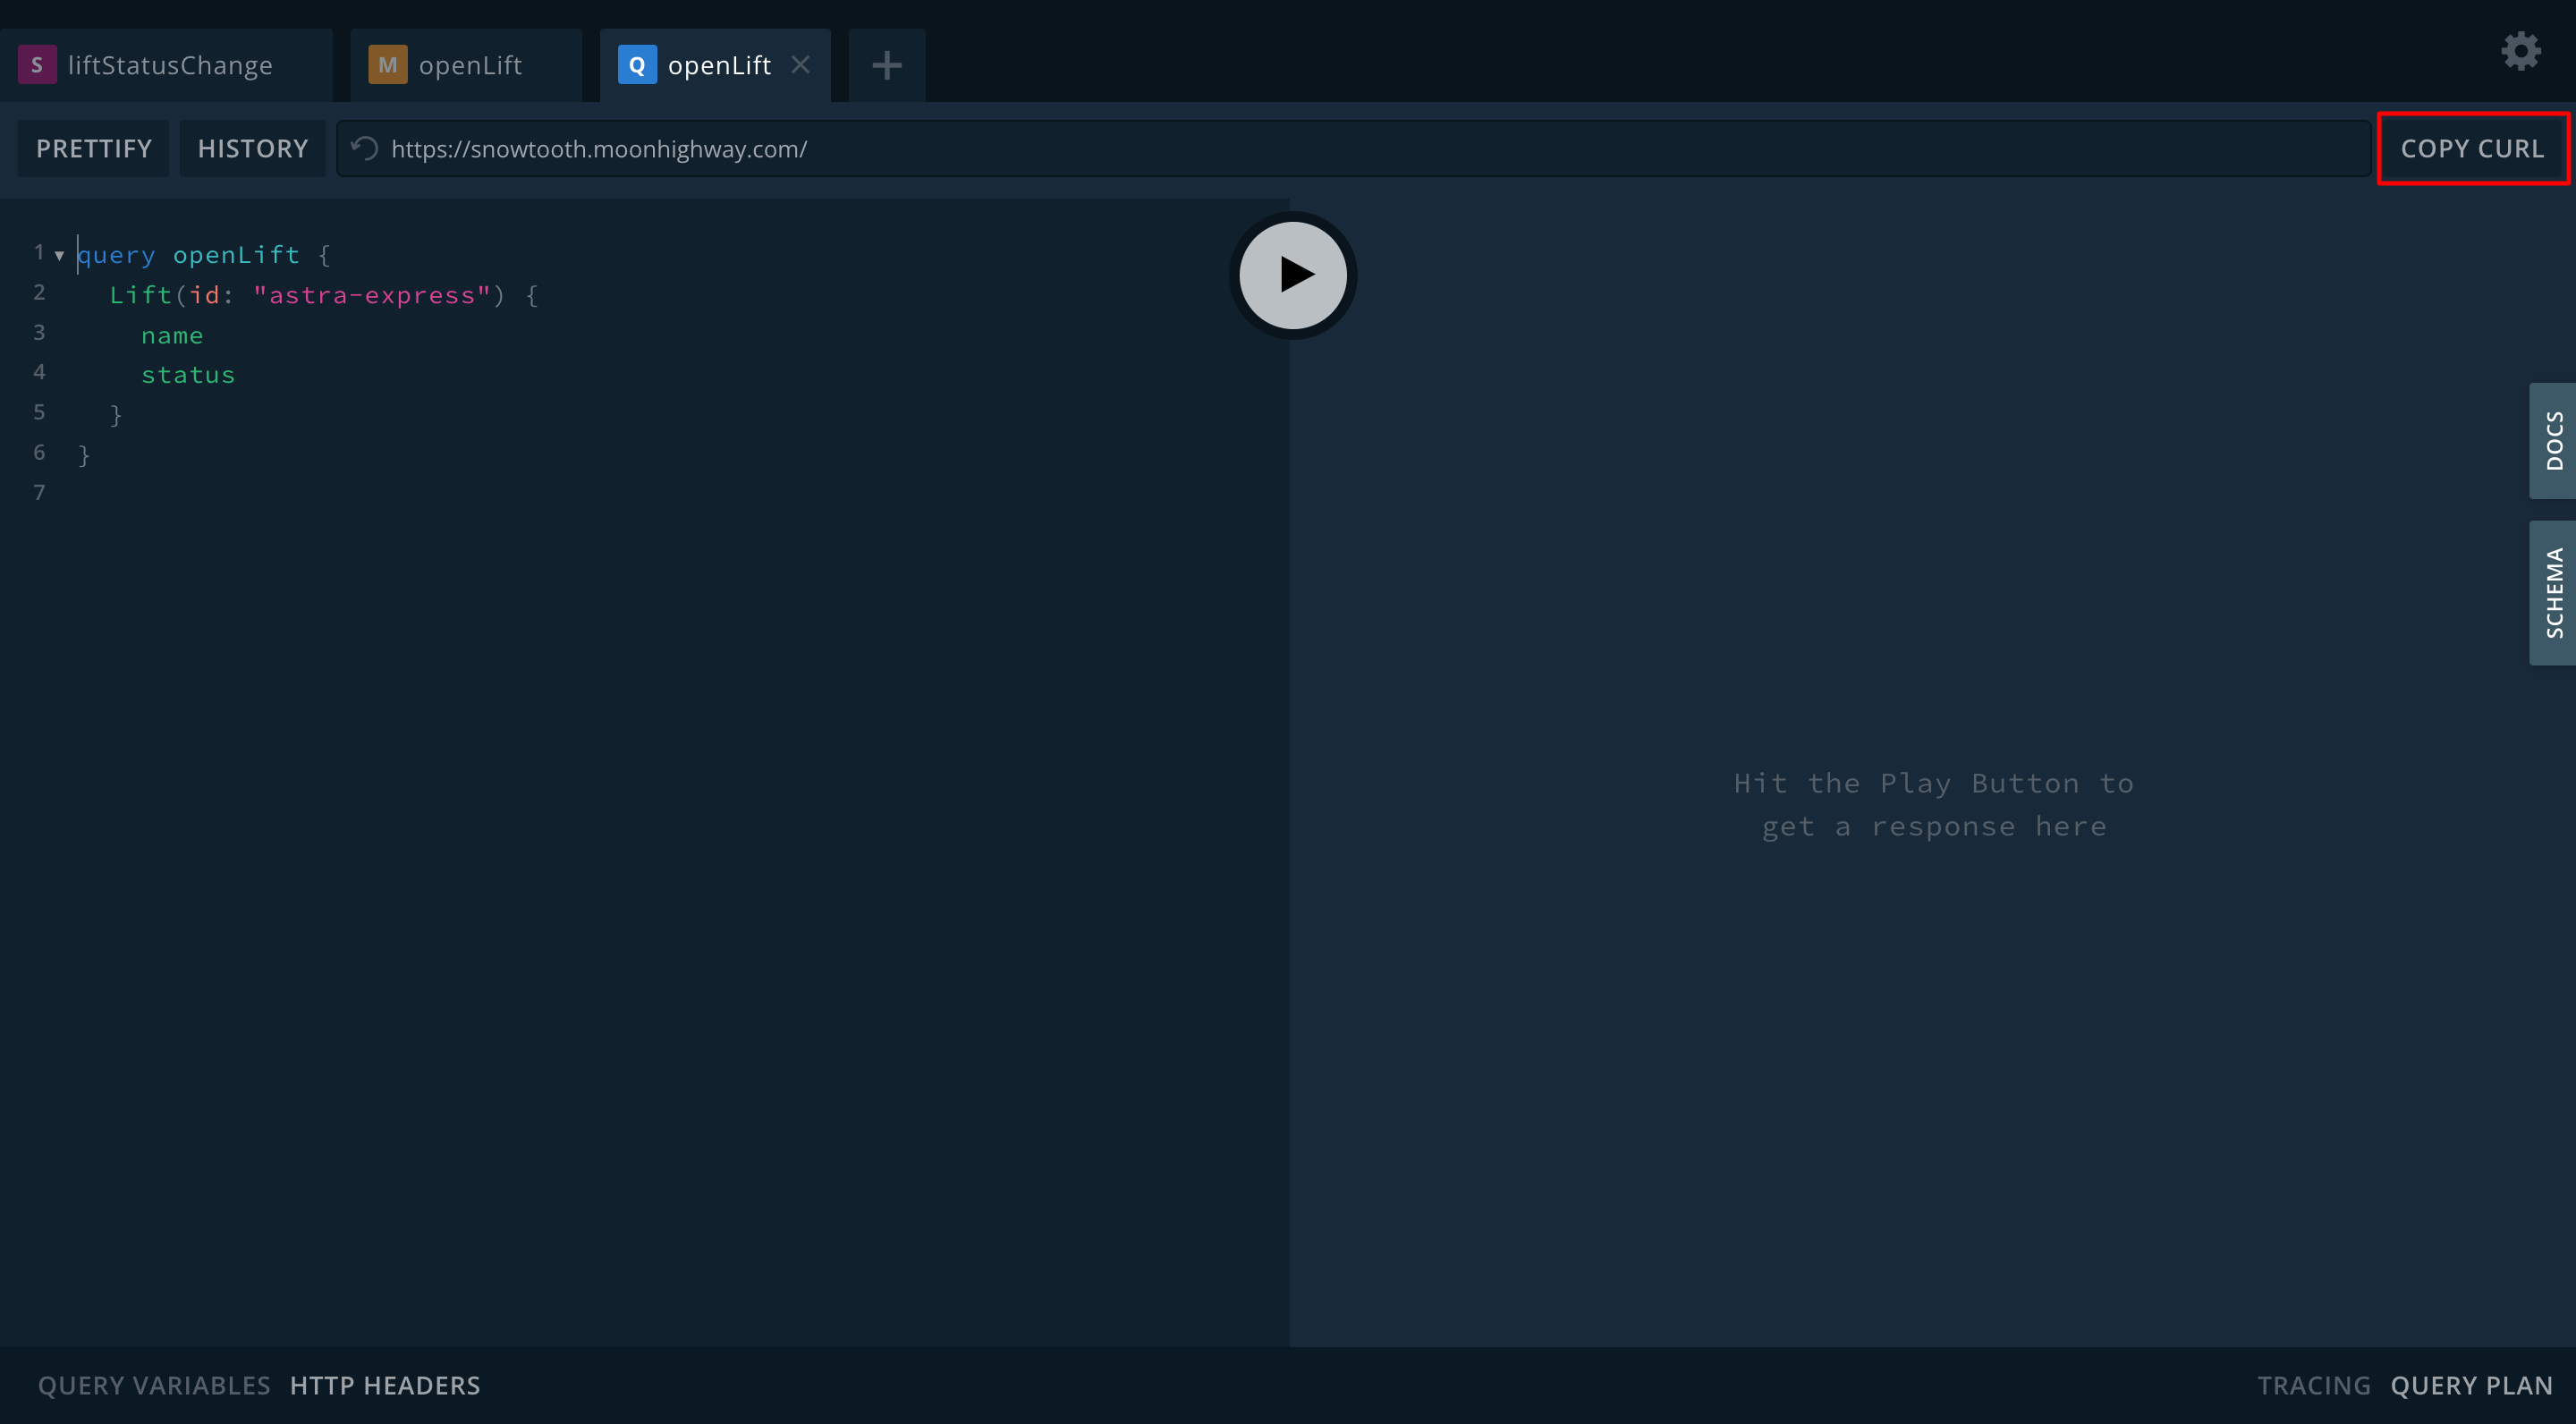
curl 'https://snowtooth.moonhighway.com/' -H 'Accept-Encoding: gzip, deflate, br' -H 'Content-Type: application/json' -H 'Accept: application/json' -H 'Connection: keep-alive' -H 'DNT: 1' -H 'Origin: https://snowtooth.moonhighway.com' --data-binary '{"query":"query openLift {\n Lift(id: \"astra-express\") {\n name\n status\n }\n}\n"}' --compressed
2. REST API の GraphQL 化
2.1 tutorial にある REST API を使って動作確認
StepZen のチュートリアルに従い、REST API の操作を行いましょう。これにより、REST API がどのように機能するかを理解することができます。
GraphQL 化する REST API として下記エンドポイントを使用します。
ブラウザや curl コマンドでアクセスすると下記のような json ファイルを取得することができます。
[
  {
    "address": {
      "city": "Boston",
      "countryRegion": "US",
      "id": 1,
      "postalCode": "02122",
      "stateProvince": "Massachusetts",
      "street": "999 Croissant Bl"
    },
    "email": "lucas.bill@example.com",
    "id": 1,
    "name": "Lucas Bill",
    "orders": [
      {
        "carrier": "ups",
        "createdAt": "2020-08-04",
        "customerId": 1,
        "id": 19,
        "shippingCost": 2,
        "trackingId": "1Z881F5V0397269080"
      },
      {
        "carrier": "ups",
        "createdAt": "2020-08-01",
        "customerId": 1,
        "id": 20,
        "shippingCost": 1,
        "trackingId": "1Z4V180W0324616505"
      }
    ]
  }
]
以下のコマンドを実行することで、GraphQL API の構成ファイルが生成されます。
stepzen import curl https://introspection.apis.stepzen.com/customers --query-name "customers" --query-type "Customer" --name "customers"
追記(2023/07/20):上記コマンドでエラーが出るようになっていました。もしエラーが出るようであれば、ポケモンAPI等の認証の不要な別のAPIで試してみてください。
stepzen import curl https://pokeapi.co/api/v2/pokemon/ditto --query-name "pokemons" --query-type "Pokemon" --name "pokemons"
生成された構成ファイルは以下のとおりです。
index.graphqlおよびcurl/index.graphqlに記載の@sdlと@restが GraphQL Directives を用いた StepZen 独自の設定となります。今回は、認証のない REST API を用いているため、非常にシンプルな構成ファイルとなっています。
{
  "endpoint": "api/getting-started"
}
schema @sdl(files: ["curl/index.graphql"]) {
  query: Query
}
type Address {
  city: String
  countryRegion: String
  id: Int
  postalCode: String
  stateProvince: String
  street: String
}
type OrdersEntry {
  carrier: String
  createdAt: Date
  customerId: Int
  id: Int
  shippingCost: Int
  trackingId: String
}
type RootEntry {
  address: Address
  email: String
  id: Int
  name: String
  orders: [OrdersEntry]
}

type Query {
  myQuery: [RootEntry]
    @rest(endpoint: "https://introspection.apis.stepzen.com/customers")
}
構成ファイル完成後、以下のコマンドでデプロイします。
stepzen start
デプロイが完了したことを、StepZen Dashboardから確認してみます。
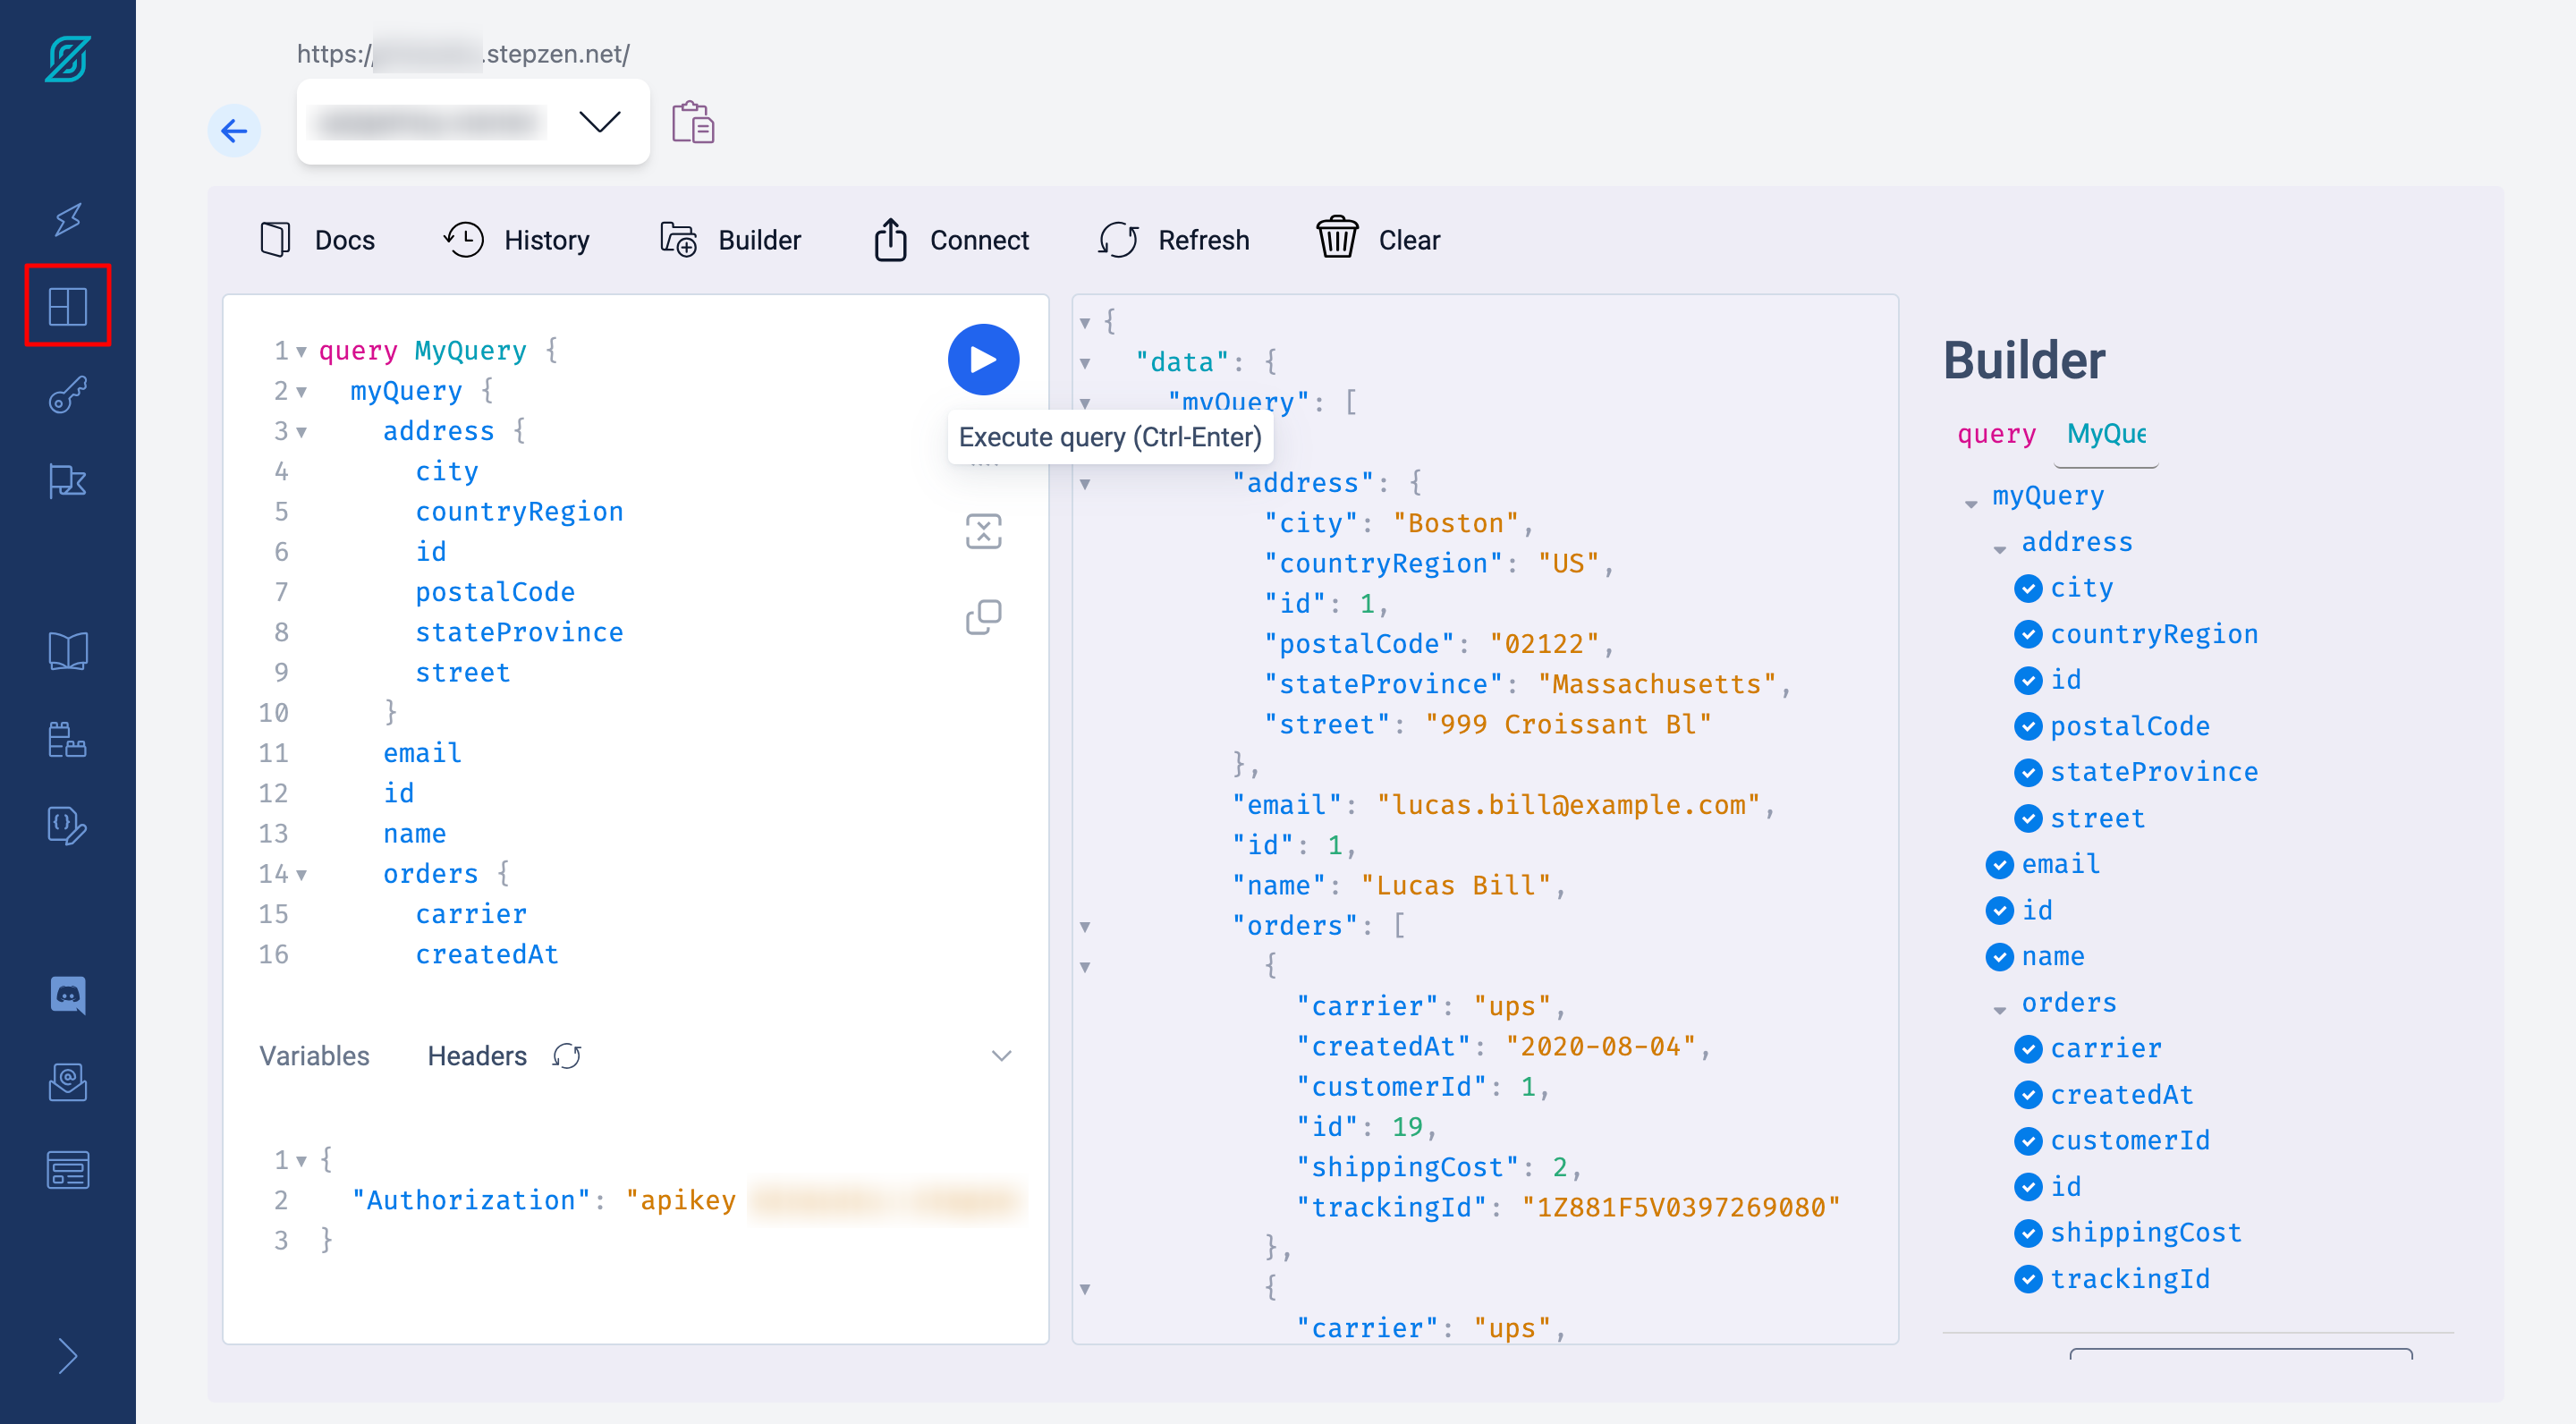
Explorer から、GraphQL API の仕様の確認やクライアント側のクエリの確認を実施できます。
StepZen Dashboard から API にアクセスする場合は、自動でヘッダーに apikey が入力されているため、クエリのみの編集で簡単に動作確認できます。
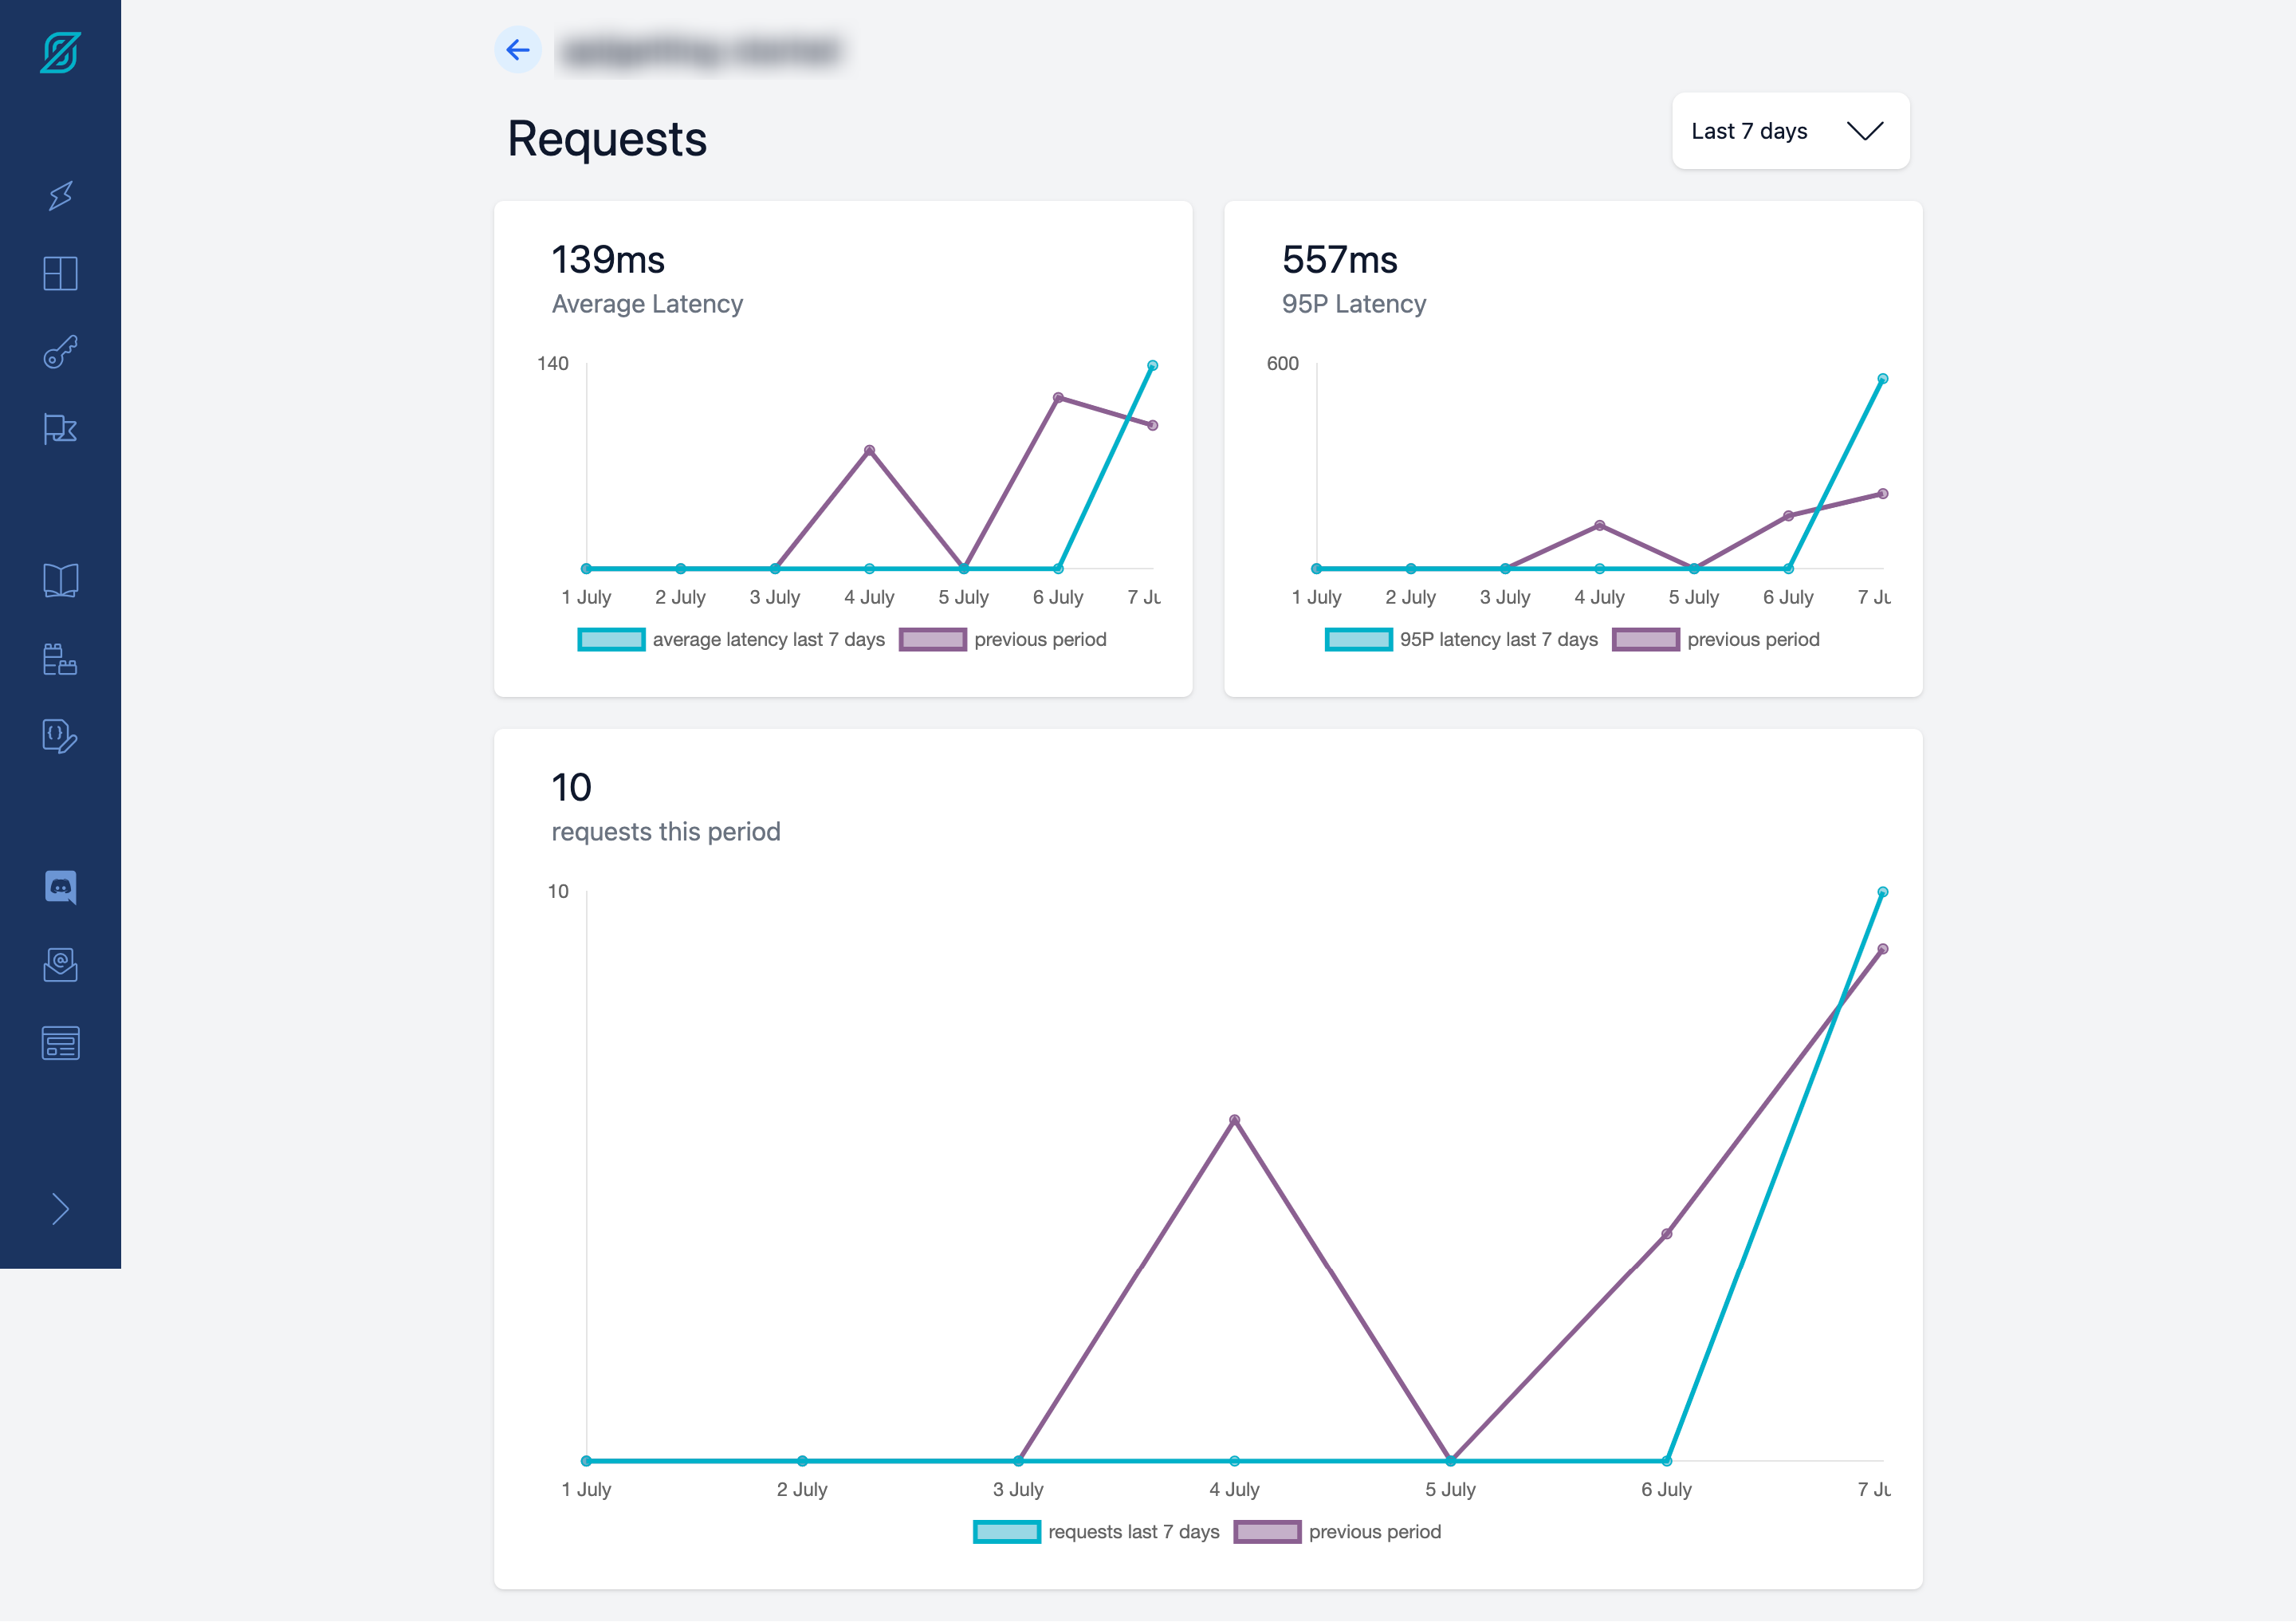
2.2 Dashboard でアクセス数・レイテンシー等を確認
StepZen Dashboardを使って、API のアクセス数やレイテンシー等のパフォーマンス指標を確認します。
2.3 GraphQL Playground でクエリ
REST API を GraphQL 化した後は、再度 GraphQL Playground でクエリを実行してみましょう。
ブラウザからアクセスする場合と異なり、ヘッダーに apikey を記載する必要があります。

2.4 stepzen request コマンドでクエリ
最後に、StepZen CLI を使用して、GraphQL エンドポイントにクエリを送信します。以下のようなコマンドを使用します。
stepzen request 'query {myQuery {email}}'
以下のような json ファイルを取得することができます。
{
  "data": {
    "myQuery": [
      {
        "email": "lucas.bill@example.com"
      },
      {
        "email": "mandy.jones@example.com"
      }
    ]
  }
}
3. RDB の GraphQL 化
3.1 tutorial にある postgresql で動作確認
StepZen チュートリアルに従い、PostgreSQL データベースの操作を行います。
PostgreSQL データベースはすでに準備されているものを使用します。接続情報は以下のとおりです。
host: postgresql.introspection.stepzen.net
database name: introspection
username: testUserIntrospection
password: HurricaneStartingSample1934
作業用フォルダにて、下記コマンドを実行します。
stepzen import postgresql
以下のような質問を対話的に聞かれるので、回答していきます。
? What would you like your endpoint to be called? api/opining-condor
? What is your host? postgresql.introspection.stepzen.net
? What is the username? testUserIntrospection
? What is the password? [hidden]
? What is your database name? introspection
? What is your database schema (leave blank to use defaults)?
? Automatically link types based on foreign key relationships using @materializer
 (https://stepzen.com/docs/features/linking-types) Yes
Starting... done
ここで、最後の質問である? Automatically link types based on foreign key relationships using @materializer (https://stepzen.com/docs/features/linking-types)に Yes で答えることにより、外部キー制約によるリレーションを階層化された GraphQL 定義に反映させることができます。
下記のようなフォルダが生成されます。中身についての説明は省略します。
hello-stepzen
├── config.yaml
├── index.graphql
├── postgresql
│   └── index.graphql
└── stepzen.config.json
以下のコマンドでデプロイします。
stepzen start
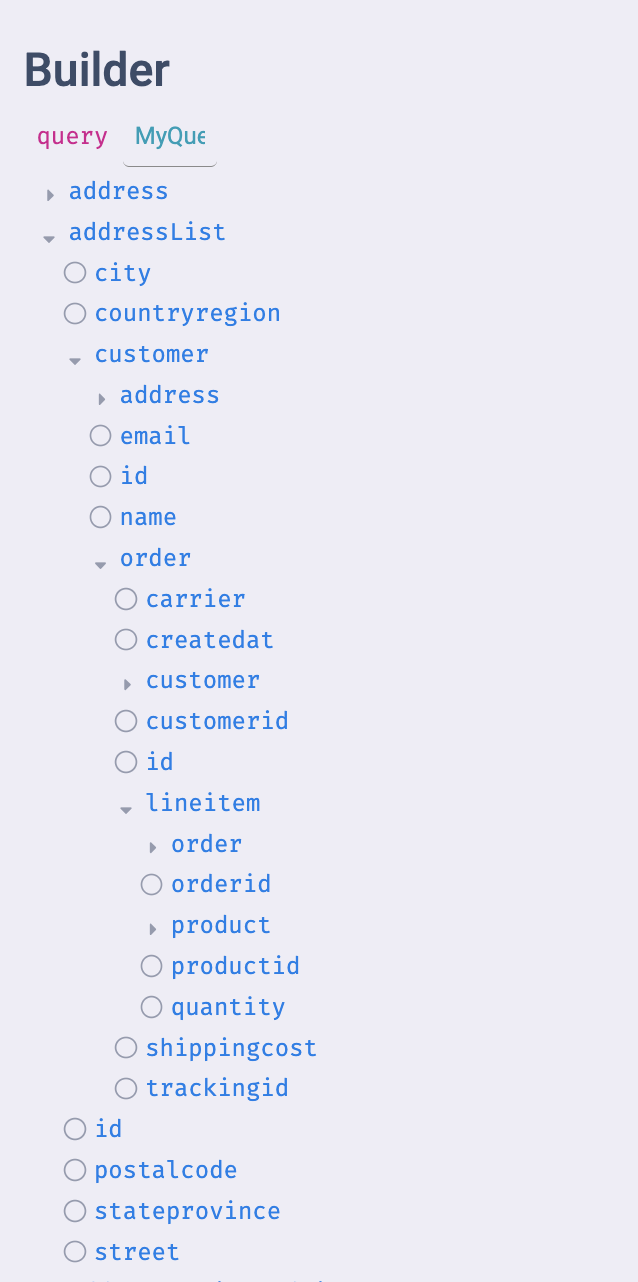
生成された API は以下のようなフィールドを含みます。
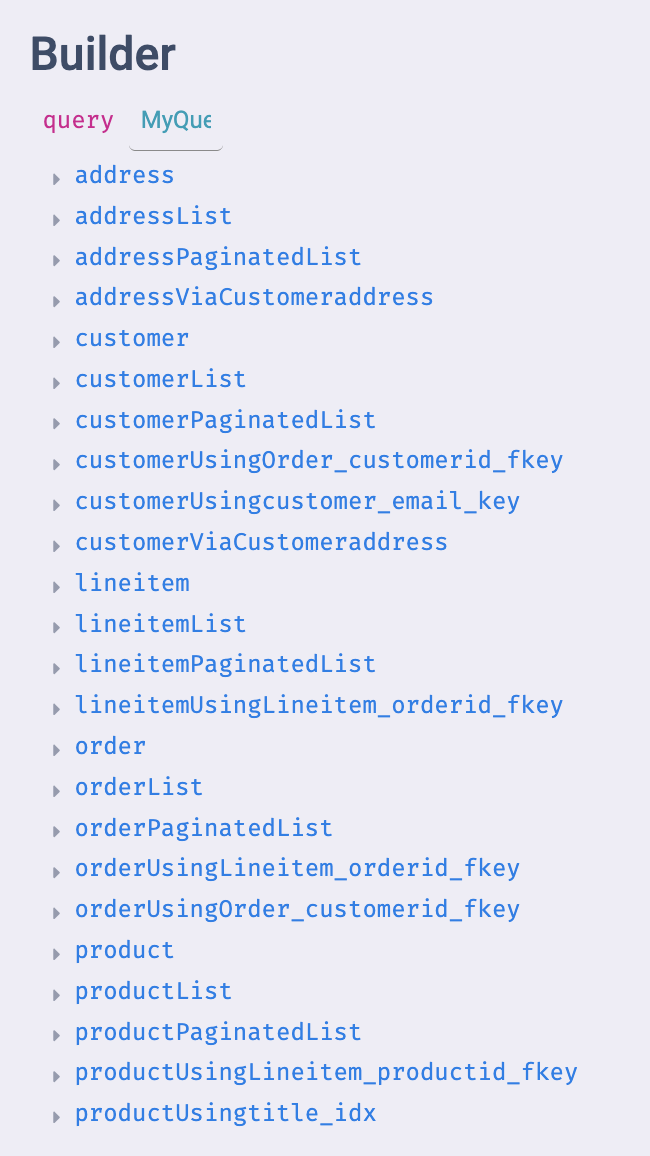
また、以下のようにそれぞれ外部キーによるリレーションを用いて階層化されていることがわかります。
4. エンドポイントのカスタマイズ
4.1 複数データソースの統合
複数のデータソース(REST API や RDB)を一つのエンドポイントにデプロイするには、index.graphql ファイル内の @sdlに複数のgraphqlファイルを指定します。
schema @sdl(files: ["curl/index.graphql", "postgresql/index.graphql"]) {
  query: Query
}
4.2 エンドポイントをカスタマイズ
@materializer や@dbquery を使用すると、クエリの実行方法をカスタマイズできます。これにより、自動生成した構成ファイルでは取得できないようなクエリをデプロイできます。
例えば、以下のように@dbqueryと SQL 文を組み合わせることで複雑なフィルタリングが可能です。
type Query {
  getCustomerByEmailAndName(email: String!, name: String!): [Customer]
    @dbquery(
      type: "postgresql"
      query: """
      select * from "customer" where "email" = $1 and "name" = $2
      """
      configuration: "postgresql_config"
    )
}
また、以下のように@materializerを使用することで各フィールドのデータ取得方法を指定できます。
type Customer {
  email: String!
  id: Int!
  name: String!
  orders: [Order]
    @materializer(
      query: "getOrderListByCustomerId"
      arguments: [{ name: "customerId", field: "id" }]
    )
}
type Query {
  getOrderListByCustomerId(customerId: Int!): [Order]
    @dbquery(
      type: "postgresql"
      query: """
      select * from "order" where "customerid" = $1
      """
      configuration: "postgresql_config"
    )
}
おわりに
本ハンズオンでは、StepZenのセッティングから、GraphQLでのクエリ方法、REST APIやRDBのGraphQL API化、カスタマイズ方法について説明しました。これで、StepZenを用いて簡単なGraphQL APIを構築できるようになったかと思います。認証認可やモック生成等、応用についても別途まとめたいと思います。
わかりにくいことがあれば、コメントいただければと思います。