参考
- Service Workerの基本とそれを使ってできること - Qiita
- Service Worker の紹介 | Web Fundamentals
- Cache - Web API | MDN
- FetchEvent.respondWith() - Web API | MDN
- Acheiving CORS via a Node HTTP Server - GitHubGist
PWAとは
- いまさら聞けないPWAとAMP - Qiita
- PWAとは(Progressive Web Appsとは) | SEO用語集:意味/解説/SEO効果など [SEO HACKS]
- PWA(Progressive Web Apps)とは?メリットと実装事例について | デジ研
- PWA(Progressive Web Apps)とは?PWAの機能や導入メリットを徹底解説!
- 実際に触って理解する! ウェブをアプリ化できるPWAとは? | BACKYARD
私がこの投稿内で作成したコードは以下です
https://github.com/okumurakengo/pwa-test
PWAを試す準備
1. テスト用アプリ作成
↓こちらのチュートリアルがとても参考になったので、こちらを元に簡単なニュースアプリを作成します。
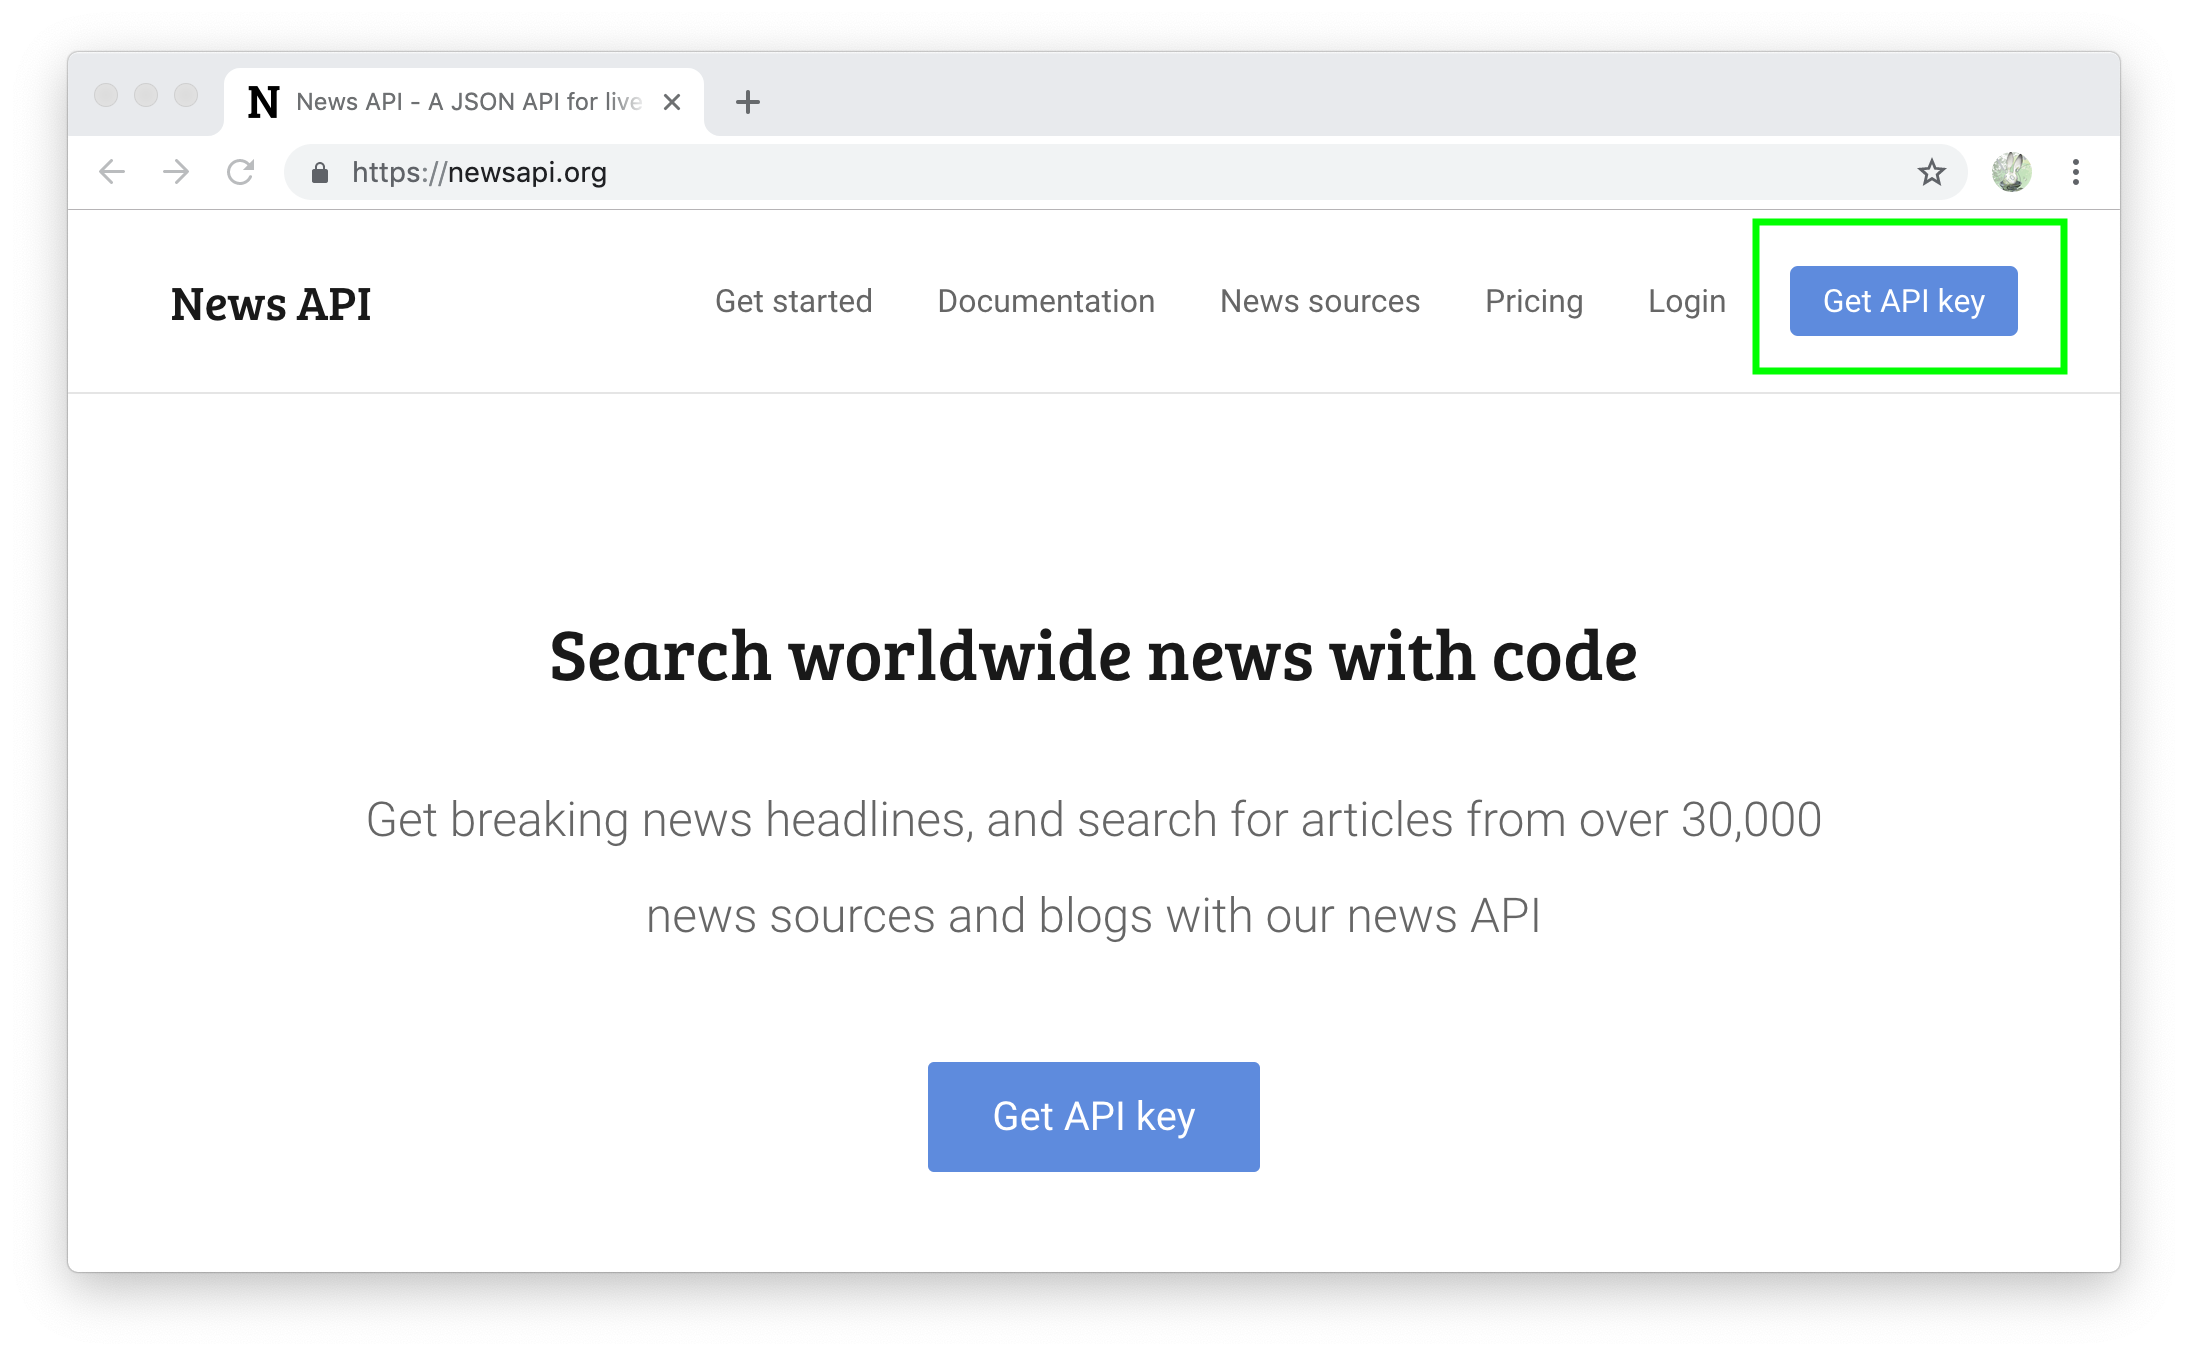
1-1. News API に登録
Service Workerを使って、取得したAPIの情報をキャッシュしてオフラインで表示といったことを行います。
News APIを使うと、無料で手軽にニュース情報のJSONを取得できるのでアカウント登録してAPI keyを取得します。
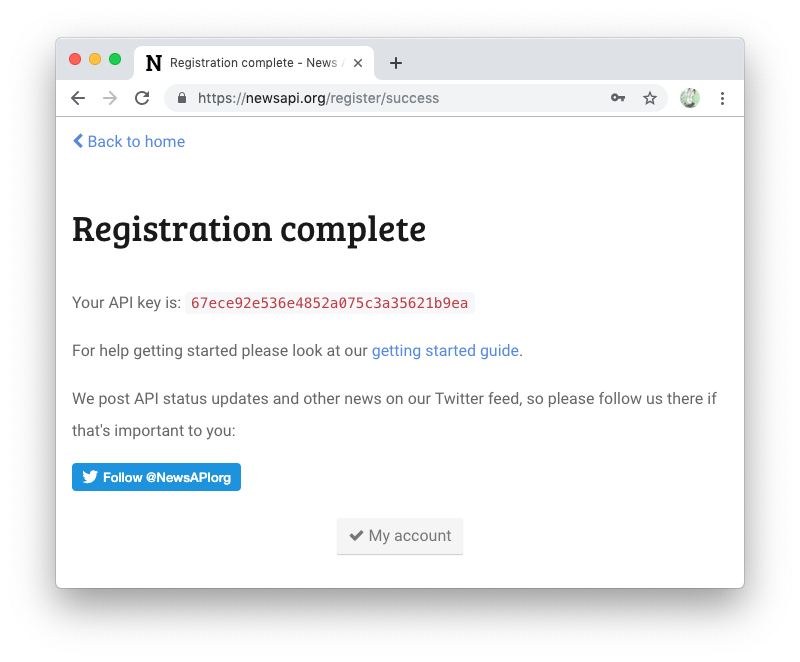
API keyが取得できました、これでアプリからNews APIを使用できます。News APIのAPI keyを取得する
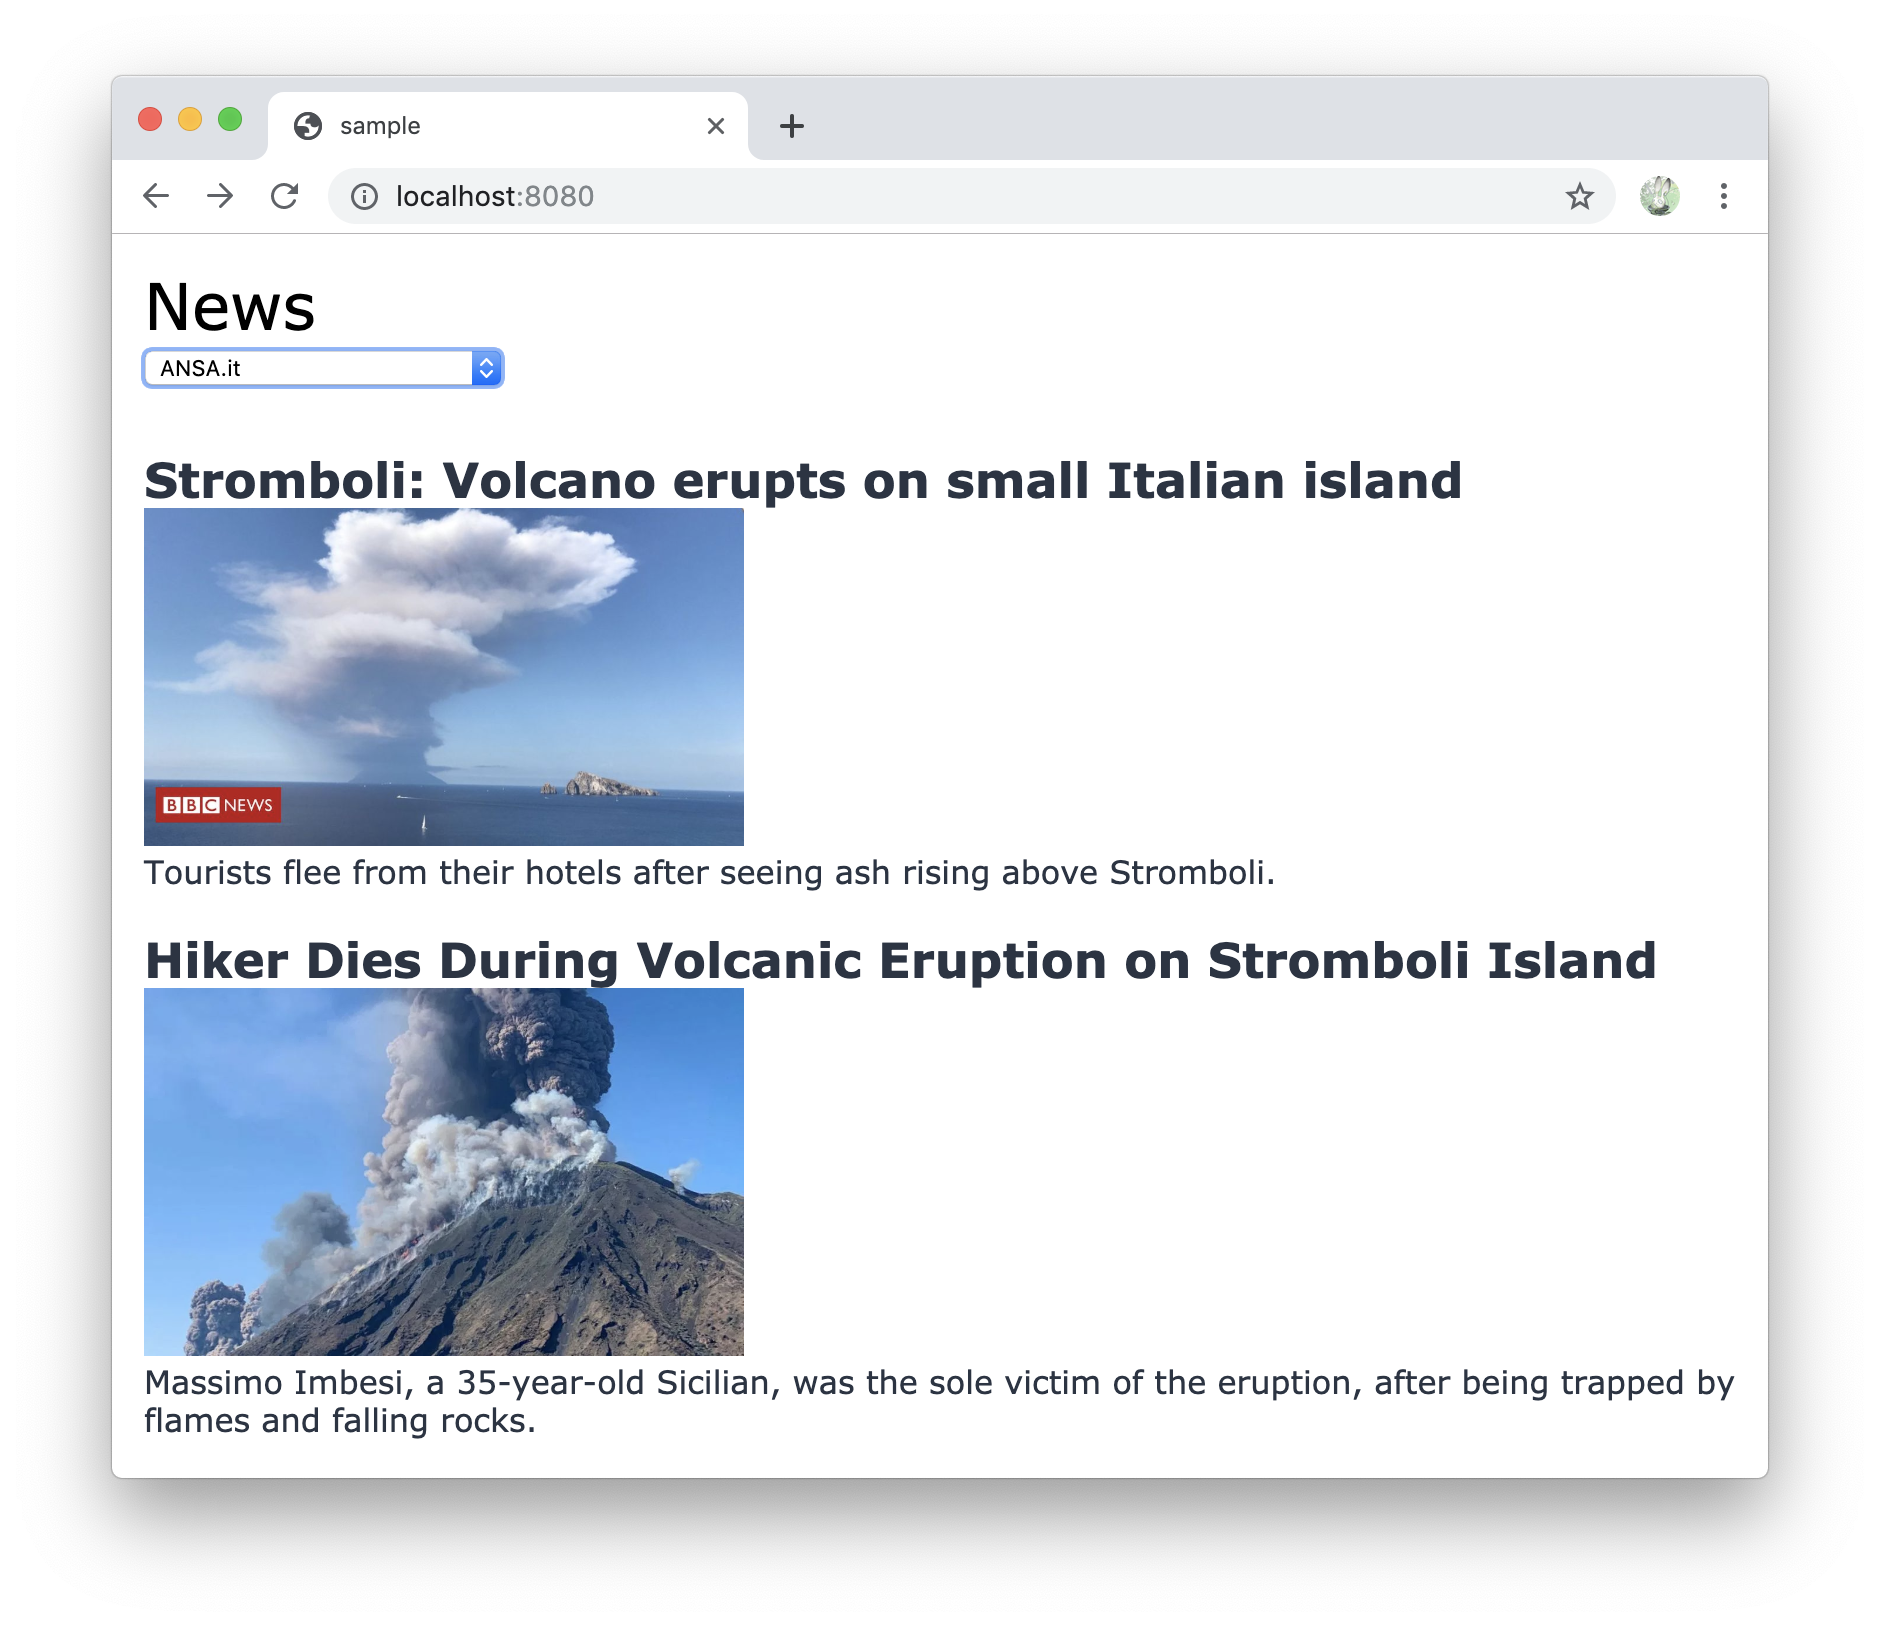
1-2. ニュース情報を表示する簡単なアプリ作成
※まだこの状態ではPWAに関することは何もありません
この時点までのサンプルは↓です
.
├── app.js
├── index.html
└── styles.css
<!DOCTYPE html>
<meta charset="utf-8">
<meta name="viewport" content="width=device-width, initial-scale=1.0">
<title>sample</title>
<link rel="stylesheet" href="styles.css">
<script src="app.js" defer></script>
<header>
    <h1>News</h1>
    <select id="sourceSelector"></select>
</header>
<main></main>
<footer><a href="https://newsapi.org/">https://newsapi.org/</a></footer>
※ NEWS_API_KEY は自分でアカウント登録した際に取得したapiキーを設定する
const NEWS_API_KEY = "67ece92e536e4852a075c3a35621b9ea"; // 自分のapiキー
const main = document.querySelector("main");
const sourceSelector = document.querySelector("#sourceSelector");
const defaultSource = "abc-news-au";

(async () => {
    updateNews();
    await updateSources();

    // 画面表示時のプルダウンの初期値を設定
    sourceSelector.value = defaultSource;
    sourceSelector.addEventListener("change", e => {
        updateNews(e.target.value);
    });
})();

/**
 * プルダウンの値を設定
 */
async function updateSources() {
    const res = await fetch(`https://newsapi.org/v2/sources?apiKey=${NEWS_API_KEY}`);
    const json = await res.json();

    json.sources.forEach(src => {
        sourceSelector.insertAdjacentHTML("beforeend", `<option value="${src.id}">${src.name}</option>`);
    });
}

/**
 * ニュースの内容を表示
 * @param {string} source
 */
async function updateNews(source = defaultSource) {
    const res = await fetch(`https://newsapi.org/v2/everything?q=${source}&apiKey=${NEWS_API_KEY}`);
    const json = await res.json();

    main.innerHTML = "";
    json.articles.forEach(article => {
        main.insertAdjacentHTML("beforeend", `
            <div class="article">
                <a href="${article.url}">
                    <h2>${article.title}</h2>
                    <img src="${article.urlToImage}">
                    <p>${article.description}</p>
                </a>
            </div>
        `);
    });
}
styles.css* {
box-sizing: border-box;
margin: 0;
padding: 0;
}
body {
font-family: Verdana, sans-serif;
}
.article a {
color: #2a3443;
text-decoration: none;
}
header, main {
padding: 16px;
}
header h1 {
font-weight: 400;
}
.article {
margin: 0 0 20px 0;
}
img {
max-width: 300px;
}
なんでもいいので簡易サーバーなどでlocalhostで表示する
#nodeで簡易サーバ
yarn add -D node-static
yarn static -p 8080
#phpで簡易サーバ
php -S 0.0.0.0:8080
#pythonで簡易サーバ
python3 -m http.server 8080
このような画面が表示されたらOK
2. PCのlocalhostをAndroidから見れるようにする
Service Wrokerを使う場合には、localhostかhttpsの必要があるため、
今回はPCのlocalhostにAndroidからアクセスしてみます。
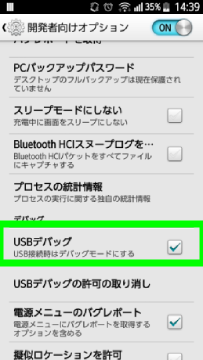
2-1. AndroidのUSBデバッグをONにする
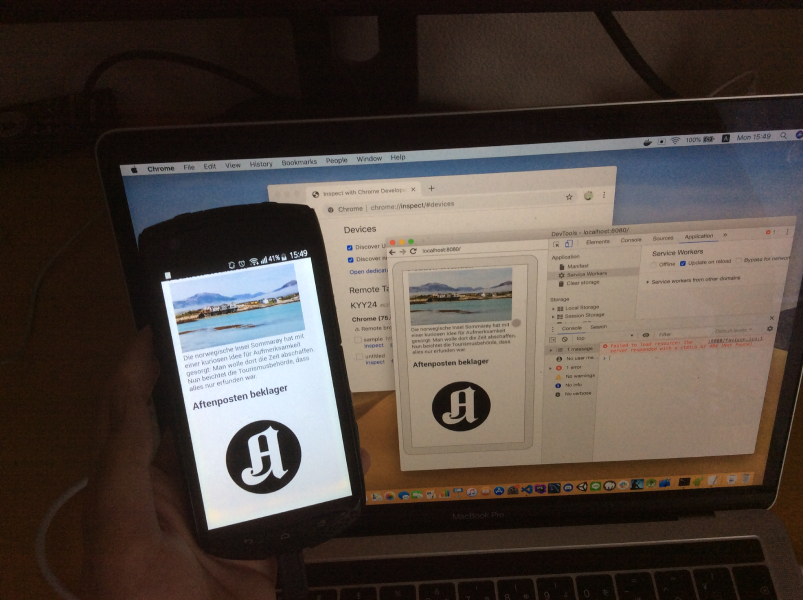
2-2. Chromeを設定してAndroidからlocalhost:8080を開く
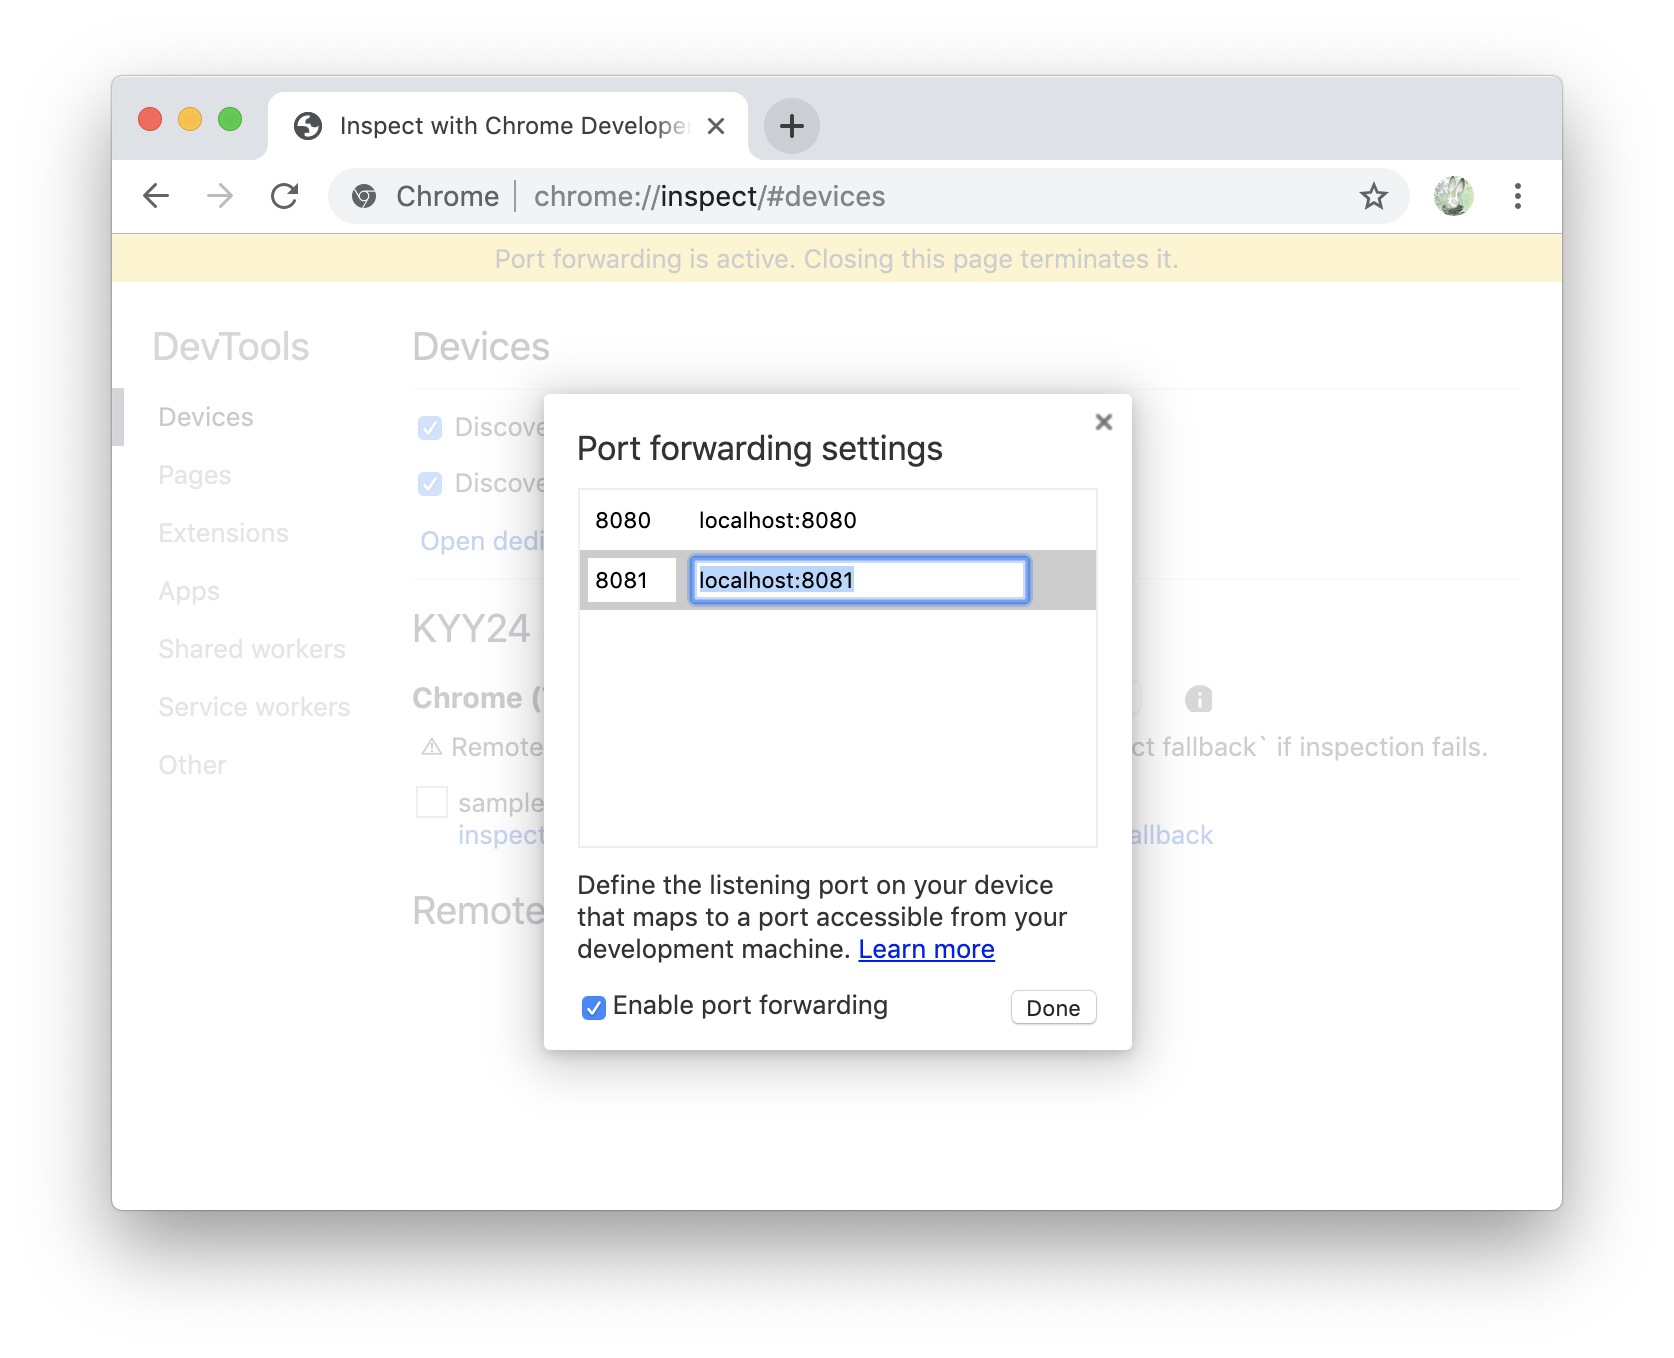
1 . PCとAndroidをUSBでつなぐ Remote Targetの部分にAndroidで現在開いているページが表示されていたらOKです。 4 . 「Port forwarding...」を押す 5 . 以下のように設定し、 6 . AndroidのChromeで AndroidからPCのlocalhostを表示できました 7 . AndroidのChromeをコンソールで見れるようにする inspectを押すとdev toolを表示してくれましたChromeを設定してAndroidから
localhost:8080を開くまで
2 . AndroidでChromeを開く
3 . chrome://inspect/#deviceを開く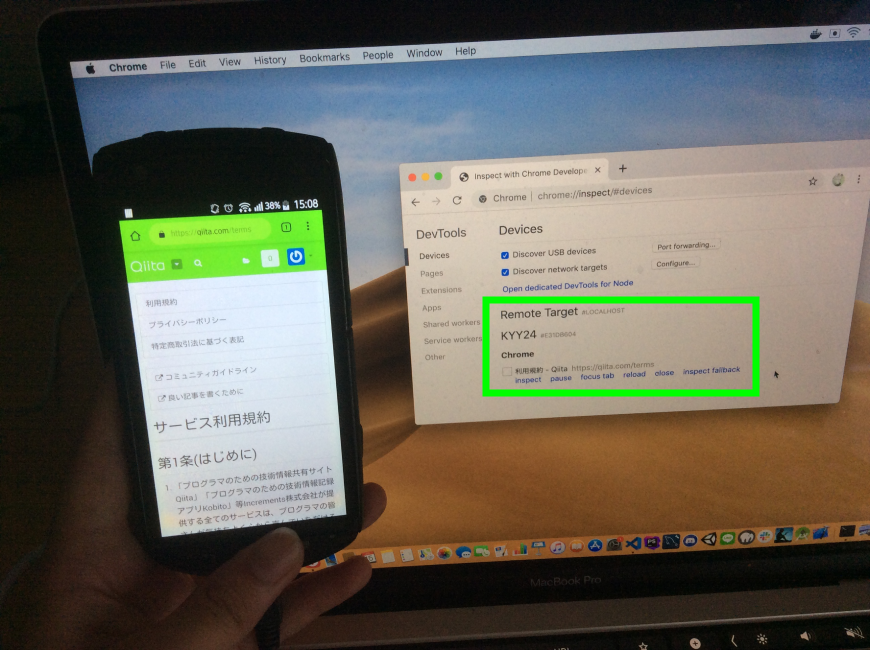
※表示されない場合はchromeを再起動すると表示してくれました。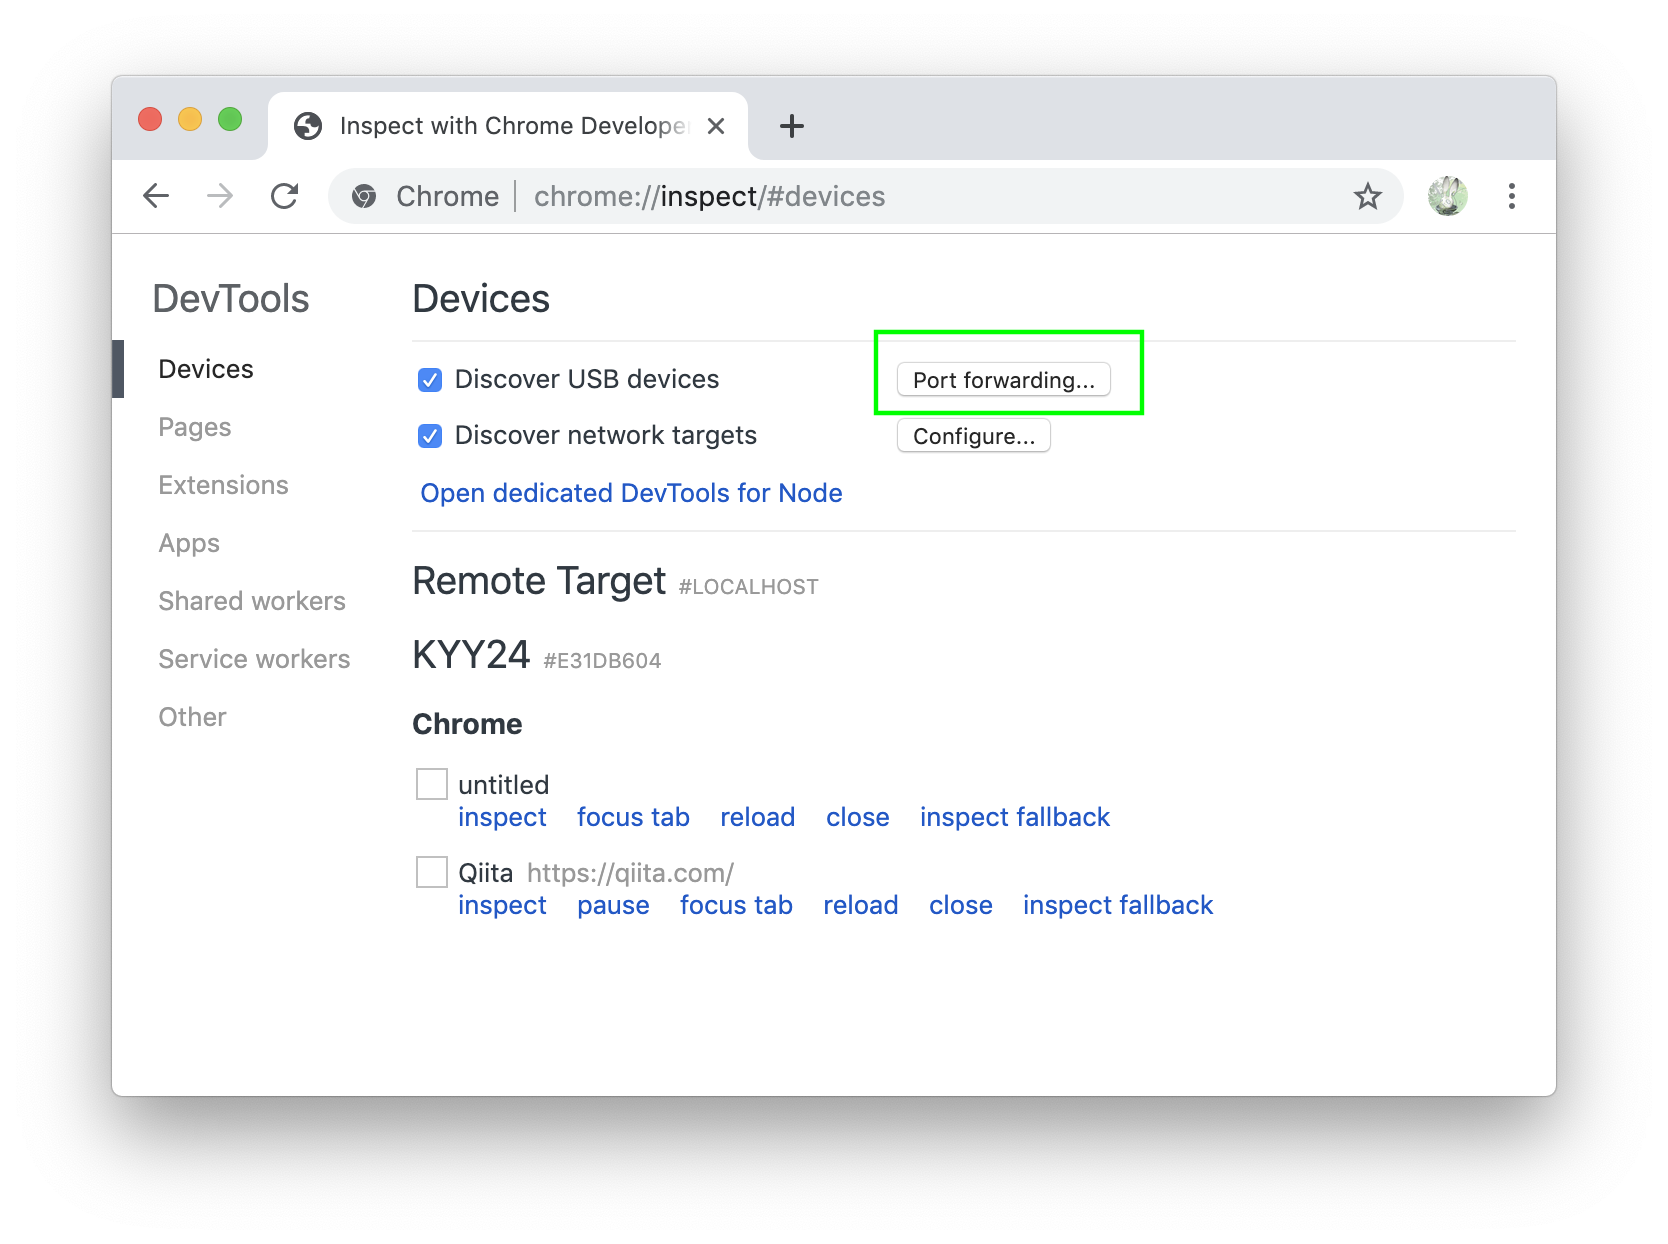
localhost:8080 を設定
「Enable port forwargind」にチェックを入れ
「Done」をクリック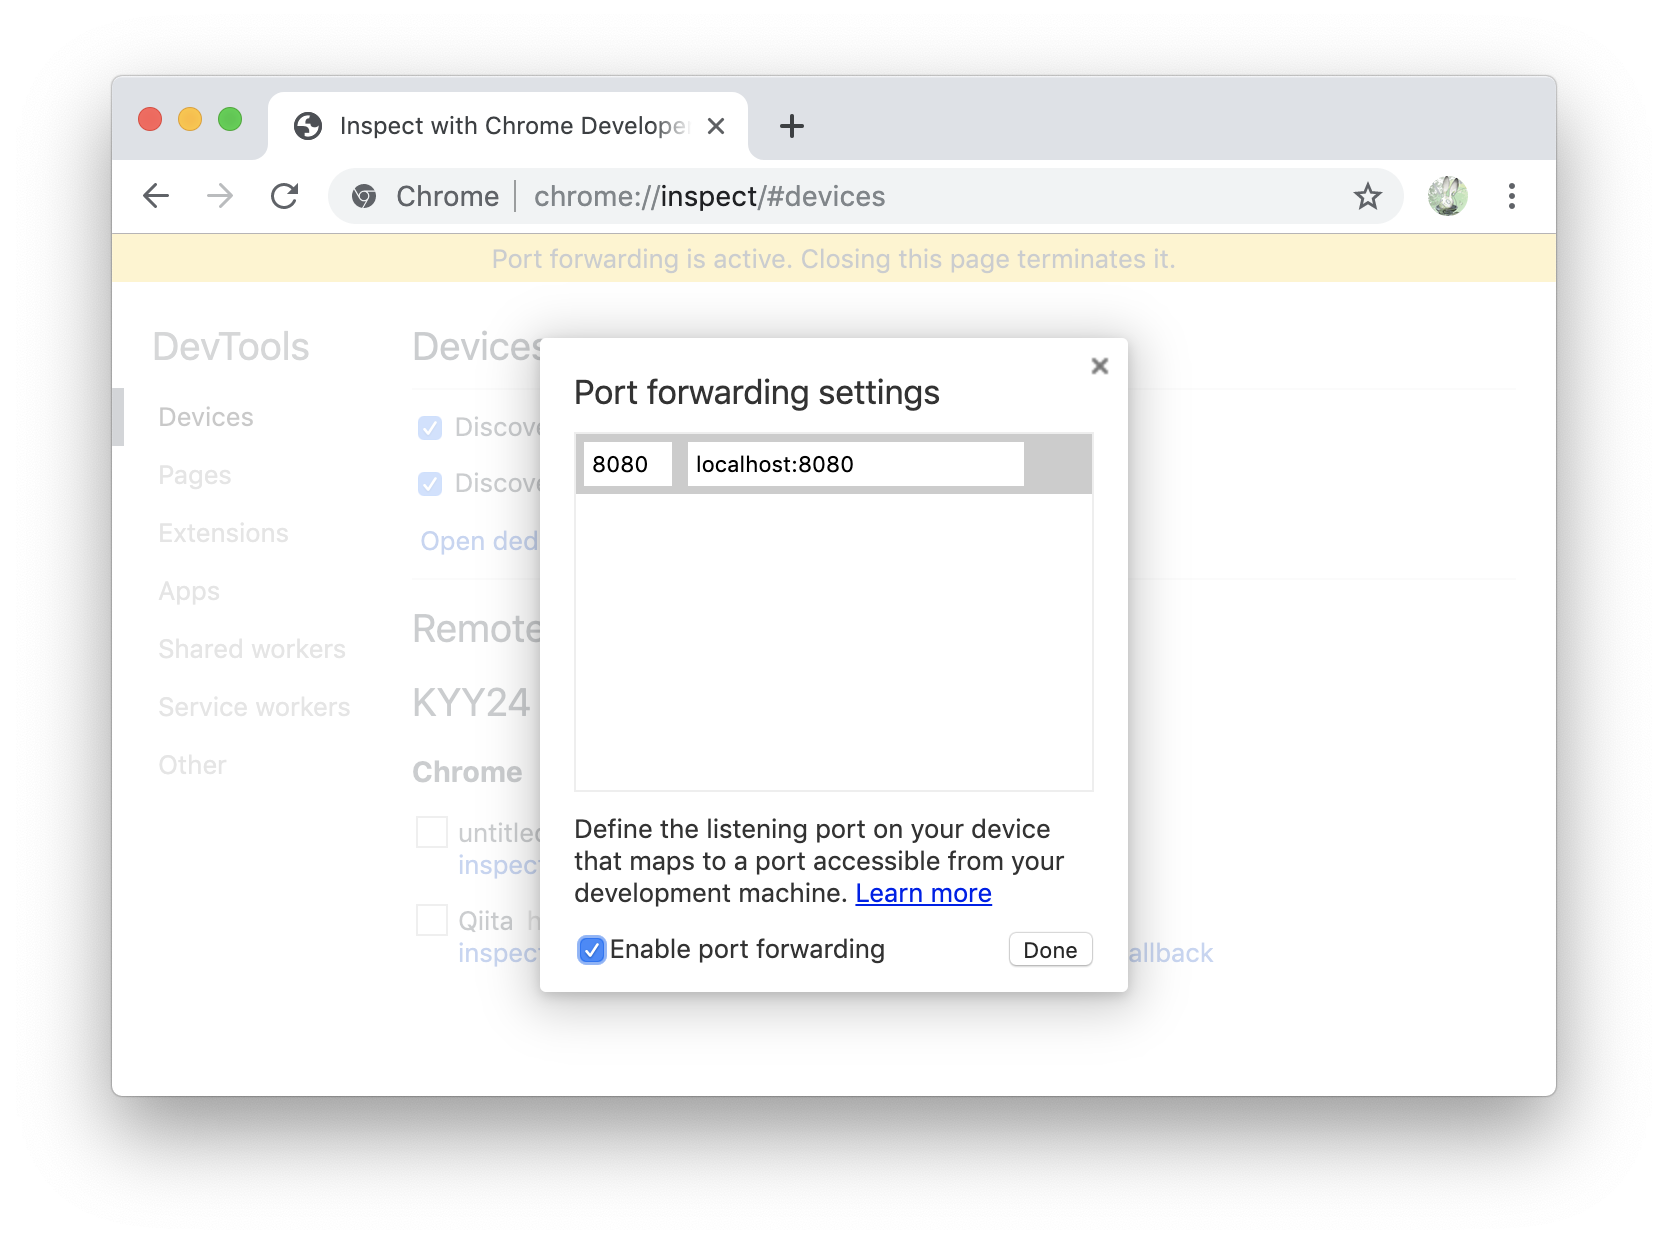
http:localhost:8080にアクセス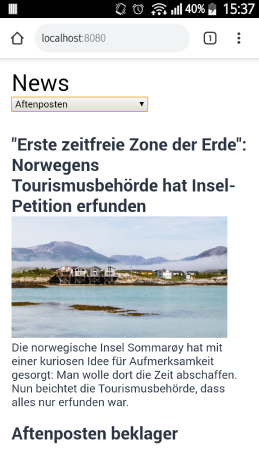
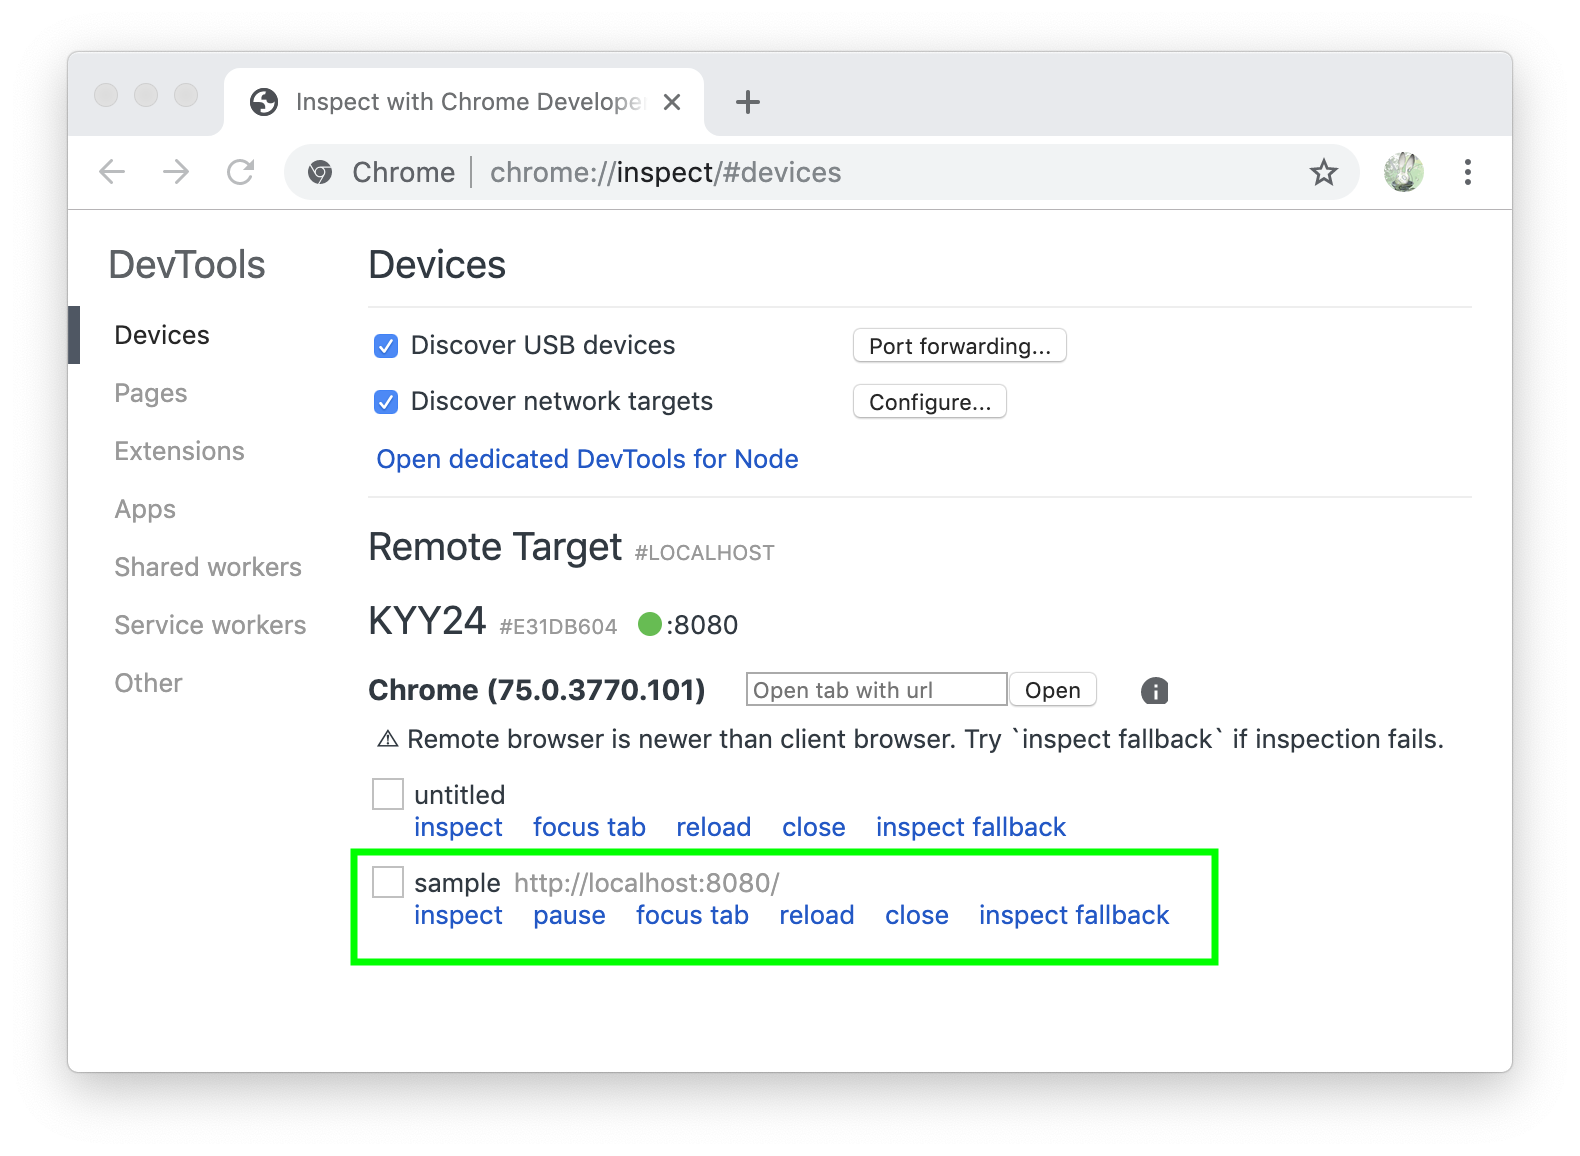
↑の設定を行うことで、PCのlocalhostを表示し、デバッグできることも確認できました。
PWAを試す
AndroidのChromeでlocalhostをみれたので、PWAの機能を追加していきます。
1. ホーム画面に追加する
ホーム画面に追加するまでを私が実際に試したコードは以下です。
ホーム画面に追加できる条件は以下を参考
1-1. manifest.jsonを用意する
manifest.jsonが必要なので用意します。
manifest.jsonの書き方については、dev toolからリンクがあるのでそれが参考になります。
The Web App Manifest | Web Fundamentals | Google Developers
またはManifest Generatorという便利なサイトもあるのでこちらでも大丈夫です。
今回はこちらのサイトを使用させていただきました。
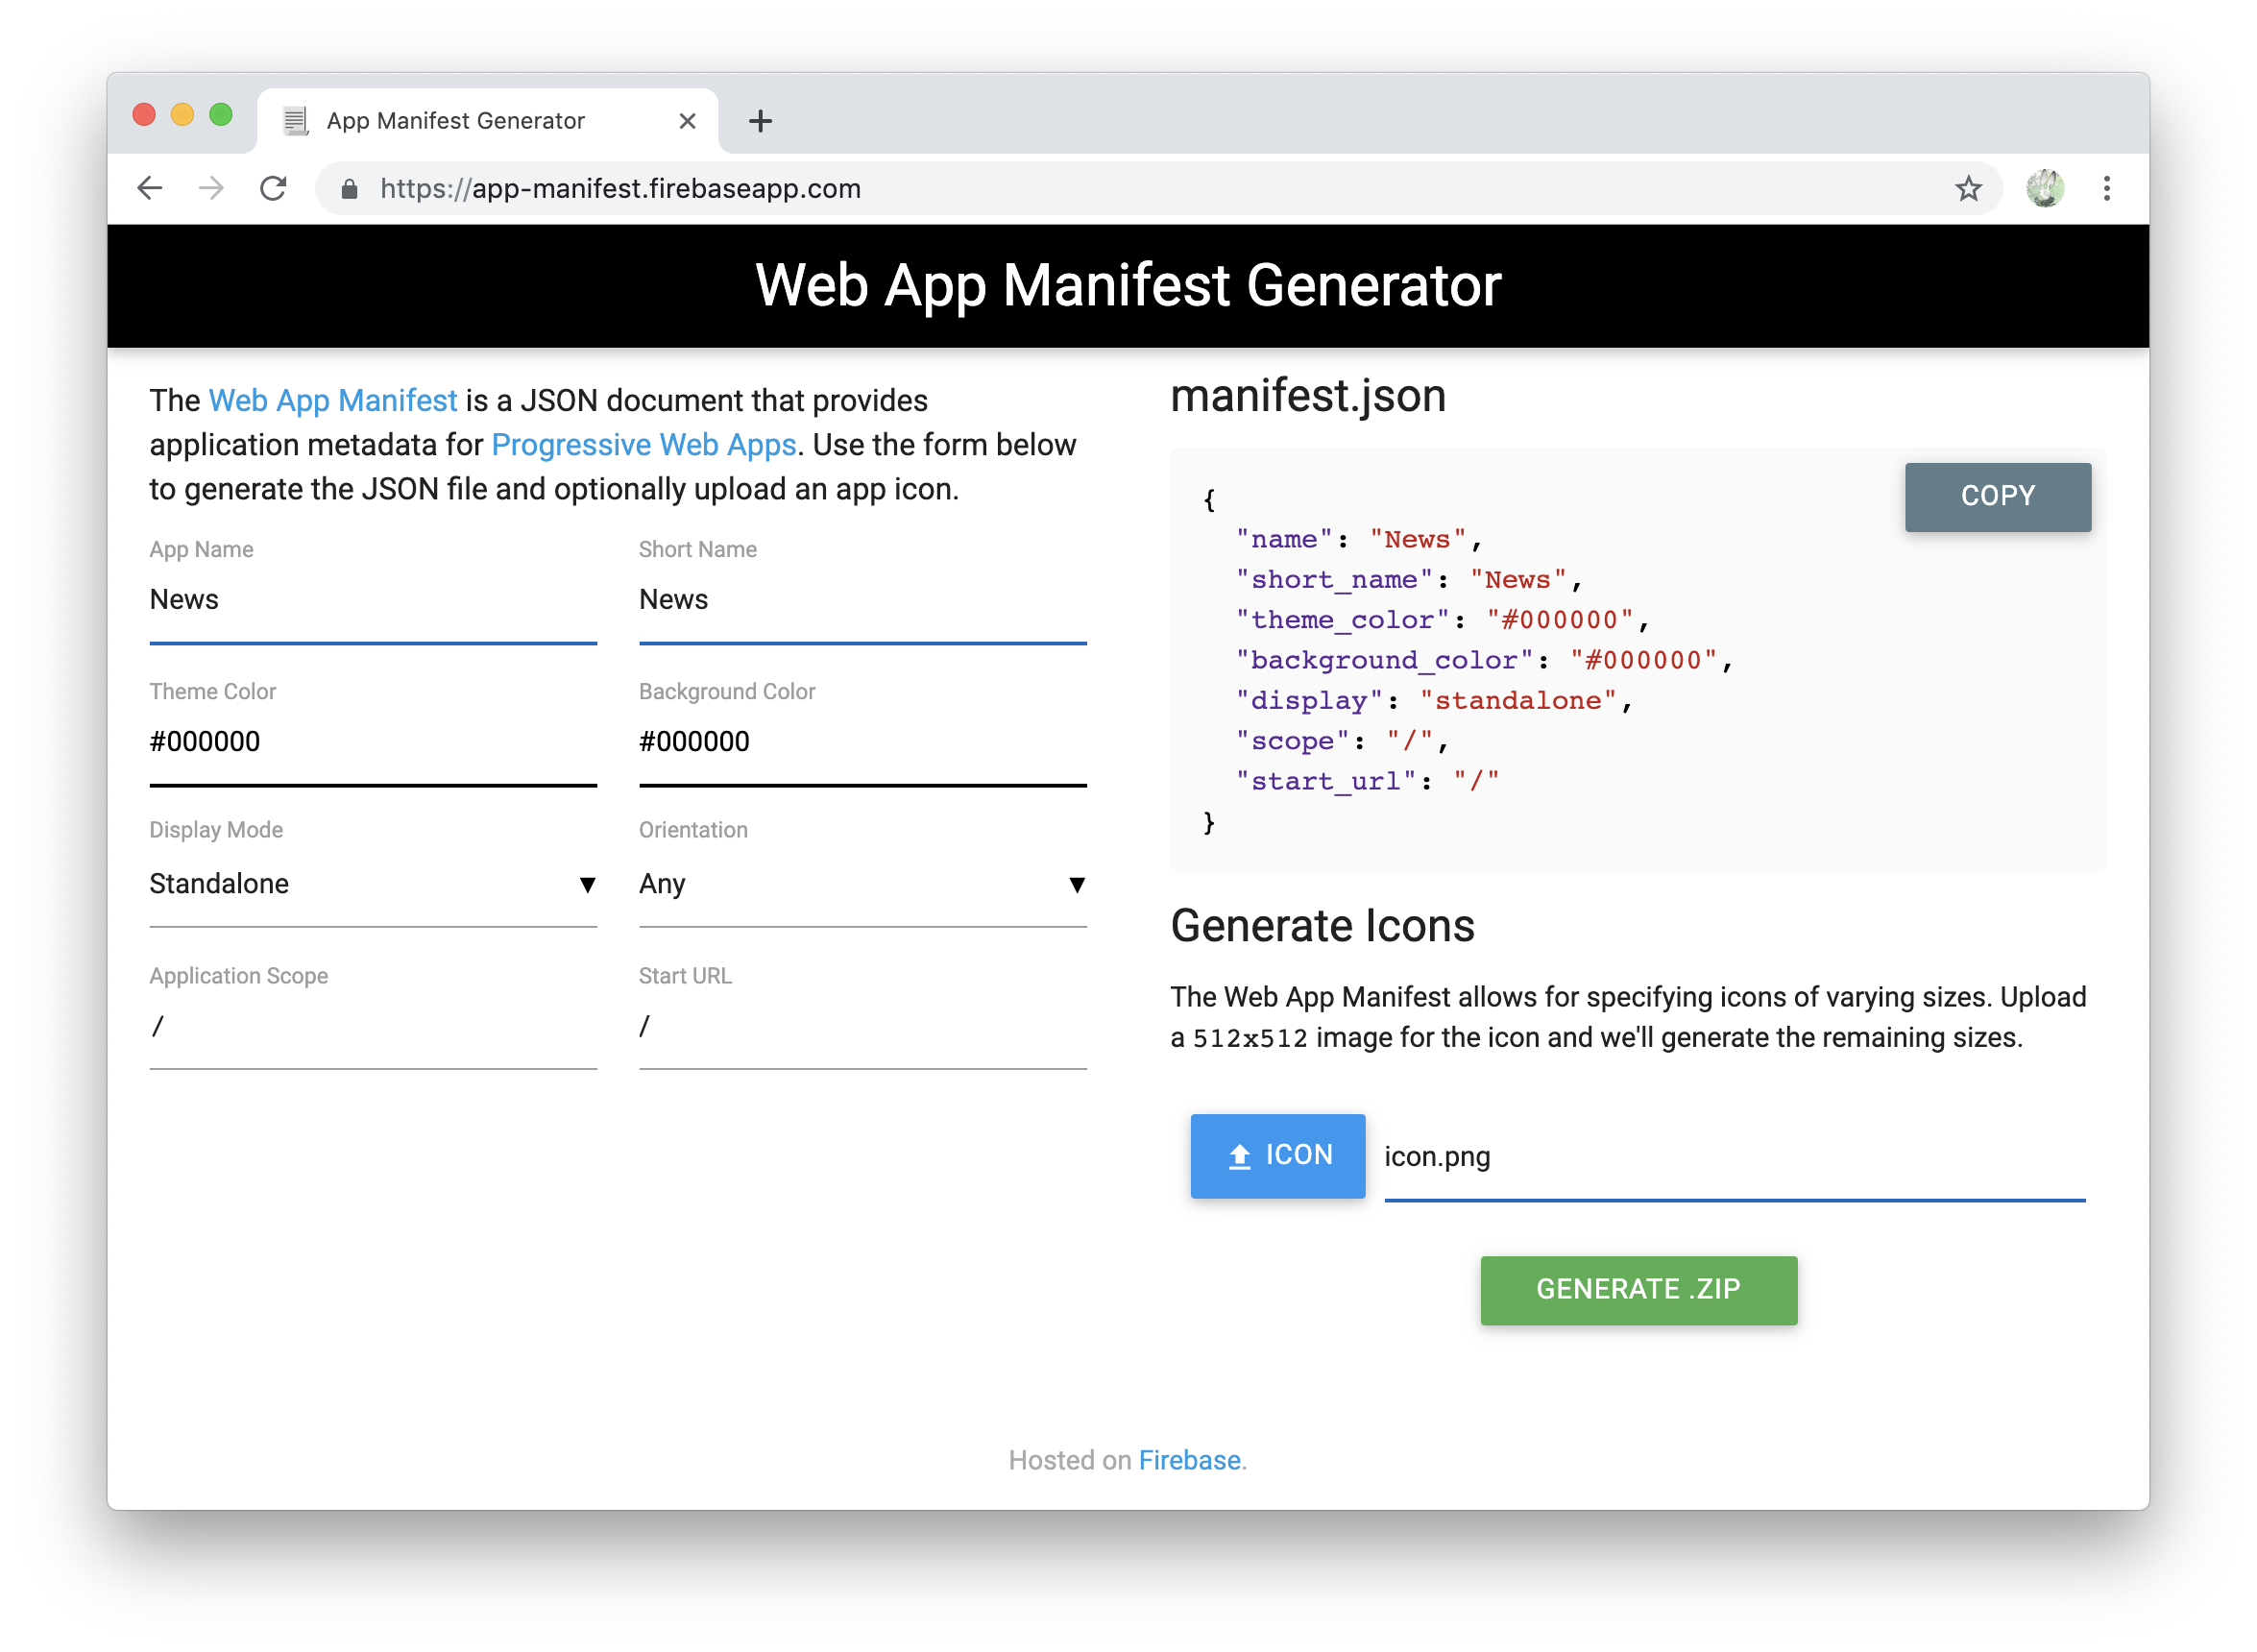
今回はこのように設定しました。
画像は512x512でアップロードしましょう。
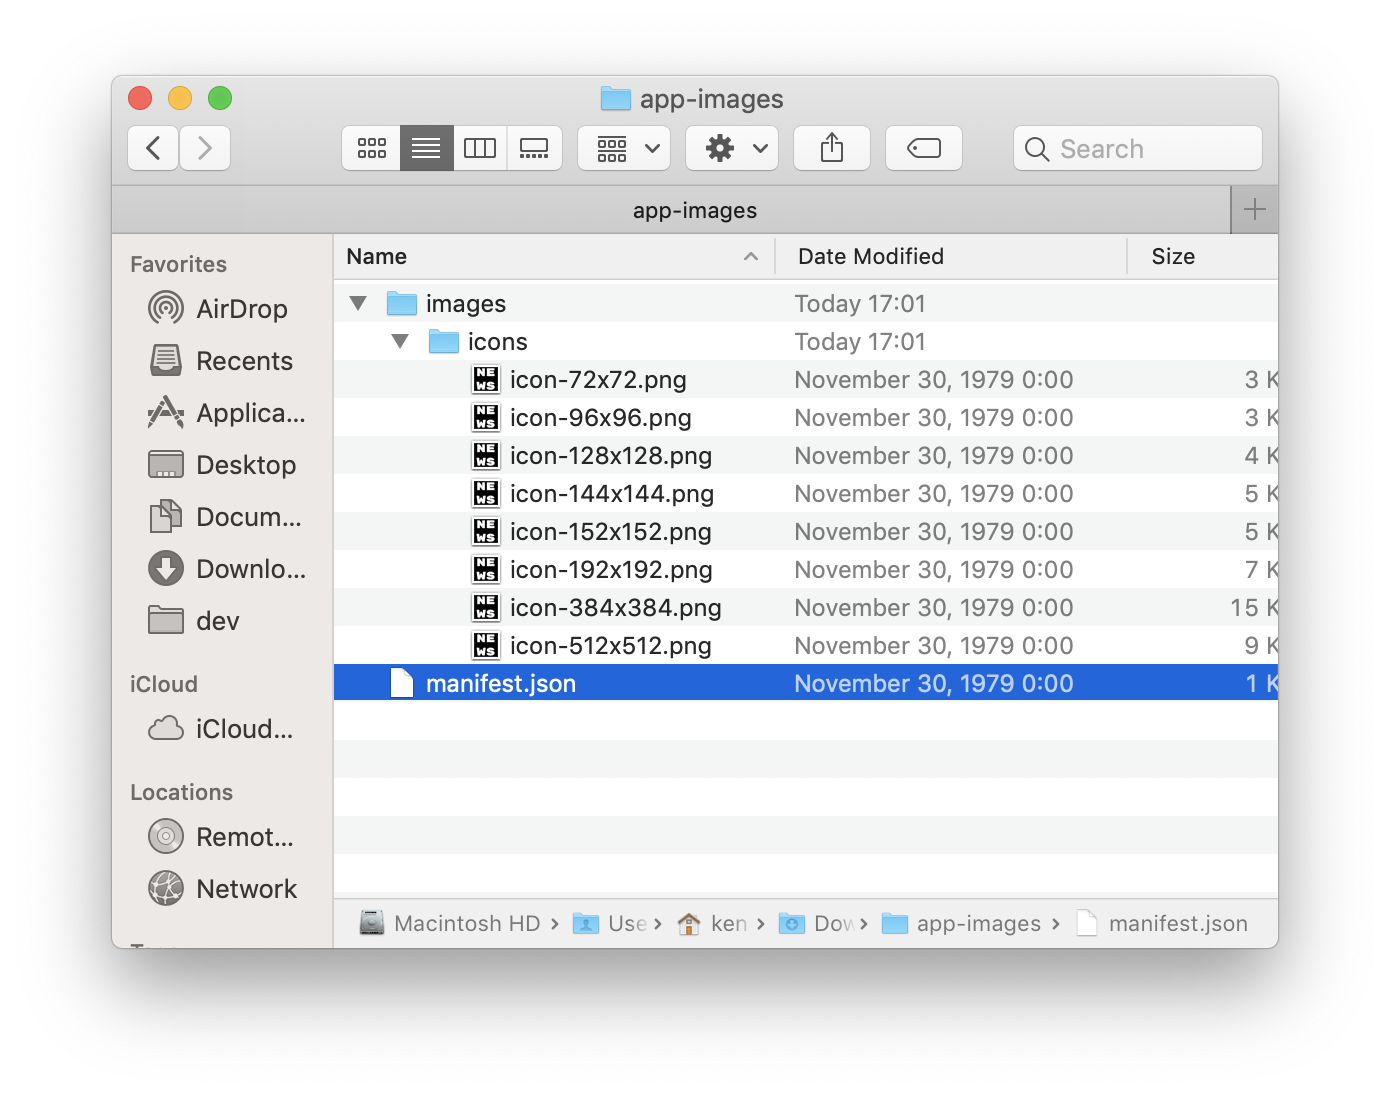
生成してダウンロードすると、このようにmanifest.jsonとアイコンが確認できます。
manifest.jsonは、このようになりました{
"name": "News",
"short_name": "News",
"theme_color": "#000000",
"background_color": "#000000",
"display": "standalone",
"Scope": "/",
"start_url": "/",
"icons": [
{
"src": "images/icons/icon-72x72.png",
"sizes": "72x72",
"type": "image/png"
},
{
"src": "images/icons/icon-96x96.png",
"sizes": "96x96",
"type": "image/png"
},
{
"src": "images/icons/icon-128x128.png",
"sizes": "128x128",
"type": "image/png"
},
{
"src": "images/icons/icon-144x144.png",
"sizes": "144x144",
"type": "image/png"
},
{
"src": "images/icons/icon-152x152.png",
"sizes": "152x152",
"type": "image/png"
},
{
"src": "images/icons/icon-192x192.png",
"sizes": "192x192",
"type": "image/png"
},
{
"src": "images/icons/icon-384x384.png",
"sizes": "384x384",
"type": "image/png"
},
{
"src": "images/icons/icon-512x512.png",
"sizes": "512x512",
"type": "image/png"
}
],
"splash_pages": null
}
manifest.jsonとiconの画像ファイルをアプリのルートに移動し、htmlで読み込みます。
  <!DOCTYPE html>
  <meta charset="utf-8">
  <meta name="viewport" content="width=device-width, initial-scale=1.0">
  <title>sample</title>
  <link rel="stylesheet" href="styles.css">
  <script src="app.js" defer></script>
+ <link rel="manifest" href="manifest.json">
  <header>
      <h1>News</h1>
      <select id="sourceSelector"></select>
  </header>
  <main></main>
  <footer><a href="https://newsapi.org/">https://newsapi.org/</a></footer>
1-2. Service Workerを読み込む
参考
ホーム画面に追加する場合は、Service Workerで fetch イベントがないとうまく動作してくれないようです。
sw.jsを作成し、それを読み込みます。
※fetchイベントがあれば特に処理は必要なし
self.addEventListener("fetch", event => {});
app.jsでsw.jsを読み込みます。
    if ("serviceWorker" in navigator) {
        try {
            navigator.serviceWorker.register("sw.js")
            console.log("SW registered")
        } catch (e) {
            console.log("SW faild")
        }
    }
app.js全体const NEWS_API_KEY = "67ece92e536e4852a075c3a35621b9ea"; // 自分のapiキー
const main = document.querySelector("main");
const sourceSelector = document.querySelector("#sourceSelector");
const defaultSource = "abc-news-au";
(async () => {
updateNews();
await updateSources();
// 画面表示時のプルダウンの初期値を設定
sourceSelector.value = defaultSource;
sourceSelector.addEventListener("change", e => {
updateNews(e.target.value);
});
if ("serviceWorker" in navigator) {
try {
navigator.serviceWorker.register("sw.js")
console.log("SW registered")
} catch (e) {
console.log("SW faild")
}
}
})();
/**
* プルダウンの値を設定
*/
async function updateSources() {
const res = await fetch(`https://newsapi.org/v2/sources?apiKey=${NEWS_API_KEY}`);
const json = await res.json();
json.sources.forEach(src => {
sourceSelector.insertAdjacentHTML("beforeend", `<option value="${src.id}">${src.name}</option>`);
});
}
/**
* ニュースの内容を表示
* @param {string} source
*/
async function updateNews(source = defaultSource) {
const res = await fetch(`https://newsapi.org/v2/everything?q=${source}&apiKey=${NEWS_API_KEY}`);
const json = await res.json();
main.innerHTML = "";
json.articles.forEach(article => {
main.insertAdjacentHTML("beforeend", `
<div class="article">
<a href="${article.url}">
<h2>${article.title}</h2>
<img src="${article.urlToImage}">
<p>${article.description}</p>
</a>
</div>
`);
});
}
1-3. ホーム画面に追加する
この状態でAndroidからhttp:localhost:8080にアクセスすると
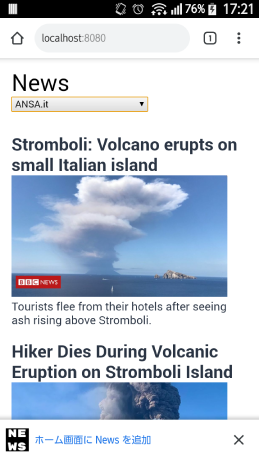
画面の下に「ホーム画面に News を追加」と表示させることができました。
画面の指示にしたがって操作してホームに追加できました。

アプリを起動すると、URLバーの表示がない状態の画面になっていることを確認できます。

2. キャッシュから表示する
オフライン状態でも表示できるように、
オンライン状態でキャッシュ -> オフライン時にキャッシュ表示 となるように変更します。
キャッシュ確認までを私が実際に試したコードは以下です。
https://github.com/okumurakengo/pwa-test/tree/3-cache
※AndroidではなくPCのchromeで試してます
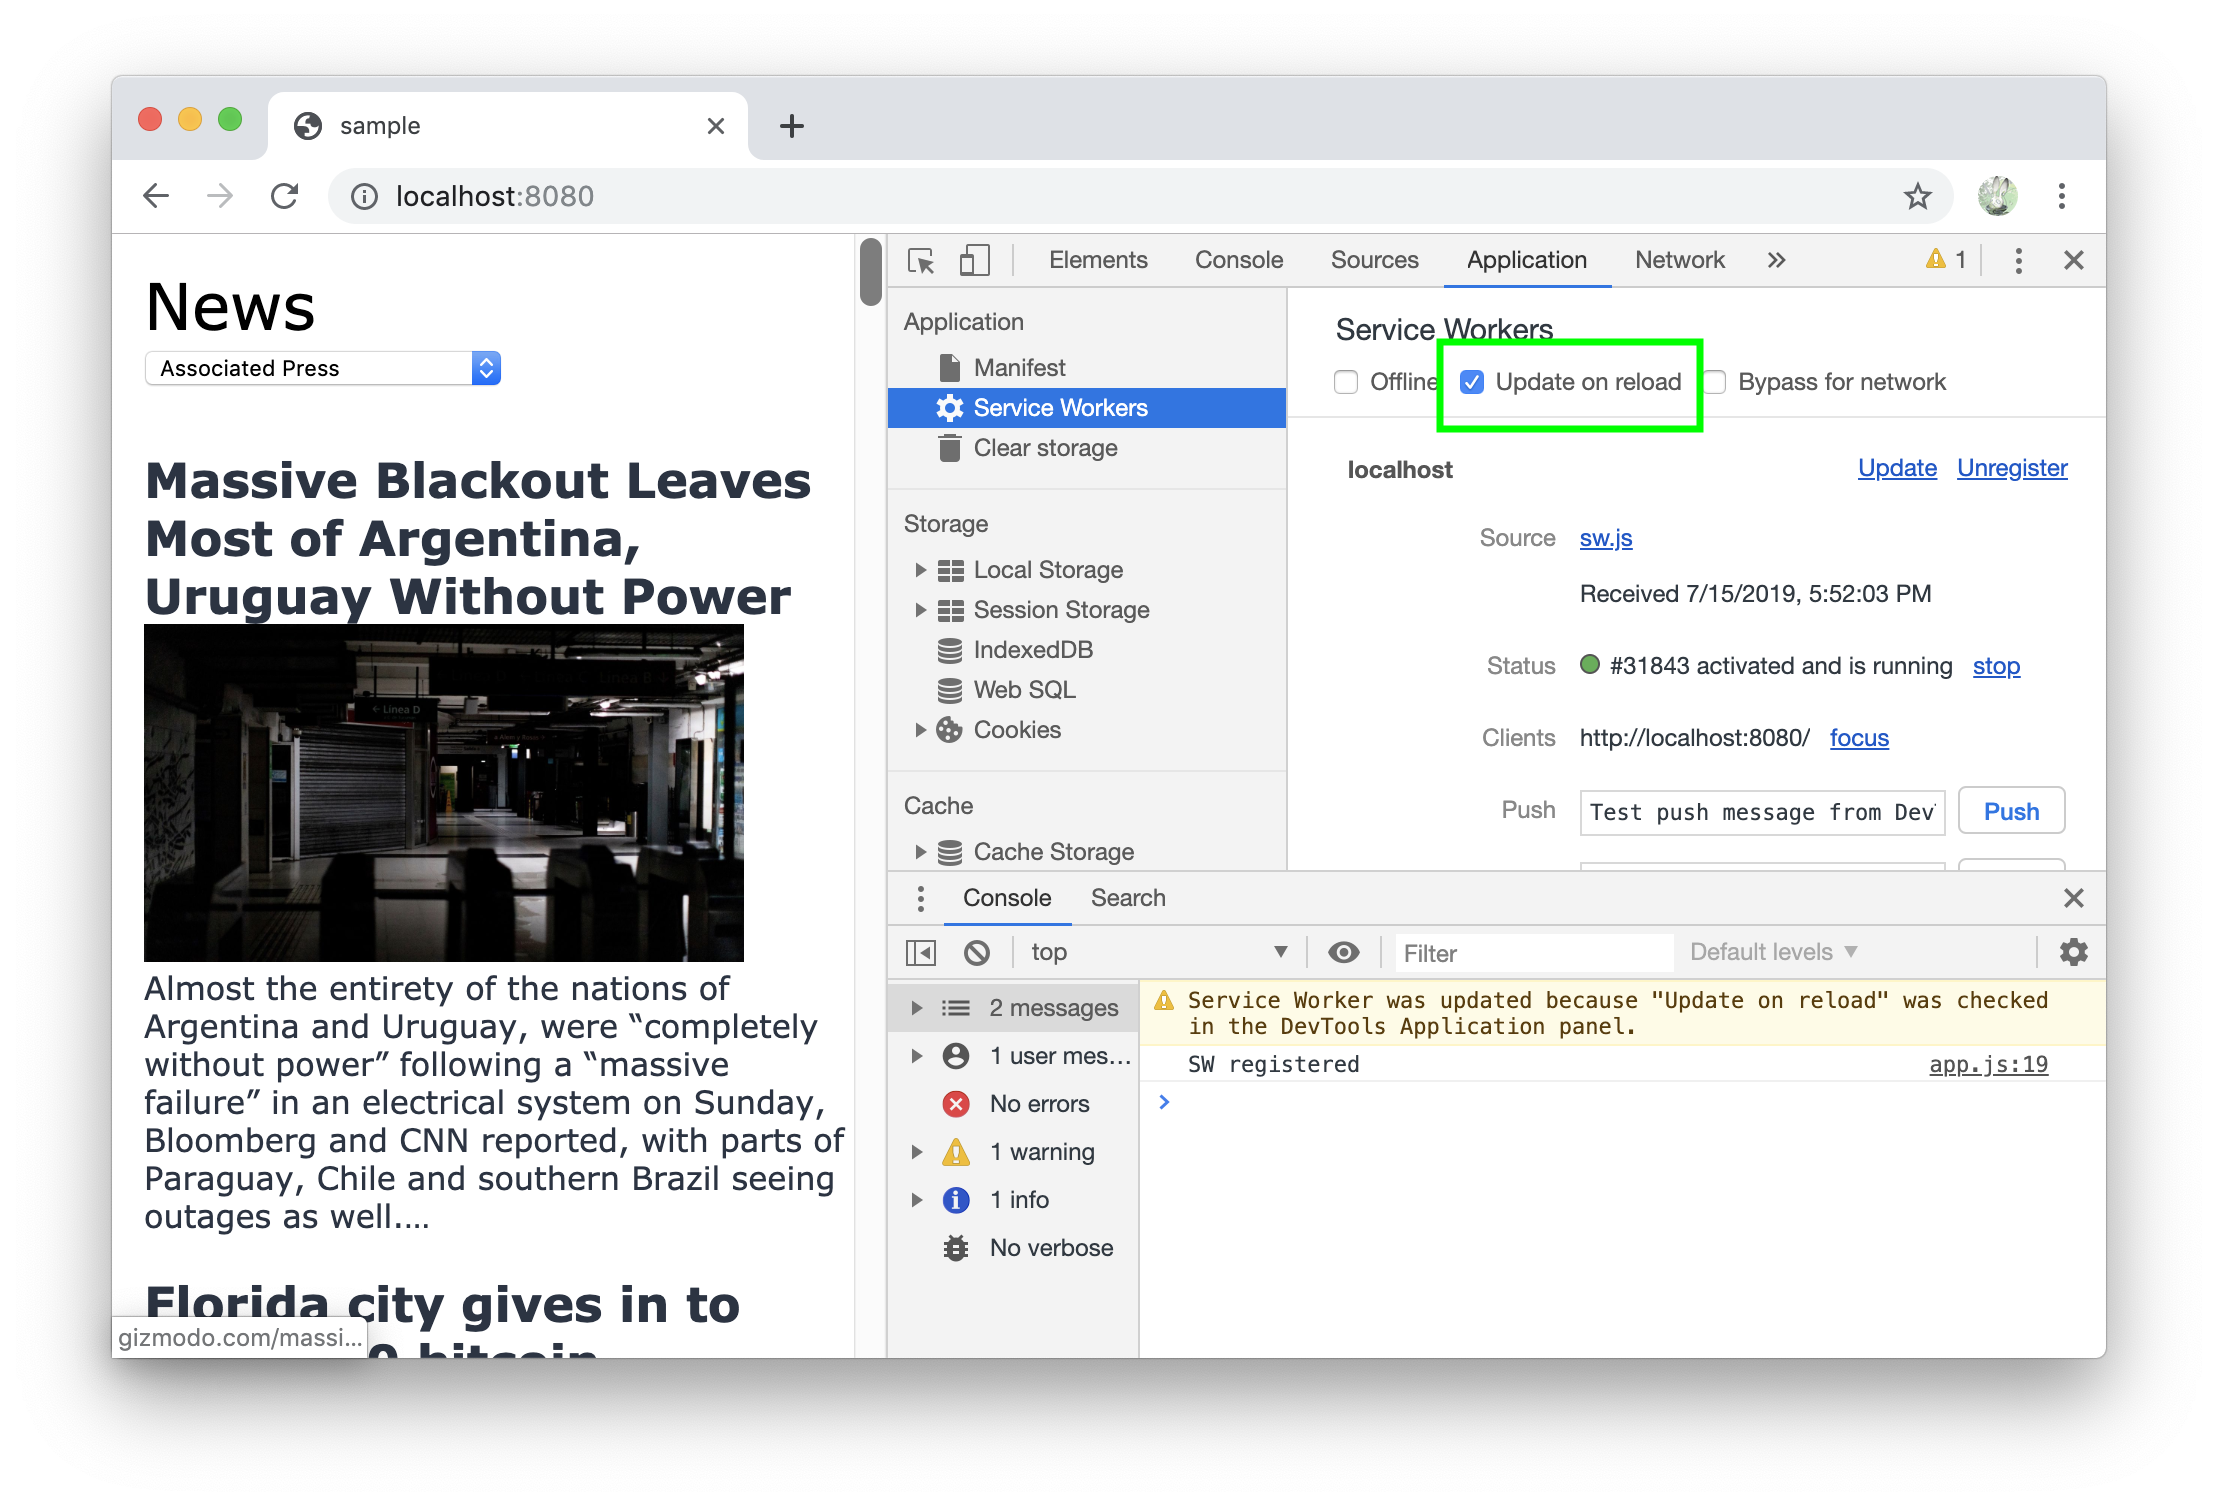
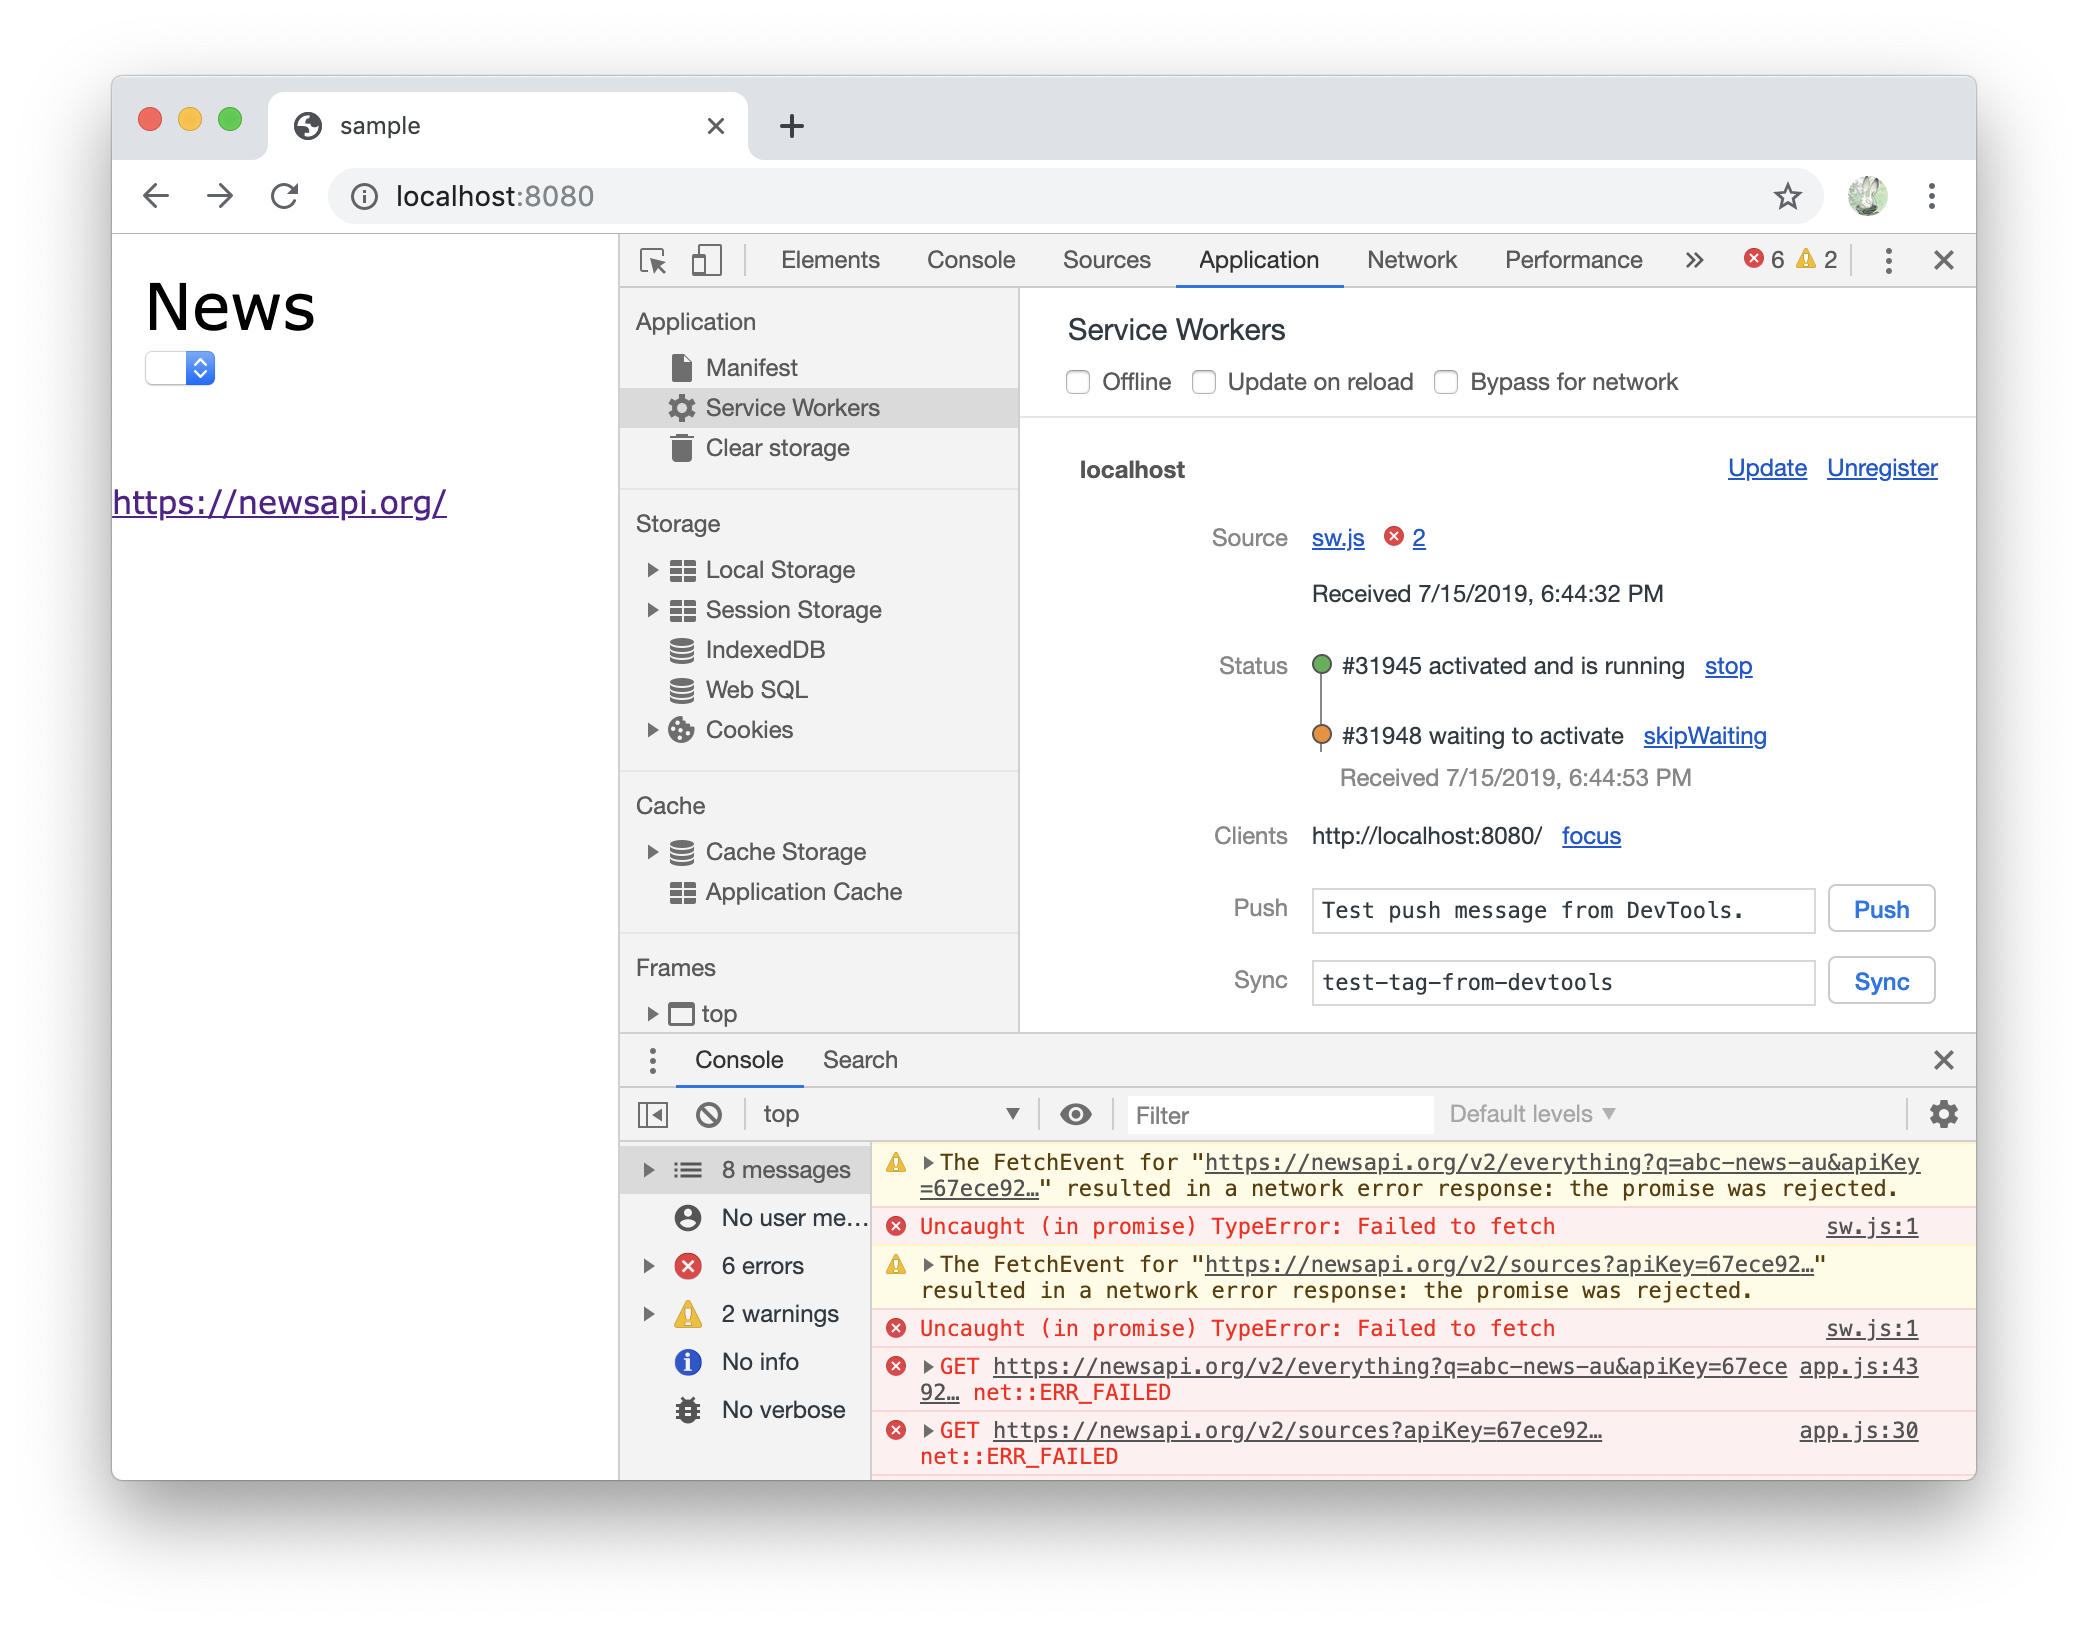
Service Workerが更新されたら再度読み込む方法について
キャッシュするようにsw.jsを変更します。
開発中だとService Workerのsw.jsを頻繁に更新するのですが、更新してもwaiting状態となり、
ブラウザを再起動するなどしないと古いService Workerの内容しか実行されません。
なので開発者ツールから、
「Application」>「Service Workers」
「Update on reload」にチェックをつけておきます。
チェックをつけると、ブラウザを再起動しないでも、Service Workerしリロードのたびにその都度更新してくれるようになりました。
※チェックをつけるとService Workerの 新規インストール/更新時 に起きるinstallイベントもリロードのたびに起きます
2-1. ローカルのファイルをキャッシュする
const staticAssets = [
    "./",
    "./styles.css",
    "./app.js",
];

// Service Workerの 新規インストール/更新時 のイベント
self.addEventListener("install", async e => {
    const cache = await caches.open("news-static");
    cache.addAll(staticAssets);
});

// 何かしらのリクエストが発生した時のイベント
self.addEventListener("fetch", async e => {
    const req = e.request;

    // respondWith()を使うことで、
    // 既定の fetch ハンドリングを抑止して、
    // 自分で Response用のPromiseを引数で指定できる
    e.respondWith(cacheFirst(req));
});

/**
 * 指定のリクエストの結果が
 * キャッシュに存在する場合はキャッシュを返し、
 * キャッシュに存在しない場合はfetchでリクエストした結果を返す
 *
 * 今回の場合だと、"./", "./styles.css", "./app.js" へのリクエストが発生するとキャッシュから表示
 * それ以外のAjaxやimgなどのリクエストの場合はfetchしてそのままのレスポンスを表示する
 *
 * @param {RequestInfo} req
 * @returns {Promise<Response>}
 */
async function cacheFirst(req) {
    const cachedResponse = await caches.match(req)
    return cachedResponse || fetch(req)
}
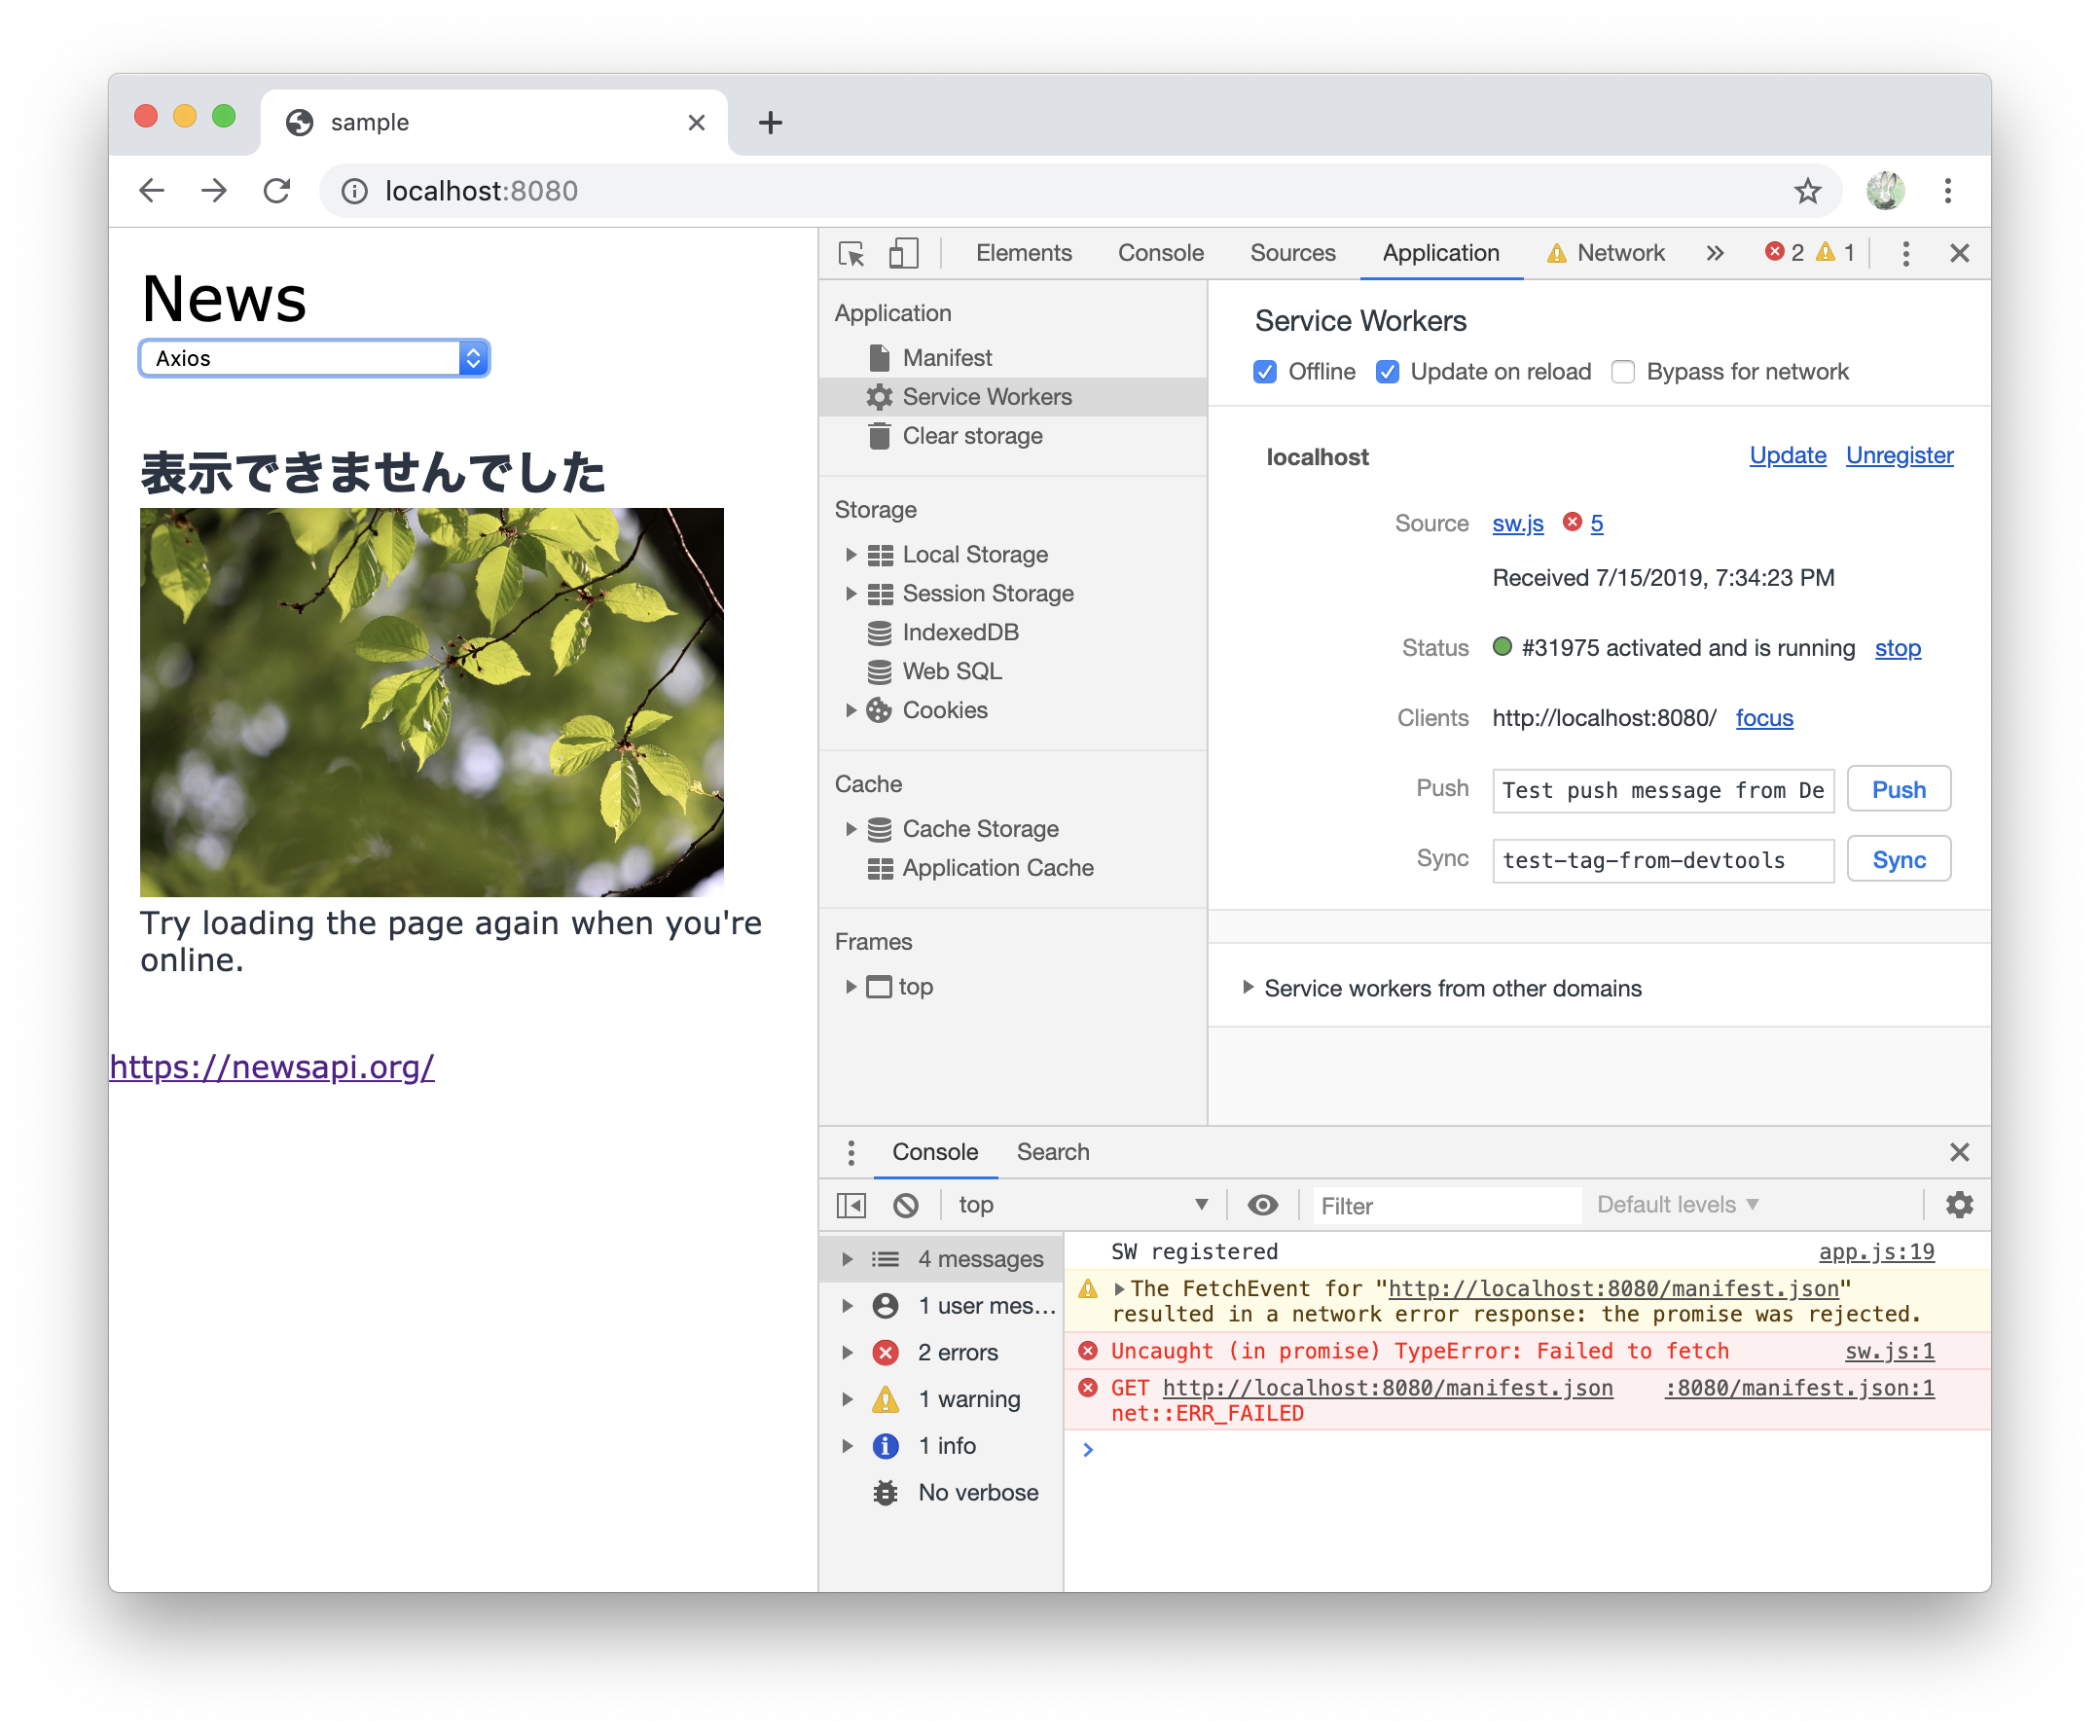
下は、Service Workerを読み込みキャッシュした後に、wifiをoffにして表示した時の画像です。
キャッシュされているHTMLは表示されているが、Offlineのためajaxが表示されていないという状況になっています。
こちらでもキャッシュが使われているかのテストにはなるのですが、wifiを切らなくても、Offlineにチェックしても良い
私の環境ではキャッシュが使われたり、使われなかったりとうまく動かないことがありました。
原因がわからないのですが、何かわかったら追記しようと思いますm(_ _)m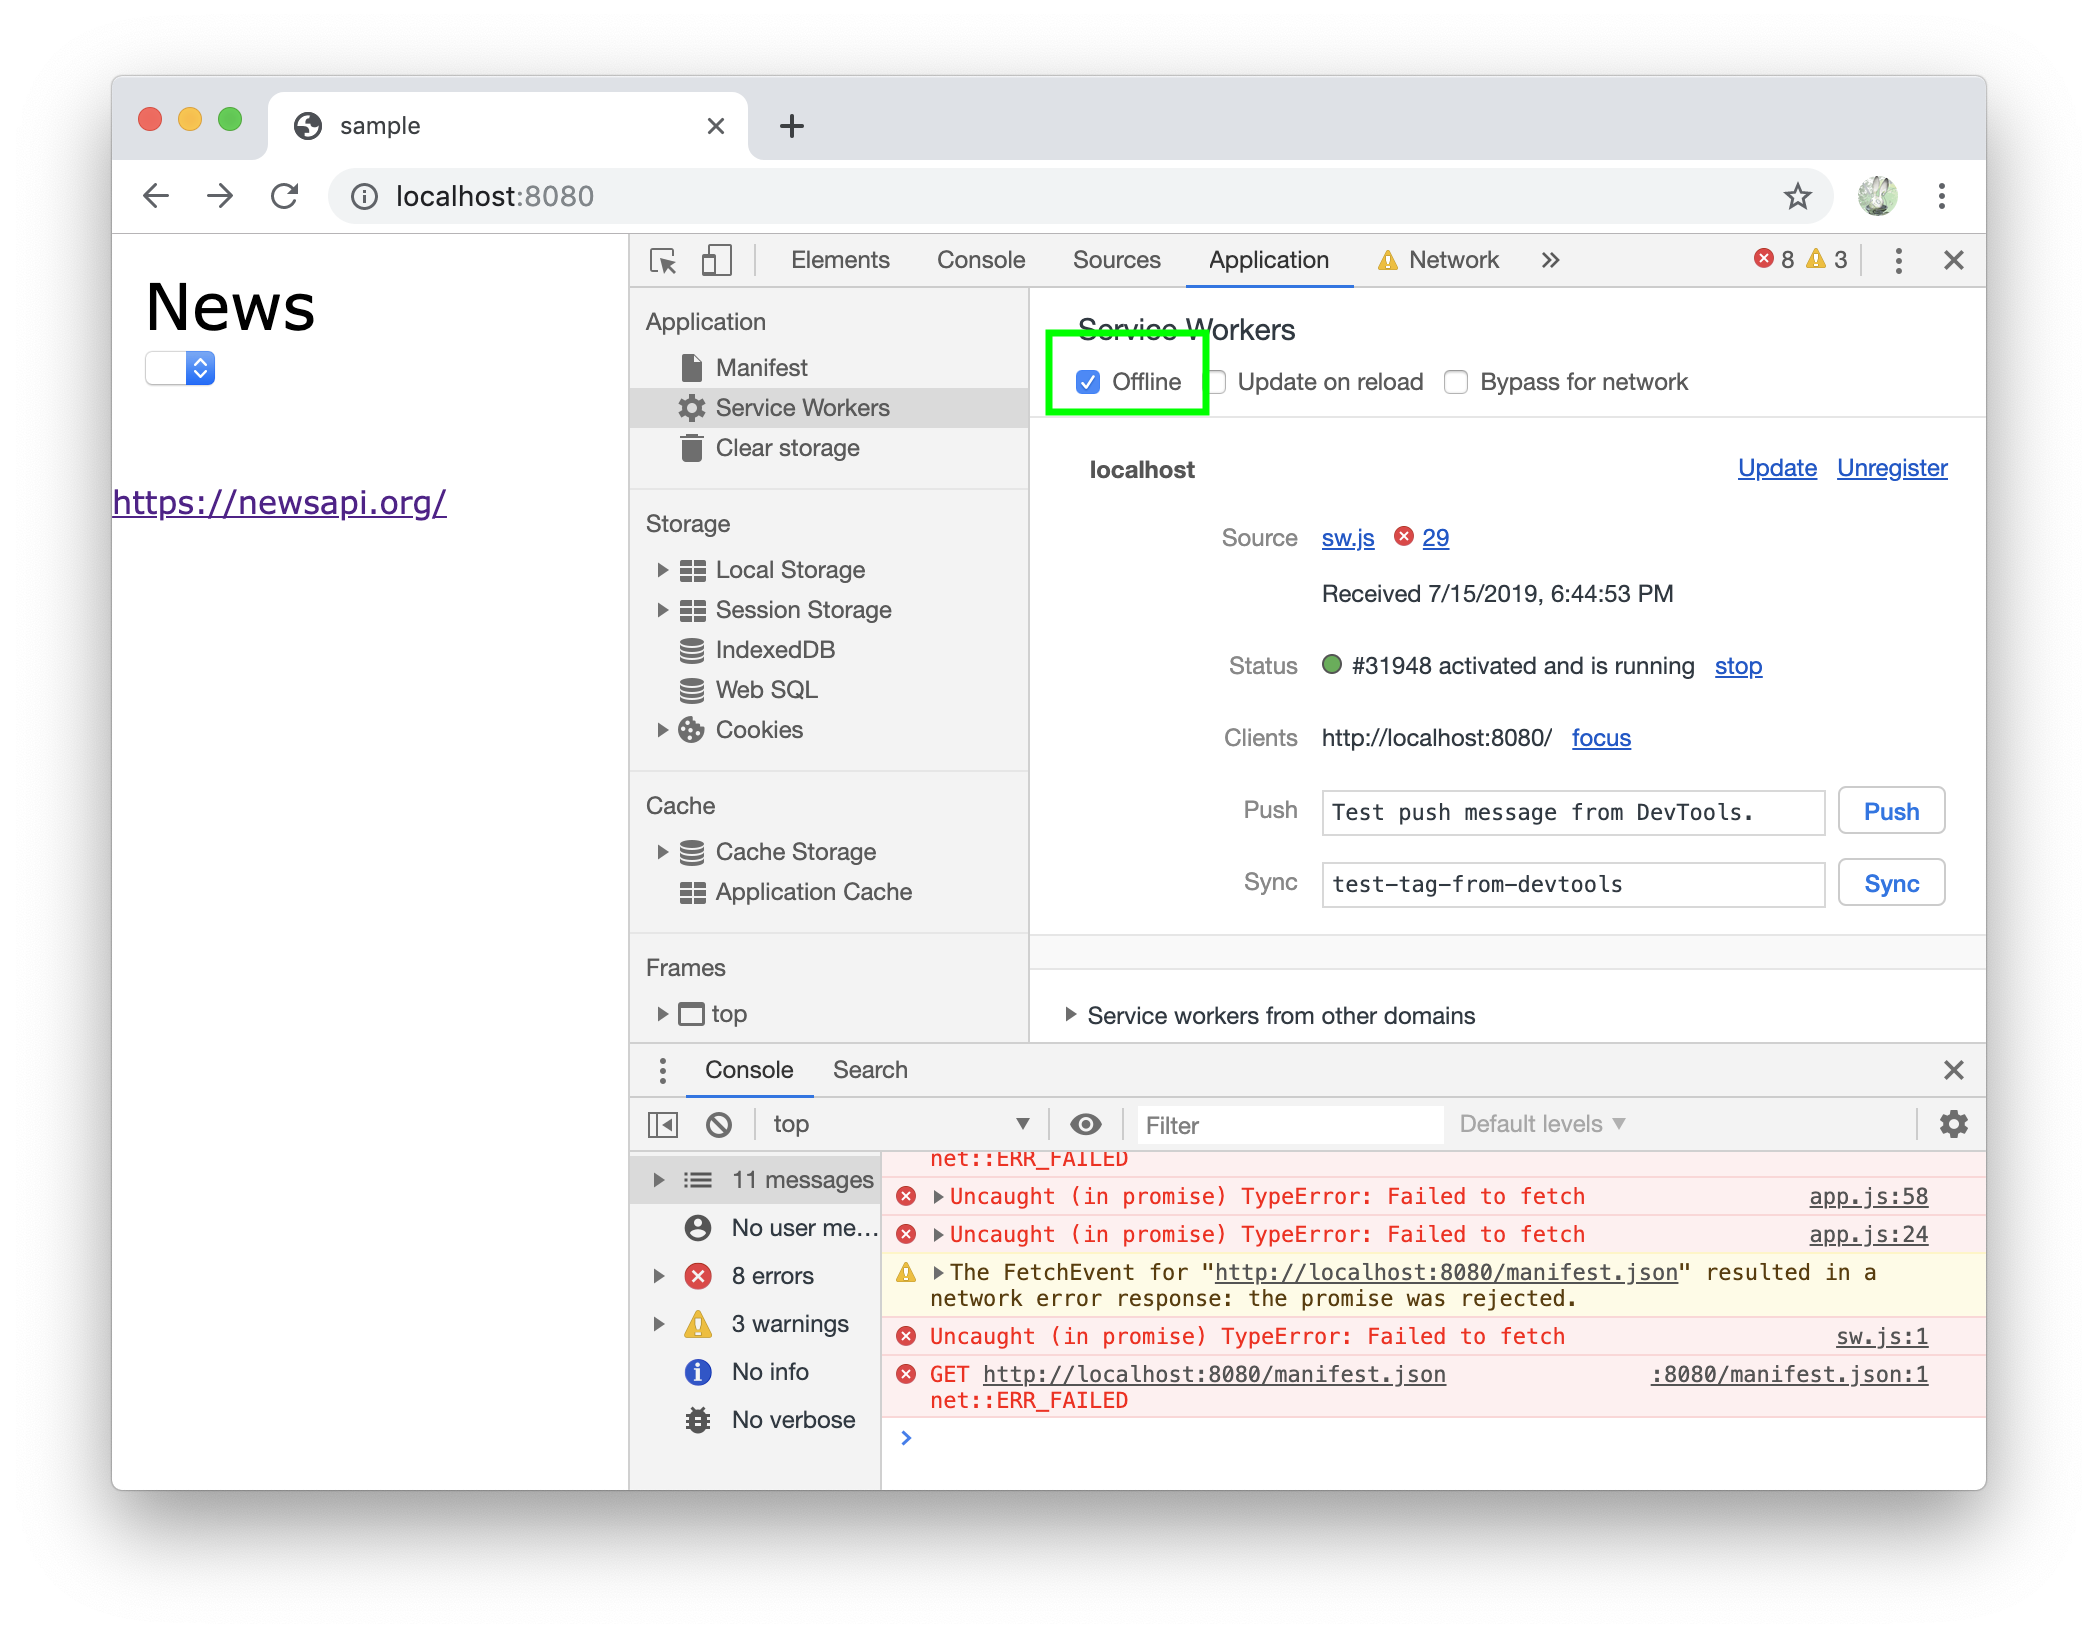
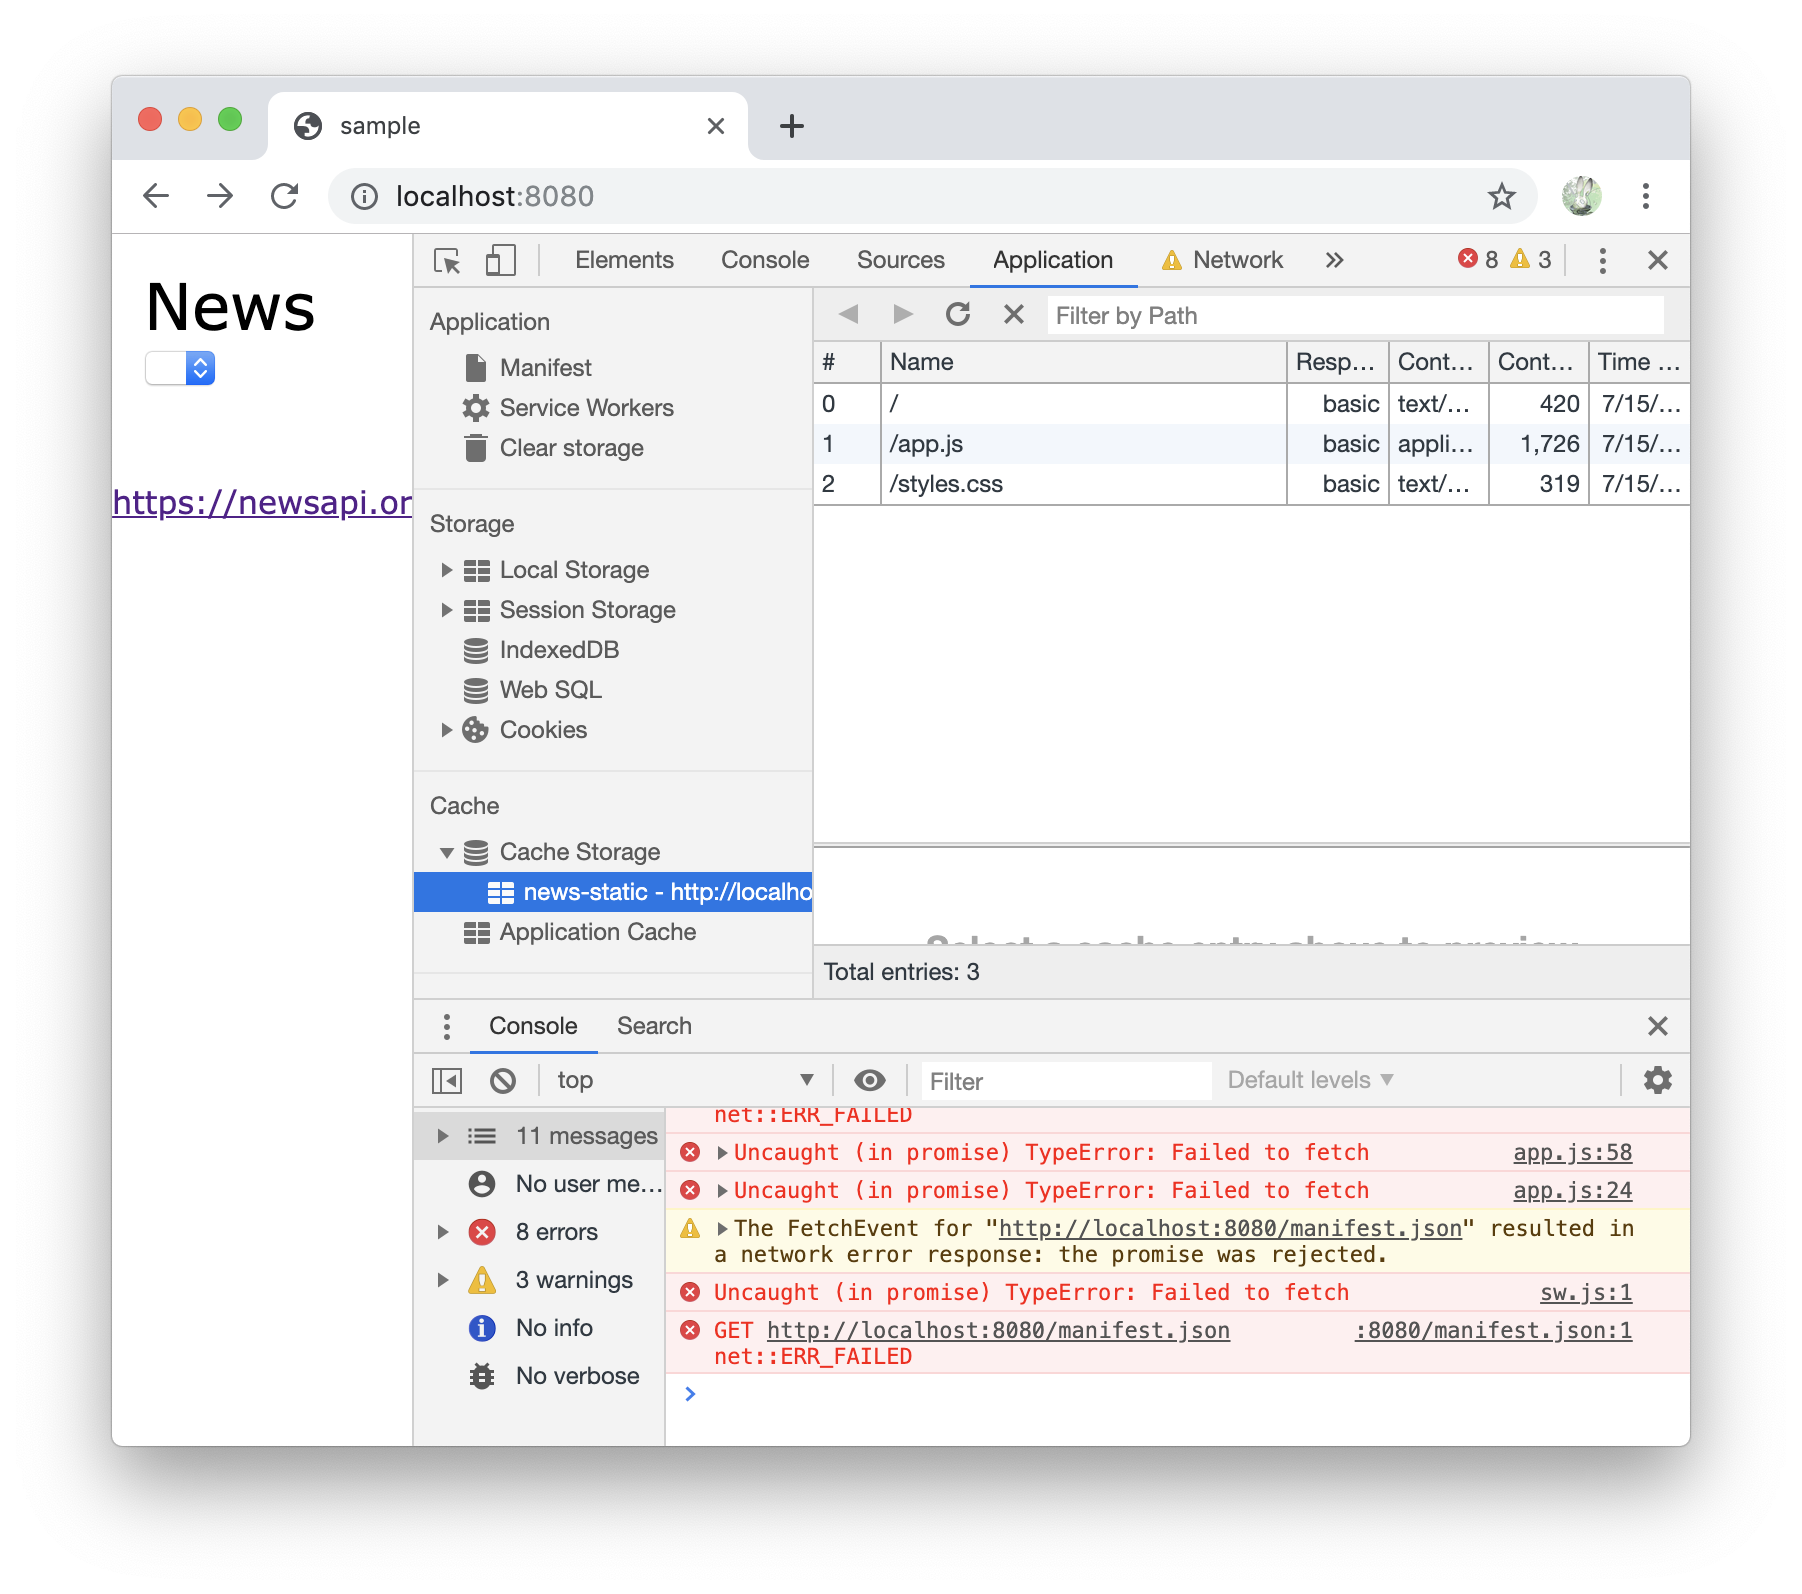
キャッシュされているファイルは「Application」>「Chache Storage」で確認することができます。
2-2. 別オリジンへのajaxやimgファイルをキャッシュする
先ほどはローカルファイルだけだったため、それ以外もキャッシュするようにします。
const staticAssets = [
    "./",
    "./styles.css",
    "./app.js",
    "./fallback.json",
    "./images/no-fetch.jpg",
];

// Service Workerの 新規インストール/更新時 のイベント
self.addEventListener("install", async e => {
    const cache = await caches.open("news-static");
    cache.addAll(staticAssets);
});

// 何かしらのリクエストが発生した時のイベント
self.addEventListener("fetch", async e => {
    const req = e.request;
    const url = new URL(req.url)

    // respondWith()を使うことで、
    // 既定の fetch ハンドリングを抑止して、
    // 自分で Response用のPromiseを引数で指定できる
    if (url.origin === location.origin) {
        // 同一オリジン(今回はlocalhost)へのリクエストの場合
        e.respondWith(cacheFirst(req))
    } else {
        // 別オリジンへのリクエストの場合
        e.respondWith(networkFirst(req))
    }
});

/**
 * 同一オリジン(今回はlocalhost)へのリクエストの場合
 *
 * 指定のリクエストの結果が
 * キャッシュに存在する場合はキャッシュを返し、
 * キャッシュに存在しない場合はfetchでリクエストした結果を返す
 *
 * 今回の場合だと、"./", "./styles.css", "./app.js" などへのリクエストが発生するとキャッシュから表示
 * それ以外のリクエストの場合はfetchしてそのままのレスポンスを表示する
 *
 * @param {RequestInfo} req
 * @returns {Promise<Response>}
 */
async function cacheFirst(req) {
    const cachedResponse = await caches.match(req)
    return cachedResponse || fetch(req)
}

/**
 * 別オリジンへのリクエストの場合
 *
 * APIの情報は常に最新を表示するようにする
 * オフラインの場合に限りキャッシュを利用する
 *
 * 指定のリクエストをそのままfetchする
 * ↓
 * 1. 正常にレスポンスが取得できた場合
 *   - レスポンスをキャッシュに保存
 *   - レスポンスを返す
 * 2. オフラインなどでリクエストが失敗
 *   - キャッシュにあればそれを返す
 *   - キャッシュになければ fallback.json を返す
 *
 * @param {RequestInfo} req
 * @returns {Promise<Response>}
 */
async function networkFirst(req) {
    const cache = await caches.open("news-dynamic")

    try {
        const res = await fetch(req)
        cache.put(req, res.clone())
        return res;
    } catch (e) {
        const cachedResponse = await cache.match(req)
        return cachedResponse || await caches.match("./fallback.json")
    }
}
※こちらのfallback.jsonはnewsapiの形式に合わせた内容です。
{
    "articles": [
        {
            "title": "表示できませんでした",
            "description": "Try loading the page again when you're online.",
            "url": "",
            "urlToImage": "images/no-fetch.jpg"
        }
    ]
}
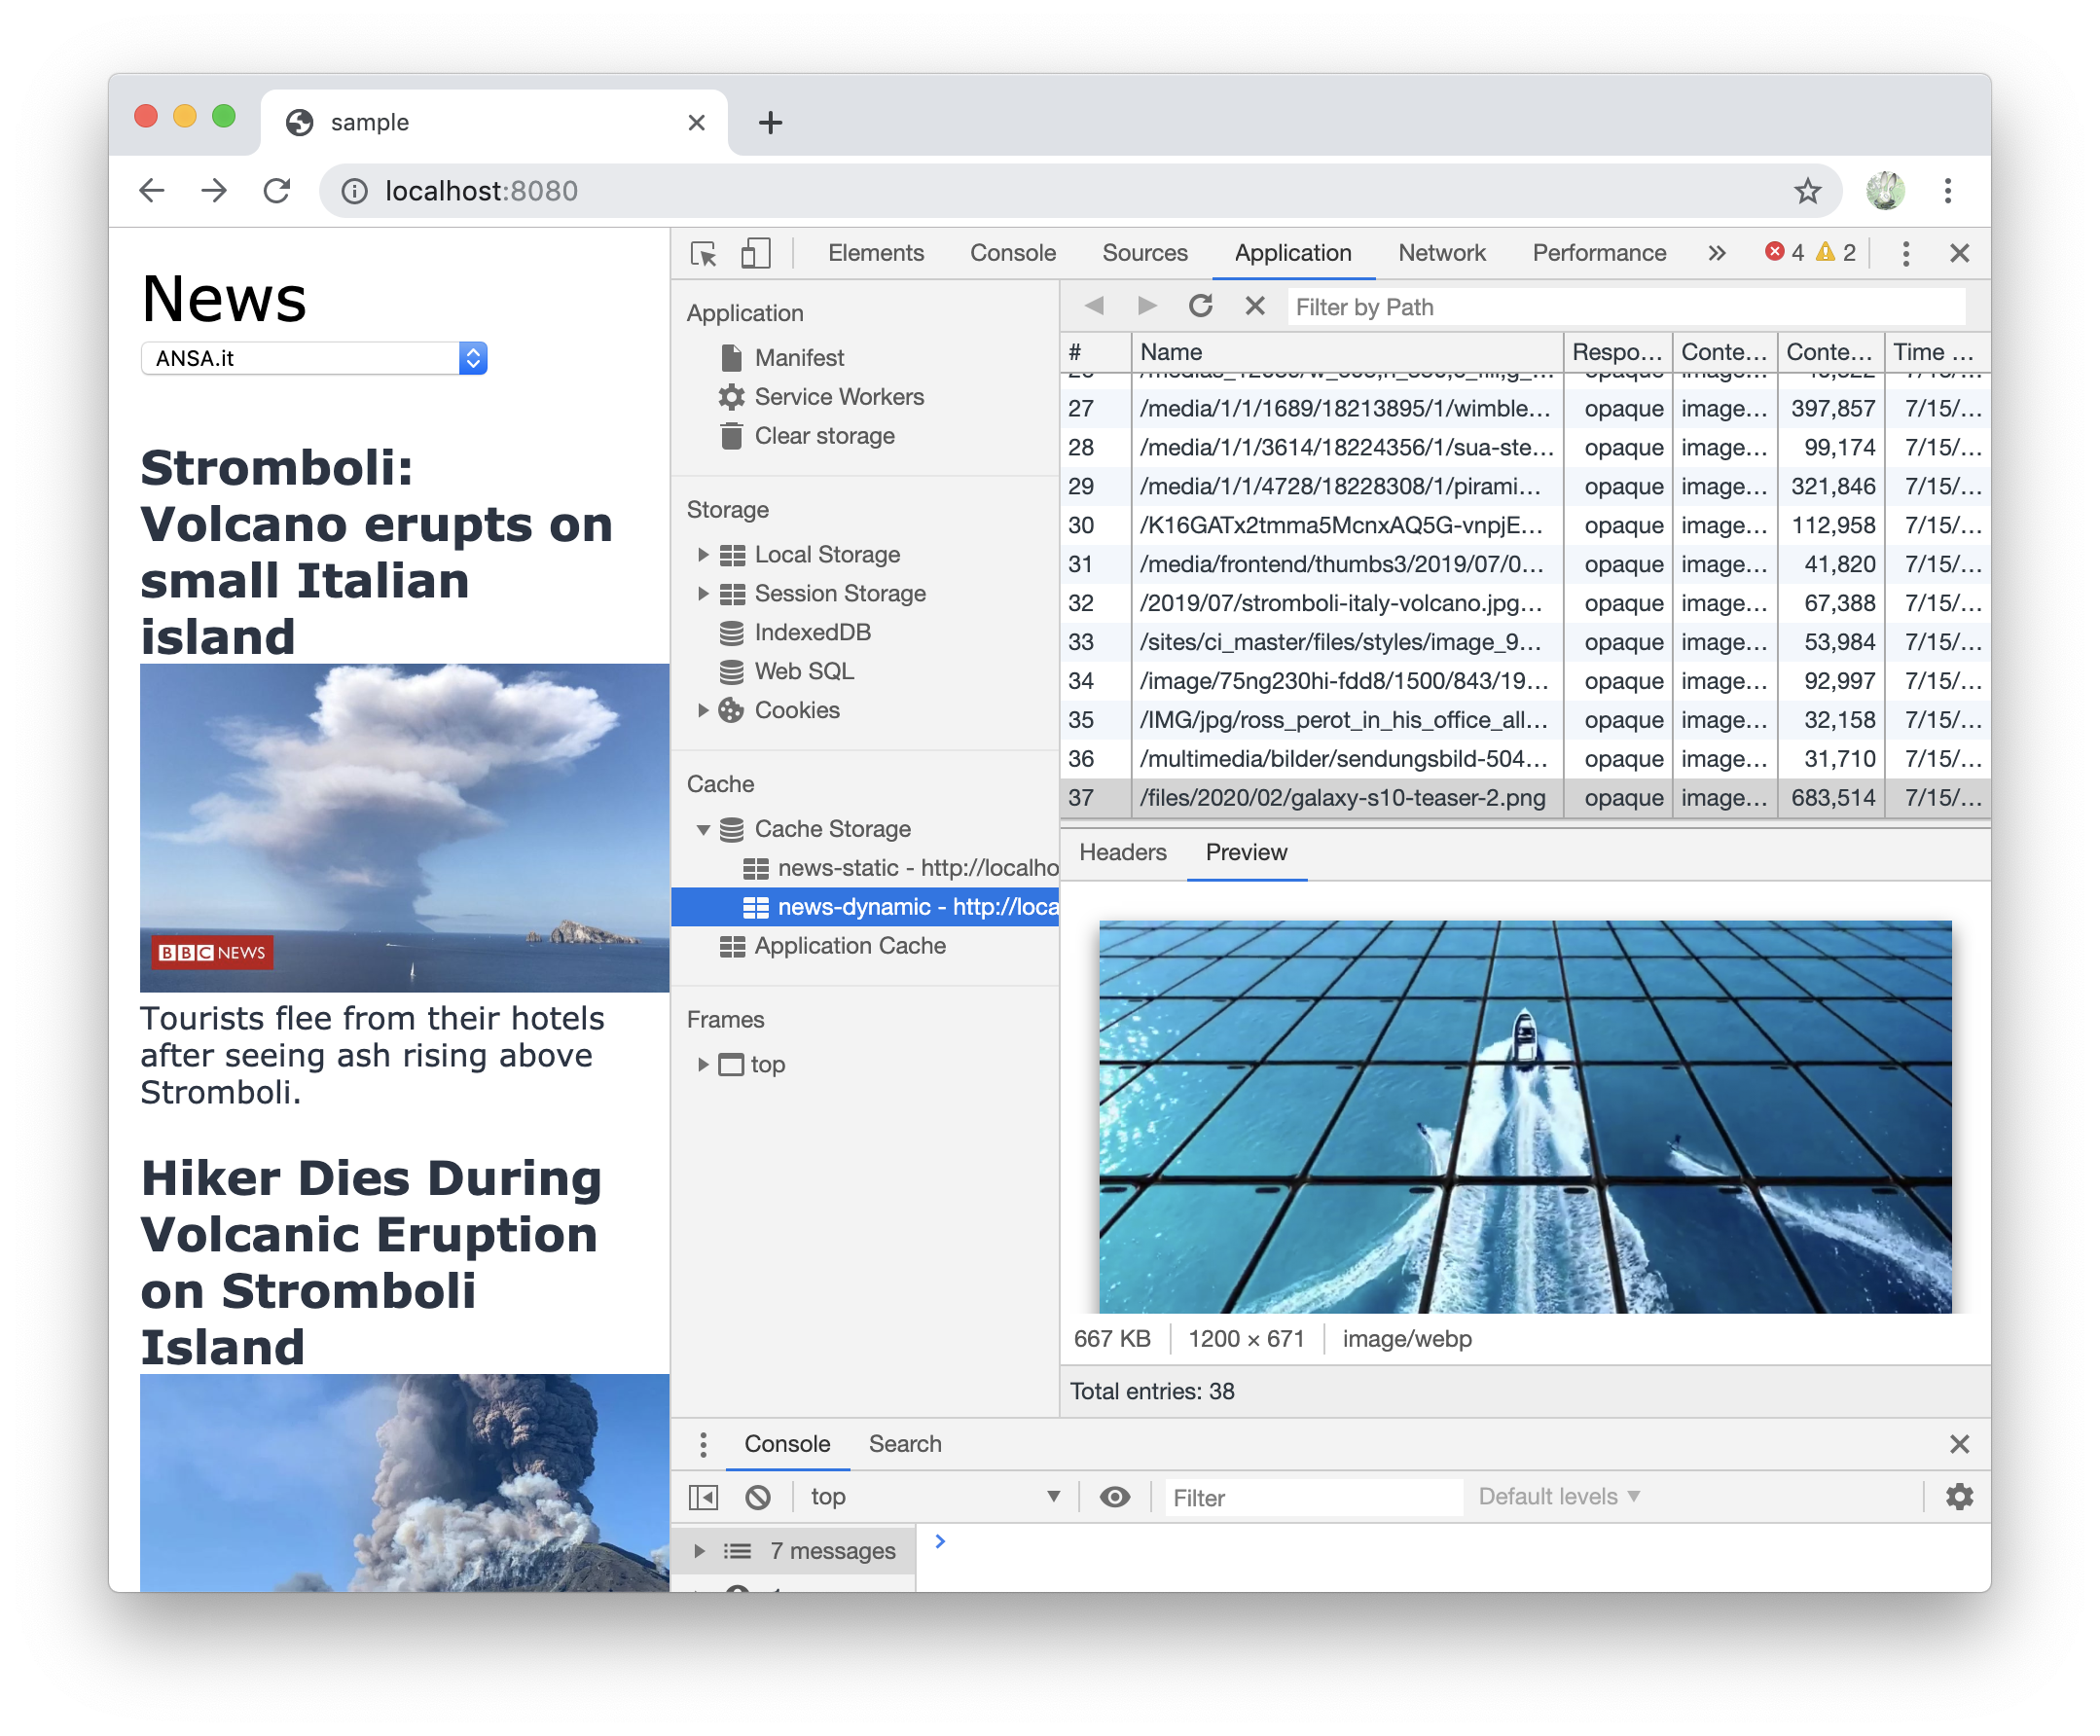
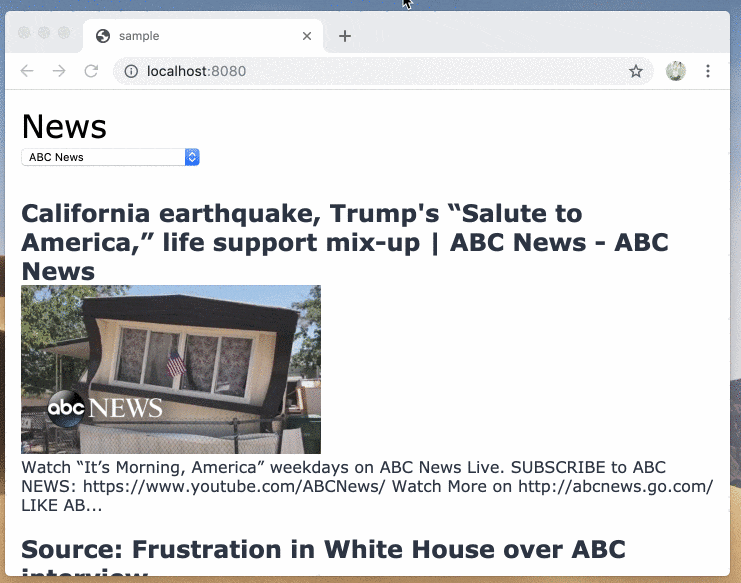
ページを開くと、別オリジンの画像もcacheに保存できていることを確認できました。
オフラインでキャッシュされている場合はこちらの情報が表示されます。
オフラインでキャッシュされていない場合はfallback.jsonを表示してくれます。
プルダウンを変更するたびにajaxリクエストしてデータを取得し、その度にキャッシュします。
開発者ツールでOfflineに設定し、プルダウンでキャッシュされていない項目を選ぶと、
fallback.jsonの内容を表示してくれました。
3. push通知する
参考
push通知確認までを私が実際に試したコードは以下です。
https://github.com/okumurakengo/pwa-test
3-1. web-pushをインストール
web-pushを使ってpush通知してみますので、installします
yarn init -y
yarn add web-push
3-2. push通知に必要なvapidキーを取得する
↓のようにコマンドを実行すると、Public KeyとPrivate Keyが表示されるのでこれを使います。
$ yarn web-push generate-vapid-keys
yarn run v1.12.3

=======================================

Public Key:
BLGgW2eVUdKoSx2R4k80hCsTSLKPd0YmvHHm2CaW5JfXIlHm92sMHMUGOgBHpaweTRERkCyrT_42cDTmtWCF6zo

Private Key:
1amdB2vaa5tm6YfV33LvguNJeutDLY0FoC7IzhZR-T8

=======================================

✨  Done in 0.22s.
3-3. push通知用のサーバーを作成
先ほど取得した、Public KeyとPrivate Keyを設定します。
このサーバーに対してfetchでリクエストしてpush通知します。
※今回はサーバーにリクエストがきたらpushの処理を行うようにしましたが、サーバーにせずnodeで実行してそのままwebpush.sendNotificationを実行でもpush通知できます。
const http = require("http");
const webpush = require("web-push");

const publicVapidKey = "BLGgW2eVUdKoSx2R4k80hCsTSLKPd0YmvHHm2CaW5JfXIlHm92sMHMUGOgBHpaweTRERkCyrT_42cDTmtWCF6zo";
const privateVapidKey = "1amdB2vaa5tm6YfV33LvguNJeutDLY0FoC7IzhZR-T8";

webpush.setVapidDetails(
    "mailto:test@test.com", // アプリケーションのmailtoまたはURL
    publicVapidKey,
    privateVapidKey
);

const server = http.createServer((req, res) => {
    // 今回は localhost:8080 -> localhost:8081 と
    // クロスドメインfetchでリクエストするので、corsの設定をしておく
    res.setHeader("Access-Control-Allow-Origin", "*");
    res.setHeader("Access-Control-Request-Method", "*");
    res.setHeader("Access-Control-Allow-Methods", "OPTIONS, POST");
    res.setHeader("Access-Control-Allow-Headers", "*");
    if (req.method === "OPTIONS") {
        res.end();
        return;
    }
});

server.on("request", async (req, res) => {
    if (req.method === "POST") {
        // リクエストボディのjson文字列を取得
        const subscription = await new Promise(resolve => {
            req.on("data", resolve);
        });

        try {
            // sendNotificationを実行すると、Service Workerでpushイベントを起こせました
            const payload = JSON.stringify({ title: "Push Test" });
            await webpush.sendNotification(JSON.parse(subscription), payload);
        } catch(e) {
            console.log(e)
        }
    }
    res.end();
});

server.listen(8081);
console.log("push server listening 8081");
サーバーを起動しておく
node push-server.js #localhost:8081でサーバーが起動する
3-4. push通知用サーバーにリクエストする
Public Key を設定し、先ほどのlocalhost:8081へfetchします。
const publicVapidKey = "BL31MrWtf-Q74RvQHgKB3WbKz-qBGvz-RCXayyPzCkH1FqyiYCGftirS1UjeK5UBRyb0saFwFYMhVMLn8Ete6ts";

// ..

    if ("serviceWorker" in navigator) {
        try {
            register = await navigator.serviceWorker.register("sw.js")
            console.log("SW registered")

            const subscription = await register.pushManager.subscribe({
                userVisibleOnly: true,
                applicationServerKey: urlBase64ToUint8Array(publicVapidKey),
            });
            console.log("Push registered");

            fetch("http://localhost:8081", {
                method: "POST",
                body: JSON.stringify(subscription),
                headers: {
                    "Content-Type": "application/json",
                },
            });
            console.log("Push Sent");
        } catch (e) {
            console.log("SW faild")
        }

// ...

/**
 * @see https://github.com/web-push-libs/web-push#using-vapid-key-for-applicationserverkey
 * @param {string} base64String
 */
function urlBase64ToUint8Array(base64String) {
    const padding = '='.repeat((4 - base64String.length % 4) % 4);
    const base64 = (base64String + padding)
        .replace(/-/g, '+')
        .replace(/_/g, '/');

    const rawData = window.atob(base64);
    const outputArray = new Uint8Array(rawData.length);

    for (let i = 0; i < rawData.length; ++i) {
        outputArray[i] = rawData.charCodeAt(i);
    }
    return outputArray;
}
app.js全体const NEWS_API_KEY = "67ece92e536e4852a075c3a35621b9ea"; // 自分のapiキー
const main = document.querySelector("main");
const sourceSelector = document.querySelector("#sourceSelector");
const defaultSource = "abc-news-au";
const publicVapidKey = "BLGgW2eVUdKoSx2R4k80hCsTSLKPd0YmvHHm2CaW5JfXIlHm92sMHMUGOgBHpaweTRERkCyrT_42cDTmtWCF6zo";
(async () => {
updateNews();
await updateSources();
// 画面表示時のプルダウンの初期値を設定
sourceSelector.value = defaultSource;
sourceSelector.addEventListener("change", e => {
updateNews(e.target.value);
});
if ("serviceWorker" in navigator) {
try {
register = await navigator.serviceWorker.register("sw.js")
console.log("SW registered")
const subscription = await register.pushManager.subscribe({
userVisibleOnly: true,
applicationServerKey: urlBase64ToUint8Array(publicVapidKey),
});
console.log("Push registered");
fetch("http://localhost:8081", {
method: "POST",
body: JSON.stringify(subscription),
headers: {
"Content-Type": "application/json",
},
});
console.log("Push Sent");
} catch (e) {
console.log("SW faild")
}
}
})();
/**
* プルダウンの値を設定
*/
async function updateSources() {
const res = await fetch(`https://newsapi.org/v2/sources?apiKey=${NEWS_API_KEY}`);
const json = await res.json();
json.sources.forEach(src => {
sourceSelector.insertAdjacentHTML("beforeend", `<option value="${src.id}">${src.name}</option>`);
});
}
/**
* ニュースの内容を表示
* @param {string} source
*/
async function updateNews(source = defaultSource) {
const res = await fetch(`https://newsapi.org/v2/everything?q=${source}&apiKey=${NEWS_API_KEY}`);
const json = await res.json();
main.innerHTML = "";
json.articles.forEach(article => {
main.insertAdjacentHTML("beforeend", `
<div class="article">
<a href="${article.url}">
<h2>${article.title}</h2>
<img src="${article.urlToImage}">
<p>${article.description}</p>
</a>
</div>
`);
});
}
/**
* @see https://github.com/web-push-libs/web-push#using-vapid-key-for-applicationserverkey
* @param {string} base64String
*/
function urlBase64ToUint8Array(base64String) {
const padding = '='.repeat((4 - base64String.length % 4) % 4);
const base64 = (base64String + padding)
.replace(/-/g, '+')
.replace(/_/g, '/');
const rawData = window.atob(base64);
const outputArray = new Uint8Array(rawData.length);
for (let i = 0; i < rawData.length; ++i) {
outputArray[i] = rawData.charCodeAt(i);
}
return outputArray;
}
3-5. Service Workerでpush通知する
sw.jsの最後にpushイベントを追加します。
self.addEventListener("push", e => {
    const { title } = e.data.json();
    self.registration.showNotification(title, {
        body: "Notification Test form SW !",
        icon: "./images/icons/icon-192x192.png",
    });
});
3-6. push通知してみる
PCの場合
Androidの場合
chrome://inspect/#deviceを開き、localhost:8081 を追加します
その状態で再読み込みをすると
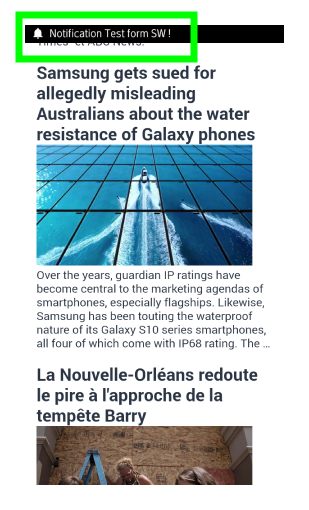
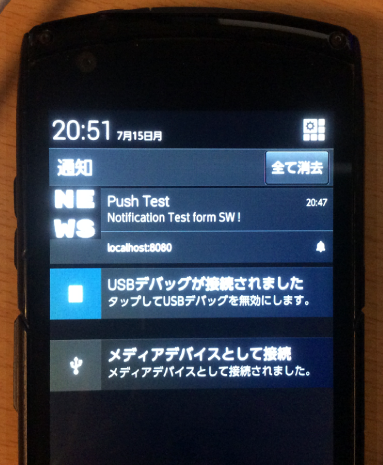
push通知がきたことを確認できました。感動の瞬間です。
最後まで読んでいただいてありがとうございました。m(_ _)m