はじめに
本記事では、Terraform で ECS の Fargate の環境と Docker イメージのデプロイのパイプライン
(CodeCommit + CodeBuild + CodePipeline)を構築する手順を記載しています。
初学者のハンズオンやApp Runner に興味を持った開発者が試用の為に利用することを想定しています。
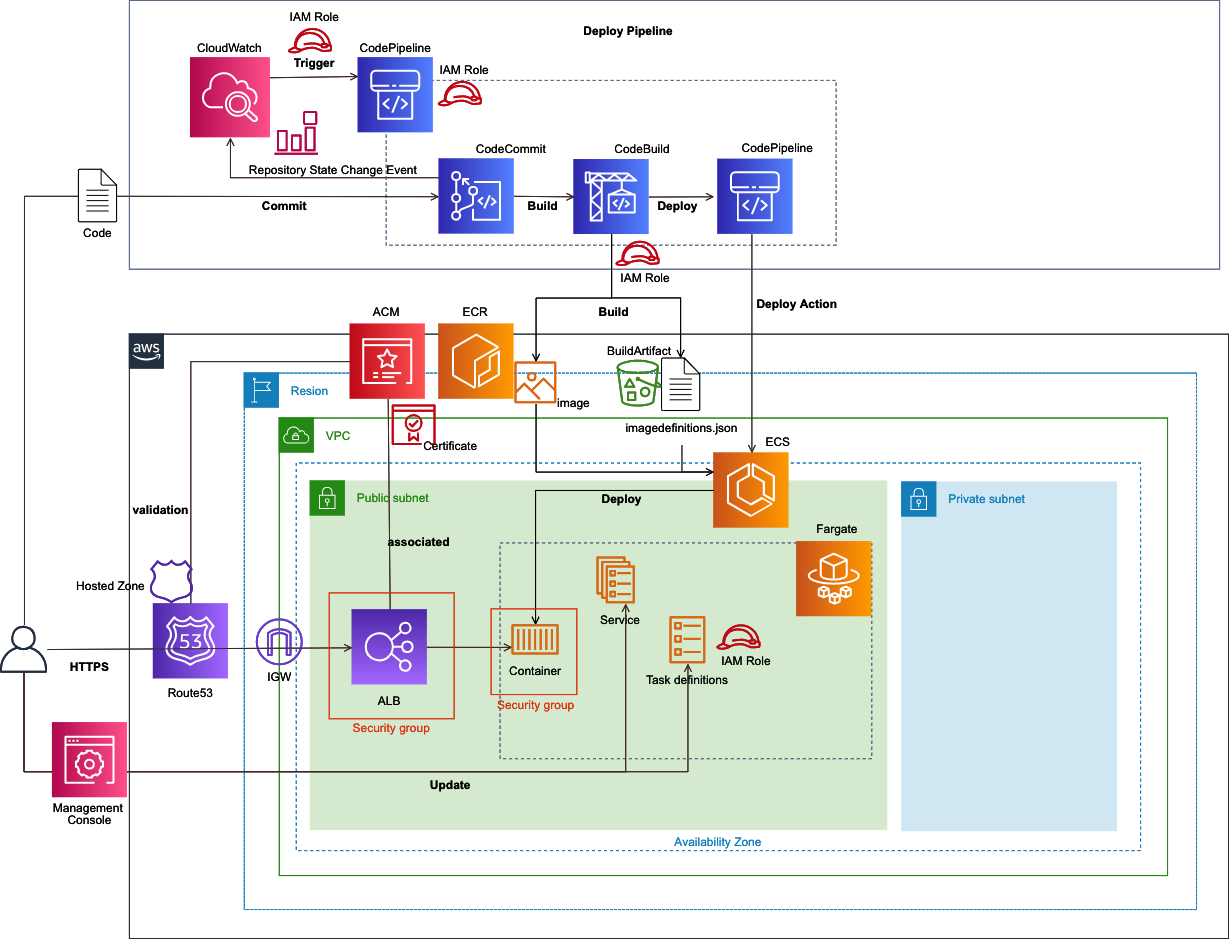
Terraform で構築する全体構成図
本環境でのイメージのECSへのデプロイは、CodePipelineによるローリングアップデートになります。
Terraform で構築するAWSリソースのBlackBeltの資料
VPC
ALB
ECS
CodeCommit
CodeBuild
CodePipeline
CloudWatchEvents
IAM
ACM
Route53
Terraform のコードと構成
$ tree aws-terraform-beginner-fargate-cicd
aws-terraform-beginner-fargate-cicd
├── acm.tf
├── alb.tf
├── aws.tf
├── cloudwatch-event.tf
├── codebuild.tf
├── codecommit.tf
├── codepipeline.tf
├── default-sample-app
│   ├── Dockerfile
│   ├── buildspec.yml
│   └── src
│       └── index.php
├── ecs.tf
├── iam-policy
│   ├── cloudwatch-event-policy.json
│   ├── cloudwatch-event-trust-policy.json
│   ├── codebuild-policy.json
│   ├── codebuild-trust-policy.json
│   ├── codepipeline-policy.json
│   ├── codepipeline-trust-policy.json
│   ├── ecs-task-policy.json
│   └── ecs-task-trust-policy.json
├── iam-role.tf
├── output.tf
├── r53.tf
├── security-group.tf
├── taskdef-default.json
├── terraform.tfvars-
├── variables.tf
└── vpc.tf
Terraform で構築する各リソース名
| リソース | 名前(デフォルト) |
|---|---|
| アプリ URL | https://sample-app.example.com |
| CodeCommit リポジトリ名 | sample-app |
| VPC 名 | prefix-dev-vpc |
| ALB 名 | prefix-dev-alb |
| ALB CNAME | sample-app.example.com |
| ALB セキュリティグループ名 | prefix-dev-alb-sg |
| ECS クラスタ名 | prefix-dev-cluster |
| ECR リポジトリ名 | prefix-dev-sample-app |
| タスク定義名 | prefix-dev-def |
| コンテナ名 | prefix-dev-sample-app |
| サービス名 | prefix-dev-sample-app-svc |
| サービス セキュリティグループ名 | prefix-dev-ecs-sg |
| CodePipeline 名 | prefix-dev-sample-app-cp |
| Artifact Store名 | prefix-dev-sample-app-artifact |
| CodeBuild プロジェクト名 | prefix-dev-sample-app-cb |
| CloudWatch Events名 | prefix-dev-sample-app-cp-cwe |
事前準備
・Docker Desktop のインストール
・Terraform のインストール
・tfenv のインストール
・Terraform を実行するための IAM のアクセスキーとシークレットキー
・CodeCommit への HTTPS 接続用の Git 認証情報
・Route53 上で有効な Route 53 Hosted Zone
・AWS CLI のインストール
Terraform の動作確認環境
$ terraform -version
Terraform v0.12.31
+ provider.aws v2.70.0
+ provider.template v2.2.0
Terrraform で環境を構築する手順
本手順は、Mac環境で実施することを想定しています。
Terraformのコードをダウンロードします。
$ git clone https://github.com/okubo-t/aws-terraform-beginner-fargate-cicd.git
Terraform のコードがあるディレクトへ移動します。
$ cd aws-terraform-beginner-fargate-cicd/
terraform.tfvars ファイルを作成します。
$ cp -p terraform.tfvars- terraform.tfvars
作成した terraform.tfvars 内の各パラメータを環境に応じて、任意で変更します。(下記のキーはサンプルです。)
# アクセスキー
aws_access_key = "AKIAIOSFODNN7EXAMPLE"

# シークレットキー
aws_secret_key = "wJalrXUtnFEMI/K7MDENG/bPxRfiCYEXAMPLEKEY"
# リージョン
aws_region     = "ap-northeast-1"

# リソース名のプレフィックス
prefix = "prefix"

# リソースの環境
env = "dev"

# ALB の ALIAS レコードを登録する Route53 上のゾーン名
hosted_zone = "example.com"

# ALB への HTTP(S) アクセスを許可するパブリック IP
source_ip = "0.0.0.0/0"

# Codecommit のリポジトリ名
repo_name = "sample-app"

# Codecommit のリポジトリの説明
repo_description = "sample-app for ECS"
下記コマンドで、Terraform の初期設定をします。
$ terraform init
下記コマンドで、環境のデプロイを実行します。
$ terraform apply
デプロイ後に出力される Outputsの内容をメモします。(下記の値は例です。)
Apply complete! Resources: 49 added, 0 changed, 0 destroyed.

Outputs:

codecommit_repository = https://git-codecommit.ap-northeast-1.amazonaws.com/v1/repos/sample-app
ecr_repository = 123456789.dkr.ecr.ap-northeast-1.amazonaws.com/prefix-dev-sample-app
url = https://prefix-dev-sample-app.example.com
これで、Terraformによる環境の構築は完了です。
下記コマンドで、構築されたAWS環境のコンポーネントを確認できます。
$ terraform state list
Docker イメージのデプロイ
AWS CLIの動作確認済み環境
$ aws --version
aws-cli/1.18.165 Python/3.7.4 Darwin/18.7.0 botocore/1.19.5
AWS 認証情報を設定しておきます。
$ export AWS_ACCESS_KEY_ID=XXXXXXXXXXXXXXXX     # アクセスキー
$ export AWS_SECRET_ACCESS_KEY=XXXXXXXXXXXXXXX  # シークレットアクセスキー
$ export AWS_DEFAULT_REGION=ap-northeast-1      # デフォルトリージョン
Terraform のコード内のディレクトリ(default-sample-app)に移動します。
$ cd default-sample-app/
AWS CLIで、レジストリに対して Docker クライアントを認証するためのコマンドを実行します。(メモしたOutputsの ecr_repository を参照します。)
$ aws ecr get-login-password --region ap-northeast-1 | docker login --username AWS --password-stdin 123456789.dkr.ecr.ap-northeast-1.amazonaws.com
Login Succeeded と表示されれば、認証に成功しています。
Login Succeeded
Docker イメージを構築するコマンドを実行します。(メモしたOutputsの ecr_repository を参照します。)
$ docker build -t prefix-dev-sample-app .
下記コマンドで、このリポジトリにイメージをプッシュできるように、イメージにタグを付けます。(メモしたOutputsの ecr_repository を参照します。)
$ docker tag prefix-dev-sample-app:latest 123456789.dkr.ecr.ap-northeast-1.amazonaws.com/prefix-dev-sample-app:latest
このリポジトリにこのイメージをプッシュします。(メモしたOutputsの ecr_repository を参照します。)
$ docker push 123456789.dkr.ecr.ap-northeast-1.amazonaws.com/prefix-dev-sample-app:latest
イメージがプッシュされていることを確認します(メモしたOutputsの ecr_repository を参照します。)
$ aws ecr describe-repositories --repository-names prefix-dev-sample-app

{
    "repositories": [
        {
            "repositoryArn": "arn:aws:ecr:ap-northeast-1:123456789:repository/prefix-dev-sample-app",
            "registryId": "123456789",
            "repositoryName": "prefix-dev-sample-app",
            "repositoryUri": "123456789.dkr.ecr.ap-northeast-1.amazonaws.com/prefix-dev-sample-app",
            "createdAt": 123456789.0,
            "imageTagMutability": "MUTABLE",
            "imageScanningConfiguration": {
                "scanOnPush": false
            },
            "encryptionConfiguration": {
                "encryptionType": "AES256"
            }
        }
    ]
}
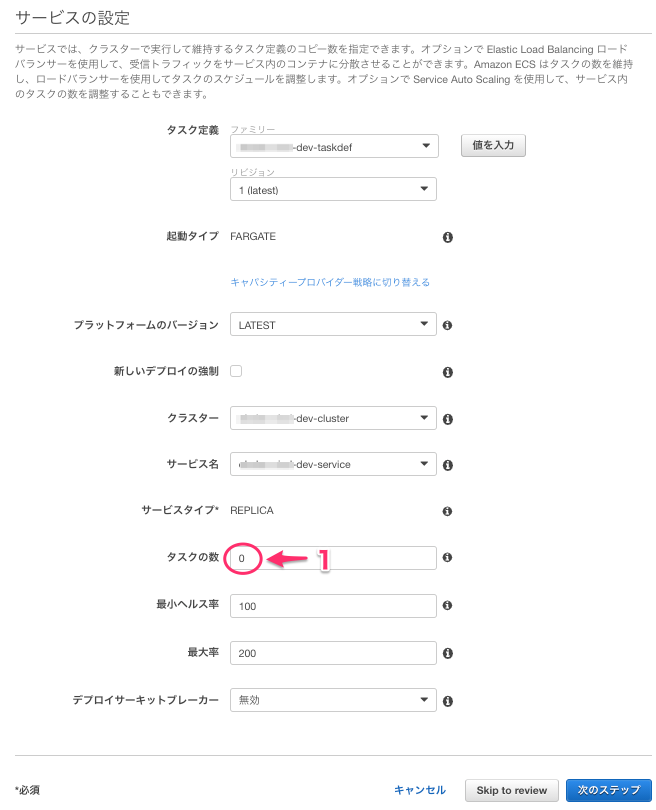
Terraform で構築した初期状態では、サービスのタスク数は 0 に設定されています。
ECSの管理コンソールからサービスの設定で、タスクの数を 1 増やして更新します。

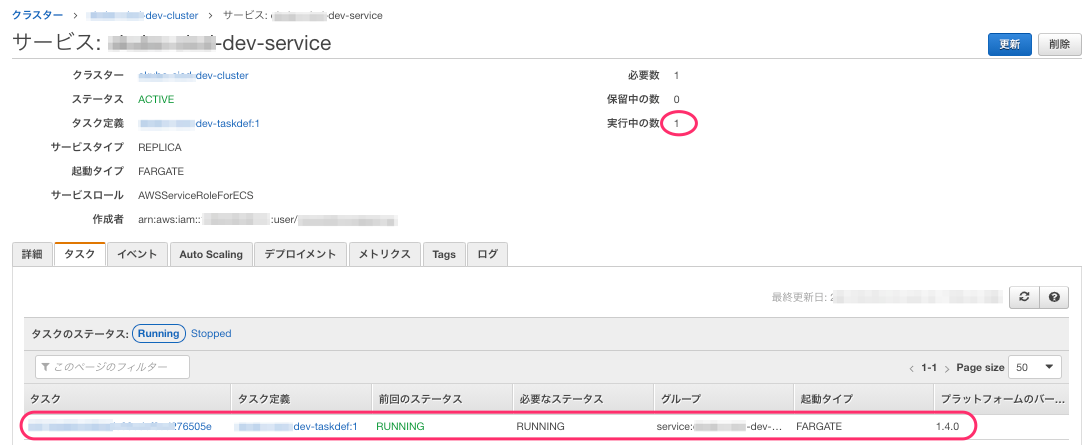
サービスを更新した後、サービスのタスクが起動していることを確認します。

curl コマンドを実行して、「Hello World v1」 と表示されることを確認します。(メモしたOutputsの url の値を参照します。)
$ curl https://sample-app.example.com
<!DOCTYPE html>
<html lang="ja">
<head>
<title>PHP Sample</title>
  </head>
  <body>
Hello World v1 </body>
下記コマンドを実行して、CodeCommit のリポジトリをクローンします。(メモしたOutputsの codecommit_repository の値を参照します。)
# ディレクトリの上へ
$ cd ..
$ git clone https://git-codecommit.ap-northeast-1.amazonaws.com/v1/repos/sample-app
Terraform のコード内のディレクトリ(default-sample-app)の各ファイルをクローンしたリポジトリにコピーします。
$ cp -r ./default-sample-app/* [クローンしたリポジトリ名]
index.phpファイルを「Hello World v2」に編集します。
$ cd sample-app/
$ vi ./src/index.php

<!DOCTYPE html>
<html lang="ja">
<head>
<title>PHP Sample</title>
  </head>
  <body>
<?php echo "Hello World v2"; ?> </body>
</html>
CodeCommitのリポジトリにプッシュします
$ git add -A

$ git status
On branch master

No commits yet

Changes to be committed:
  (use "git rm --cached <file>..." to unstage)

	new file:   Dockerfile
	new file:   buildspec.yml
	new file:   src/index.php

$ git commit -m "update index.php"
$ git push
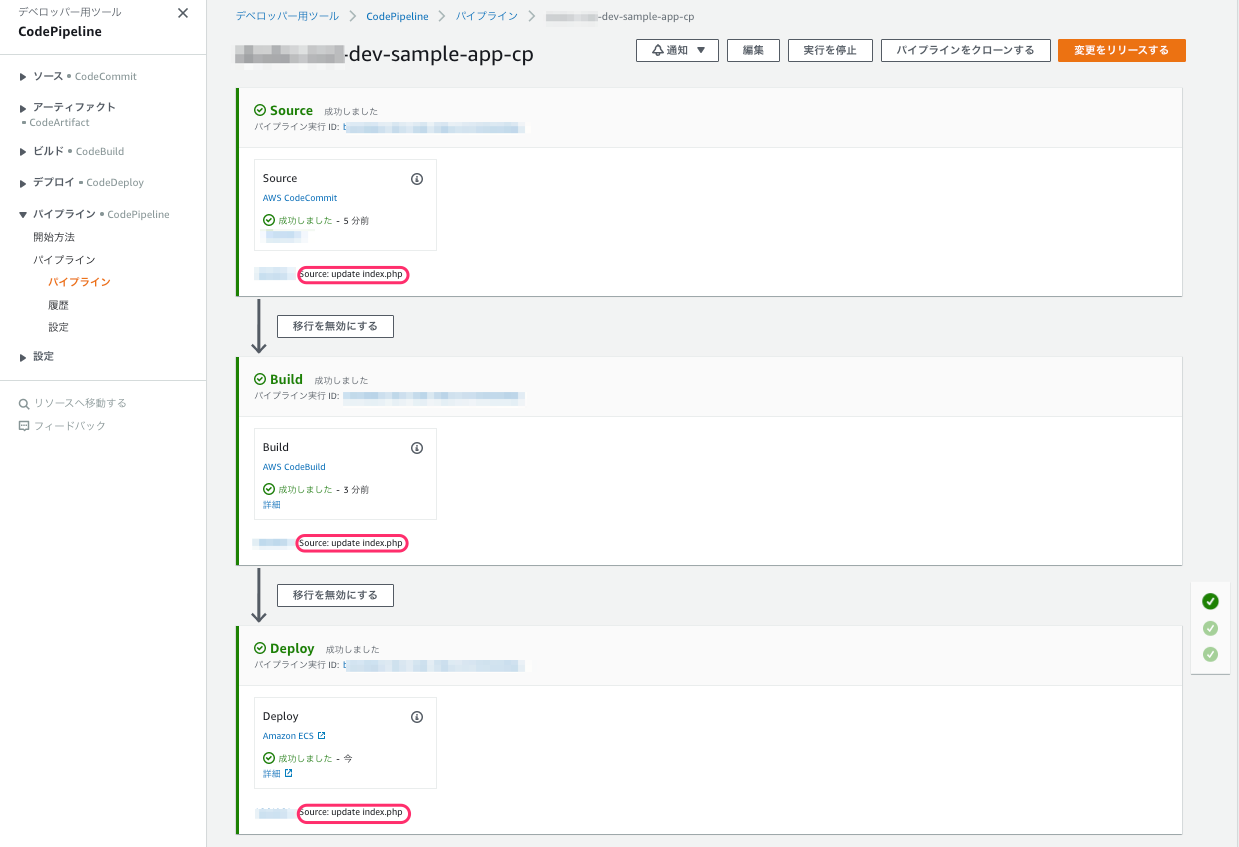
CodePipeline の管理コンソールからデプロイパイプラインが成功していることを確認します。

もう一度、curl コマンドを実行して、「Hello World v2」 と表示されれば環境の構築は完了です。
$ curl https://sample-app.example.com
<!DOCTYPE html>
<html lang="ja">
<head>
<title>PHP Sample</title>
  </head>
  <body>
Hello World v2 </body>
</html>
詳細は、管理コンソール上から各リソースの設定を確認して下さい。
後片付け
下記コマンドで、Terraform で作成したAWS環境を削除します。
$ terraform destroy
さいごに
少しでも初学者のFargateのCI/CDの学習に役立てれば幸いです。
