こんにちは。
株式会社クラスアクト インフラストラクチャ事業部の大塚です。
今回は、CodePipelineを使ってCI/CDパイプライン環境を構築していきたいと思います。
今回作る環境は以下のCodeBuild,Codedeployの環境を使っていきますので、こちらも併せてご覧頂ければと思います。
※正直勉強がてら触っているだけなので、細かいことは書けません。
構築イメージ
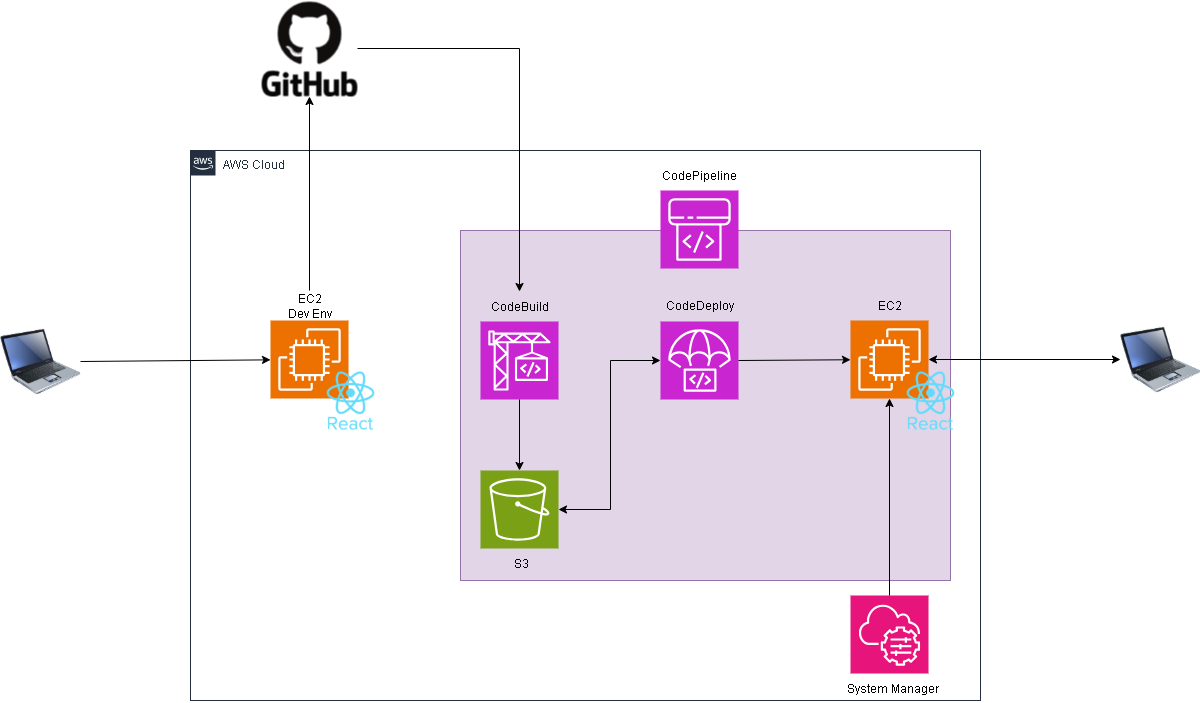
構築
開発用のEC2からgithubに資材アップロード
gitにアップロードするファイル構成を以下のようにしていきたいです。
その準備をしていきます。
my-react-app/
├── src/               # ★Reactのソースコード(開発はここで行う)
├── public/
├── package.json
├── vite.config.js
├── buildspec.yml      # CI/CD用ファイル
├── appspec.yml        # CI/CD用ファイル
└── scripts/           # CI/CD用ファイル
    ├── install_apache.sh
    └── start_server.sh
以下のコマンドを実行して、開発環境の準備をします。
まっさらなEC2(無料利用枠)をデプロイして、そこで環境用意をしています。
[ec2-user@ip-192-168-1-249 ~]$ sudo su -
[root@ip-192-168-1-249 ~]# dnf update && dnf upgrade -y
[root@ip-192-168-1-249 ~]# dnf install -y git
[root@ip-192-168-1-249 ~]# git clone https://github.com/ohtsuka-shota-se/app.git
[root@ip-192-168-1-249 ~]# cd app/
[root@ip-192-168-1-249 app]# ls
README.md  eslint.config.js  index.html  package-lock.json  package.json  public  src  vite.config.js
[root@ip-192-168-1-249 app]# curl -o- https://raw.githubusercontent.com/nvm-sh/nvm/v0.39.7/install.sh | bash
[root@ip-192-168-1-249 app]# source ~/.bashrc
[root@ip-192-168-1-249 app]# nvm install --lts
[root@ip-192-168-1-249 app]# node -v
v22.19.0
Reactでアプリを作ります。
[root@ip-192-168-1-249 app]# rm -rf *
[root@ip-192-168-1-249 app]# ls
[root@ip-192-168-1-249 app]# npm create vite@latest .
Need to install the following packages:
create-vite@7.1.3
Ok to proceed? (y) y


> npx
> create-vite .

x
◇  Current directory is not empty. Please choose how to proceed:
x  Remove existing files and continue
x
◇  Select a framework:
x  React
x
◇  Select a variant:
x  JavaScript
x
◇  Scaffolding project in /root/app...
x
m  Done. Now run:

  npm install
  npm run dev

npm notice
npm notice New major version of npm available! 10.9.3 -> 11.6.0
npm notice Changelog: https://github.com/npm/cli/releases/tag/v11.6.0
npm notice To update run: npm install -g npm@11.6.0
npm notice

[root@ip-192-168-1-249 app]# ls -ltr
total 20
drwxr-xr-x. 2 root root  22 Sep 23 01:04 public
-rw-r--r--. 1 root root 361 Sep 23 01:04 index.html
-rw-r--r--. 1 root root 763 Sep 23 01:04 eslint.config.js
-rw-r--r--. 1 root root 856 Sep 23 01:04 README.md
-rw-r--r--. 1 root root 161 Sep 23 01:04 vite.config.js
drwxr-xr-x. 3 root root  83 Sep 23 01:04 src
-rw-r--r--. 1 root root 600 Sep 23 01:04 package.json
[root@ip-192-168-1-249 app]# npm install
CodeBuildで使用するbuildspec.ymlを準備します。中身は以下とします。
[root@ip-192-168-1-249 app]# vi buildspec.yml
[root@ip-192-168-1-249 app]# cat buildspec.yml
version: 0.2

phases:
  install:
    runtime-versions:
      nodejs: 22
    commands:
      - echo "依存パッケージをインストールします..."
      - npm install

  build:
    commands:
      - echo "スクリプトに実行権限を付与します..."
      - chmod +x scripts/*.sh
      - echo "ビルドを開始します..."
      - npm run build

artifacts:
  files:
    - 'dist/**/*'
    - 'appspec.yml'
    - 'scripts/**/*'
次にCodeDeployで使用するappspec.ymlを準備します
[root@ip-192-168-1-249 app]# vi appspec.yml
[root@ip-192-168-1-249 app]# cat appspec.yml
version: 0.0
os: linux
files:
  - source: /dist/  # アーティファクト内の「dist」ディレクトリをソースに指定
    destination: /var/www/html
hooks:
  AfterInstall:
    - location: scripts/install_apache.sh
      timeout: 300
      runas: root
  ApplicationStart:
    - location: scripts/start_server.sh
      timeout: 300
      runas: root
scriptを2つ用意します。
[root@ip-192-168-1-249 app]# mkdir scripts
[root@ip-192-168-1-249 app]# cd scripts/
[root@ip-192-168-1-249 scripts]# vi install_apache.sh
[root@ip-192-168-1-249 scripts]# vi start_server.sh
[root@ip-192-168-1-249 scripts]# cat install_apache.sh
#!/bin/bash
# エラーが発生したらスクリプトを停止する
set -e

echo "Installing Apache (httpd)..."
sudo yum update -y
sudo yum install -y httpd

[root@ip-192-168-1-249 scripts]# cat start_server.sh
#!/bin/bash
set -e

echo "Starting Apache (httpd)..."
# httpdを有効化して、OS起動時に自動で起動するようにする
sudo systemctl enable httpd
# httpdを起動する
sudo systemctl start httpd
githubにpushします。
[root@ip-192-168-1-249 app]# git add .
[root@ip-192-168-1-249 app]# git commit -m "first-push"
[root@ip-192-168-1-249 app]# git push origin main
Username for 'https://github.com': ohtsuka-shota-se
Password for 'https://ohtsuka-shota-se@github.com':
Enumerating objects: 14, done.
Counting objects: 100% (14/14), done.
Compressing objects: 100% (10/10), done.
Writing objects: 100% (10/10), 9.28 KiB | 3.09 MiB/s, done.
Total 10 (delta 3), reused 0 (delta 0), pack-reused 0 (from 0)
remote: Resolving deltas: 100% (3/3), completed with 3 local objects.
To https://github.com/ohtsuka-shota-se/app.git
   daf8a93..694fa85  main -> main
CodePipelineのデプロイ先のEC2を準備する
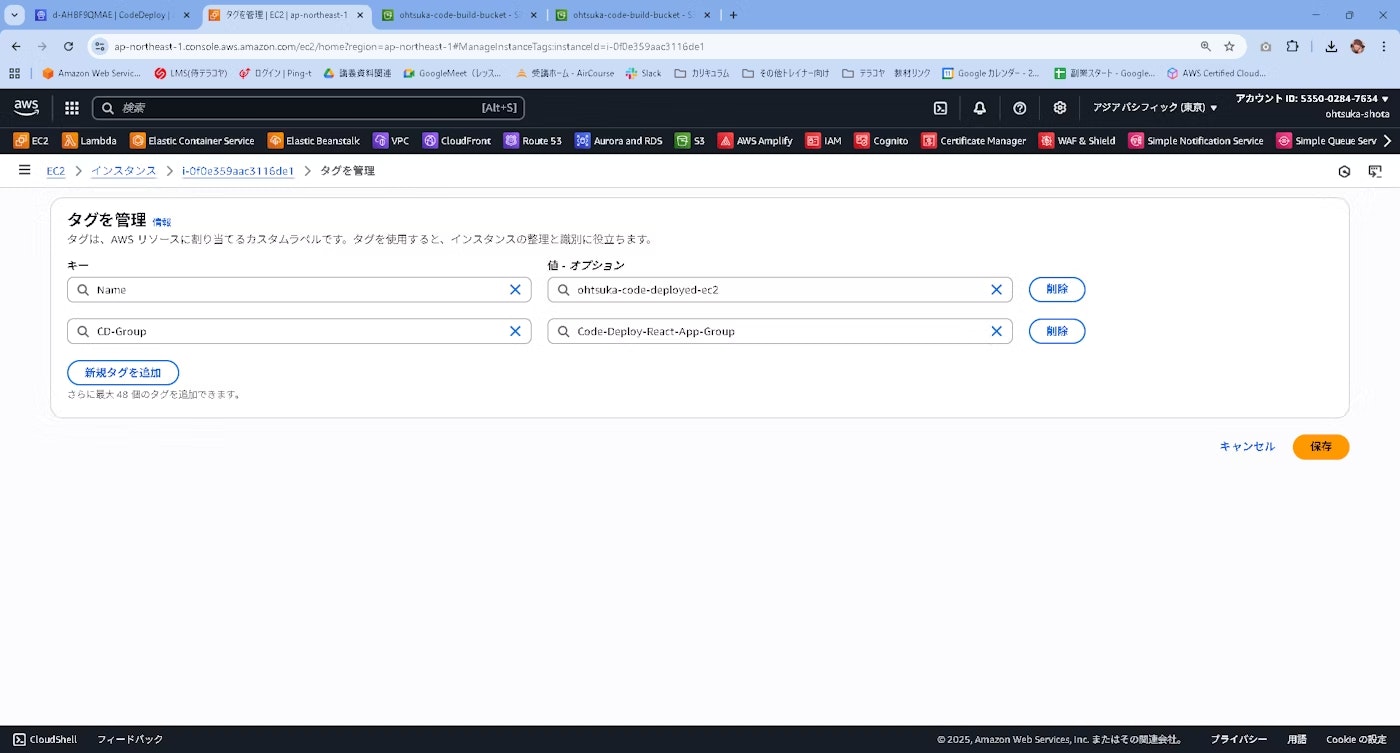
こちらも無料枠で立ち上げます。立ち上げる際にAmazonS3FullAccessとAmazonSSMManagedInstanceCoreを持ったIAM Roleを紐づておきます。

また、タグを紐づけておきます。このタグがCodePipelineで使用するCodeDeployと連携できるものを指定します。
私の今までの環境であればCD-Group:Code-Deploy-React-App-Groupとなります。
Fleet Managerで対象のEC2を認識させ、CodeDeployAgentをインストールさせます。
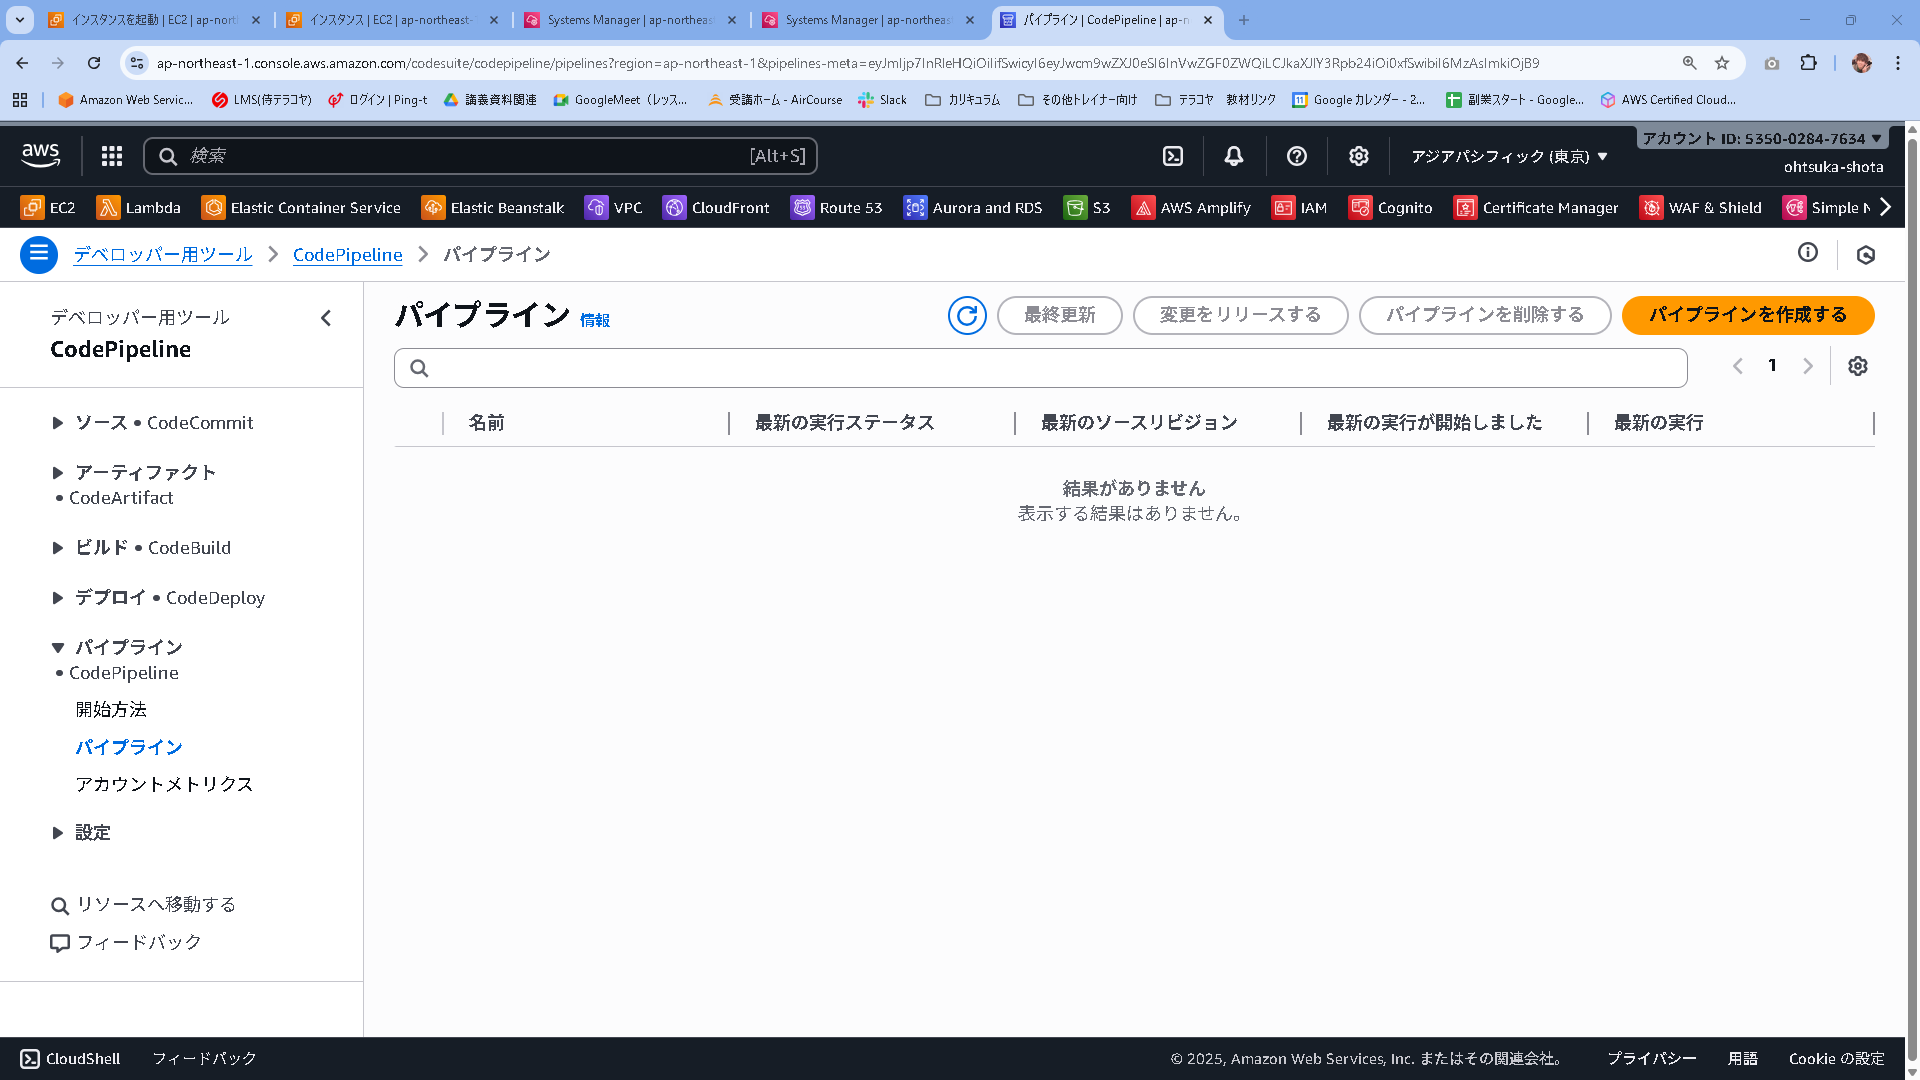
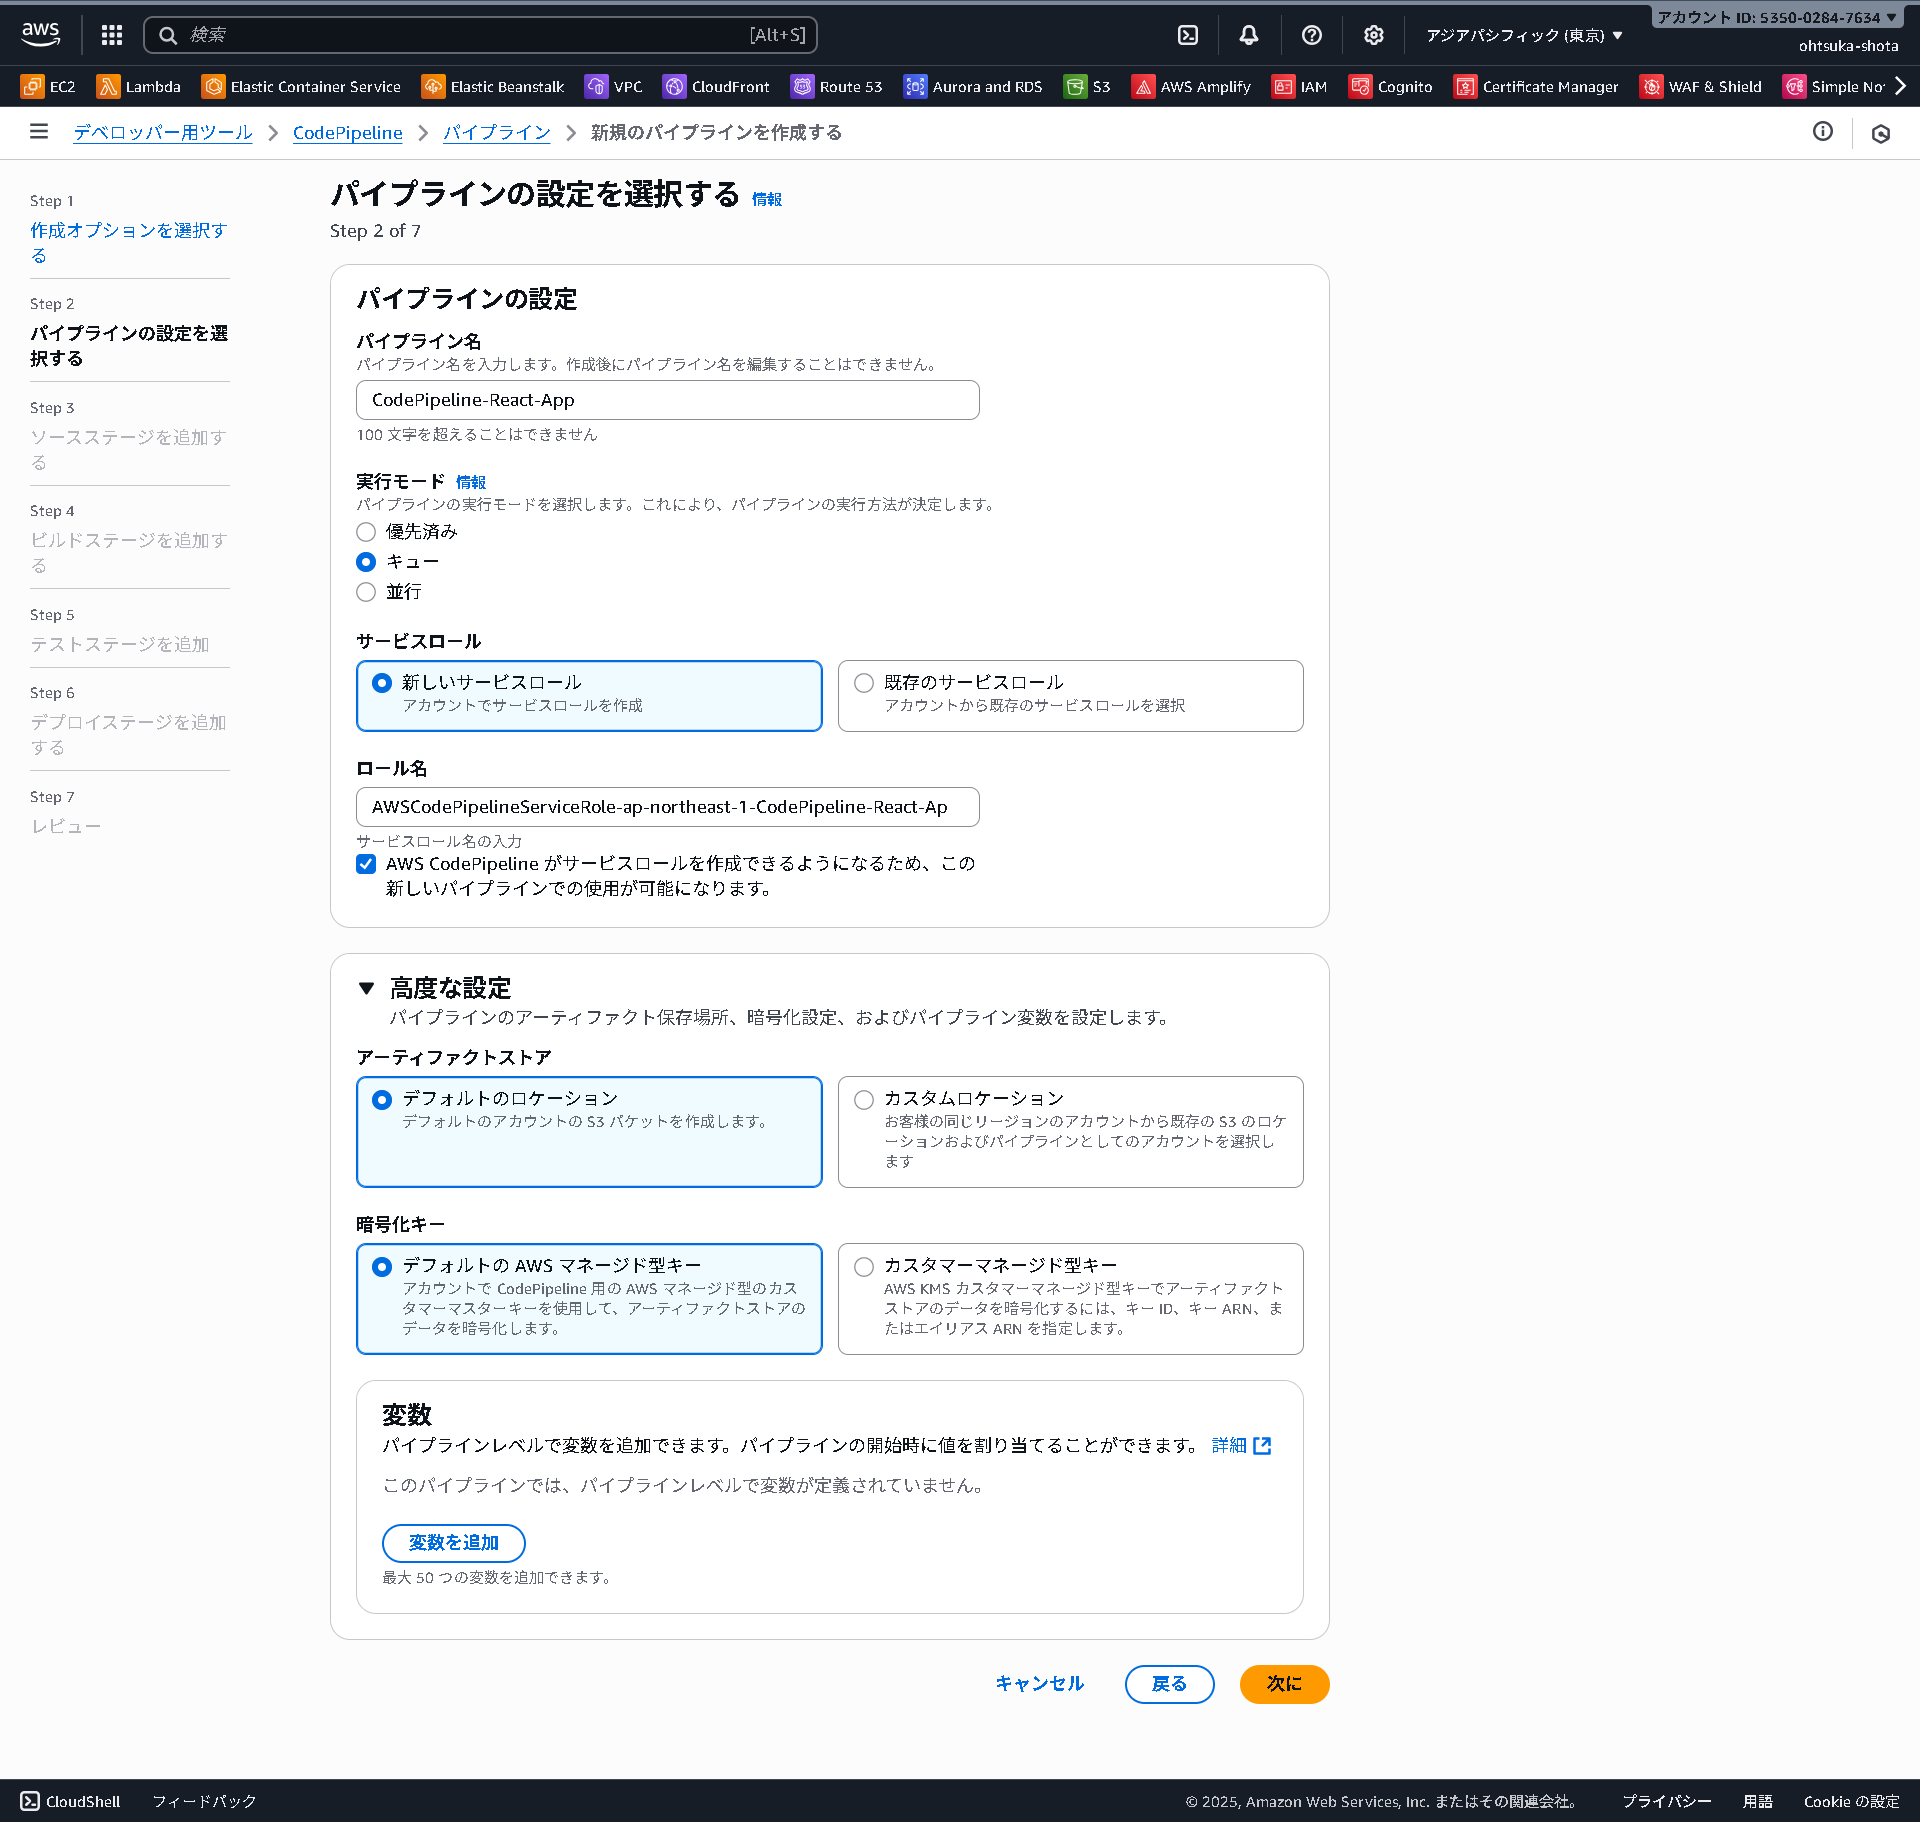
CodePipelineの環境作成
CodePipelineの管理画面に移動して、パイプラインを作成するを押下します。
カスタムパイプラインを選択して次に進みます。

今回作成するパイプラインの名前等を決めていきます。
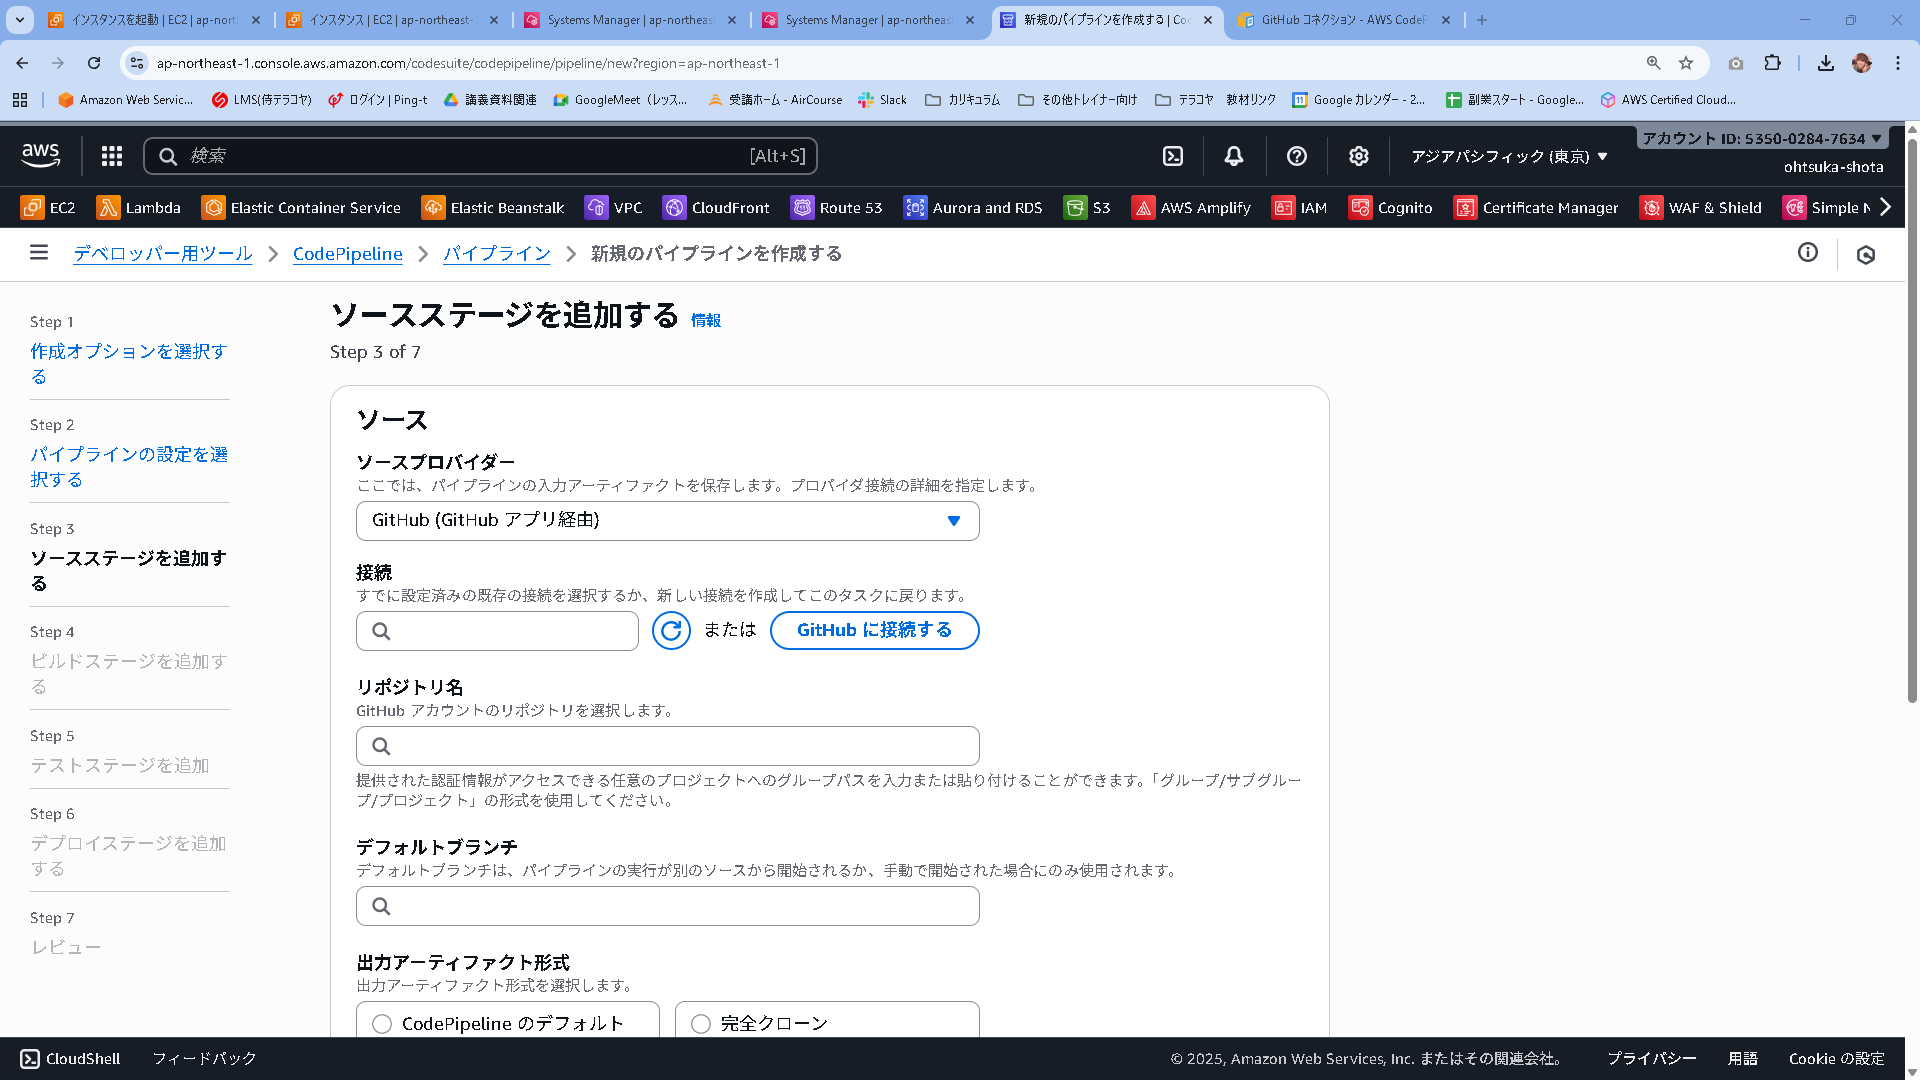
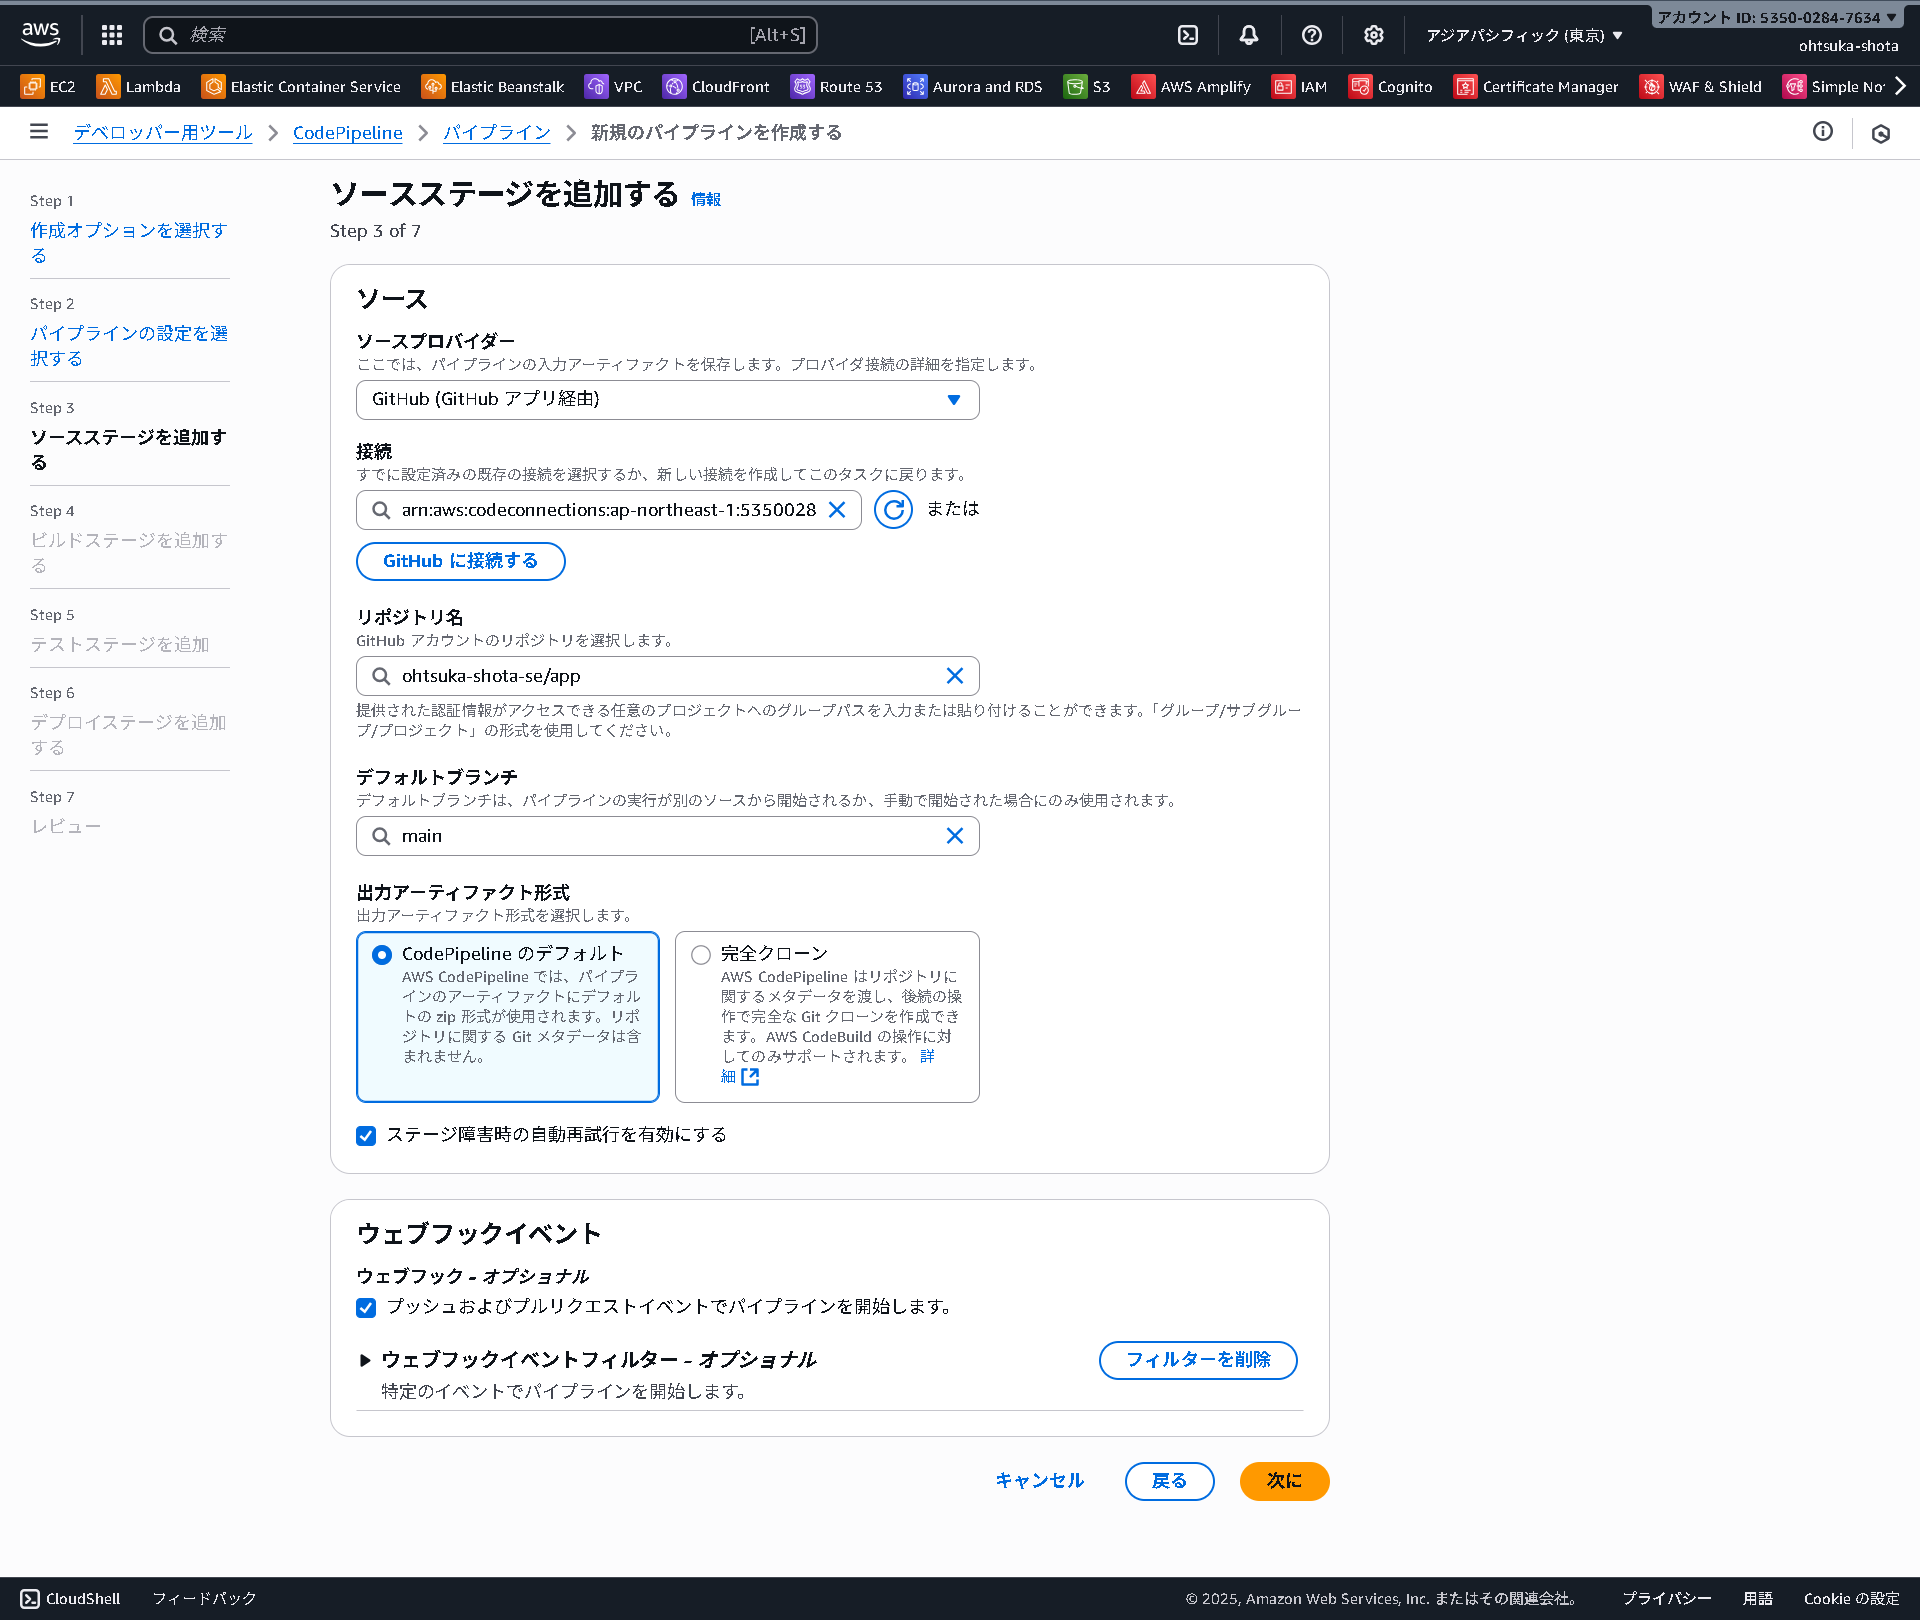
ソースを設定していきます。
CodeBuildの時に設定した内容が残っているようであればそれを使ってGithubと連携するようにします。
もし設定が無いようであればGithubに接続するボタンを押下します。
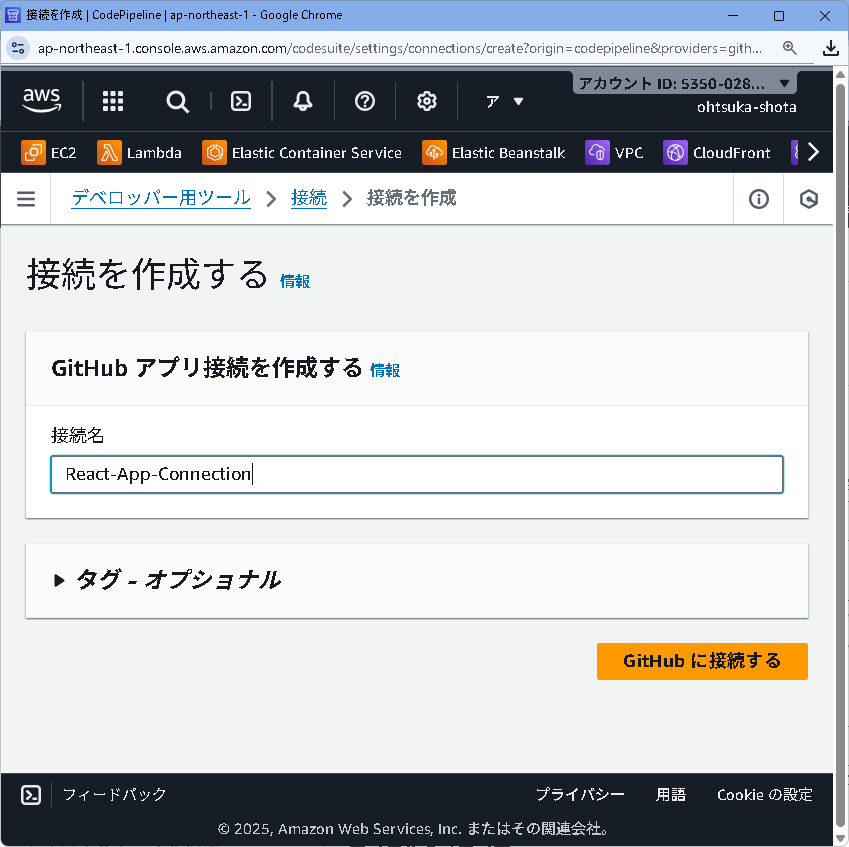
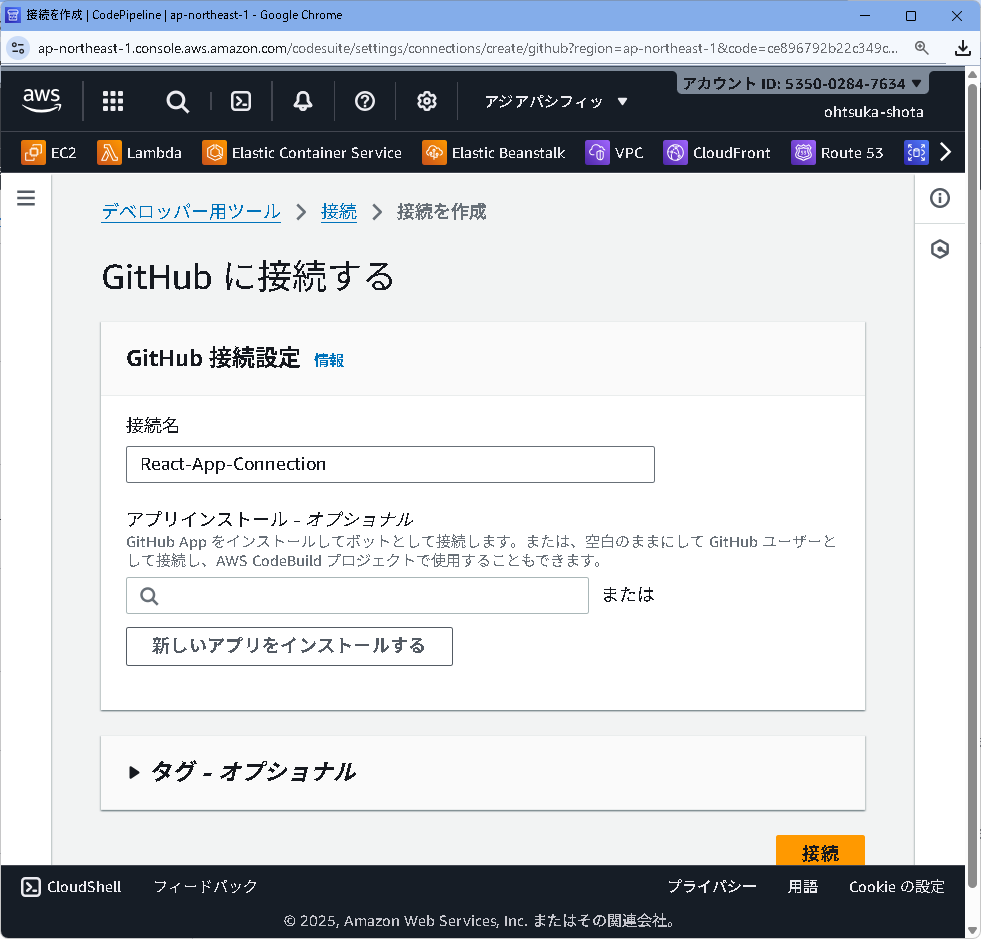
任意の名前を設定して接続するを押下します。
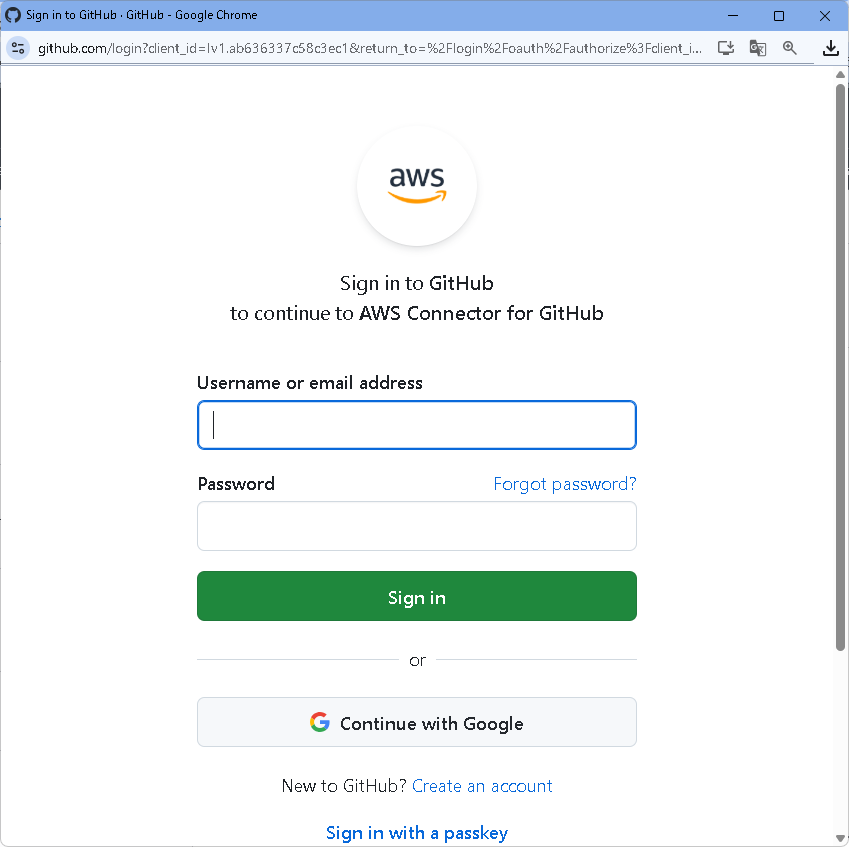
ログインが求められます。
Githubにログインするための情報を入力します。
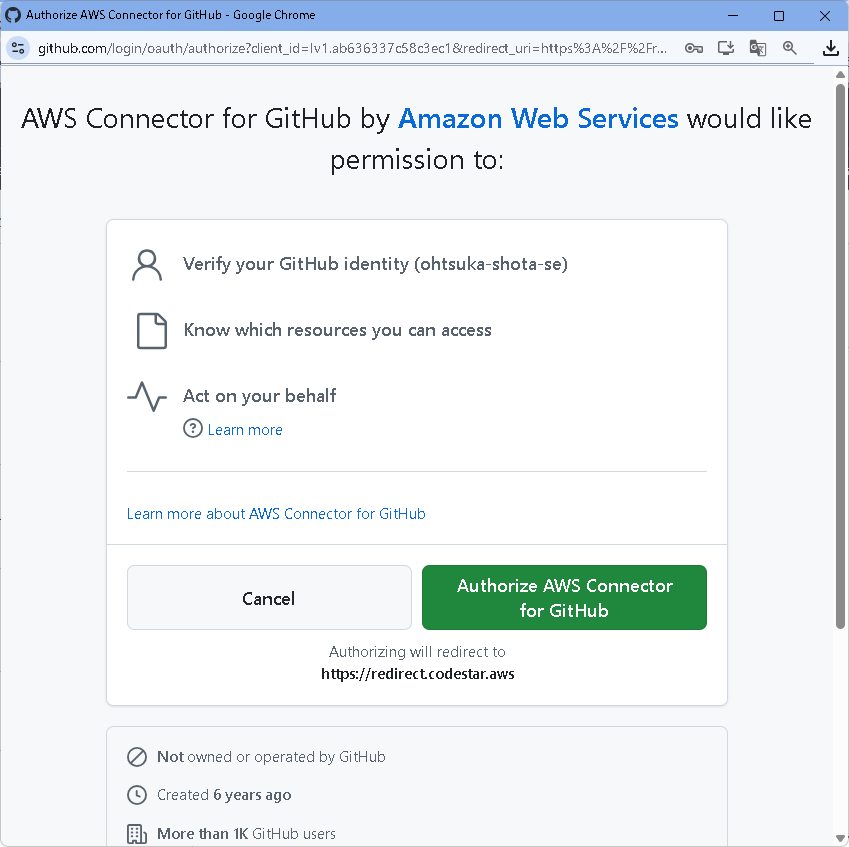
設定が完了したたら改めて接続するを押下します。
Githubと連携がうまくいくと、リポジトリ・ブランチが設定できるようになります。
設定して次に進みます。
ビルドステージの設定をしていきます。
その他のプロバイダーを選択し、CodeBuildを押下。プロジェクト名は以前作成したものを設定しておきます。
buildspecのオーバーライドにチェックを入れ、buildspec.ymlを指定します。
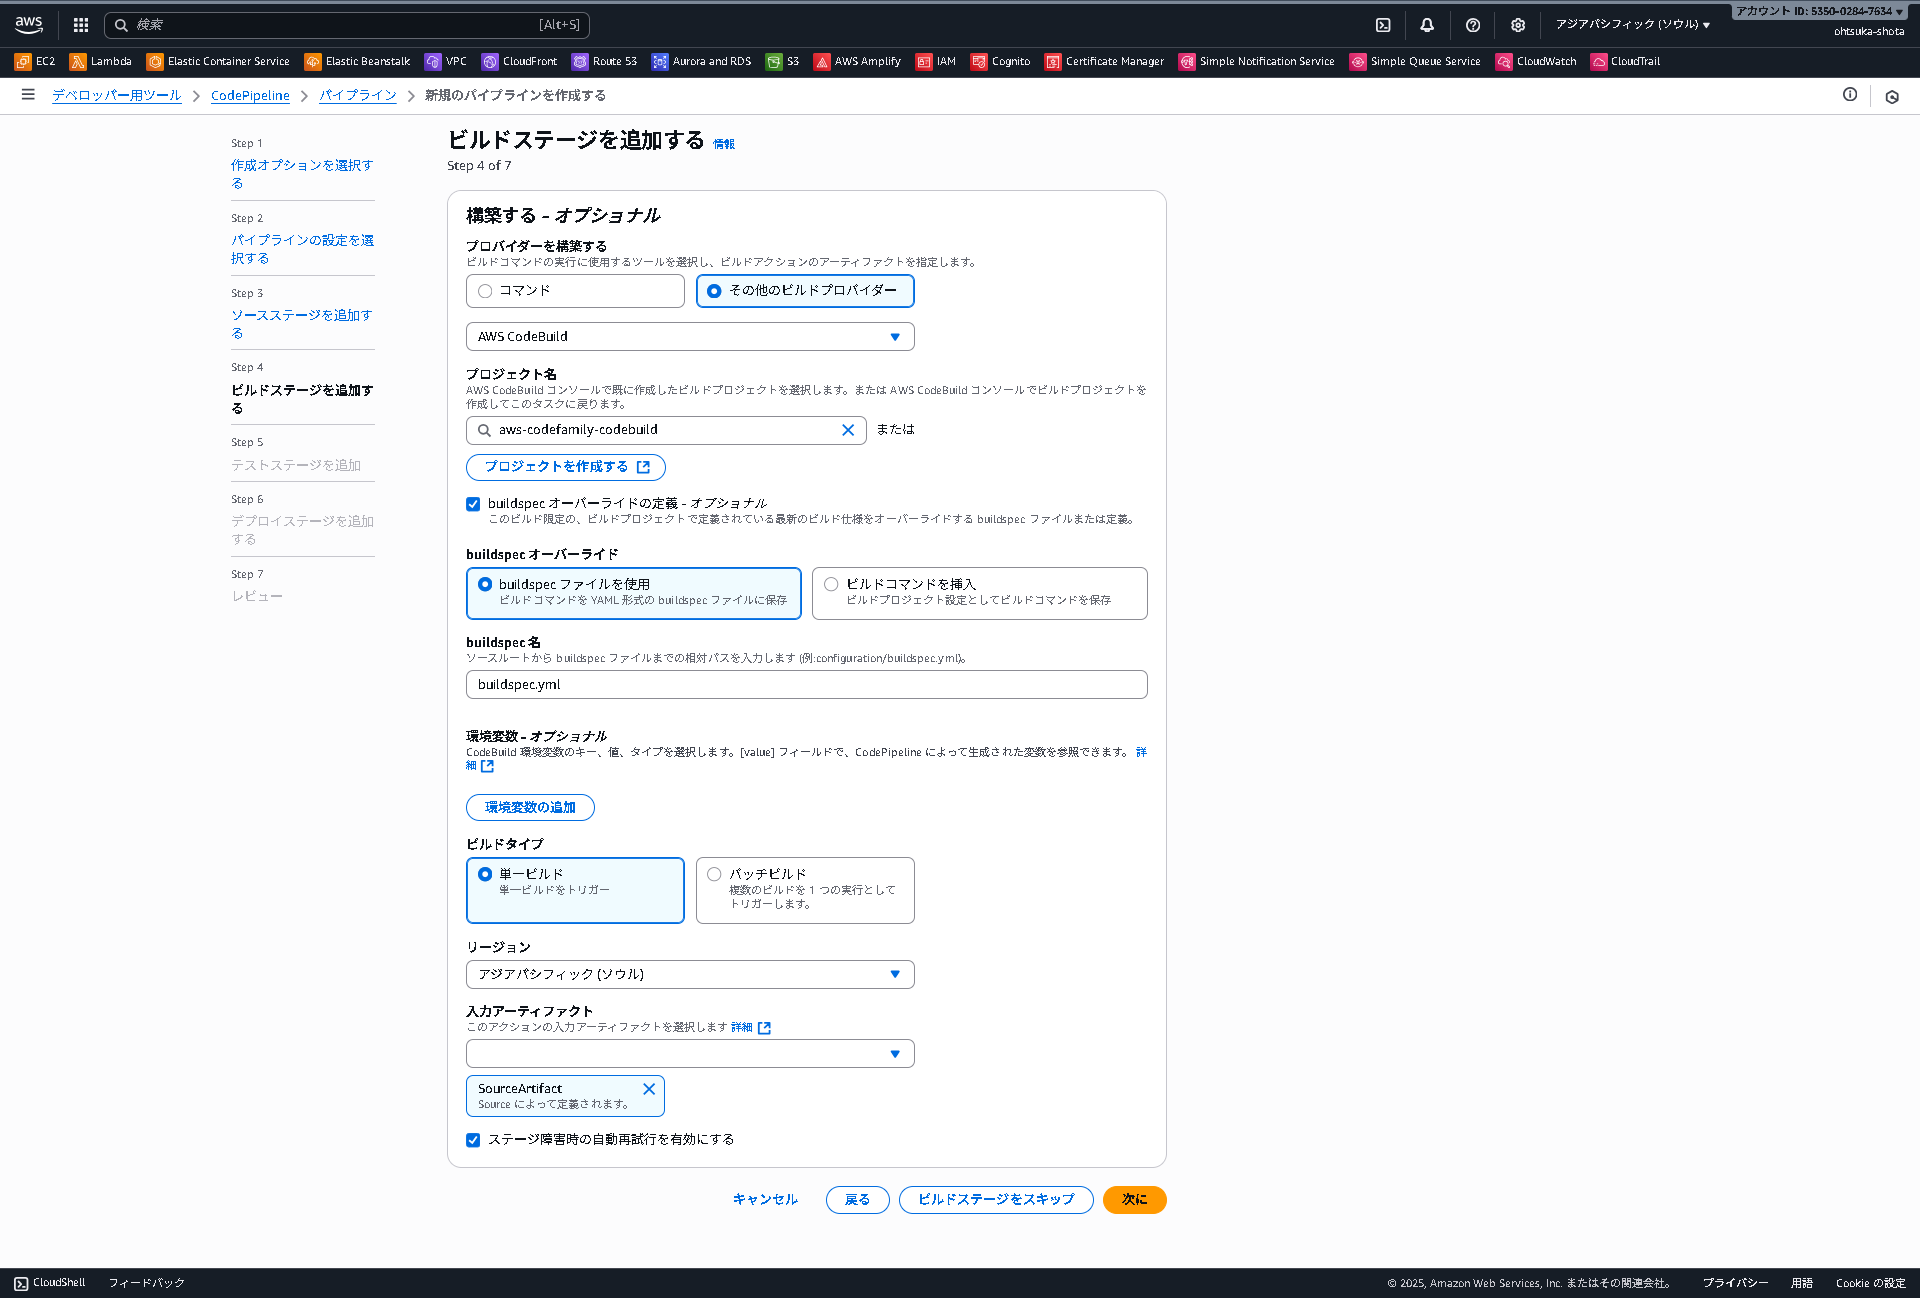
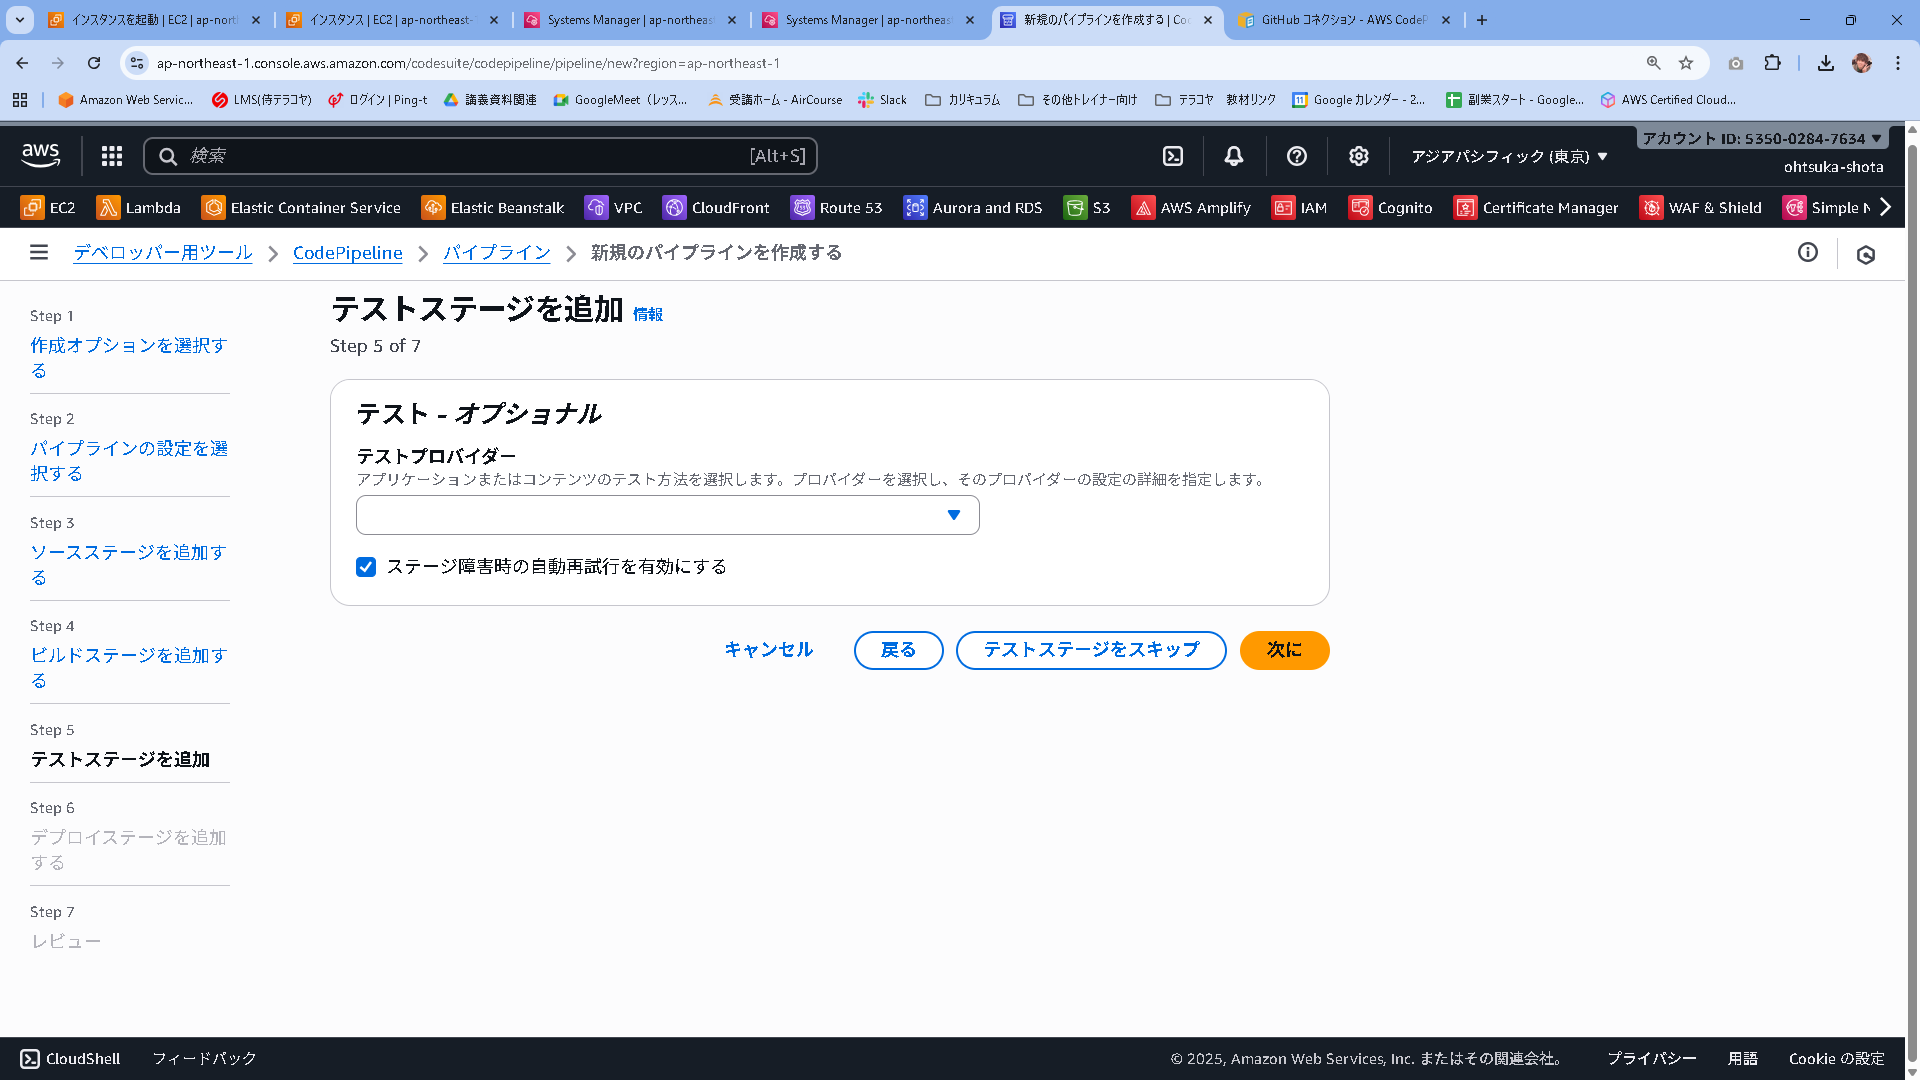
テストステージはスキップして次に進みます。
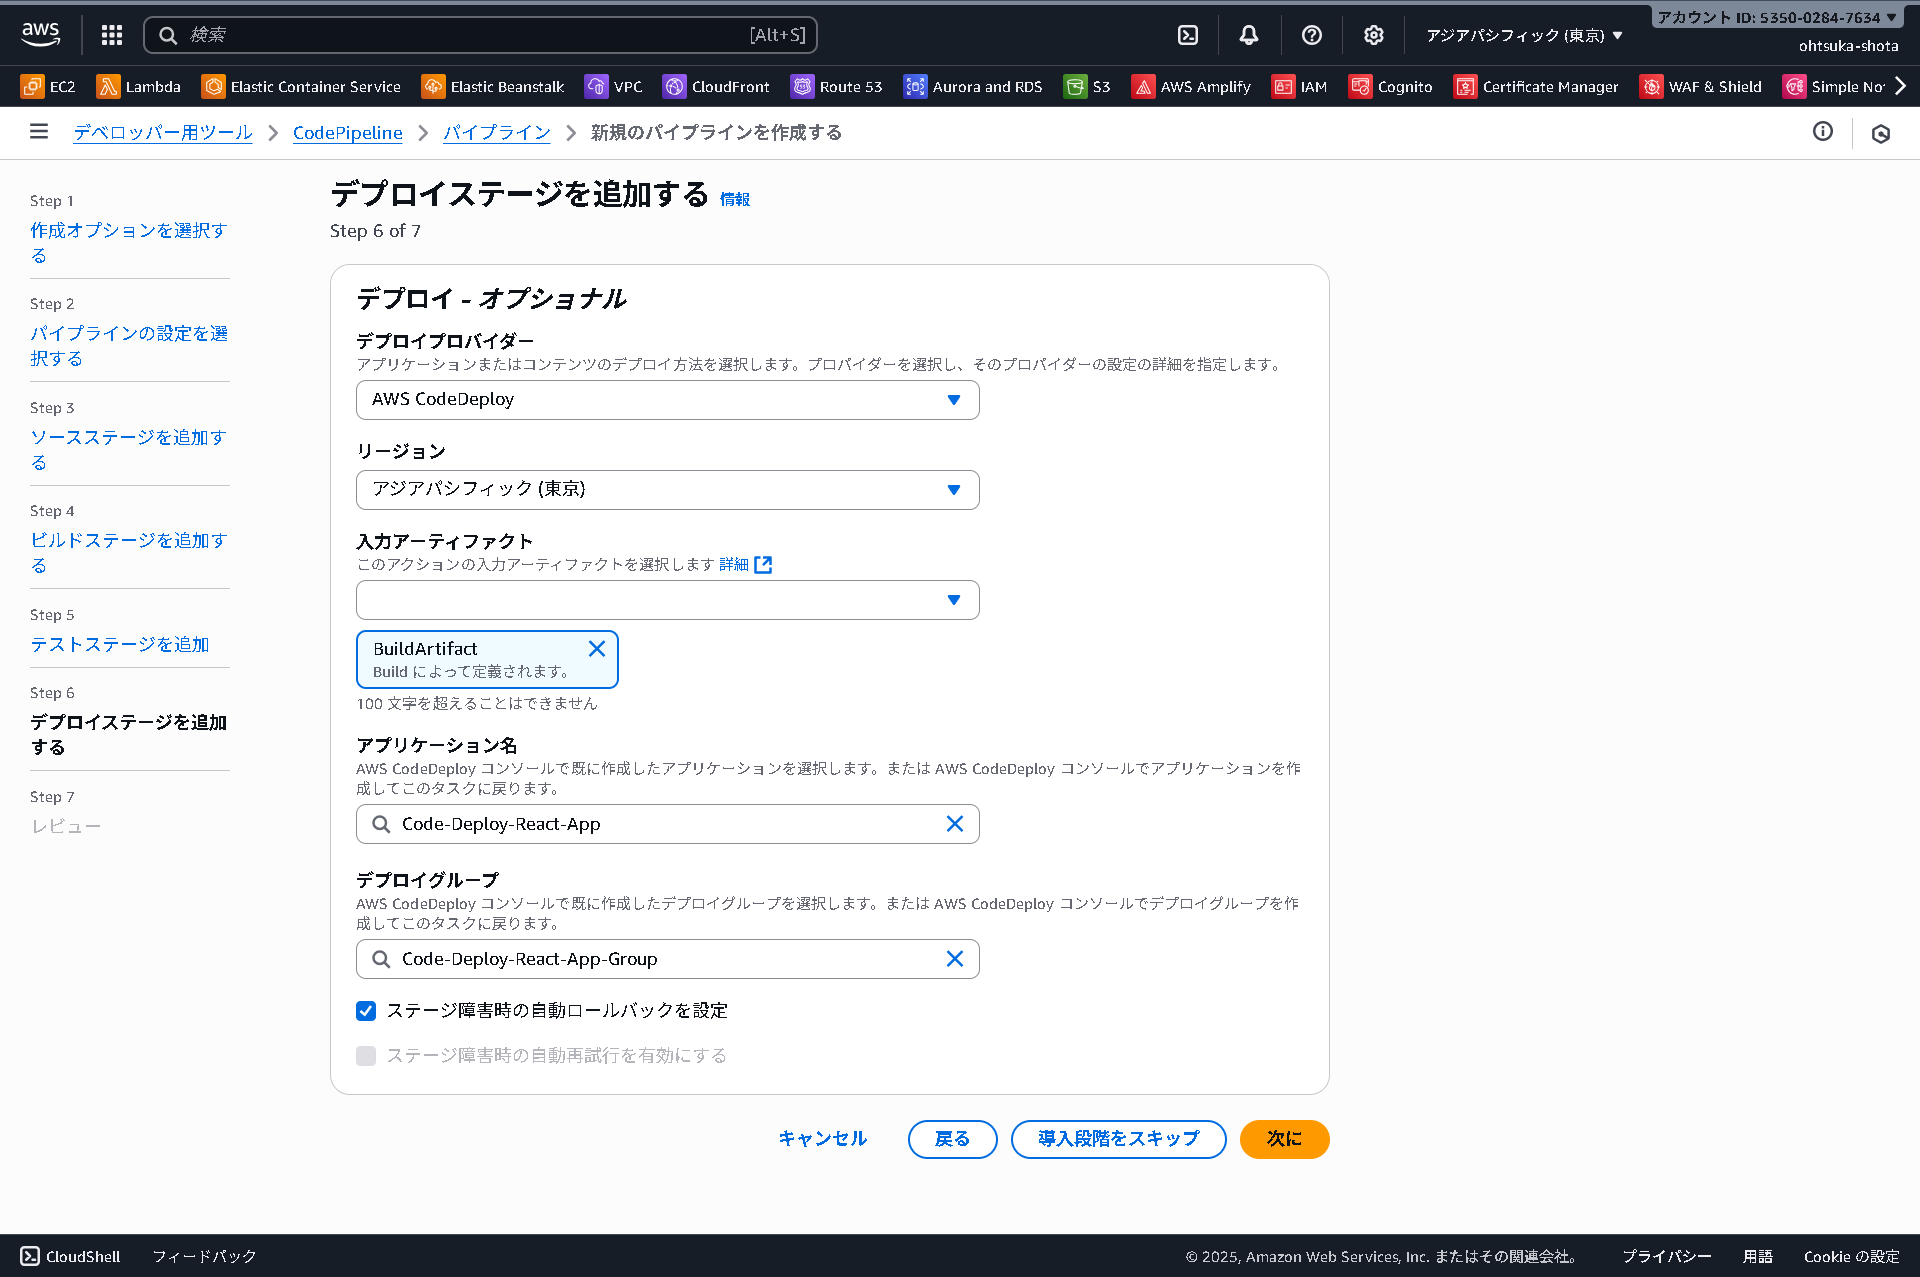
デプロイステージを設定していきます。
プロバイダーにCodeDeployをしちぇいして、アプリケーション名・デプロイグループは以前作成したものを指定します。
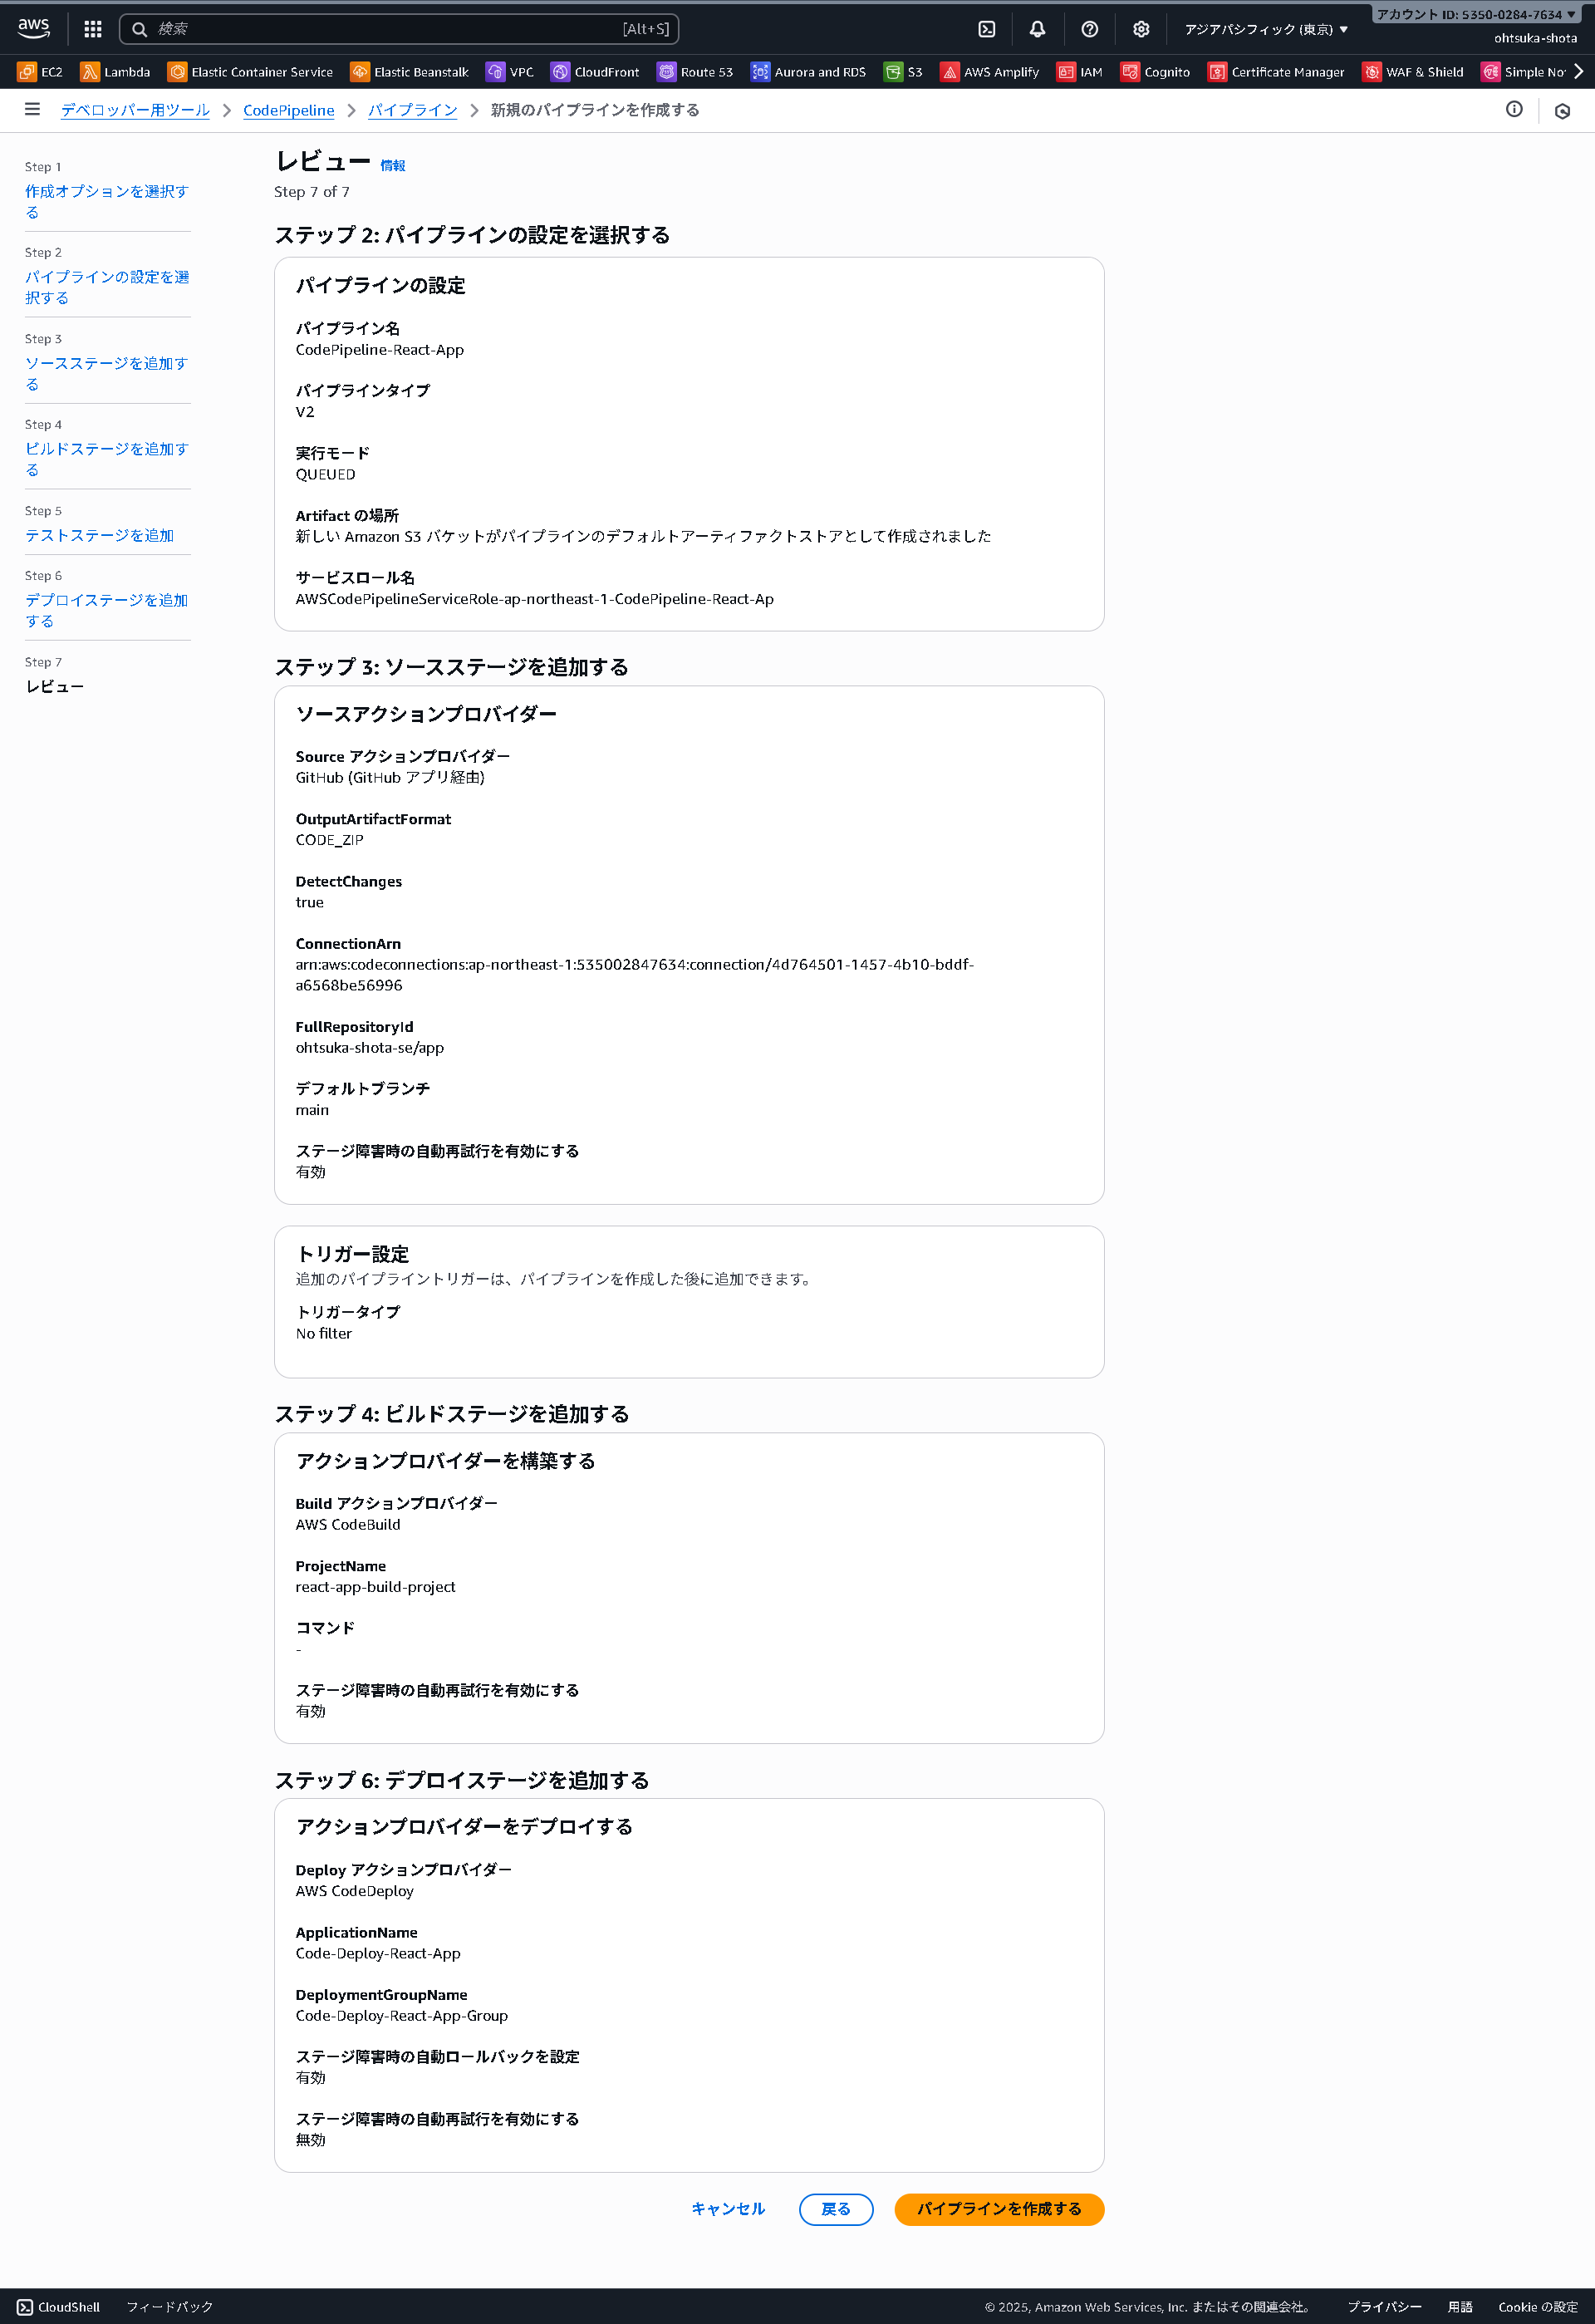
設定した内容を確認して、作成していきます。
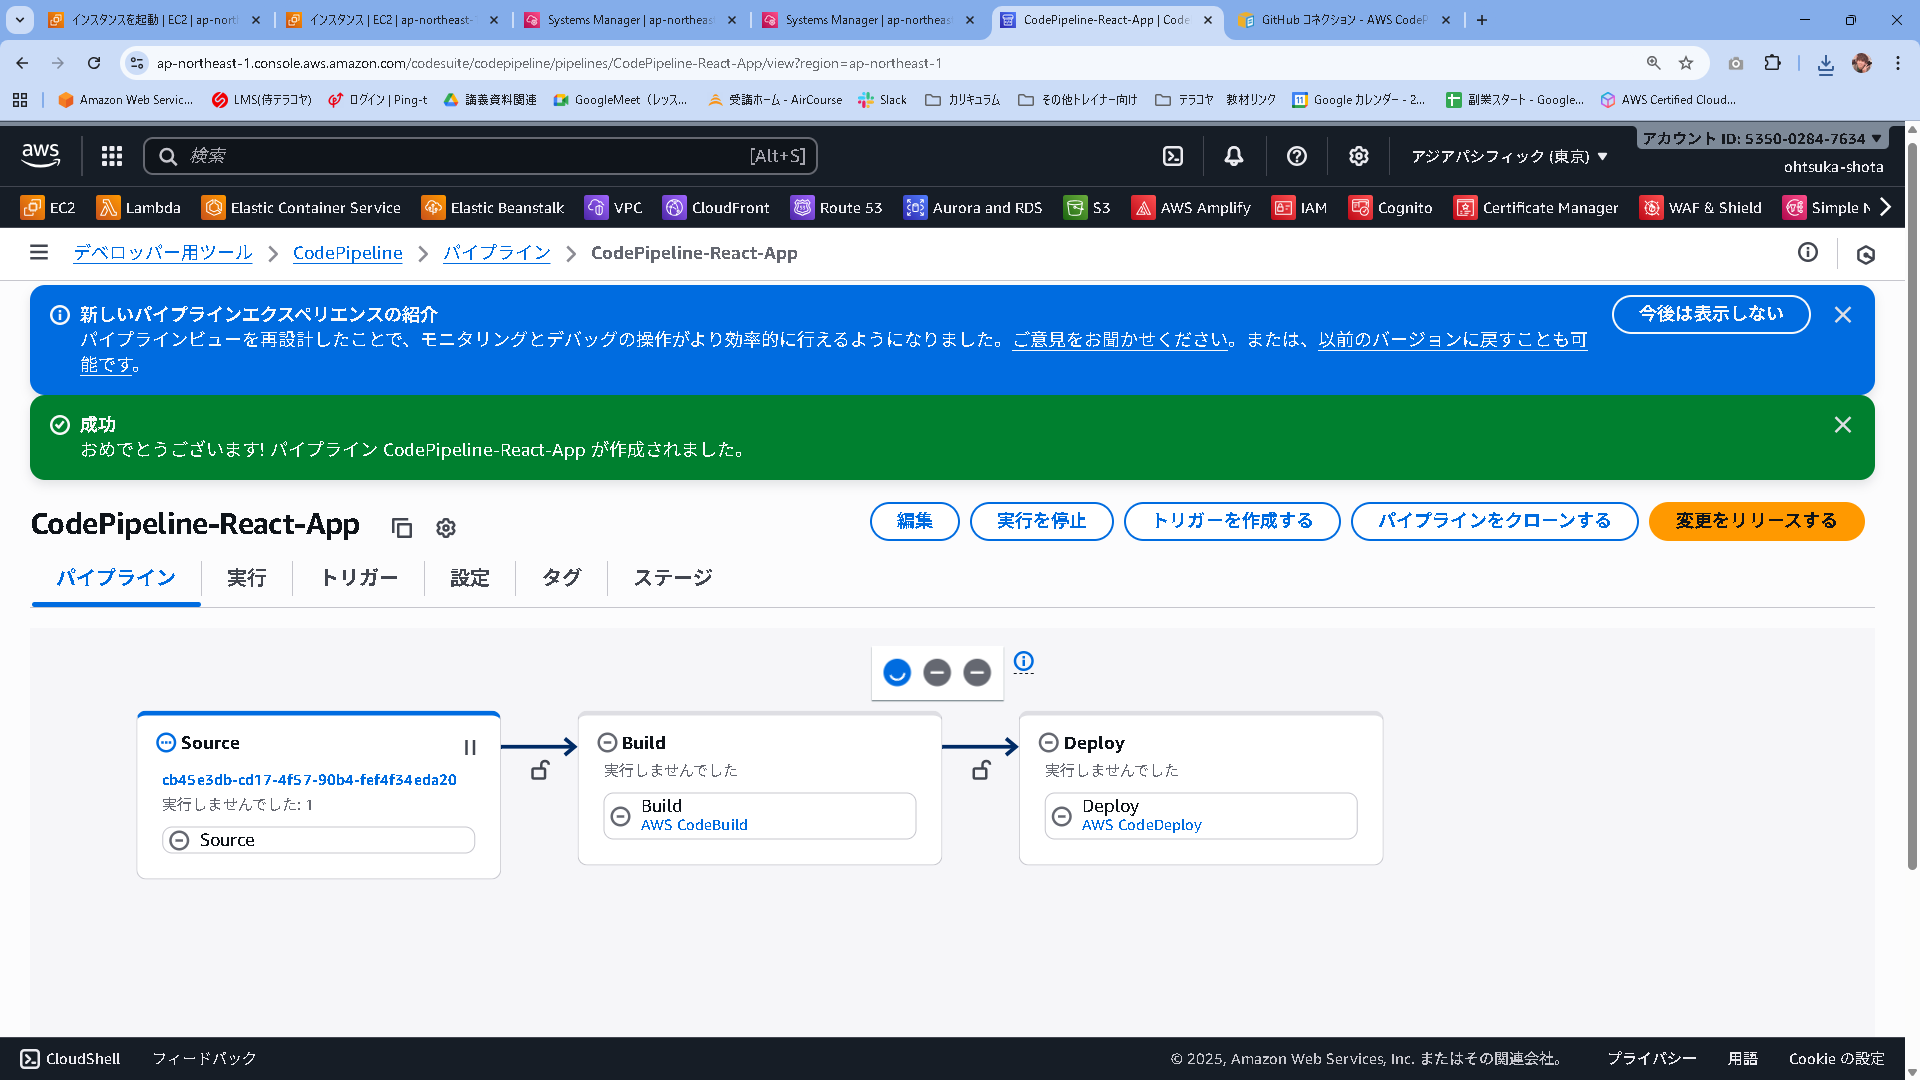
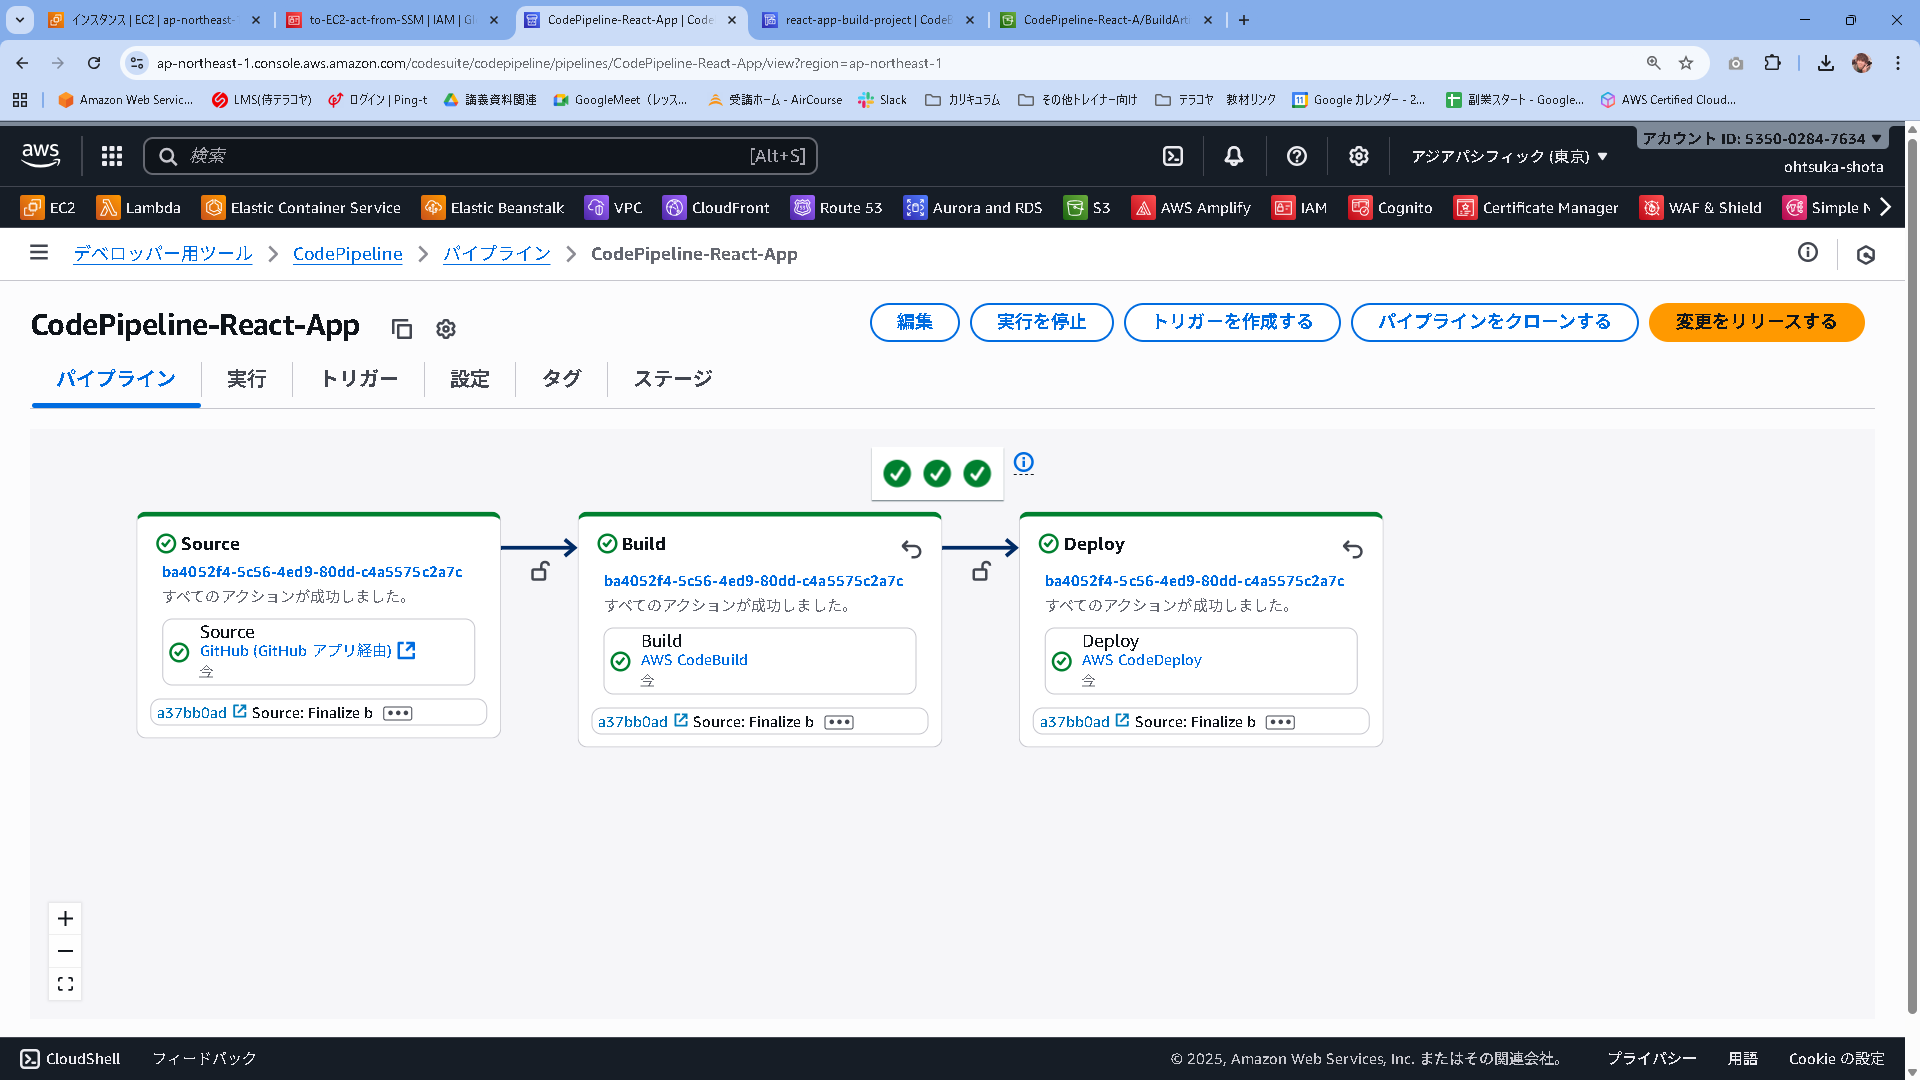
パイプラインが作成されました。
既にGithubにコードが用意されているので、Pipelineがトリガーされて自動実行されます。
正常に完了すると以下のようになります。
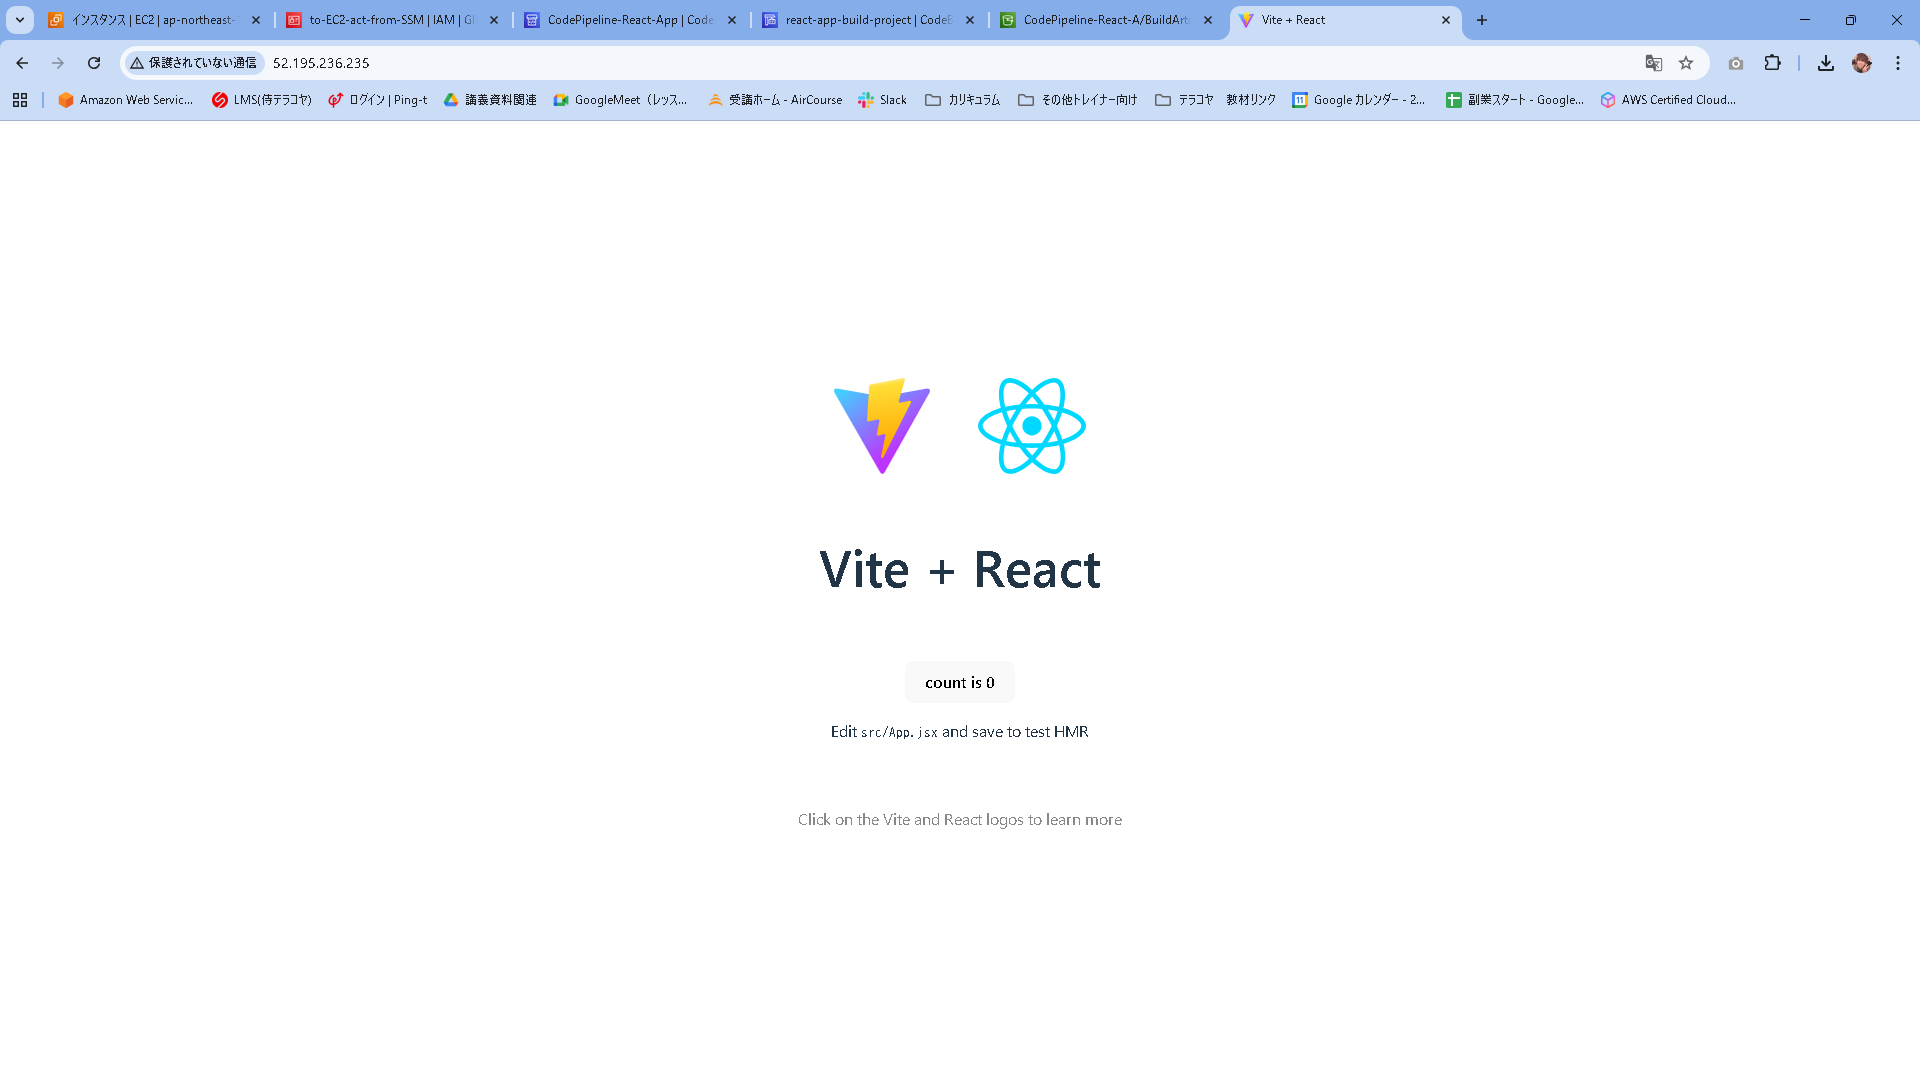
EC2にWebブラウジングすると以下のように表示されると思います