はじめに
| 名前 | 開発企業 | 特徴 | パラメーター数 | モデルサイズ | HuggingFaceリンク |
|---|---|---|---|---|---|
| Phi-3.5-vision-instruct | Microsoft | 軽量で高性能、マルチモーダル対応 | 4.2B | ~9GB | microsoft/Phi-3.5-vision-instruct |
| Qwen2-VL-2B-Instruct | Alibaba (Qwen Team) | 超軽量、日本語良好、動画対応 | 2B | ~4GB | Qwen/Qwen2-VL-2B-Instruct |
| Qwen2-VL-7B-Instruct | Alibaba (Qwen Team) | 高性能、日本語良好、動画対応 | 7B | ~15GB | Qwen/Qwen2-VL-7B-Instruct |
| LLaVA-1.5-7B | Microsoft/LLaVA Team | 最も有名、豊富なドキュメント | 7B | ~14GB | llava-hf/llava-1.5-7b-hf |
| LLaVA-1.5-13B | Microsoft/LLaVA Team | 高精度(量子化推奨) | 13B | ~26GB | llava-hf/llava-1.5-13b-hf |
| InternVL2-2B | OpenGVLab/Shanghai AI Lab | 超軽量で高精度、マルチタスク | 2B | ~4GB | OpenGVLab/InternVL2-2B |
| InternVL2-8B | OpenGVLab/Shanghai AI Lab | 高性能、マルチタスク対応 | 8B | ~16GB | OpenGVLab/InternVL2-8B |
| MobileVLM-3B | MobileVLM Team | モバイル最適化、高速推論 | 3B | ~6GB | mtgv/MobileVLM-3B |
| Florence-2-large | Microsoft | OCR・物体検出特化、超高速 | 0.77B | ~1.5GB | microsoft/Florence-2-large |
| Florence-2-base | Microsoft | 超軽量、タスク特化型 | 0.23B | ~0.5GB | microsoft/Florence-2-base |
| PaliGemma-3B | 多言語対応、シンプル設計 | 3B | ~6GB | google/paligemma-3b-mix-448 | |
| CogVLM2-llama3-chat-19B | Zhipu AI/Tsinghua | 高精度(量子化必須) | 19B | ~38GB | THUDM/cogvlm2-llama3-chat-19B |
| Molmo-7B-D | Allen Institute for AI | 最新、高品質応答 | 7B | ~14GB | allenai/Molmo-7B-D-0924 |
| Video-LLaVA-7B | PKU | 動画理解に特化 | 7B | ~14GB | LanguageBind/Video-LLaVA-7B-hf |
| Sarashina2-vision-8B | SB Intuitions (日本) | 日本語特化VLM、高精度 | 8B | ~16GB | sbintuitions/sarashina2-vision-8b |
Phi-3.5-vision
# Google Colab用 Phi-3.5-vision-instruct 実行コード (修正版)
# ========================================

# 1. 必要なライブラリのインストール (特定バージョン)
print("📦 ライブラリをインストール中...")
!pip install -q torch torchvision pillow accelerate
!pip install -q transformers==4.43.0  # 互換性のあるバージョンを指定

# 2. ライブラリのインポート
print("📚 ライブラリをインポート中...")
import torch
from transformers import AutoModelForCausalLM, AutoProcessor
from PIL import Image
import requests
from io import BytesIO

# 3. デバイスの設定
print("🖥️ デバイスを設定中...")
device = "cuda" if torch.cuda.is_available() else "cpu"
print(f"使用デバイス: {device}")

# 4. モデルとプロセッサの読み込み
print("🤖 モデルを読み込み中... (数分かかる場合があります)")
model_id = "microsoft/Phi-3.5-vision-instruct"

# プロセッサの読み込み
processor = AutoProcessor.from_pretrained(
    model_id,
    trust_remote_code=True
)

# モデルの読み込み
model = AutoModelForCausalLM.from_pretrained(
    model_id,
    device_map="auto",
    torch_dtype=torch.float16,
    trust_remote_code=True,
    _attn_implementation='eager'
)

print("✅ モデルの読み込みが完了しました!")

# 5. 画像の読み込み関数
def load_image(image_source):
    """URLまたはローカルパスから画像を読み込む"""
    if image_source.startswith('http://') or image_source.startswith('https://'):
        response = requests.get(image_source)
        image = Image.open(BytesIO(response.content))
    else:
        image = Image.open(image_source)
    return image

# 6. 推論関数 (修正版)
def generate_response(image_source, prompt, max_new_tokens=500):
    """画像とプロンプトから応答を生成"""
    # 画像の読み込み
    image = load_image(image_source)

    # メッセージの作成
    messages = [
        {
            "role": "user",
            "content": f"<|image_1|>\n{prompt}"
        }
    ]

    # プロンプトの作成
    prompt_text = processor.tokenizer.apply_chat_template(
        messages,
        tokenize=False,
        add_generation_prompt=True
    )

    # 入力の準備
    inputs = processor(
        prompt_text,
        [image],
        return_tensors="pt"
    ).to(device)

    # 推論 (use_cache=Falseに設定してキャッシュ問題を回避)
    print("🔮 推論中...")
    with torch.no_grad():
        generate_ids = model.generate(
            **inputs,
            max_new_tokens=max_new_tokens,
            eos_token_id=processor.tokenizer.eos_token_id,
            use_cache=False,  # キャッシュを無効化
            do_sample=False,
            temperature=None,
            top_p=None,
        )

    # 入力部分を除去
    generate_ids = generate_ids[:, inputs['input_ids'].shape[1]:]

    # デコード
    response = processor.batch_decode(
        generate_ids,
        skip_special_tokens=True,
        clean_up_tokenization_spaces=False
    )[0]

    return response

# ========================================
# 使用例
# ========================================

print("\n" + "="*60)
print("🎯 使用例: サンプル画像の説明")
print("="*60)

# サンプル画像URL
sample_image_url = "https://huggingface.co/datasets/huggingface/documentation-images/resolve/main/transformers/tasks/car.jpg"

# 画像の内容を説明
response = generate_response(
    image_source=sample_image_url,
    prompt="この画像について詳しく説明してください。"
)
print(f"\n回答:\n{response}")

# ========================================
# カスタム画像の使い方
# ========================================

print("\n" + "="*60)
print("📝 カスタム画像の使い方:")
print("="*60)
print("""
# ローカル画像をアップロードして使用:
from google.colab import files
uploaded = files.upload()
image_path = list(uploaded.keys())[0]

response = generate_response(
    image_source=image_path,
    prompt="この画像について教えてください。"
)
print(response)
""")
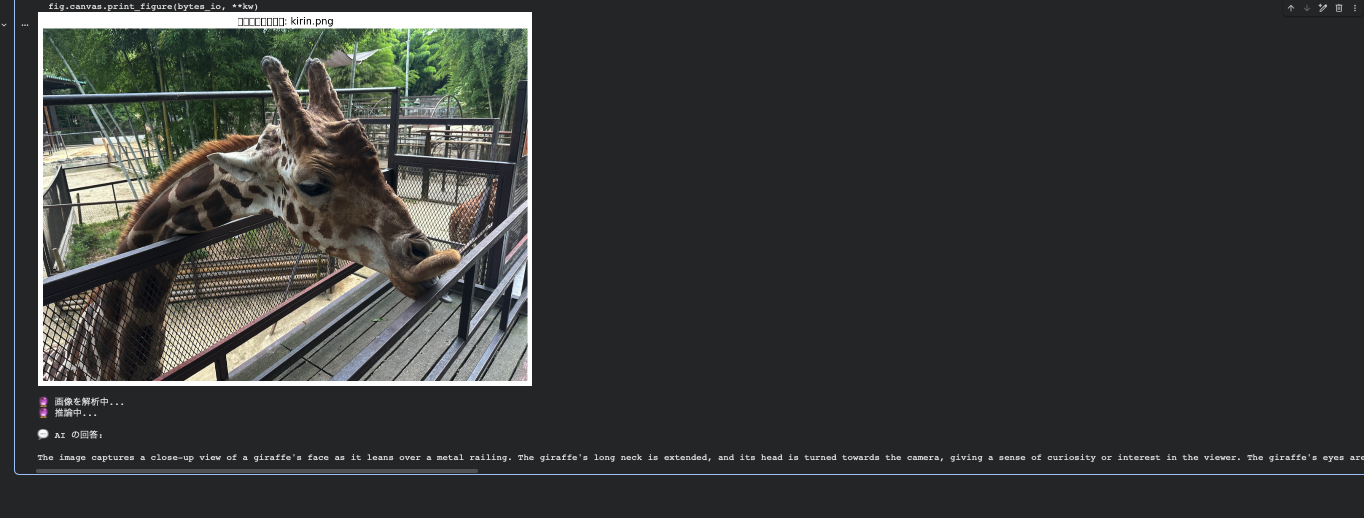
The image captures a close-up view of a giraffe's face as it leans over a metal railing. The giraffe's long neck is extended, and its head is turned towards the camera, giving a sense of curiosity or interest in the viewer. The giraffe's eyes are partially closed, and its mouth is slightly open, as if it is about to take a bite or is in the process of eating. The background shows a fenced enclosure with trees and a clear sky, suggesting that the giraffe is in a zoo or wildlife park. The railing in the foreground adds a sense of depth to the image and separates the viewer from the giraffe. The overall composition of the image focuses on the interaction between the giraffe and the viewer, creating an intimate and engaging moment.

金属の手すりに身を乗り出すキリンの顔をクローズアップした画像。キリンの長い首は伸びきり、頭はカメラの方を向いており、見る者への好奇心や興味を感じさせる。キリンの目は半開きで、口はわずかに開いており、何かを噛みつきそうだったり、食べている最中であるかのように見える。背景には柵で囲まれた囲いと木々、澄んだ空が広がり、キリンが動物園や野生動物公園にいることを示唆している。前景の手すりは画像に奥行き感を与え、観る者とキリンを隔てている。画像全体の構図はキリンと観る者の相互作用に焦点を当て、親密で引き込まれる瞬間を創出している。
sarashina2-vision-8b
import gradio as gr
import torch
from PIL import Image
from transformers import AutoModelForCausalLM, AutoProcessor, BitsAndBytesConfig
import gc

# モデルパスの設定
model_path = "sbintuitions/sarashina2-vision-8b"

print("モデルを読み込んでいます...")
processor = AutoProcessor.from_pretrained(model_path, trust_remote_code=True)

# デバイスの設定
device = "cuda" if torch.cuda.is_available() else "cpu"
print(f"使用デバイス: {device}")

# 8bit量子化の設定(メモリ使用量を削減)
if device == "cuda":
    quantization_config = BitsAndBytesConfig(
        load_in_8bit=True,
        llm_int8_threshold=6.0,
    )
    model = AutoModelForCausalLM.from_pretrained(
        model_path,
        quantization_config=quantization_config,
        torch_dtype=torch.float16,
        trust_remote_code=True,
        low_cpu_mem_usage=True,
    )
else:
    print("警告: GPUが利用できません。CPUモードで実行しますが、処理に時間がかかります。")
    model = AutoModelForCausalLM.from_pretrained(
        model_path,
        torch_dtype=torch.float32,
        trust_remote_code=True,
        low_cpu_mem_usage=True,
    )
    model = model.to(device)

print("モデルの読み込みが完了しました!")

# メモリクリーンアップ
gc.collect()
if device == "cuda":
    torch.cuda.empty_cache()import gradio as gr
import torch
from PIL import Image
from transformers import AutoModelForCausalLM, AutoProcessor, BitsAndBytesConfig
import gc

# モデルパスの設定
model_path = "sbintuitions/sarashina2-vision-8b"

print("モデルを読み込んでいます...")
processor = AutoProcessor.from_pretrained(model_path, trust_remote_code=True)

# デバイスの設定
device = "cuda" if torch.cuda.is_available() else "cpu"
print(f"使用デバイス: {device}")

# 8bit量子化の設定(メモリ使用量を削減)
if device == "cuda":
    quantization_config = BitsAndBytesConfig(
        load_in_8bit=True,
        llm_int8_threshold=6.0,
    )
    model = AutoModelForCausalLM.from_pretrained(
        model_path,
        quantization_config=quantization_config,
        torch_dtype=torch.float16,
        trust_remote_code=True,
        low_cpu_mem_usage=True,
    )
else:
    print("警告: GPUが利用できません。CPUモードで実行しますが、処理に時間がかかります。")
    model = AutoModelForCausalLM.from_pretrained(
        model_path,
        torch_dtype=torch.float32,
        trust_remote_code=True,
        low_cpu_mem_usage=True,
    )
    model = model.to(device)

print("モデルの読み込みが完了しました!")

# メモリクリーンアップ
gc.collect()
if device == "cuda":
    torch.cuda.empty_cache()
def describe_image(image, prompt="この画像について詳しく説明してください。"):
    """
    画像を受け取り、日本語で説明を生成する関数

    Args:
        image: PIL Image または numpy array
        prompt: カスタムプロンプト(デフォルト: "この画像について詳しく説明してください。")
    """
    if image is None:
        return "画像をアップロードしてください。"

    # 画像をPIL形式に変換
    if not isinstance(image, Image.Image):
        image = Image.fromarray(image).convert("RGB")
    else:
        image = image.convert("RGB")

    # プロンプトの作成
    message = [{"role": "user", "content": prompt}]
    text_prompt = processor.apply_chat_template(message, add_generation_prompt=True)

    # 入力の準備
    inputs = processor(
        text=[text_prompt],
        images=[image],
        padding=True,
        return_tensors="pt",
    )
    inputs = inputs.to(device)

    # 停止条件の設定
    stopping_criteria = processor.get_stopping_criteria(["\n###"])

    # 推論の実行
    print("画像を分析中...")
    with torch.no_grad():
        output_ids = model.generate(
            **inputs,
            max_new_tokens=256,
            temperature=0.7,
            do_sample=True,
            stopping_criteria=stopping_criteria,
        )

    # 生成されたテキストの抽出
    generated_ids = [
        output_ids[len(input_ids):]
        for input_ids, output_ids in zip(inputs.input_ids, output_ids)
    ]
    output_text = processor.batch_decode(
        generated_ids,
        skip_special_tokens=True,
        clean_up_tokenization_spaces=True
    )

    # メモリクリーンアップ
    del inputs, output_ids, generated_ids
    gc.collect()
    if torch.cuda.is_available():
        torch.cuda.empty_cache()

    return output_text[0]
# Gradioインターフェースの作成
with gr.Blocks(theme=gr.themes.Soft(), title="Sarashina2-Vision 画像説明ツール") as demo:
    gr.Markdown(
        """
        # 🖼️ Sarashina2-Vision 画像説明ツール

        画像をアップロードすると、Sarashina2-Vision-8Bが日本語で詳しく説明します。
        プロンプトをカスタマイズすることで、特定の質問に答えさせることもできます。
        """
    )

    with gr.Row():
        with gr.Column(scale=1):
            image_input = gr.Image(type="pil", label="画像をアップロード")
            prompt_input = gr.Textbox(
                label="プロンプト(オプション)",
                value="この画像について詳しく説明してください。",
                lines=2
            )
            submit_btn = gr.Button("説明を生成", variant="primary")

        with gr.Column(scale=1):
            output_text = gr.Textbox(label="画像の説明", lines=15)

    # 例を追加
    gr.Examples(
        examples=[
            ["この画像について詳しく説明してください。"],
            ["この写真に写っているもので、最も有名と考えられる建築物は何でどこに写っていますか?"],
            ["この画像の雰囲気や色使いについて説明してください。"],
            ["この写真に写っている人物は何をしていますか?"],
        ],
        inputs=prompt_input,
        label="プロンプトの例"
    )

    # イベント処理
    submit_btn.click(
        fn=describe_image,
        inputs=[image_input, prompt_input],
        outputs=output_text
    )

    gr.Markdown(
        """
        ---
        **モデル情報:**
        - [sbintuitions/sarashina2-vision-8b](https://huggingface.co/sbintuitions/sarashina2-vision-8b)
        - 開発: SB Intuitions
        """
    )

# Colab環境でUIを起動
demo.launch(share=True, debug=True, height=1800)
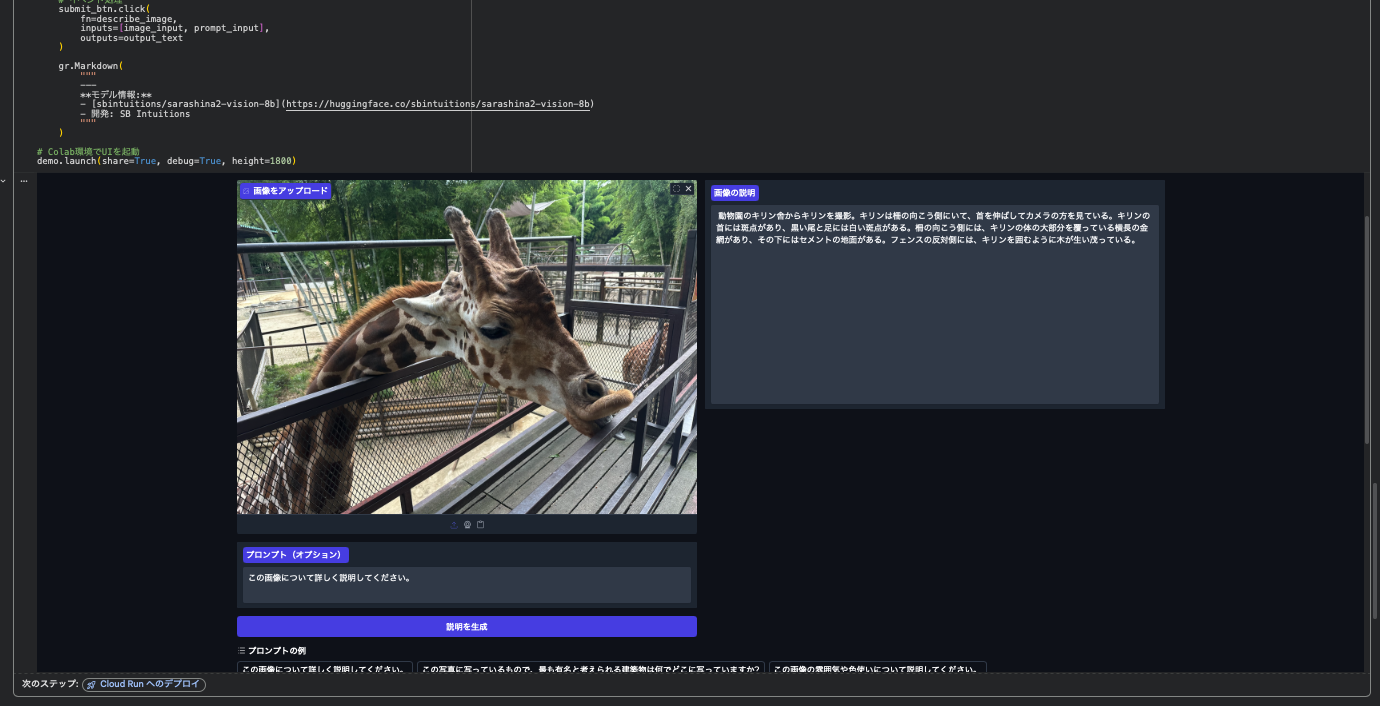
動物園のキリン舎からキリンを撮影。キリンは柵の向こう側にいて、首を伸ばしてカメラの方を見ている。キリンの首には斑点があり、黒い尾と足には白い斑点がある。柵の向こう側には、キリンの体の大部分を覆っている横長の金網があり、その下にはセメントの地面がある。フェンスの反対側には、キリンを囲むように木が生い茂っている。