#はじめに
仕事でNVIDIAのJetson関連製品の使用やプライベートでもJetson Nanoを購入したこともあり、これらの初期設定・セットアップを備忘録としてまとめることにしました。今後も最低限必要な設定等があれば、随時追記させていただこうと思います。また、本記事の内容の一部は、Jetson Xavier NXなどのJetson関連製品の設定に活用できます。
※ 本記事では、Deep learningなどを利用する環境設定については触れておりません。
▼ セットアップ
こちらのサイト( https://qiita.com/tsutof/items/66e68c75b462c4faf1cb )に沿って設定を行います。
▼ sudo入力時のパスワード入力の省略設定
サイト( https://qiita.com/RyodoTanaka/items/e9b15d579d17651650b7 ) に沿って設定を行います。
▼ 有線LANの設定
こちらでは、GUIによる設定についてご説明します。(CUIでの設定も可能ですが、ここでは割愛します。)

上図より、Edit Connections → Ethernet connections → IPv4 Settingsより行います。
▼ 無線LANの設定(Wireless USB adapterを用いる場合)
Terminalを起動し、以下のコマンドを順番に入力します。
sudo apt update
sudo apt upgrade
cd
git clone https://github.com/geekworm-com/rtl88x2BU_WiFi_linux_v5.3.1_27678.20180430_COEX20180427-5959.git
cd rtl88x2BU_WiFi_linux_v5.3.1_27678.20180430_COEX20180427-5959
make
sudo apt install rsync dkms
sudo rsync -rvhP ./ /usr/src/rtl88x2bu-5.3.1
sudo dkms add -m rtl88x2bu -v 5.3.1
sudo dkms build -m rtl88x2bu -v 5.3.1
sudo dkms install -m rtl88x2bu -v 5.3.1
sudo modprobe 88x2bu
▼ リモートデスクトップ接続の設定
① Terminalを起動し、以下のコマンドを入力します。
1. sudo vi /usr/share/glib-2.0/schemas/org.gnome.Vino.gschema.xml

※上記コマンドを入力後、以下を追記し、保存します。
<key name='enabled' type='b'>
  <summary>Enable remote access to the desktop</summary>
    <description>
      If true, allows remote access to the desktop via the
      RFB protocol. Users on remote machines may then
      connect to the desktop using a VNC viewer.
  </description>
   <default>false</default>
</key>

2. sudo glib-compile-schemas /usr/share/glib-2.0/schemas
3. gsettings set org.gnome.Vino require-encryption false
4. gsettings set org.gnome.Vino prompt-enabled false
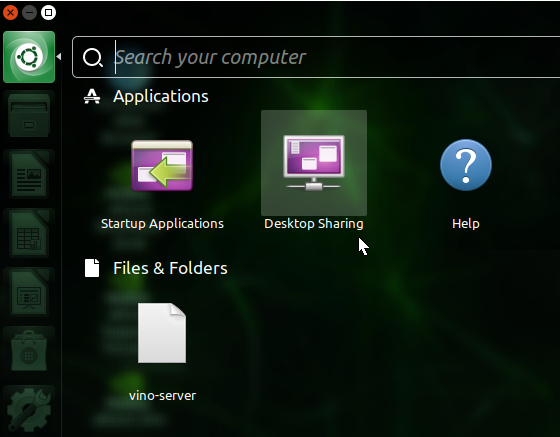
② デスクトップ画面の左上にある緑色のアイコンをクリックして「検索」パネルを開きます。
画面の上部に表示される検索ボックスに「Startup Application」と入力し、開きます。
右側の「Add」をクリックしてから、「Name」に「Vino」と入力し、「Command」に「/usr/lib/vino/vino-server」と入力します。最後に、「Comment」に(例えば)「VNC Server」と記入します。
右下の「Save」をクリックし、設定完了です。
③ 「Desktop Sharing」よりリモートデスクトップの任意に設定を行います。

④ Terminalにて、以下のコマンドを入力します。
1. sudo apt-get install xrdp
2. sudo service xrdp start
⑤ コンピュータの起動が自動ログオンに設定されているかを確認します。
⑥ 上記の全ての設定を終えたら、再起動を行い、リモート接続できるかを確認します。
※ リモート接続時の画面サイズが小さい場合は、以下を行います。
Terminalに「sudo vi /etc/X11/xorg.conf」を入力し、開いたファイルの以下の「Virtual」部分を編集します。
Section "Screen"
  Identifier "Default Screen"
  Monitor "Configured Monitor"
  Device "Default Device"

 SubSection "Display"
    Depth 24
    Virtual 1280 800
  EndSubSection
EndSection
★ 参考サイト
・https://blog.hackster.io/getting-started-with-the-nvidia-jetson-nano-developer-kit-43aa7c298797
・https://qiita.com/iwatake2222/items/a3bd8d0527dec431ef0f
・http://penguinitis.g1.xrea.com/computer/linux/xrdp.html
▼ メモリ不足対策の設定(swap)
Terminalを起動し、以下のコマンドを順番に入力します。
git clone https://github.com/JetsonHacksNano/installSwapfile
cd installSwapfile
./installSwapfile.sh
※ この設定は、画像の物体検出などの重い処理を行う場合に、必要になると思います。
★ 参考サイト:http://hituji-ws.com/ai/jetson-nano-install/
▼ ファン制御スクリプトのインストール・設定
Terminalを起動し、以下を入力します。
cd
sudo apt install python3-dev
git clone https://github.com/Pyrestone/jetson-fan-ctl.git
cd jetson-fan-ctl
./install.sh
sudo service automagic-fan restart
★参考サイト:https://coneta.jp/article/show/2829
おわりに
上記の手順を追っていく際のスクリーンショットの画像などを省略していますので、詳細な説明を希望される場合は、遠慮なくお申しつけください。また、本記事の手順に沿って設定を行ったが、うまくいかなかった場合やご不明な点等がありましたらコメントいただける幸いです。読んでいただき、ありがとうございました。