今回の内容
今回は複数のタスク(例えばデータ準備とモデルトレーニングにような)を、ひとつのパイプラインとして実行する機能を紹介します。
完成したパイプラインはエンドポイントとして公開できるようになり、自動化のパーツとすることができます。それ自身でスケジュール実行もできますし、呼出し時にパラメタを渡すこともできますが、今回は最も基本的なサンプルで説明しようと思います。
ここでのシナリオ
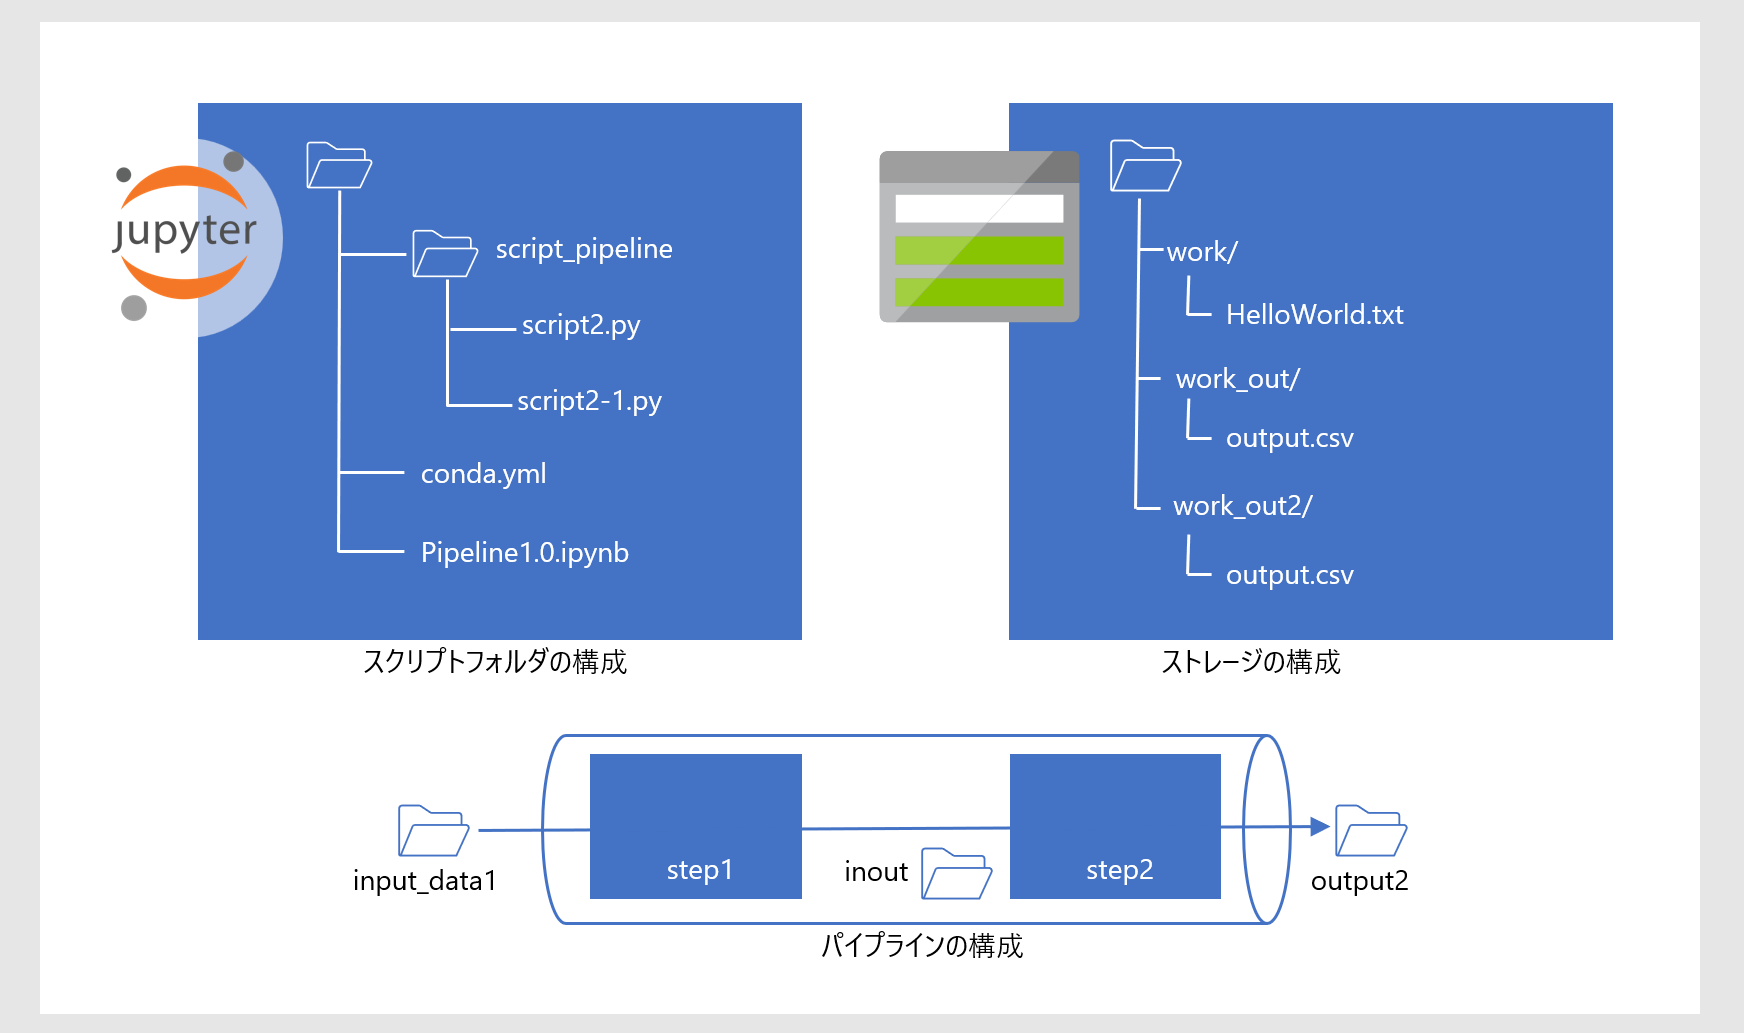
いま STEP1 と STEP2 の2つのタスクをシーケンシャルに実行するパイプラインを考えます。(下図の「パイプラインの構成」)
- STEP1 は input_data1 からファイル "HelloWorld.txt" を受取り、中間ファイル "output.csv" を inout に格納します
- STEP2 は inout のファイルを取出し、そのまま output2 に格納します
input_data1, inout, output2 はそれぞれスクリプト上のオブジェクト名なので、実体としては demostore という名前で登録された blog ストレージのフォルダ、work, work_out, work_out2 が参照されます。(下図の「ストレージの構成」)
また Nootebook のローカルには script_pipeline フォルダが準備されていて、STEP1 と STEP2 の処理内容が script2.py と script2-1.py に実装されているものとします。(下図の「スクリプトフォルダの構成」)
手順
これまでどおり手順をみていきます。
-
パッケージの読込み
パッケージを読込みます。from azureml.core import Workspace, Experiment, Dataset, Datastore from azureml.core.compute import ComputeTarget from azureml.core.compute_target import ComputeTargetException from azureml.core.runconfig import RunConfiguration from azureml.core.conda_dependencies import CondaDependencies from azureml.data import OutputFileDatasetConfig from azureml.pipeline.core import Pipeline from azureml.pipeline.steps import PythonScriptStep from azureml.widgets import RunDetails workspace = Workspace.from_config() -
コンピューティングクラスターの指定
コンピューティングクラスターを指定します。aml_compute_target = "demo-cpucluster1" # <== The name of the cluster being used try: aml_compute = ComputeTarget(workspace, aml_compute_target) print("found existing compute target.") except ComputeTargetException: print("no compute target with the specified name found") -
input と output フォルダの指定
demostore は Azure ML Workspace に登録したデータストア名です。データストアの BLOB コンテナ内のファイルパスを dataset クラスに渡しています。ds = Datastore(workspace, 'demostore') input_data1 = Dataset.File.from_files(ds.path('work/HelloWorld.txt')).as_named_input('input_ds').as_mount() inout = OutputFileDatasetConfig(destination=(ds, 'work_out')) output2 = OutputFileDatasetConfig(destination=(ds, 'work_out2')) # can not share output folder between stepsこれは、Azure ML Python SDK を使う3:アウトプットを Blob ストレージに書きだす - その1 で示したインプット/アウトプットのペアと同様ですが、ここでは OutputFileDatasetConfig で定義されるアウトプットが 2つある点が異なります。またこの時点では inout が中間ファイル置き場であることが関連づけられていませんが、これは後続セルで関連づけられます。
-
環境の指定
次のセルで使用する PythonScriptStep では、これまでの例で使った Environment() ではなく、RunConfiguration() を使う必要があります。run_config = RunConfiguration() run_config.environment.python.conda_dependencies = CondaDependencies(conda_dependencies_file_path="conda.yml")conda.yml はノートブックと同じフォルダに配置されているものとします。
name: my-env dependencies: - python=3.8.5 - pip: - azureml-defaults channels: - anaconda - conda-forge -
実行ファイル名の指定
これまでのサンプルでは ScriptRunConfig によって実行ファイル名や環境を構成していましたが、パイプラインでは PythonScriptStep を使います。(パイプラインの内容によってはこれに限りません。)
引数の構成は ScriptRunConfig とほとんど同じです。
パイプラインは複数のタスクをひとまとめにしてコンピュートクラスターに投げこみますが、ここでは STEP1 と STEP2 を準備します。step1 = PythonScriptStep(name="step1", script_name="script2.py", source_directory='script_pipeline', arguments =['--datadir', input_data1, '--output', inout], compute_target=aml_compute, runconfig=run_config, allow_reuse=True) step2 = PythonScriptStep(name="step2", script_name="script2-1.py", source_directory='script_pipeline', arguments =['--datadir', inout.as_input(name='inout'), '--output', output2], compute_target=aml_compute, runconfig=run_config, allow_reuse=True)STEP1 のアウトプットとして定義された inout が、STEP2 のインプットで .as_input() として定義しなおされています。これによって STEP1 と STEP2 が間接的に関連づけられ、同時に inout が中間ファイル置き場であることが指定されます。
この関連づけがないと、STEP1 と STEP2 はパラレル実行されることになります。(ただしパラレル実行する場合 STEP1 のアウトプットフォルダ名と STEP2 のインプットフォルダ名は異なっている必要があります) -
パイプラインの定義
パイプラインを定義します。pipeline1 = Pipeline(workspace=workspace, steps=[step1, step2])パイプラインの構成は事前に検証することができます。
pipeline1.validate() print("Pipeline validation complete") -
パイプランの実行
パイプラインを実行します。pipeline_run = Experiment(workspace, 'pipeline-test').submit(pipeline1, regenerate_outputs=False)パイプラインに限ったことではありませんが、RunDetails を使って実行状況をモニタリングできます。これまでご紹介していなかったのでここで使ってみます。
RunDetails(pipeline_run).show()このウィジェットに以下のような実行状態が表示されます。
この実行グラフは Azure ML Studio でも参照することができます。 -
パイプライン終了の待機
パイプラインの終了を待ちます%%time pipeline_run.wait_for_completion(show_output=True) -
STEP1, STEP2 の内容
参考のためスクリプトの内容を例示します。これまで使ってきたサンプルとほとんど同じつくりにしています。
script2.pyimport argparse import os print("*********************************************************") print("************* Hello World! *************") print("*********************************************************") parser = argparse.ArgumentParser() parser.add_argument('--datadir', type=str, help="data directory") parser.add_argument('--output', type=str, help="output") args = parser.parse_args() print("Argument 1: %s" % args.datadir) print("Argument 2: %s" % args.output) with open(args.datadir, 'r') as f: content = f.read() with open(os.path.join(args.output, 'output.csv'), 'w') as fw: fw.write(content)script2-1.py
import argparse
import os

print("*********************************************************")
print("*************          Hello World!         *************")
print("*********************************************************")

parser = argparse.ArgumentParser()
parser.add_argument('--datadir', type=str, help="data directory")
parser.add_argument('--output', type=str, help="output")
args = parser.parse_args()

print("Argument 1: %s" % args.datadir)
print("Argument 2: %s" % args.output)

for fname in next(os.walk(args.datadir))[2]:
    print('processing', fname)
    with open(os.path.join(args.datadir, fname),'r') as f:
        content = f.read()
        with open(os.path.join(args.output, fname), 'w') as fw:
            fw.write(content)
なお、ここで使った HelloWorld.txt は非常に簡単なファイルです。
0,Hello World
1,Hello World
2,Hello World
おわりに
いかがでしょうか。パイプラインをつくることで Machine Learning タスクが自動化できるようになります。MLOps の基本構成要素として非常に重要な機能を提供します。
参考資料
Azure Machine Learning Pipelines: Getting Started
PythonScriptStep Class
Azure ML Python SDK を使う1:データセットをインプットとして使う - その1
Azure ML Python SDK を使う2:データセットをインプットとして使う - その2
Azure ML Python SDK を使う3:データセットをインプットとして使う - その1
Azure ML Python SDK を使う4:データセットをインプットとして使う - その2
Azure/MachineLearningNotebooks
Azure Machine Learning SDK for Python とは

