はじめに
Flutterでプラットフォームとやりとりする方法の1つとしてMethodChannelを使う方法があります。
ここでは、そのMethodChannelを各プラットフォームごとにどのように実装するかをまとめてみました。
■本記事でわかることは...
- Flutterとプラットフォーム間で複数データをやりとりする方法
- 各プラットフォームへの実装方法
■本記事で分からないことは...
- APIの詳細
■今回対象とするのは以下5つのプラットフォーム。
| プラネットフォーム | 開発言語 |
|---|---|
| Android | Kotolin |
| iOS | Swift |
| macOS | Swift |
| Windows | C++ |
| Linux | C++ |
事前説明
環境
VSCodeでFlutterプロジェクトを作成して出来たテンプレートをもとに紹介していきます。
(Flutter開発用の拡張機能ある前提 : Flutter、Dart)
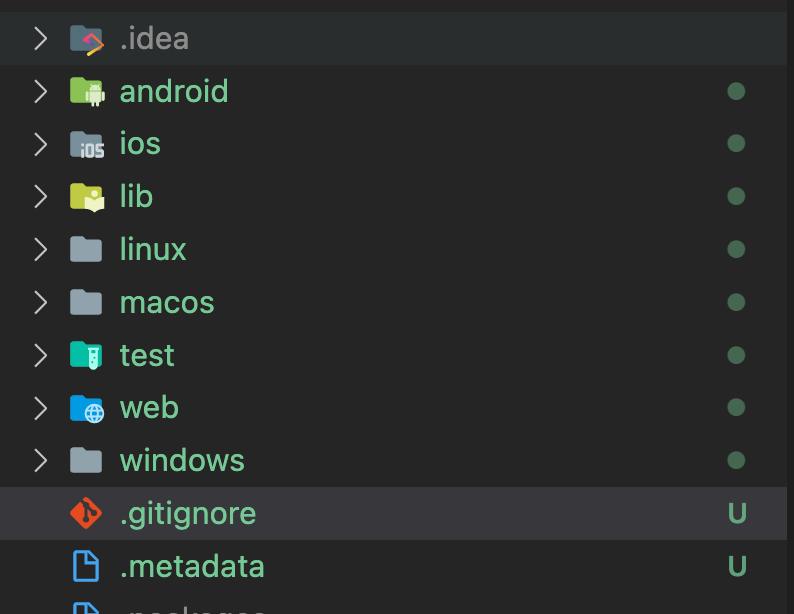
手順を踏めばこのような構造のプロジェクトが作成されているはずです。
【手順】「VSCodeのコマンドパレットを開く」>「Flutter:NewProject」>「Application」

バージョン情報
- Flutter : 3.0.3
- VSCode : 1.74.3
- Android SDK : 30.0.3
- Android API26(Androiudエミュレータ)
- MacOS : 12.6.2
- Xcode : 14.2
- Windows10
- Ubuntu22.04
作るものについて
全プラットフォームで同じことができることを示すために作るものは共通のものとなります。
Flutter公式のサンプル(バッテリー残量取得)を改造したものを今回は紹介させていただきます。
アプリ動作
- Flutter側 : 画面のバッテリーボタンを押下
- Flutter側 : プラットフォームへデータを渡して関数呼び出し
- プラットフォーム側 : Flutterから渡されたデータを解析して文字列作成
- プラットフォーム側 : 各プラットフォームにてバッテリー残量を取得
- プラットフォーム側 : プラットフォームからデータを結果に入れてFlutterへ返す
- Flutter側 : 画面に結果を表示

前提条件
■MethodChannelでやりとりするための共通設定
- チャンネル :
platform_method/battery - メソッド :
getBatteryInfo
■Flutterから送るデータ
-
text(文字列) -
num(数値)
■プラットフォームから返ってくるデータ
-
device(文字列) : プラットフォーム名 -
level(数値) : バッテリー残量% -
message(文字列) : 表示文字列(textの前後に特定文字をnum回分追加した文字列)
Flutter側
ソースコード
import 'package:flutter/material.dart';
import 'package:flutter/services.dart';

void main() {
  runApp(const MyApp());
}

class MyApp extends StatelessWidget {
  const MyApp({Key? key}) : super(key: key);

  @override
  Widget build(BuildContext context) {
    return MaterialApp(
      title: 'Flutter Demo',
      theme: ThemeData(
        primarySwatch: Colors.blue,
        textTheme: const TextTheme(bodyText2: TextStyle(fontSize: 32)),
      ),
      home: const MyHomePage(),
    );
  }
}

class MyHomePage extends StatefulWidget {
  const MyHomePage({Key? key}) : super(key: key);

  @override
  State<MyHomePage> createState() => _MyHomePageState();
}

class _MyHomePageState extends State<MyHomePage> {
  /* @POINT1 : メソッドチャンネルを作成 */
  static const batteryChannel = MethodChannel('platform_method/battery');
  // バッテリーの残量
  String batteryLevel = 'Waiting...';
  String message = "";

  @override
  Widget build(BuildContext context) {
    return Scaffold(
      body: Center(
          child: Column(
              mainAxisSize: MainAxisSize.min,
              children: <Widget>[Text(batteryLevel), Text(message)])),
      floatingActionButton: FloatingActionButton(
        onPressed: () async {
          await getBatteryInfo(); // バッテリー情報を取得
        },
        tooltip: 'Get Battery Level',
        child: const Icon(Icons.battery_full),
      ), // This trailing comma makes auto-formatting nicer for build methods.
    );
  }

  Future getBatteryInfo() async {
    String devName = "Not...";
    int level = 0;
    String devMessage = "ERROR";

    try {
      /* @POINT2 : パラメータを作成して、プラットフォームの関数呼び出し */
      final arguments = {
        'text': "Flutter",
        'num': 5,
      };
      final res =
          await batteryChannel.invokeMethod('getBatteryInfo', arguments);

      /* @POINT3 : プラットフォームからの結果を解析取得 */
      devName = res["device"];
      level = res["level"];
      devMessage = res["message"];
    } on PlatformException catch (e) {
      batteryLevel = "Failed to get battery level: '${e.message}'.";
    }

    // 画面を再描画する
    setState(() {
      batteryLevel = '$devName:$level%';
      message = '$devMessage';
    });
  }
}
詳細
やってること...
- フロートボタンを押されたら
getBatteryInfo()を呼び出し -
getBatteryInfo()の中でプラットフォームからデータを取得して画面表示更新
チャンネルを作成
static const batteryChannel = MethodChannel('platform_method/battery');
MethodChannel(チャンネル名)で使用チャンネルを用意する。
プラットフォーム処理呼び出し
final arguments = {
    'text': "Flutter",
    'num': 5,
};
final res =
      await batteryChannel.invokeMethod('getBatteryInfo', arguments);
Flutterから複数データを渡すときはMap型を使う。
(本コードでは<String, dynamic>型)
MethodChannel.invokeMethod(メソッド名、パラメータ)で、プラットフォーム処理を指定し、パラメータには先ほど用意したMapを渡す。
プラットフォーム結果を取得
final res =
    await batteryChannel.invokeMethod('getBatteryInfo', arguments);

devName = res["device"];
level = res["level"];
devMessage = res["message"];
プラットフォームでの実行結果はinvokeMethodの返り値に入る。
今回は複数データをやりとりするしているため、プラットフォーム側からの結果をMapとして受け取りデータを取り出している。
(補足)resのデータ側を調べてみると_InternalLinkedHashMap<Object?, Object?>となっている模様。
プラットフォーム側
Android
ソースコードと動作結果
package com.example.platform_method

// MethodChannelのため
import androidx.annotation.NonNull
import io.flutter.embedding.android.FlutterActivity
import io.flutter.embedding.engine.FlutterEngine
import io.flutter.plugin.common.MethodChannel
import io.flutter.plugin.common.MethodCall

// バッテリー取得のため
import android.content.Context
import android.os.BatteryManager

class MainActivity: FlutterActivity() {

    /*===== ここから =====*/
    override fun configureFlutterEngine(@NonNull flutterEngine: FlutterEngine) {
        super.configureFlutterEngine(flutterEngine)

        /* @POINT1 チャンネルとハンドラコールバック登録 */
        val channel = MethodChannel(flutterEngine.dartExecutor.binaryMessenger, "platform_method/battery")
        channel.setMethodCallHandler { methodCall: MethodCall, result: MethodChannel.Result ->

            if (methodCall.method == "getBatteryInfo") {

                /* @POINT2 : Flutterから渡されたデータを解析取得 */
                val text = methodCall.argument<String>("text") ?: "Not Message..."
                val num = methodCall.argument<Int>("num") ?: 0
                val message = makeMessage(text, num)

                // バッテリー残量を取得
                val level = getBatteryLevel()

                /* @POINT3 : Flutterへ返す情報を作成 */
                val res =  mapOf(
                    "device" to "Android",
                    "level" to level,
                    "message" to message,
                )
                result.success(res)

            }
            else {
                result.notImplemented()
            }
        }
    }
    /*===== ここまで =====*/

    /* メッセージ作成 */
    // Androidからはtextの前後に「-」をnum回数分付与
    private fun makeMessage(text:String, num:Int) : String {
        val mark = "-"
        var message = ""
        for (i in 1..num) {
            message += mark
        }
        message += text
        for (i in 1..num) {
            message += mark
        }
        return message
    }

    /* バッテリー残量を取得 */
    private fun getBatteryLevel() :Int {
        val manager = getSystemService(Context.BATTERY_SERVICE) as BatteryManager
        val batteryLevel : Int = manager.getIntProperty(BatteryManager.BATTERY_PROPERTY_CAPACITY)
        return batteryLevel
    }
}
詳細
MethodChannelの実装場所
VSCodeで自動作成した場合は未定義なので、以下をMainActivityに追加。
override fun configureFlutterEngine(@NonNull flutterEngine: FlutterEngine){}
そして、Flutterからの受信を行うMethodChannelは以下の場所に実装していく。
override fun configureFlutterEngine(@NonNull flutterEngine: FlutterEngine) {
    super.configureFlutterEngine(flutterEngine)

    /****** この中に実装していきます ******/
}
MethodChannelの準備
val channel = MethodChannel(flutterEngine.dartExecutor.binaryMessenger, "platform_method/battery")
channel.setMethodCallHandler { methodCall: MethodCall, result: MethodChannel.Result ->
    // Flutterから指定チャネルが呼ばれたらここが呼ばれる
    if (methodCall.method == "getBatteryInfo") {
        // メソッド名「getBatteryInfo」が指定されていればここの処理が実行できる
    }
}
MethodChannelを作成して、setMethodCallHandlerの中に呼ばれた時の制御を書いていく。
Flutterから指定されるメソッドはMethodCallのmethodで取得。
Flutterから渡されたデータを取得
val text = methodCall.argument<String>("text") ?: "Not Message..."
val num = methodCall.argument<Int>("num") ?: 0
FlutterからのデータはMethodCallのargumentに入っており、キー名とデータ型を指定して取得。
このとき取得データ型はNullable(?がつくデータ型)になる。
Flutterへ返すデータを作成して結果通知
val res =  mapOf(
    "device" to "Android",
    "level" to level,
    "message" to message,
)
result.success(res)
Androidではコレクションで複数データを返すことができ、今回はMapを使う。
結果はresult.success(通知する結果)で返せる。
iOS
ソースコードと動作結果
import UIKit
import Flutter

@UIApplicationMain
@objc class AppDelegate: FlutterAppDelegate {
  override func application(
    _ application: UIApplication,
    didFinishLaunchingWithOptions launchOptions: [UIApplication.LaunchOptionsKey: Any]?
  ) -> Bool {

    /*===== ここから =====*/

    /* @POINT1 チャンネルとハンドラコールバック登録 */

    let controller : FlutterViewController = window?.rootViewController as! FlutterViewController
    let batteryChannel = FlutterMethodChannel(name:  "platform_method/battery", binaryMessenger: controller as! FlutterBinaryMessenger)
    batteryChannel.setMethodCallHandler({
      (methodCall: FlutterMethodCall, result: @escaping FlutterResult) -> Void in

        if (methodCall.method == "getBatteryInfo") {

          /* @POINT2 : Flutterから渡されたデータを解析取得 */
          var message = "Not Message...";
          if let args = methodCall.arguments as? Dictionary<String, Any> {
            if let text = args["text"] as? String,
              let num = args["num"] as? Int {
                message = self.makeMessage(text:text,num:num)
            }
          }

          // バッテリー残量を取得
          let level = self.getBatteryLevel()

          /* @POINT3 : Flutterへ返す情報を作成 */
          let res = [
              "device": "iOS",
              "level": level,
              "message": message,
          ]
          result(res)

        } else {
            result(FlutterMethodNotImplemented)
        }
    })

    /*===== ここまで =====*/

    GeneratedPluginRegistrant.register(with: self)
    return super.application(application, didFinishLaunchingWithOptions: launchOptions)
  }

  /* メッセージ作成 */
  private func makeMessage(text:String, num:Int) -> String {
    let mark = "#"
    var message = ""
    for _ in 1...num {
      message += mark
    }
    message += text
    for _ in 1...num {
      message += mark
    }
    return message
  }

  /* バッテリー残量を取得 */
  private func getBatteryLevel() -> Int {
    let device = UIDevice.current
    device.isBatteryMonitoringEnabled = true

    if (device.batteryState == UIDevice.BatteryState.unknown) {
      return -1
    } else {
      return Int(device.batteryLevel * 100)
    }
  }
}
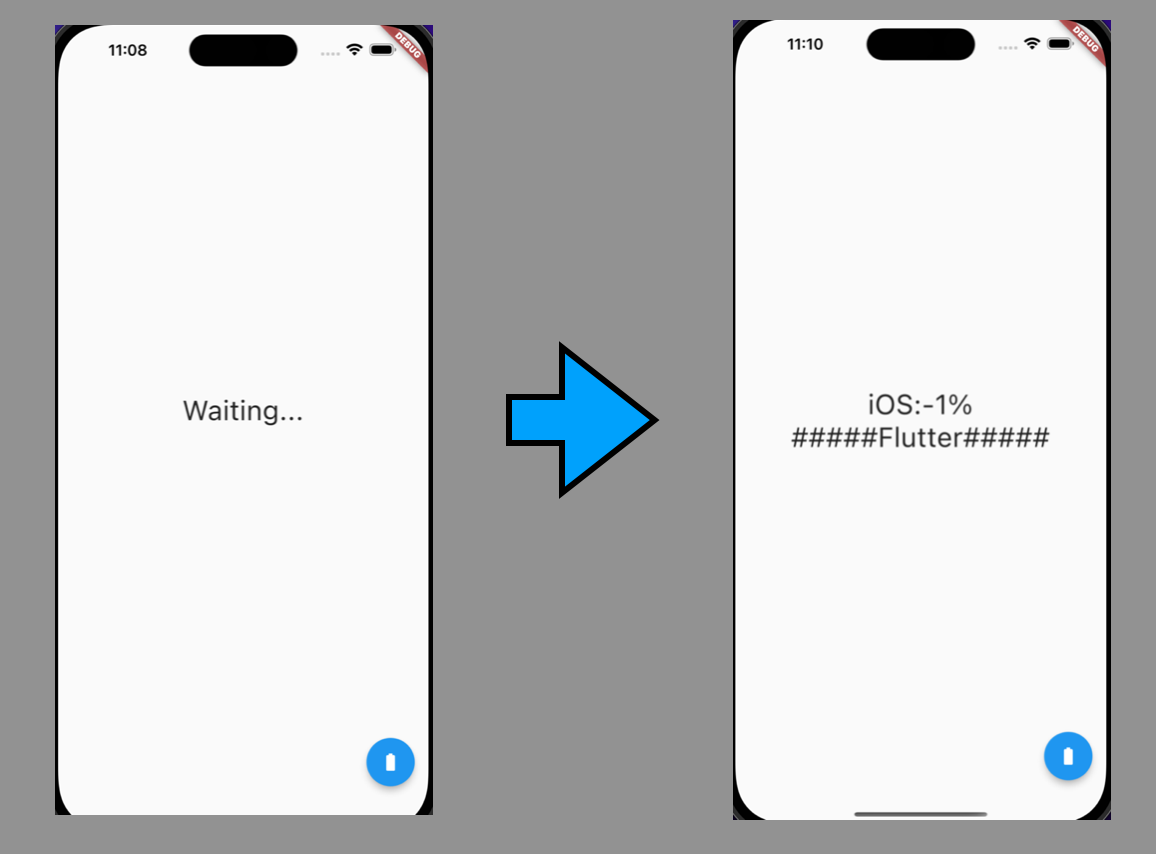
iOSでの動作結果
※iOSシミュレータだとバッテリー情報は取れないのでバッテリー残量が-1になってます

詳細
MethodChannelの実装場所
VSCodeで自動作成した場合は既に以下関数が存在しています。
@objc class AppDelegate: FlutterAppDelegate {
  override func application(
    _ application: UIApplication,
    didFinishLaunchingWithOptions launchOptions: [UIApplication.LaunchOptionsKey: Any]?
  ) -> Bool {}
そして、Flutterからの受信を行うMethodChannelは以下の場所に実装していきます。
override func application(
    _ application: UIApplication,
    didFinishLaunchingWithOptions launchOptions: [UIApplication.LaunchOptionsKey: Any]?
    ) -> Bool {

        /****** この中に実装していきます ******/

    }

    GeneratedPluginRegistrant.register(with: self)
    return super.application(application, didFinishLaunchingWithOptions: launchOptions)
  }
MethodChannelの準備
let controller : FlutterViewController = window?.rootViewController as! FlutterViewController
let batteryChannel = FlutterMethodChannel(name:  "platform_method/battery", binaryMessenger: controller as! FlutterBinaryMessenger)
batteryChannel.setMethodCallHandler({
      (methodCall: FlutterMethodCall, result: @escaping FlutterResult) -> Void in
    // Flutterから指定チャネルが呼ばれたらここが呼ばれる
    if (methodCall.method == "getBatteryInfo") {
        // メソッド名「getBatteryInfo」が指定されていればここの処理が実行できる
    }
})
FlutterMethodChannelを作成して、setMethodCallHandlerの中に呼ばれた時の制御を書いていく。
Flutterから指定されるメソッドはFlutterMethodCallのmethodで取得。
Flutterから渡されたデータを取得
/* @POINT2 : Flutterから渡されたデータを解析取得 */
var message = "Not Message...";
if let args = methodCall.arguments as? Dictionary<String, Any> {
  if let text = args["text"] as? String,
     let num = args["num"] as? Int {
      message = self.makeMessage(text:text,num:num)
  }
}
FlutterからのデータはMethodCallのargumentsに入っており、Dictionary<String, Any>として取り出せる。
後はDictionaryにキー名を指定することでバリューを取得。
Flutterへ返すデータを作成して結果通知
/* @POINT3 : Flutterへ返す情報を作成 */
let res = [
  "device": "iOS",
  "level": level,
  "message": message,
]
result(res)
iOSではmapを使うことで複数データを用意することが可能。
結果はresult(通知する結果)で返せる。
macOS
ソースコードと動作結果
import Cocoa
import FlutterMacOS
import IOKit.ps   // バッテリー残量取得のため

class MainFlutterWindow: NSWindow {
  override func awakeFromNib() {
    let flutterViewController = FlutterViewController.init()
    let windowFrame = self.frame
    self.contentViewController = flutterViewController
    self.setFrame(windowFrame, display: true)

    /*===== ここから =====*/

    /* @POINT1 チャンネルとハンドラコールバック登録 */
    let batteryChannel = FlutterMethodChannel(name: "platform_method/battery", binaryMessenger: flutterViewController.engine as! FlutterBinaryMessenger)
    batteryChannel.setMethodCallHandler({
      (methodCall: FlutterMethodCall, result: @escaping FlutterResult) -> Void in

        if (methodCall.method == "getBatteryInfo") {

          /* @POINT2 : Flutterから渡されたデータを解析取得 */
          var message = "Not Message...";
          if let args = methodCall.arguments as? Dictionary<String, Any> {
            if let text = args["text"] as? String,
              let num = args["num"] as? Int {
                message = self.makeMessage(text:text,num:num)
            }
          }

          // バッテリー残量を取得
          let level = self.getBatteryLevel()

          /* @POINT3 : Flutterへ返す情報を作成 */
          let res = [
              "device": "macOS",
              "level": level,
              "message": message,
          ]
          result(res)

        } else {
            result(FlutterMethodNotImplemented)
        }
    })

    /*===== ここまで =====*/

    RegisterGeneratedPlugins(registry: flutterViewController)

    super.awakeFromNib()
  }

  /* メッセージ作成 */
  private func makeMessage(text:String, num:Int) -> String {
    let mark = "@"
    var message = ""
    for _ in 1...num {
      message += mark
    }
    message += text
    for _ in 1...num {
      message += mark
    }
    return message
  }

  /* バッテリー残量を取得 */
  private func getBatteryLevel() -> Int {

    guard let snapshot = IOPSCopyPowerSourcesInfo()?.takeRetainedValue()
    else {
      return -1
    }

    guard let sources: NSArray = IOPSCopyPowerSourcesList(snapshot)?.takeRetainedValue()
    else {
      return -1
    }

    for ps in sources {
      guard let info: NSDictionary = IOPSGetPowerSourceDescription(snapshot, ps as CFTypeRef)?.takeUnretainedValue()
      else {
        return -1
      }
      if let capacity = info[kIOPSCurrentCapacityKey] as? Int {
        return( capacity )
      }
    }

    return -1
  }
}
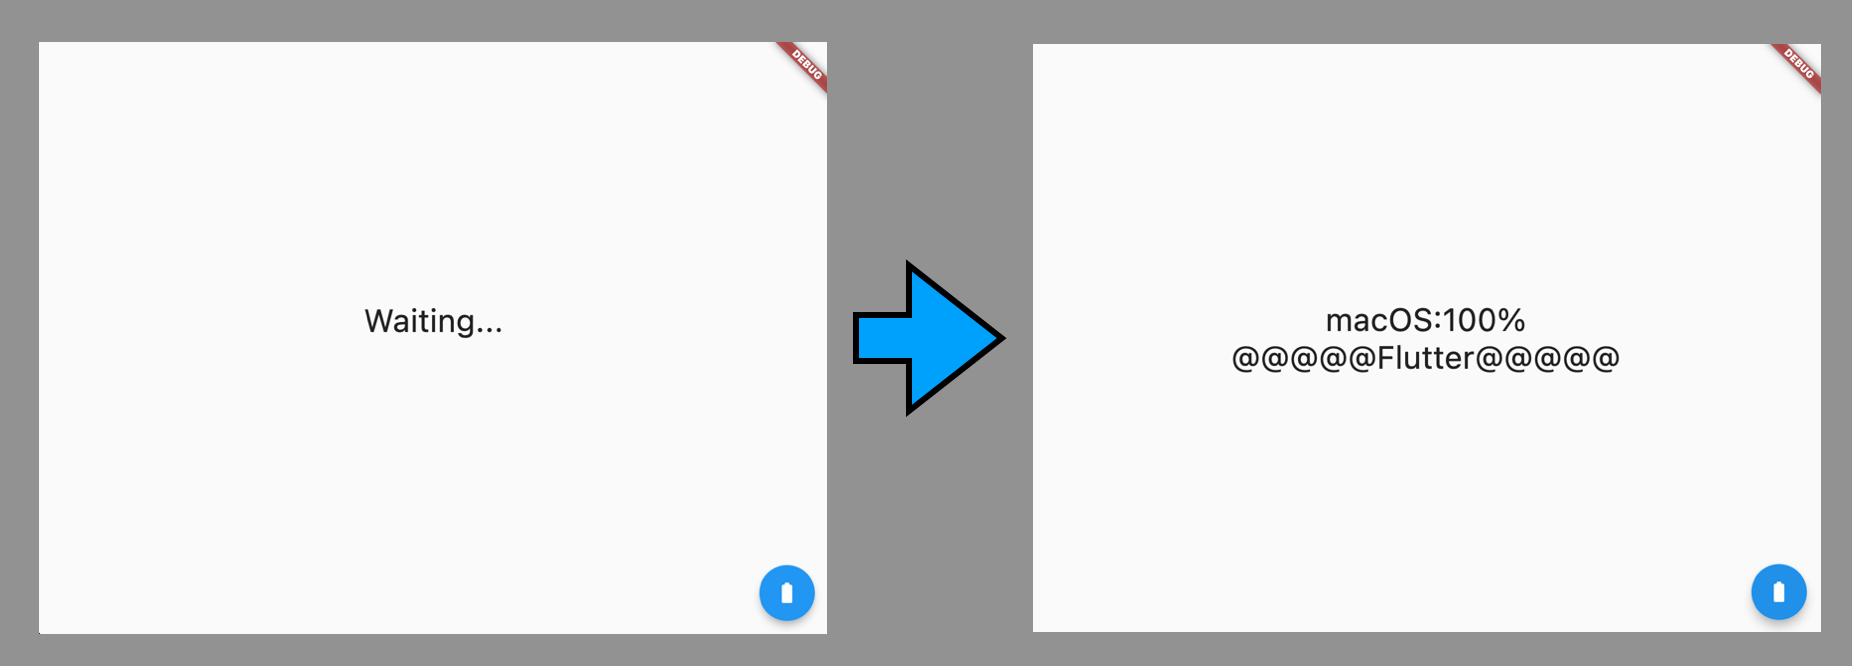
macOSでの動作結果

詳細
macOSの場合はMethodChannelなどは同じswiftでもあり同じ方法で組み込むことが可能。
しかし、実装する対象のファイル(該当関数のある場所)が異なるので注意が必要。
MethodChannelの実装場所
VSCodeで自動作成した場合は既に以下関数が存在している。(NSWindowクラス)
override func awakeFromNib() {}
そして、Flutterからの受信を行うMethodChannelは以下の場所に実装していく。
override func awakeFromNib() {
  let flutterViewController = FlutterViewController.init()
  let windowFrame = self.frame
  self.contentViewController = flutterViewController
  self.setFrame(windowFrame, display: true)

        /****** この中に実装していきます ******/

  RegisterGeneratedPlugins(registry: flutterViewController)

  super.awakeFromNib()
}
MethodChannelの準備
let batteryChannel = FlutterMethodChannel(name: "platform_method/battery", binaryMessenger: flutterViewController.engine as! FlutterBinaryMessenger)
batteryChannel.setMethodCallHandler({
      (methodCall: FlutterMethodCall, result: @escaping FlutterResult) -> Void in
    // Flutterから指定チャネルが呼ばれたらここが呼ばれる
    if (methodCall.method == "getBatteryInfo") {
        // メソッド名「getBatteryInfo」が指定されていればここの処理が実行できる
    }
})
※iOSと同様なので省略
Flutterから渡されたデータを取得
var message = "Not Message...";
if let args = methodCall.arguments as? Dictionary<String, Any> {
  if let text = args["text"] as? String,
     let num = args["num"] as? Int {
       message = self.makeMessage(text:text,num:num)
  }
}
※iOSと同様なので省略
Flutterへ返すデータを作成して結果通知
let res = [
  "device": "macOS",
  "level": level,
  "message": message,
]
result(res)
※iOSと同様なので省略
Windows
ソースコードと動作結果
#include "flutter_window.h"

#include <optional>

#include "flutter/generated_plugin_registrant.h"

// MethodChannelのため
#include <flutter/method_channel.h>
#include <flutter/standard_method_codec.h>

/* メッセージ作成 */
static std::string MakeMessage(std::string text, int num) {
  std::string mark = "w";
  std::string message = "";
  for ( int i=0; i<num; i++ ) {
    message += mark;
  }
  message += text;
  for ( int i=0; i<num; i++ ) {
    message += mark;
  }
  return message;
}

/* バッテリー残量取得 */
static int GetBatteryLevel() {
  SYSTEM_POWER_STATUS status;
  if (GetSystemPowerStatus(&status) == 0 || status.BatteryLifePercent == 255) {
    return -1;
  }
  return status.BatteryLifePercent;
}

FlutterWindow::FlutterWindow(const flutter::DartProject& project)
    : project_(project) {}

FlutterWindow::~FlutterWindow() {}

bool FlutterWindow::OnCreate() {
  if (!Win32Window::OnCreate()) {
    return false;
  }

  RECT frame = GetClientArea();

  flutter_controller_ = std::make_unique<flutter::FlutterViewController>(
      frame.right - frame.left, frame.bottom - frame.top, project_);
  if (!flutter_controller_->engine() || !flutter_controller_->view()) {
    return false;
  }
  RegisterPlugins(flutter_controller_->engine());

  /* ===== ここから ===== */
  flutter::MethodChannel<> channel(
    flutter_controller_->engine()->messenger(),
    "platform_method/battery",
    &flutter::StandardMethodCodec::GetInstance()
  );
  channel.SetMethodCallHandler(
    [](const flutter::MethodCall<>& call,
    std::unique_ptr<flutter::MethodResult<>> result) {

      if ( call.method_name() == "getBatteryInfo" ) {

        std::string message = "Not Message...";
        if ( call.arguments() ) {
          const auto *arguments = std::get_if<flutter::EncodableMap>(call.arguments());
          if ( arguments ) {
            auto text_it = arguments->find(flutter::EncodableValue("text"));
            auto num_it = arguments->find(flutter::EncodableValue("num"));
            if ( (text_it != arguments->end()) && (num_it != arguments->end()) ) {
              std::string text = std::get<std::string>(text_it->second);
              int num = std::get<int>(num_it->second);
              message = MakeMessage(text,num);
            }
          }
        }

        int batteryLevel = GetBatteryLevel();

        flutter::EncodableMap res = {
          {"device", "Windows"},
          {"level", batteryLevel },
          {"message", message },
        };

        result->Success(res);

      } else {
        result->Error("UNAVAILABLE","ERROR");
      }
  });

  /*===== ここまで =====*/

  SetChildContent(flutter_controller_->view()->GetNativeWindow());
  return true;
}


/*
    以下関数は省略
        OnDestroy
        MessageHandlerは省略
*/
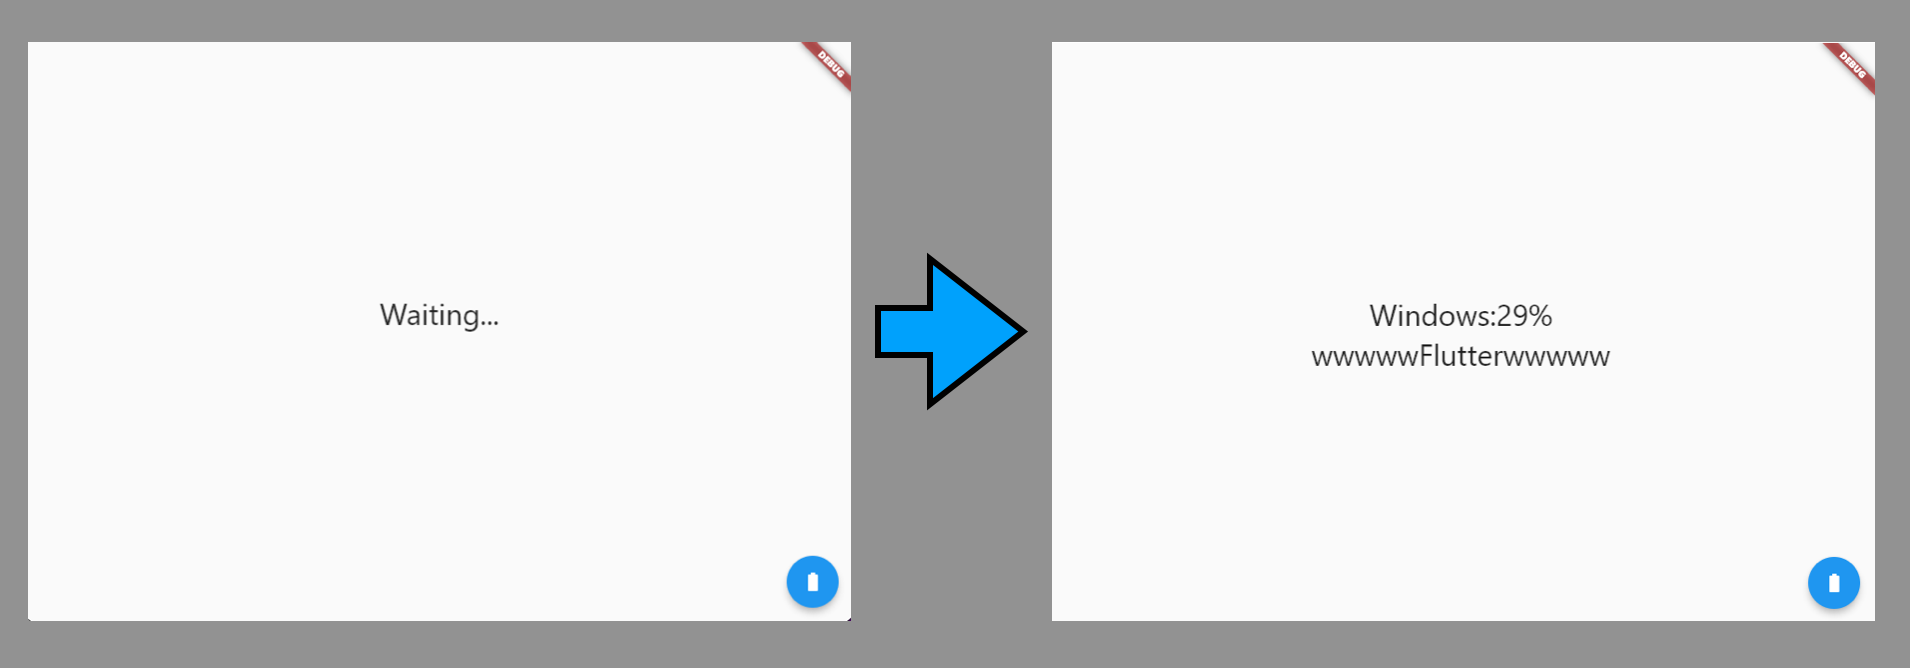
Windowsでの動作結果

詳細
MethodChannelの実装場所
VSCodeで自動作成した場合は既に以下関数が存在している。
bool FlutterWindow::OnCreate() {}
そして、Flutterからの受信を行うMethodChannelは以下の場所に実装していく。
bool FlutterWindow::OnCreate() {

    // コード省略

  RegisterPlugins(flutter_controller_->engine());  // ここが実装位置の基準

        /****** この中に実装していきます ******/

  SetChildContent(flutter_controller_->view()->GetNativeWindow());
  return true;
}
MethodChannelの準備
flutter::MethodChannel<> channel(
    flutter_controller_->engine()->messenger(),
    "platform_method/battery",
    &flutter::StandardMethodCodec::GetInstance()
);
channel.SetMethodCallHandler(
    [](const flutter::MethodCall<>& call,
    std::unique_ptr<flutter::MethodResult<>> result) {
      // Flutterから指定チャネルが呼ばれたらここが呼ばれる
      if ( call.method_name() == "getBatteryInfo" ) {
        // メソッド名「getBatteryInfo」が指定されていればここの処理が実行できる
      }
    }
);
flutter::MrthodChannelのチャンネルを作成して、SetMethodCallHandlerの中に呼ばれたときの制御を書いていく。
Flutterから指定されるメソッドはflutter::MethodCall<>& callのmethod_name()にて取得。
Flutterから渡されたデータを取得
if ( call.arguments() ) {
  // EncodableMapポインタ
  const auto *arguments = std::get_if<flutter::EncodableMap>(call.arguments());
  if ( arguments ) {
    auto text_it = arguments->find(flutter::EncodableValue("text"));
    auto num_it = arguments->find(flutter::EncodableValue("num"));
    if ( (text_it != arguments->end()) && (num_it != arguments->end()) ) {
      std::string text = std::get<std::string>(text_it->second);
      int num = std::get<int>(num_it->second);
      message = MakeMessage(text,num);
    }
  }
}
FlutterからのデータはMethodCallのargumensに入って flutter::EncodableMapポインタとして取得ことができる。
取得したMapポインタからflutter::EncodableValue(キー名)で検索をかけて取得する。
Flutterへ返すデータを作成して結果通知
// map用意
flutter::EncodableMap res = {
  {"device", "Windows"},
  {"level", batteryLevel },
  {"message", message },
};

result->Success(res);
複数データを返す方法もデータを取り出すときと同様にflutter::EncodableMapに詰めることで返すことが可能。
結果はresult->Success(通知する結果)で返せる。
Linux
ソースコードと動作結果
#include "my_application.h"

#include <flutter_linux/flutter_linux.h>
#ifdef GDK_WINDOWING_X11
#include <gdk/gdkx.h>
#endif

#include "flutter/generated_plugin_registrant.h"

// メッセージ作成のため
#include <string>
#include <stdlib.h>

/* メッセージ作成 */
static std::string makeMessage(std::string text, int num) {
  std::string mark = "&";
  std::string message = "";
  for ( int i = 0; i < num; i++ ) {
    message += mark;
  }
  message += text;
  for ( int i = 0; i < num; i++ ) {
    message += mark;
  }
  return message;
}

/* バッテリー残量を取得 */
static int getBatteryLevel() {
  int level = -1;
  FILE* fp = nullptr;
  char buf[30];

  // バッテリー残量をコマンド実行で取得
  const char* cmd = "cat /sys/class/power_supply/BAT0/capacity";
  if ( (fp=popen(cmd,"r")) == nullptr ) {

  }
  // バッファにコマンド結果を格納
  if ( fgets(buf, 30, fp) != nullptr ) {
    level = atoi(buf);
  }
  (void)pclose(fp);

  return level;
}

/* コールバック関数 */
static void method_call_cb(FlMethodChannel *channel, FlMethodCall *method_call, gpointer user_data) {
  const gchar *method = fl_method_call_get_name(method_call);

  if (strcmp(method, "getBatteryInfo") == 0) {

    /* @POINT2 : Flutterから渡されたデータを解析取得 */

    std::string message = "Not Message...";

    // データ取得
    FlValue* args = fl_method_call_get_args(method_call);
    FlValue* text_value = fl_value_lookup_string(args, "text");
    FlValue* num_value = fl_value_lookup_string(args, "num");

    bool isText = (text_value == nullptr || fl_value_get_type(text_value) == FL_VALUE_TYPE_STRING ) ? true : false;
    bool isNum  = (num_value  == nullptr || fl_value_get_type(num_value)  == FL_VALUE_TYPE_INT ) ? true : false;

    if ( isText && isNum ) {
      // 取得データを適したデータ型に変換
      const char* text = fl_value_get_string(text_value);
      int num = fl_value_get_int(num_value);
      message = makeMessage(text,num);
    }

    // バッテリー残量取得
    int level = getBatteryLevel();

    /* @POINT3 : Flutterへ返す情報を作成 */

    g_autoptr(FlValue) res = fl_value_new_map();
    fl_value_set(res,
      fl_value_new_string("device"),
      fl_value_new_string("Linux")
    );
    fl_value_set(res,
      fl_value_new_string("level"),
      fl_value_new_int(level)
    );
    fl_value_set(res,
      fl_value_new_string("message"),
      fl_value_new_string(message.c_str())
    );

    g_autoptr(FlMethodResponse) response = FL_METHOD_RESPONSE(fl_method_success_response_new(res));
    g_autoptr(GError) error = nullptr;
    fl_method_call_respond(method_call, response, &error);

  } else {
    g_autoptr(FlMethodResponse) response = FL_METHOD_RESPONSE(fl_method_not_implemented_response_new());
    g_autoptr(GError) error = nullptr;
    fl_method_call_respond(method_call, response, &error);
  }

}

struct _MyApplication {
  GtkApplication parent_instance;
  char** dart_entrypoint_arguments;
};

G_DEFINE_TYPE(MyApplication, my_application, GTK_TYPE_APPLICATION)

static void my_application_activate(GApplication* application) {

  MyApplication* self = MY_APPLICATION(application);
  GtkWindow* window =
      GTK_WINDOW(gtk_application_window_new(GTK_APPLICATION(application)));

  gboolean use_header_bar = TRUE;
#ifdef GDK_WINDOWING_X11
  GdkScreen* screen = gtk_window_get_screen(window);
  if (GDK_IS_X11_SCREEN(screen)) {
    const gchar* wm_name = gdk_x11_screen_get_window_manager_name(screen);
    if (g_strcmp0(wm_name, "GNOME Shell") != 0) {
      use_header_bar = FALSE;
    }
  }
#endif
  if (use_header_bar) {
    GtkHeaderBar* header_bar = GTK_HEADER_BAR(gtk_header_bar_new());
    gtk_widget_show(GTK_WIDGET(header_bar));
    gtk_header_bar_set_title(header_bar, "platform_method");
    gtk_header_bar_set_show_close_button(header_bar, TRUE);
    gtk_window_set_titlebar(window, GTK_WIDGET(header_bar));
  } else {
    gtk_window_set_title(window, "platform_method");
  }

  gtk_window_set_default_size(window, 1280, 720);
  gtk_widget_show(GTK_WIDGET(window));

  g_autoptr(FlDartProject) project = fl_dart_project_new();
  fl_dart_project_set_dart_entrypoint_arguments(project, self->dart_entrypoint_arguments);

  FlView* view = fl_view_new(project);
  gtk_widget_show(GTK_WIDGET(view));
  gtk_container_add(GTK_CONTAINER(window), GTK_WIDGET(view));

  fl_register_plugins(FL_PLUGIN_REGISTRY(view));

  gtk_widget_grab_focus(GTK_WIDGET(view));

  /*===== ここから =====*/

  /* @POINT1 チャンネルとハンドラコールバック登録 */
  FlEngine *engine = fl_view_get_engine(view);
  g_autoptr(FlStandardMethodCodec) codec = fl_standard_method_codec_new();
  g_autoptr(FlBinaryMessenger) messenger = fl_engine_get_binary_messenger(engine);
  g_autoptr(FlMethodChannel) channel =
      fl_method_channel_new(messenger,
                            "platform_method/battery",
                            FL_METHOD_CODEC(codec));
  fl_method_channel_set_method_call_handler(channel,
                                            method_call_cb,
                                            g_object_ref(view),
                                            g_object_unref);

  /*===== ここまで =====*/

}

/*
    以下関数は省略(自動生成されたテンプレート参照)
        my_application_local_command_line
        my_application_dispose
        my_application_class_init
        my_application_init
        my_application_new
*/
詳細
MethodChannelの実装場所
VSCodeで自動作成した場合は既に以下関数が存在している。
static void my_application_activate(GApplication* application) {}
そして、Flutterからの受信を行うMethodChannelは以下の場所に実装していく。
static void my_application_activate(GApplication* application) {
  // 他実装は長いので省略
  fl_register_plugins(FL_PLUGIN_REGISTRY(view));

  gtk_widget_grab_focus(GTK_WIDGET(view)); // ここが実装位置の基準

        /****** この中に実装していきます ******/

}
MethodChannelの準備
// チャンネル用意
g_autoptr(FlMethodChannel) channel =
      fl_method_channel_new(messenger,
                            "platform_method/battery",
                            FL_METHOD_CODEC(codec));

// コールバック関数を登録
fl_method_channel_set_method_call_handler(channel,    // 用意したチャンネル
                                        method_call_cb,   // コールバック関数(メソッド)
                                        g_object_ref(view),
                                        g_object_unref);

  fl_method_channel_set_method_call_handler(channel,
                            method_call_cb, g_object_ref(view), g_object_unref);
Linuxの場合はMethodChannelはコールバック関数として登録してあげる必要があるらしい。
FlMethodChannelのチャンネルを作成して、
fl_method_channel_set_method_call_handlerに作成チャンネルとコールバック関数を登録。
今回登録するコールバック関数は以下で、この中にメソッドが指定されてた時の制御を書いていく。
static void method_call_cb(FlMethodChannel *channel, FlMethodCall *method_call, gpointer user_data) {
  const gchar *method = fl_method_call_get_name(method_call);

  if (strcmp(method, "getBatteryInfo") == 0) {
    // メソッド名「getBatteryInfo」が指定されていればここの処理が実行できる
  }
}
Flutterから指定されるメソッドは引数のFlMethodCall *method_callを用いてfl_method_call_get_name(method_call)で取得。
Flutterから渡されたデータを取得
// データ取得
FlValue* args = fl_method_call_get_args(method_call);       // データ一覧を取得
FlValue* text_value = fl_value_lookup_string(args, "text"); // キー名を指定して各バリューを取り出す
FlValue* num_value = fl_value_lookup_string(args, "num");

// 取得できているかチェック
bool isText = (text_value == nullptr || fl_value_get_type(text_value) == FL_VALUE_TYPE_STRING ) ? true : false;
bool isNum  = (num_value  == nullptr || fl_value_get_type(num_value)  == FL_VALUE_TYPE_INT ) ? true : false;

if ( isText && isNum ) {
  // 取得データを適したデータ型に変換
  const char* text = fl_value_get_string(text_value);
  int num = fl_value_get_int(num_value);
  message = makeMessage(text,num);
}
Flutterからのデータは引数のFlMethodCall *method_callより、
fl_method_call_get_args(method_call)でFLValueポインタとして取得。
バリューを取り出すときはfl_value_lookup_string(method_callから取り出したポインタ,"キー名")で取得。(この時も結果はFlValueポインタ)
取り出したバリューはfl_value_get_XXXでXXXのデータ型に変換。
Flutterへ返すデータを作成して結果通知
// map用意
g_autoptr(FlValue) res = fl_value_new_map();

// キーとバリューをmapに登録
fl_value_set(res,
  fl_value_new_string("device"),
  fl_value_new_string("Linux")
);
fl_value_set(res,
  fl_value_new_string("level"),
  fl_value_new_int(level)
);
fl_value_set(res,
  fl_value_new_string("message"),
  fl_value_new_string(message.c_str())
);

// レスポンス作成
g_autoptr(FlMethodResponse) response = FL_METHOD_RESPONSE(fl_method_success_response_new(res));
g_autoptr(GError) error = nullptr;

// 結果登録
fl_method_call_respond(method_call, response, &error);
複数データを返すときはfl_value_new_map()でmapを用意して使う。
mapにデータを登録するときはfl_value_setでキーとバリューを設定。
結果を返すときはFL_METHOD_RESPONSE(fl_method_success_response_new(通知する結果))にてレスポンスを作成し、
fl_method_call_respond(method_call, response, &error)に作成したレスポンスを入れることで返せる。
最後に
MethodChannelについてAndroidやiOSは結構記事が見つかるものの、少し前(2022/02)に正式対応となったWindowsやmacOS向けのやり方がなかなか見つからなかったので、本記事を作成してみました。
今回はMethodChannelを使ったもので、やり取りするデータについて型安全とは言えないと思います。
pigeonという型安全なメッセージでやりとりできる仕組みもあるらしいので、気が向いたら置き換えとかしてみたいなぁと思ったりしてます。
参考
Dart、Android、iOS
https://docs.flutter.dev/
Windows、Linusx
https://www.dynamsoft.com/codepool/flutter-document-scanning-plugin-windows-linux.html

