顔画像をクラスタリングする実装の例を複数見つけたので、整理のためにメモする。
チェックすべきポイント
- 顔照合の特徴量ベクトルを使っているかどうか
- 顔向きの変動にどれくらい対応しているか
- 表情の変化に対してどれくらい安定か
- 顔の一部が隠れている時にどれくらい安定か
- 照明条件が安定していないときにどれくらい安定か
- 顔照合のライブラリの性能、本人と他人とを区別する性能を反映したクラスタリングになっているか、特にその境目の性能が優れているかどうか
- クラスタリングアルゴリズムとして何を用いているのか
- 使用しているライブラリ
それぞれの実装にあるサンプルは
顔画像のクラスタリングが実装されていることを示すだけのサンプルです。
顔画像のクラスタリングが、人物の同一性を記述にクラスタリングが性能が保たれていることを示すものではありません。
性能が達成できているかどうかは、実際に顔画像群を入力して、どこまでクラスタリングに成功しているのかを検証することです。
評価の際に間違えてほしくないこと
- 顔識別の学習の性能
- クラスタリングアルゴリズムの性能
両方が、顔画像のクラスタリングに効いているということ。
最新のクラスタリングアルゴリズムを紹介しているときの顔識別器の学習済みのモデルが、東洋人のデータをあまり含まないデータセットで学習していることがありがちです。
ですから、使用している顔識別器の学習済みのモデルの精度の限界をあきらめないでください。
今までに学習モデルを作り上げてきた人たちは、そのためのデータベースを育てるための努力をしてきたのだということです。
東洋人の顔照合の精度・顔クラスタリングの性能が不足しているのであれば、それを乗り越えるデータセットを作りあげることです。
http://dlib.net/face_clustering.py.html
これはdlibの中にある顔画像のクラスタリングのスクリプトです。
github https://github.com/davisking/dlib
PyPI https://pypi.org/project/dlib/
dlibに含まれているライブラリだけで、目的の作業ができるなら、それに越したことはない。
そのスクリプトにある次の部分は、画像と特徴点のデータから、顔照合の128次元のベクトルを生成している部分です。
オリジナルのスクリプト
        # Compute the 128D vector that describes the face in img identified by
        # shape.
        face_descriptor = facerec.compute_face_descriptor(img, shape)
face_clustering.py
1番目の引数: shape_predictor_5_face_landmarks.dat
5点で顔のアライメントを行うためのデータです。
2番めの引数: dlib_face_recognition_resnet_model_v1.dat
face recognition model
顔照合のための学習済みのモデルです。
3番めの引数: 一つはまた複数の顔が含まれている画像がある入力ディレクトリ
4番目の引数: 出力ディレクトリ
動作例
$ ./face_clustering.py shape_predictor_5_face_landmarks.dat dlib_face_recognition_resnet_model_v1.dat ../examples/faces output_folder
Processing file: ../examples/faces/bald_guys.jpg
Number of faces detected: 24
Processing file: ../examples/faces/2009_004587.jpg
Number of faces detected: 2
Processing file: ../examples/faces/2008_002506.jpg
Number of faces detected: 3
Processing file: ../examples/faces/Tom_Cruise_avp_2014_4.jpg
Number of faces detected: 1
Processing file: ../examples/faces/2008_002079.jpg
Number of faces detected: 6
Processing file: ../examples/faces/2008_004176.jpg
Number of faces detected: 7
Processing file: ../examples/faces/dogs.jpg
Number of faces detected: 0
Processing file: ../examples/faces/2008_007676.jpg
Number of faces detected: 7
Processing file: ../examples/faces/2008_002470.jpg
Number of faces detected: 6
Processing file: ../examples/faces/2008_001009.jpg
Number of faces detected: 2
Processing file: ../examples/faces/2007_007763.jpg
Number of faces detected: 7
Processing file: ../examples/faces/2008_001322.jpg
Number of faces detected: 3
Number of clusters: 46
Biggest cluster id number: 0
Number of faces in biggest cluster: 6
Indices of images in the biggest cluster: [0, 1, 5, 11, 21, 22]
Saving faces in largest cluster to output folder...
$
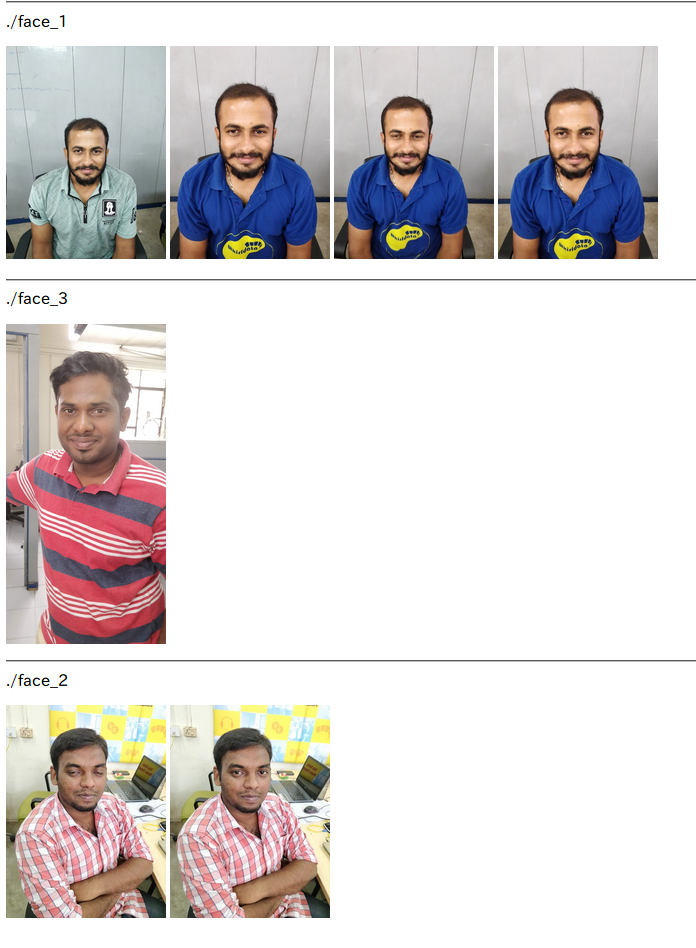
face_clustering.pyの出力結果のフォルダ
output_folder に保存されたのは、以下の顔画像でした。クラスタリングして一番大きいクラスターに属した画像を保存するというものです。

# Now let's cluster the faces.
labels = dlib.chinese_whispers_clustering(descriptors, 0.5)
num_classes = len(set(labels))
複数のクラスタを表示する改変版のスクリプト
一番大きなクラスタだけではなく、他のクラスタも結果を保存させたいならば、このスクリプトを書き換えるだけですむはずだ。
クラスタリング後のクラスタの数は、このアルゴリズムの中で自動で設定される。(k-MEANというアルゴリズムでは、クラスタの数が自動で決まらないのとは異なる。Wikipedia k平均法 )
改変後のスクリプト
#!/usr/bin/python
# The contents of this file are in the public domain. See LICENSE_FOR_EXAMPLE_PROGRAMS.txt
#
#   This example shows how to use dlib's face recognition tool for clustering using chinese_whispers.
#   This is useful when you have a collection of photographs which you know are linked to
#   a particular person, but the person may be photographed with multiple other people.
#   In this example, we assume the largest cluster will contain photos of the common person in the
#   collection of photographs. Then, we save extracted images of the face in the largest cluster in
#   a 150x150 px format which is suitable for jittering and loading to perform metric learning (as shown
#   in the dnn_metric_learning_on_images_ex.cpp example.
#   https://github.com/davisking/dlib/blob/master/examples/dnn_metric_learning_on_images_ex.cpp
#
# COMPILING/INSTALLING THE DLIB PYTHON INTERFACE
#   You can install dlib using the command:
#       pip install dlib
#
#   Alternatively, if you want to compile dlib yourself then go into the dlib
#   root folder and run:
#       python setup.py install
#
#   Compiling dlib should work on any operating system so long as you have
#   CMake installed.  On Ubuntu, this can be done easily by running the
#   command:
#       sudo apt-get install cmake
#
#   Also note that this example requires Numpy which can be installed
#   via the command:
#       pip install numpy

import sys
import os
import dlib
import glob

if len(sys.argv) != 5:
    print(
        "Call this program like this:\n"
        "   ./face_clustering.py shape_predictor_5_face_landmarks.dat dlib_face_recognition_resnet_model_v1.dat ../examples/faces output_folder\n"
        "You can download a trained facial shape predictor and recognition model from:\n"
        "    http://dlib.net/files/shape_predictor_5_face_landmarks.dat.bz2\n"
        "    http://dlib.net/files/dlib_face_recognition_resnet_model_v1.dat.bz2")
    exit()

predictor_path = sys.argv[1]
face_rec_model_path = sys.argv[2]
faces_folder_path = sys.argv[3]
output_folder_path = sys.argv[4]

# Load all the models we need: a detector to find the faces, a shape predictor
# to find face landmarks so we can precisely localize the face, and finally the
# face recognition model.
detector = dlib.get_frontal_face_detector()
sp = dlib.shape_predictor(predictor_path)
facerec = dlib.face_recognition_model_v1(face_rec_model_path)

descriptors = []
images = []

# Now find all the faces and compute 128D face descriptors for each face.
for f in glob.glob(os.path.join(faces_folder_path, "*.jpg")):
    print("Processing file: {}".format(f))
    img = dlib.load_rgb_image(f)

    # Ask the detector to find the bounding boxes of each face. The 1 in the
    # second argument indicates that we should upsample the image 1 time. This
    # will make everything bigger and allow us to detect more faces.
    dets = detector(img, 1)
    print("Number of faces detected: {}".format(len(dets)))

    # Now process each face we found.
    for k, d in enumerate(dets):
        # Get the landmarks/parts for the face in box d.
        shape = sp(img, d)

        # Compute the 128D vector that describes the face in img identified by
        # shape.
        face_descriptor = facerec.compute_face_descriptor(img, shape)
        descriptors.append(face_descriptor)
        images.append((img, shape))

# Now let's cluster the faces.
labels = dlib.chinese_whispers_clustering(descriptors, 0.5)
num_classes = len(set(labels))
print("Number of clusters: {}".format(num_classes))

for i, label in enumerate(labels):
    img, shape = images[i]

    clusterDir = os.path.join(output_folder_path, "%d" % label)
    if not os.path.isdir(clusterDir):
        os.makedirs(clusterDir)

    file_path = os.path.join(output_folder_path, "%d" % label, "face_" + str(i))
    # The size and padding arguments are optional with default size=150x150 and padding=0.25
    dlib.save_face_chip(img, shape, file_path, size=150, padding=0.25)
スクリプトへの解説
なお、
dlib.chinese_whispers_clustering(descriptors, 0.5) のchinese_whispers_clusteringに対応するC++の関数は以下のURLがヒントになる。
http://dlib.net/dlib/clustering/chinese_whispers.h.html
http://dlib.net/face_clustering.py.html
の中に解説が書いてあります。
#   This example shows how to use dlib's face recognition tool for clustering using chinese_whispers.
#   This is useful when you have a collection of photographs which you know are linked to
#   a particular person, but the person may be photographed with multiple other people.
#   In this example, we assume the largest cluster will contain photos of the common person in the
#   collection of photographs. Then, we save extracted images of the face in the largest cluster in
#   a 150x150 px format which is suitable for jittering and loading to perform metric learning (as shown
#   in the dnn_metric_learning_on_images_ex.cpp example.
#   https://github.com/davisking/dlib/blob/master/examples/dnn_metric_learning_on_images_ex.cpp
Chinese Whispers (clustering method) というクラスタリングアルゴリズムが用いられています。
Wikipedida Chinese_Whispers
によれば、フラットなクラスタリングであって、階層的なクラスタリングとは異なるとのことです。
乱数を利用したアルゴリズムであって、ノードの数が増えたときでも、処理時間の増加が線形であって、処理量の増大が抑えられるアルゴリズムらしいです。
この例題の中で使われている顔画像の人物は、次のページで解説されています。日本人にとっては、Bruce Willisくらいしか見慣れていないのではないかと思います。
High Quality Face Recognition with Deep Metric Learning
dlib の例題のスクリプトに対する若干の説明は以下の場所にある。
https://qiita.com/nonbiri15/items/9561c8194ba0b2041bd0
スクリプトで利用している学習済みデータについて
pyfacy — Face Recognition and Face Clustering.
PyPI https://pypi.org/project/pyfacy/
pip install numpy
pip install scipy
pip install scikit-learn
from pyfacy import face_clust


mdl = face_clust.Face_Clust_Algorithm('./cluster')
mdl.load_faces()
mdl.save_faces('./cluster_output')
このスクリプトはコマンドラインに引数をとりません。
入出力はスクリプトにハードコードされています。
入力ディレクトリ:'./cluster'
出力ディレクトリ:'./cluster_output'
スクリプトの実行例
$ python face_cluster.py
1 / 7
2 / 7
3 / 7
4 / 7
5 / 7
6 / 7
7 / 7
[INFO] Total of Images Readed= 7
$
face_cluster.py の実行結果
クラスタリングアルゴリズムにはscikit-learn を利用しています。
$ grep sklearn */*.py
pyfacy/utils.py:from sklearn.neighbors import KNeighborsClassifier
pyfacy/utils.py:from sklearn.linear_model import LogisticRegression
pyfacy/utils.py:from sklearn.discriminant_analysis import LinearDiscriminantAnalysis
$
pyfacy には、2つの顔を比較する関数が用意されています。その関数を利用してクラスタリング
2つの顔を比較する。
from pyfacy import utils
image1 = utils.load_image('<image1 src>')
image2 = utils.load_image('<image2 src>')
matching,distance = utils.compare_faces(image1,image2)
Face clustering with Python
顔照合技術ベースの顔画像のクラスタリングです。
github https://github.com/ageitgey/face_recognition
PyPI https://pypi.org/project/face_recognition/
にあるface_recognition モジュールを利用しています。
ソースコードをダウンロードするには、メールのアドレスを登録して、登録メールが送られて来る指示に従います。
facenet-face-cluster-chinese-whispers-
このクラスタリングの実装のGithubには、README.md ファイルと2つのpythonスクリプトがあるだけです。
batch_cluster.py はバッチ クラスタリングに使います。クラスタリングするためのたくさんディレクトリある場合に用います。
clustering.pyは、1つのディレクトリをクラスタリングするものです。たくさんの顔が含まれている1つのディレクトリを入力します。そうすると、クラスタ1つに対応する1つのディレクトリに対応するディレクトリを生成します。
このクラスタリングのスクリプトのgithubには、テスト用の入力データが用意されていません。自前のデータを用意して、スクリプトをコマンドラインで動作させてみることです。
facenetを使っています。
facenet は tensorflow を使っています。
github https://github.com/jonaphin/facenet
PyPI https://pypi.org/project/facenet/
SlideShare 論文輪読資料「FaceNet: A Unified Embedding for Face Recognition and Clustering」
github facenet Face Recognition using Tensorflow
Chinese Whispers Algorithm については、スクリプトの中に出典が書かれているので、それを調べていくのが良さそうだ。
facenet – Tensorflowを使用した顔認識
Facenetを使った類似顔画像検索のための特徴量抽出
Face Clustering with Python
K-Means を用いたクラスタリングです。
以下のスクリプトが示すように顔照合の視点はあまり反映されていなさそうです。
import numpy as np
from sklearn.cluster import KMeans

# Get the face data
data = [np.array(face["features"]) for face in faces]

# Build the model using the face data
kmeans = KMeans(n_clusters=cluster_count)
kmeans = kmeans.fit(data)

# Get cluster numbers for each face
labels = kmeans.predict(data)
for (label, face) in zip(labels, faces):
    face["group"] = int(label)
それを裏付けるかのように、クラスターの数Kを変えていったときに、costの値がどう減少していくのかをグラフに載せています。
そのことから、この手法ではその画像には全体として何人分の画像があるのかを顔照合的な部分で判断することはできていないようです。

Clustering Application in Face Recognition in Python
スクリプトの中にsklearn.clusterというモジュールの利用がある。
また画像の主成分分析 PCAをそのまま使っていることから、顔照合としての類似性を十分に反映したものにはなっていない。
主成分分析の成分には、人の区別に有効な成分と無効な成分とが混じっている。だから、この実装は、クラスタリングのアルゴリズムの違いによって、クラスタリング結果がどのように違ってくるのかを見るための参考の実装とみるべきだろう。
###We use different clustering algs on face datasets
from sklearn.decomposition import PCA
import numpy as np
from sklearn.preprocessing import StandardScaler
from sklearn.cluster import DBSCAN
from sklearn.cluster import KMeans
from sklearn.cluster import AgglomerativeClustering
付記:
顔関係のライブラリを調査していると、ライブラリの名前が似通っているのが多く、どれがどのサイトで公開されているものなのかが
混乱を生じやすい。
よりよいライブラリをよりよくすることで、標準となるべきライブラリを育ていくことが必要だ。
PyPI で配布しているライブラリは、他の人に利用してもらうことを想定しているものである。
Chinese Whispers clustering が scikit-learn にあればいいのに。
github https://github.com/nlpub/chinese-whispers-python
Python 3
Jupyter notebook 環境
samples.ipynb
入力データは、顔データではないが、chinese-wisper なので、アルゴリズムを理解するために、調査している。
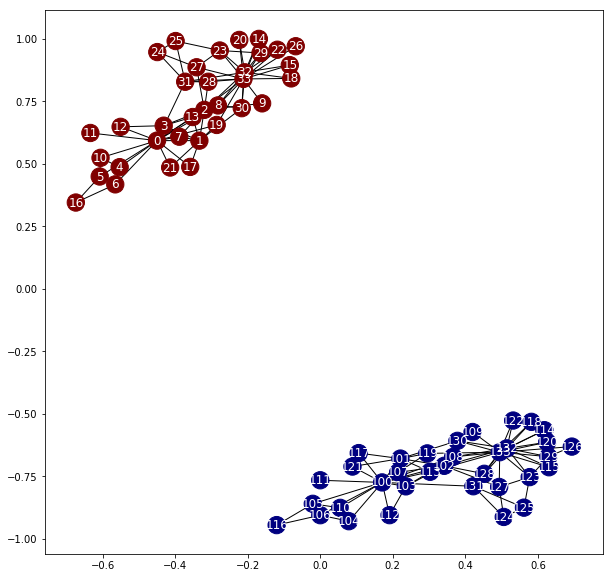
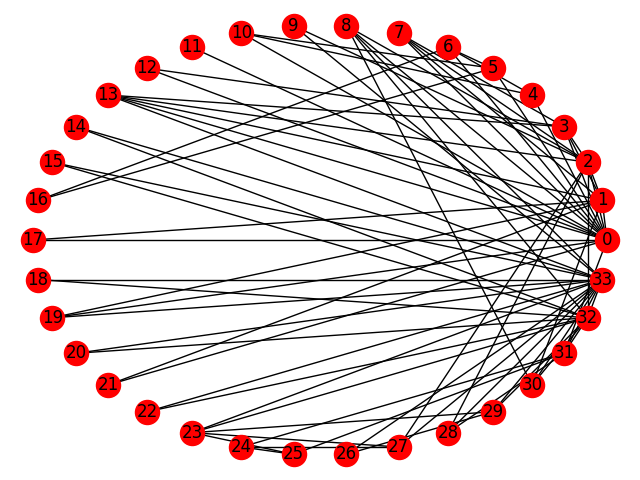
利用しているデータを反映して、ノード0,33には多数の接続先が見られます。
利用しているライブラリ
Python の NetworkX 入門
【Python】NetworkX 2.0の基礎的な使い方まとめ
利用しているデータ
各ノードが図に記されたグラフ構造を持っています。
0,33のノードが接続が多いのに対して、接続先が2つしかないノードも多数あります。
ノードを結ぶ部分のことをエッジと呼ぶ。
参考 グラフ理論
Chinese Whispers の論文
wikipedia [Chinese Whispers (clustering method)]
(https://en.wikipedia.org/wiki/Chinese_Whispers_(clustering_method))
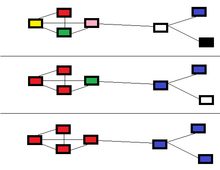
グラフ構造で表されているデータのクラスタリングらしい。
顔画像をクラスタリングしたい目的は何か?
それに応じてクラスタリング手法を変えることです。
そもそも顔の似た人を見つけるためのクラスタリングであれば、
そのような目的の階層化クラスタリングなどが候補に上がります。
総当りのクラスタリングでは、要素の数が増えるとクラスタリングのための計算コストが上昇します。
他人受け入れ率(FAR)を設定できるとき:
- 他人受け入れ率を十分に低くしたしきい値を使って照合の類似度を判定する。
- 個々の顔画像をノードする。
- 十分に照合の類似度が高いと確信できる場合だけ、ノードをエッジで接続する。
- そうすると、同一人物の範囲だけ接続されていて、別人はつながっていないデータ構造になる。
- グラフ構造を扱うpythonのライブラリにはnetworkxがある。
- networkx ではノードに対して、顔画像を貼り付けるなどができるので、結果を見やすい。