シリーズ
ElasticsearchのFrozenデータティアにデータが入るのをテストしてみた (1)
ElasticsearchのFrozenデータティアにデータが入るのをテストしてみた (2)
はじめに
こんにちは。Elasticのソリューションアーキテクトをしている関屋です。
Elasticsearchバージョン7.12からFrozenデータティアが使えるようになりました。Frozenティアを使えば、検索する頻度の少ない古いデータに関してはスナップショットとしてオブジェクトストレージに保管しつつも、そのまま検索可能できるようになりました。(Frozenを使うにはEnterpriseライセンスが必要です。)
(Opensearchでは同じ機能は存在しないので、ご注意ください)

引用: https://www.elastic.co/blog/introducing-elasticsearch-frozen-tier-searchbox-on-s3
このブログでは、Frozenデータティアを使うための必要な最低限の設定と、実際にデータがFrozenに入る様子を確認していきます。環境はElastic Cloudのバージョン8.7のEnterpriseライセンスを使っています。
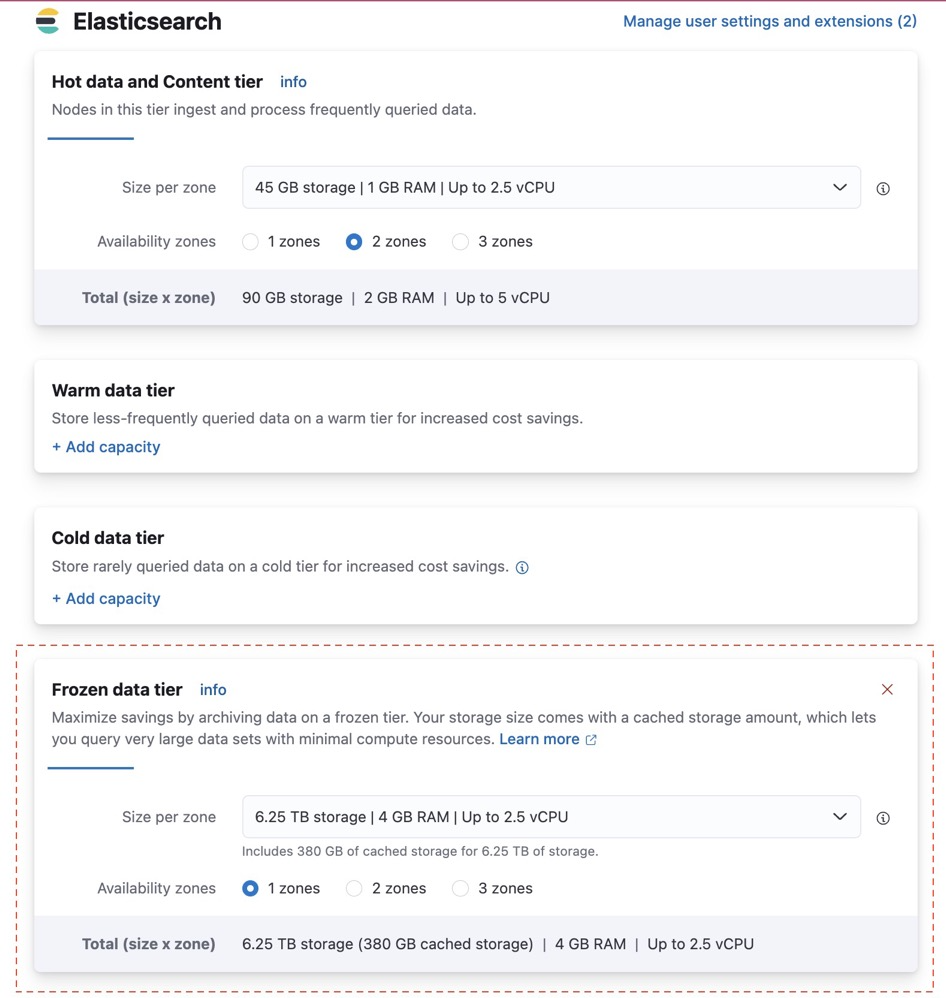
セルフマネージド(オンプレ)のElasticsearchでも、Minioなどのオブジェクトストレージを組むことで実現はできるものの、Elastic Cloudであれば手間なくFrozenを使うことができます。以下のようにFrozen data tierを設定するだけです。

テストステップの概要
詳細が長くなるので、本記事の構成として、こちらの概要編と、下の詳細手順編で分けてます。
1.準備: Data StreamとIndex Lifecycle Management(ILM)の理解
データティア構成を使う場合、基本的に2つの設定が必要です。ILM Policyと、Index Templateです。
ILM機能によって自動的にデータティア間のライフサイクルを管理できるようになります。例えば、HotのIndexがxx日以上経過あるいはxxGBのサイズ以上になったら、次のWarm/Cold/Frozenのいずれかのティアに移動するなど。この設定をILM Policyとしてユーザーが定義します。ILMを使い際は、v7.9で登場したData Streamと共に使うのが推奨です。Data StreamはIndexのようなものなのですが、IndexをBacking Indexとしてロールオーバーして扱うことができます。詳しくは下の文書を参考にしてください。
https://www.elastic.co/blog/an-introduction-to-the-elastic-data-stream-naming-scheme
https://www.elastic.co/guide/en/elasticsearch/reference/current/data-streams.html
Data Streamを使うために、Index Templateの作成が必要です。これは、通常のIndexであればIndex SettingsやIndex Mapppingを定義するのと同じように、Data Streamの同等の設定をIndex Templateとして作成します。(TemplateからBacking Indexとして一つ以上のIndexがData Streamの中で作られるわけです)
ここまで理解した上で、概要レベルですが、どのようにデータが流れていくかの例を以下に説明します。
- クライアントからData Stream(名前はmydataとします)にデータを投入
- Data Streamの内部で隠れIndexが .ds-mydata-2023.05.26-000001のような名前で作成され、実際のデータはこのIndexに入る
- ILM Policyに定義されたロールオーバー条件までデータが溜まったら、この1世代目のIndex(.ds-mydata-2023.05.26-000001)は書き込み対象ではなくなり、新たな2世代目のIndexが.ds-mydata-2023.05.27-000002のような名前で新たに作成され、次からはそこにデータが書き込まれるようになります。
- 1世代目のIndex(.ds-mydata-2023.05.26-000001)はILM Policyの定義に従い、Warm/Cold/Frozenなどに移動されます。
2.Index TemplateとIndex Lifecycle Policyの作成
ここからは作業としてやることの概要をまとめます。詳しいコードは下の手順詳細の方に記載しています。
- Index Lifecycle Policyの作成
- Index Templateの作成
このテンプレート内でData Streamを有効化し、また作ったILM Policyを紐づけておきます。
3. Elasticsearchにデータを投入し、データティア間の移動を確認
- データをData Streamに投入
- Hotデータティアにデータが保存されていることを確認
- ロールオーバー条件に合致するまでデータをさらにData Streamに投入し続ける
- Data StreamのIndexがロールオーバーされたことを確認
- ロールオーバーされたIndexがFrozenデータティアへの移動したことを確認
手順詳細
では、実際の手順です。こちらのコードに関してはKibanaのDev Toolsから実行できるコマンドとして用意しています。
ILM Policyの作成
Dev Toolsから以下を実行してください。ilm_mylogsはポリシー名なので、任意の名前をつけてください。
PUT /_ilm/policy/ilm_mylogs
{
    "policy": {
        "phases": {
            "hot": {
                "actions": {
                    "rollover": {
                        "max_docs": 10
                    }
                }
            },
            "frozen": {
                "min_age": "0d",
                "actions": {
                    "searchable_snapshot": {
                        "snapshot_repository": "found-snapshots"
                    }
                }
            },
            "delete": {
                "min_age": "365d",
                "actions": {
                    "delete": {
                        "delete_searchable_snapshot": "true"
                    }
                }
            }
        }
    }
}
上記では下のようにライフサイクルを定義しています。
- Index内のドキュメント数が10を超えるとIndexのロールオーバーを行う ( テストでロールオーバーが簡単に行われるような条件に設定していますが、普通はこのような条件にしないでくださいw)
- ロールオーバーの直後(0days)でFrozenに移動する
- ロールオーバーの365日後にIndexを削除する
Index Templateの作成
テンプレート名mylogs_templateとして作成します。これも任意の名前でいいです。
PUT /_index_template/mylogs_template
{
    "index_patterns": ["mylogs*"],
    "priority": 100,
    "data_stream": {},
    "template": {
        "settings": {
            "index": {
                "lifecycle": {
                    "name": "ilm_mylogs"
                },
                "routing": {
                    "allocation": {
                        "include": {
                            "_tier_preference": "data_hot"
                        }
                    }
                },
                "number_of_shards": "1",
                "number_of_replicas": "0"
            }
        },
        "mappings": {
            "properties": {
                "@timestamp": {
                    "type": "date"
                },
                "message": {
                    "type": "text"
                }
            }
        },
        "aliases": {}
    }
}
このテンプレートのポイント
- Index Templateに、ILMポリシーをリンクする
                "lifecycle": {
                    "name": "ily_mylogs"
                },
- Data Streamを有効化
"data_stream": {}
- このIndexテンプレートを適用してほしいData Stream名の文字列パターンを設定
"index_patterns": ["mylogs*"],
データをData Streamに投入
宛先のData Stream名を指定してドキュメントをPostします。Index_patterns (mylogs*)にマッチするData Stream名(例:mylogs-test01)であれば何でも良いです。
POST /mylogs-test01/_doc
{
    "@timestamp": "2023-01-01T00:00:00+0900",
    "message": "hello"
}
Hotデータティアにデータが保存されていることを確認
統計値を確認する前は必ず_refreshを実行し、最新の数値を確認できるようにします。
POST /mylogs-test01/_refresh
mylogs-test01のShard情報を確認すると、データの格納ノードを確認できます。
GET /_cat/shards/mylogs-test01?format=yaml
---
- index: ".ds-mylogs-test01-2023.05.26-000001"
  shard: "0"
  prirep: "p"
  state: "STARTED"
  docs: "1"
  store: "3.7kb"
  ip: "10.46.32.91"
  node: "instance-0000000014"
下のコマンドにて、instance-0000000014がHotデータティアのノードであることがわかります。(node.roleに'h'のシンボルがあるのがHot)
GET /_cat/nodes?v
ip           heap.percent ram.percent cpu load_1m load_5m load_15m node.role master name
10.46.32.102           51         100   0    0.68    1.88     2.98 lr        -      instance-0000000002
10.46.47.224           79         100   7    1.42    1.94     2.38 himrst    *      instance-0000000013
10.46.32.163           32          93   0    0.72    0.85     0.97 rw        -      instance-0000000003
10.46.32.91            72         100   6    1.79    2.44     2.79 himrst    -      instance-0000000014
10.46.32.26            49         100   0    4.36    2.74     2.21 mv        -      tiebreaker-0000000012
10.46.32.209           36          66   0    0.43    0.49     0.59 f         -      instance-0000000015
現状のIndexのライフサイクルの状態をexplainコマンドで確認します。
GET /mylogs-test01/_ilm/explain
{
  "indices": {
    ".ds-mylogs-test01-2023.05.26-000001": {
      "index": ".ds-mylogs-test01-2023.05.26-000001",
      "managed": true,
      "policy": "ilm_mylogs",
      "index_creation_date_millis": 1685080936153,
      "time_since_index_creation": "3.04m",
      "lifecycle_date_millis": 1685080936153,
      "age": "3.04m",
      "phase": "hot",
      "phase_time_millis": 1685080936617,
      "action": "rollover",
      "action_time_millis": 1685080936617,
      "step": "check-rollover-ready",
      "step_time_millis": 1685080936617,
      "phase_execution": {
        "policy": "ilm_mylogs",
        "phase_definition": {
          "min_age": "0ms",
          "actions": {
            "rollover": {
              "max_docs": 10
            }
          }
        },
        "version": 2,
        "modified_date_in_millis": 1685079122762
      }
    }
  }
}
ポイント
- Indexの"phase": "hot"である
- "step": "check-rollover-ready"というところで、このIndexがロールオーバー前であり、ロールオーバー条件に合致するかのチェックがされていることがわかります
ロールオーバー条件に合致するまでデータをData Streamに投入
以下のPOSTを繰り返し、Index内のドキュメントが10を超えるようにします。
POST /mylogs-test01/_doc
{
    "@timestamp": "2023-01-01T00:00:00+0900",
    "message": "hello"
}
POST /mylogs-test01/_refresh
GET /mylogs-test01/_ilm/explain
{
  "indices": {
    ".ds-mylogs-test01-2023.05.26-000001": {
      "index": ".ds-mylogs-test01-2023.05.26-000001",
      "managed": true,
      "policy": "ilm_mylogs",
      "index_creation_date_millis": 1685080936153,
      "time_since_index_creation": "6.81m",
      "lifecycle_date_millis": 1685080936153,
      "age": "6.81m",
      "phase": "hot",
      "phase_time_millis": 1685080936617,
      "action": "rollover",
      "action_time_millis": 1685080936617,
      "step": "check-rollover-ready",
      "step_time_millis": 1685080936617,
      "phase_execution": {
        "policy": "ilm_mylogs",
        "phase_definition": {
          "min_age": "0ms",
          "actions": {
            "rollover": {
              "max_docs": 10
            }
          }
        },
        "version": 2,
        "modified_date_in_millis": 1685079122762
      }
    }
  }
}
ポイント
- Rollover条件(max_docs:10)を満たしているが、この時点ではまだphase: Hotかつstep: check-rollover-readyと、ロールオーバーが発生していない。
ロールオーバーはindices.lifecycle.poll_interval(デフォルト10分)のサイクル毎にチェックされ、行われるので、10分経過下あたりにもう一度チェックしましょう。
GET /mylogs-test01/_ilm/explain
{
  "indices": {
    ".ds-mylogs-test01-2023.05.26-000002": {
      "index": ".ds-mylogs-test01-2023.05.26-000002",
      "managed": true,
      "policy": "ilm_mylogs",
      "index_creation_date_millis": 1685081592247,
      "time_since_index_creation": "11.71s",
      "lifecycle_date_millis": 1685081592247,
      "age": "11.71s",
      "phase": "hot",
      "phase_time_millis": 1685081592618,
      "action": "rollover",
      "action_time_millis": 1685081593018,
      "step": "check-rollover-ready",
      "step_time_millis": 1685081593018,
      "phase_execution": {
        "policy": "ilm_mylogs",
        "phase_definition": {
          "min_age": "0ms",
          "actions": {
            "rollover": {
              "max_docs": 10
            }
          }
        },
        "version": 2,
        "modified_date_in_millis": 1685079122762
      }
    },
    ".ds-mylogs-test01-2023.05.26-000001": {
      "index": ".ds-mylogs-test01-2023.05.26-000001",
      "managed": true,
      "policy": "ilm_mylogs",
      "index_creation_date_millis": 1685080936153,
      "time_since_index_creation": "11.13m",
      "lifecycle_date_millis": 1685081592218,
      "age": "11.74s",
      "phase": "frozen",
      "phase_time_millis": 1685081593218,
      "action": "searchable_snapshot",
      "action_time_millis": 1685081593418,
      "step": "wait-for-shard-history-leases",
      "step_time_millis": 1685081593418,
      "phase_execution": {
        "policy": "ilm_mylogs",
        "phase_definition": {
          "min_age": "0d",
          "actions": {
            "searchable_snapshot": {
              "snapshot_repository": "found-snapshots",
              "force_merge_index": true
            }
          }
        },
        "version": 2,
        "modified_date_in_millis": 1685079122762
      }
    }
  }
}
上のポイント
- ロールオーバーが行われて、*-000001のIndexは"phase": "frozen"に変化し、"step": "wait-for-shard-history-leases"となっています。
- 2世代目のIndex *-000002が新たに作成され、こちらは"phase": "hot"です。
GET /_cat/shards/mylogs-test01?format=yaml
---
- index: ".ds-mylogs-test01-2023.05.26-000002"
  shard: "0"
  prirep: "p"
  state: "STARTED"
  docs: "0"
  store: "225b"
  ip: "10.46.47.224"
  node: "instance-0000000013"
- index: ".ds-mylogs-test01-2023.05.26-000001"
  shard: "0"
  prirep: "p"
  state: "STARTED"
  docs: "12"
  store: "8.1kb"
  ip: "10.46.32.91"
  node: "instance-0000000014"
上のポイント
- 1世代目の*-000001のIndexはexplain結果ではphaseがfrozenであったものの、まだ実際にはHotノードinstance-0000000014に居ました。
PhaseがFrozenになった際に、"step": "wait-for-shard-history-leases"でしばらく状態が止まるのがここで観察されました。これはどうやら下の文書に書いてある、Frozenに実際にデータを移動する前に、ShardのHistoryの有効期限を待つ必要があるためのようです。
https://www.elastic.co/guide/en/elasticsearch/reference/current/index-modules-history-retention.html
次、7分後くらいにまたexplainを実行してみました。1世代目のFrozenフェーズのstepが"step": "segment-count"に進んでました。
{
  "indices": {
    ".ds-mylogs-test01-2023.05.26-000002": {
      "index": ".ds-mylogs-test01-2023.05.26-000002",
      "managed": true,
      "policy": "ilm_mylogs",
      "index_creation_date_millis": 1685081592247,
      "time_since_index_creation": "7.53m",
      "lifecycle_date_millis": 1685081592247,
      "age": "7.53m",
      "phase": "hot",
      "phase_time_millis": 1685081592618,
      "action": "rollover",
      "action_time_millis": 1685081593018,
      "step": "check-rollover-ready",
      "step_time_millis": 1685081593018,
      "phase_execution": {
        "policy": "ilm_mylogs",
        "phase_definition": {
          "min_age": "0ms",
          "actions": {
            "rollover": {
              "max_docs": 10
            }
          }
        },
        "version": 2,
        "modified_date_in_millis": 1685079122762
      }
    },
    ".ds-mylogs-test01-2023.05.26-000001": {
      "index": ".ds-mylogs-test01-2023.05.26-000001",
      "managed": true,
      "policy": "ilm_mylogs",
      "index_creation_date_millis": 1685080936153,
      "time_since_index_creation": "18.46m",
      "lifecycle_date_millis": 1685081592218,
      "age": "7.53m",
      "phase": "frozen",
      "phase_time_millis": 1685081593218,
      "action": "searchable_snapshot",
      "action_time_millis": 1685081593418,
      "step": "segment-count",
      "step_time_millis": 1685081892377,
      "phase_execution": {
        "policy": "ilm_mylogs",
        "phase_definition": {
          "min_age": "0d",
          "actions": {
            "searchable_snapshot": {
              "snapshot_repository": "found-snapshots",
              "force_merge_index": true
            }
          }
        },
        "version": 2,
        "modified_date_in_millis": 1685079122762
      }
    }
  }
}
さらに、3分後くらいにまたexplainを実行してみました。1世代目のIndex名が変わり、partial-*というプリフィックスがつきました。"phase": "frozen", "action": "complete", "step": "complete"とあり、Frozenへの移行が完了したのがわかります。
{
  "indices": {
    "partial-.ds-mylogs-test01-2023.05.26-000001": {
      "index": "partial-.ds-mylogs-test01-2023.05.26-000001",
      "managed": true,
      "policy": "ilm_mylogs",
      "index_creation_date_millis": 1685080936153,
      "time_since_index_creation": "21.4m",
      "lifecycle_date_millis": 1685081592218,
      "age": "10.47m",
      "phase": "frozen",
      "phase_time_millis": 1685081593218,
      "action": "complete",
      "action_time_millis": 1685081593418,
      "step": "complete",
      "step_time_millis": 1685082195648,
      "repository_name": "found-snapshots",
      "snapshot_name": "2023.05.26-.ds-mylogs-test01-2023.05.26-000001-ilm_mylogs-di1fqot-qzkqvg1hoqkwzw",
      "phase_execution": {
        "policy": "ilm_mylogs",
        "phase_definition": {
          "min_age": "0d",
          "actions": {
            "searchable_snapshot": {
              "snapshot_repository": "found-snapshots",
              "force_merge_index": true
            }
          }
        },
        "version": 2,
        "modified_date_in_millis": 1685079122762
      }
    },
    ".ds-mylogs-test01-2023.05.26-000002": {
      "index": ".ds-mylogs-test01-2023.05.26-000002",
      "managed": true,
      "policy": "ilm_mylogs",
      "index_creation_date_millis": 1685081592247,
      "time_since_index_creation": "10.47m",
      "lifecycle_date_millis": 1685081592247,
      "age": "10.47m",
      "phase": "hot",
      "phase_time_millis": 1685081592618,
      "action": "rollover",
      "action_time_millis": 1685081593018,
      "step": "check-rollover-ready",
      "step_time_millis": 1685081593018,
      "phase_execution": {
        "policy": "ilm_mylogs",
        "phase_definition": {
          "min_age": "0ms",
          "actions": {
            "rollover": {
              "max_docs": 10
            }
          }
        },
        "version": 2,
        "modified_date_in_millis": 1685079122762
      }
    }
  }
}
次、Shardの状態を確認すると、instance-0000000014(Hotノード)にあったものが、instance-0000000015(Frozenノードに移ったことがわかります)
GET /_cat/shards/mylogs-test01?format=yaml
---
- index: "partial-.ds-mylogs-test01-2023.05.26-000001"
  shard: "0"
  prirep: "p"
  state: "STARTED"
  docs: "12"
  store: "0b"
  ip: "10.46.32.209"
  node: "instance-0000000015"
- index: ".ds-mylogs-test01-2023.05.26-000002"
  shard: "0"
  prirep: "p"
  state: "STARTED"
  docs: "0"
  store: "225b"
  ip: "10.46.47.224"
  node: "instance-0000000013"
まとめ
いかがでしたでしょうか。
実際にFrozenデータティアを使いたいと思っても、Frozenノードをプロビジョンしただけではデフォルトではデータは入っていきませんので、今回の手順を参考にILMの設定、Data Streamの設定をしてください。
なお、Elastic AgentのIntegrationsを使ったログ収集では、自動的にIndex TemplateとData Streamが構成され、ILMも'logs'という名前のILM Policyが自動的に作成されています。ですので、この場合は'logs'のILM Policyを変更してFrozenを有効にするか、あるいは少し手間ですが、Policyを別に作り、Index Templateがその新しいPolicyを使うように変更する形となります。