※ 2018/10/05 Laravel5.6 から 5.7 に記述を更新
関連記事はこちら
Laravel + Vue + Vuetify で業務サイト作ってみる
すごく単純パターンで記述
Laravel の Blade から Vueのコンポーネントにデータを渡してみる
とりあえずインストールから
(インストールはcentos7 を利用した時のメモです)
1.Laravel インストール
$ composer create-project --prefer-dist   laravel/laravel   u9m31
$ cd  u9m31
$ php artisan --version
Laravel Framework 5.7.8
実行時点での最新 v5.6.21 がインストールされました
実行時点での最新 v5.7.8 がインストールされました
2.Vue.js インストール
$ npm install
「 pngquant-bin@4.0.0 」のエラーが出たらバージョンを固定
npm ERR! pngquant-bin@4.0.0 postinstall: `node lib/install.js`
npm ERR! Exit status 1
npm ERR!
npm ERR! Failed at the pngquant-bin@4.0.0 postinstall script.
npm ERR! This is probably not a problem with npm. There is likely additional logging output above.
~~
    "devDependencies": {
        "axios": "^0.18",
        "bootstrap": "^4.0.0",
        "cross-env": "^5.1",
        "jquery": "^3.2",
        "laravel-mix": "^2.0",
        "lodash": "^4.17.5",
        "popper.js": "^1.12",
        "vue": "^2.5.7",
★      "imagemin-pngquant": "5.0.1"
    }
~~
こちらを参考
https://nextat.co.jp/staff/archives/189
https://qiita.com/hokutoasari/items/e01179cd3bb0e2fd74af
いろんなノウハウをあげてくださる方々に感謝
$ npm install
3.Vue.js の画面 Component 作成
	<template>
	    <div class="container">
	        <div class="row justify-content-center">
	            <div class="col-md-8">
	                <div class="card card-default">
	                    <div class="card-header">Example Component</div>

	                    <div class="card-body">
	                        I'm an example component. <br>
★1	                        <span class="test">{{ test }}</span>
	                    </div>
	                </div>
	            </div>
	        </div>
	    </div>
	</template>

	<style scoped>
	.test {
	    color: red;
	}
	</style>

	<script>
	export default {
	    props: {
★2	        test: String,
	    },

	    mounted() {
	        console.log('ExampleComponent mounted.')
	    },
	}
	</script>
★2で Laravel からのデータを受け取り
★1で 受け取ったデータを表示している
4.Vue.js の画面 Component の読み込み設定
/**
 * First we will load all of this project's JavaScript dependencies which
 * includes Vue and other libraries. It is a great starting point when
 * building robust, powerful web applications using Vue and Laravel.
 */

require('./bootstrap');

window.Vue = require('vue');

/**
 * Next, we will create a fresh Vue application instance and attach it to
 * the page. Then, you may begin adding components to this application
 * or customize the JavaScript scaffolding to fit your unique needs.
 */

Vue.component('example-component', require('./components/ExampleComponent.vue'));

const app = new Vue({
    el: '#app'
});
コンポーネントの読み込み設定
「 ExampleComponent.vue 」を 「 example-component 」という名前で使えるように読み込み
5.Laravel 側の画面 Blade 作成
	<!doctype html>
	<html lang="{{ app()->getLocale() }}">
	<head>
	    <meta charset="utf-8">
	    <meta http-equiv="X-UA-Compatible" content="IE=edge">
	    <meta name="viewport" content="width=device-width, initial-scale=1">
	    <meta name="csrf-token" content="{{ csrf_token() }}">

	    <title>Laravel5.7 + Vue.js2.5</title>

	    <!-- Fonts -->
	    <link href="https://fonts.googleapis.com/css?family=Nunito:200,600" rel="stylesheet" type="text/css">

	    <!-- Styles -->
	    <link rel="stylesheet" href="{{ mix('css/app.css') }}">
	    <style>
	    html, body {
	        background-color: #fff;
	        color: #636b6f;
	        font-family: 'Nunito', sans-serif;
	        font-weight: 200;
	        height: 100vh;
	        margin: 0;
	    }
	    </style>
	</head>
	<body>
	    <div id="app">
★	        <example-component test="GET DATA: {{ $_GET['AAA'] }}"></example-component>
	    </div>
	    <script src=" {{ mix('js/app.js') }} "></script>
	</body>
	</html>
★Laravel から データを Vue へ渡している
固定文字列「 GET DATA: 」 と、変数の内容 $_GET['AAA'] を渡している
手順3の★2の props には ここで指定した要素名?「test=」を設定すること
6.Laravel ルーティング設定
Route::get('/', function () {
    return view('home');
});
手順5で作った Blade 画面「 home 」を呼び出し
7.Vue.js のコンパイル
$ npm run dev
$ $ find public/ -type f -name "app*" -ls
  197822 Oct  5 12:44 public/css/app.css
 1389083 Oct  5 12:44 public/js/app.js
./public 配下に app.css と app.js が生成されている
※ 出力は一部整形しています
8.Laravel サーバ起動
$ php artisan serve --host=172.16.0.100 --port=8000
IPアドレスや ポートは任意
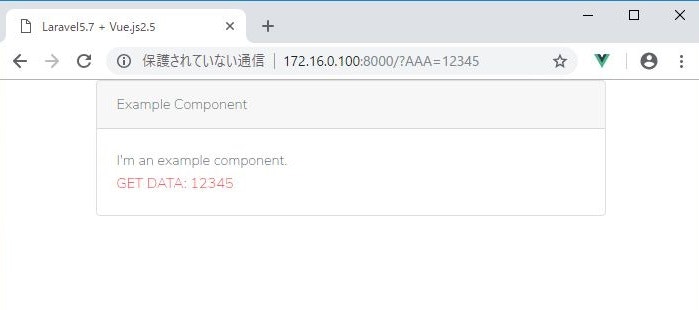
9.ブラウザからアクセス
上記で起動したサーバのIPとポートにアクセス
GETに渡すためにGET要求も追加しとく
すると、Laravel から Vue へデータが引き渡されて、表示が以下のようになること
以上
Laravel から Vue へデータを渡すことができました
すごく単純パターンだけど。。