※ 2018/10/15 Laravel5.6 から 5.7 に記述を更新
Laravelに登録しているユーザでログイン処理をして、ユーザの権限によって表示する vueコンポーネントを出し分けてみます
Laravelの権限は GATE 機能 を利用してみます
環境設定他関連記事はこちら
Laravel + Vue + Vuetify で業務サイト作ってみる
とりあえず、権限は「管理者 Admin」と「ユーザ User」の2種類のみ
隠し設定?で「システム管理者 System」も一応定義だけはしておきます
権限 role 系の設定等についてはこちらを参考にさせていただきました
LaravelのGate(ゲート)機能で権限(ロール)によるアクセス制限を実装する
1.ユーザテーブルに権限roleカラムを追加
ユーザテーブル変更
ほんとはカラム追加のmigrateをするべきなんでしょうけど、Userテーブル作成ファイルを直接編集しちゃいます
<?php

use Illuminate\Support\Facades\Schema;
use Illuminate\Database\Schema\Blueprint;
use Illuminate\Database\Migrations\Migration;

class CreateUsersTable extends Migration
{
    /**
     * Run the migrations.
     *
     * @return void
     */
    public function up()
    {
        Schema::create('users', function (Blueprint $table) {
            $table->increments('id');
            $table->string('name');
            $table->string('loginid')->unique()->comment('ログインID');
            $table->string('password');
            $table->tinyInteger('role')->unsigned()->default(10)->comment('権限 0:system  5:admin  10:user');
            $table->rememberToken();
            $table->timestamps();
        });
    }

    /**
     * Reverse the migrations.
     *
     * @return void
     */
    public function down()
    {
        Schema::dropIfExists('users');
    }
}
初期データ追加部分変更
管理者ユーザと一般ユーザを作成して、ダミーデータを100件登録
<?php

use Illuminate\Database\Seeder;
use Illuminate\Support\Facades\Hash;

class UsersTableSeeder extends Seeder
{
    /**
    * Run the database seeds.
    *
    * @return void
    */
    public function run()
    {
        DB::table('users')->insert(
        [
            [
                'name' => 'メイプル 管理者',
                'loginid' => 'maple_admin',
                'password' => Hash::make('password'),
                'role' => 5,
            ],
            [
                'name' => 'メイプル ユーザ',
                'loginid' => 'maple_user',
                'password' => Hash::make('password'),
                'role' => 10,
            ],
        ]);

        factory(App\User::class, 100)->create();
    }
}
ダミーデータ作成部分変更
ダミーデータも role を追加しときます
role の出現率?はユーザ権限を多めにしておきます
<?php

use Faker\Generator as Faker;
use Illuminate\Support\Facades\Hash;

/*
|--------------------------------------------------------------------------
| Model Factories
|--------------------------------------------------------------------------
|
| This directory should contain each of the model factory definitions for
| your application. Factories provide a convenient way to generate new
| model instances for testing / seeding your application's database.
|
*/

$factory->define(App\User::class, function (Faker $faker) {
    return [
        'name' => $faker->name,
        'loginid' => $faker->unique()->safeEmail,
        'password' => Hash::make('password'),
        'role' => $faker->randomElement($array = array (5, 10, 10, 10, 10, 10)),
    ];
});
モデルも変更
<?php

namespace App;

use Illuminate\Notifications\Notifiable;
use Illuminate\Contracts\Auth\MustVerifyEmail;
use Illuminate\Foundation\Auth\User as Authenticatable;

class User extends Authenticatable
{
    use Notifiable;

    /**
     * The attributes that are mass assignable.
     *
     * @var array
     */
    protected $fillable = [
        'name',
//        'email',
        'loginid',
        'password',
    ];

    /**
     * The attributes that should be hidden for arrays.
     *
     * @var array
     */
    protected $hidden = [
        'password',
        'role',
        'remember_token',
    ];
}
変更を反映
php artisan migrate:refresh --seed
2.Laravel GATE の設定
参考サイトをほぼそのまま真似しておきます
※ boot 内に権限毎の定義(Gate::define)をしておきます
LaravelのGate(ゲート)機能で権限(ロール)によるアクセス制限を実装する
<?php

namespace App\Providers;

use Illuminate\Support\Facades\Gate;
use Illuminate\Foundation\Support\Providers\AuthServiceProvider as ServiceProvider;

class AuthServiceProvider extends ServiceProvider
{
    /**
     * The policy mappings for the application.
     *
     * @var array
     */
    protected $policies = [
        'App\Model' => 'App\Policies\ModelPolicy',
    ];

    /**
     * Register any authentication / authorization services.
     *
     * @return void
     */
    public function boot()
    {
        $this->registerPolicies();

        // システム管理者(role 0)のみ許可
        Gate::define('system', function ($user) {
            return ($user->role == 0);
        });

        // 管理者以上(システム管理者(role 0) & 管理者(role 5))に許可
        Gate::define('admin', function ($user) {
            return ($user->role <= 5);
        });

        // 一般ユーザ(role 10)以上(つまり全権限)に許可
        Gate::define('all', function ($user) {
            return ($user->role <= 10);
        });

        // 一般ユーザのみ許可
        Gate::define('user', function ($user) {
            return ($user->role == 10);
        });
    }
}
GATE 指定によって以下の動作になる
'system' とすると、システム管理者(role 0)のみ許可
'admin' とすると、システム管理者(role 0) と 管理者(role 5)に許可
'user' とすると、ユーザ(role 10)のみ許可
'all' とすると、システム管理者、管理者、一般ユーザに許可
3.管理者用コンポーネント作成
作成済みの ExampleComponent.vue をコピーして 管理者用コンポーネントを作成します。
どちらの権限で入っているのかを分かりやすくするために、ユーザ名や role も表示できるように改造もしときます。
ユーザ用コンポーネント
GETで表示をやめて、ユーザ名やらを表示するように変更
<template>
  <div class="container">
    <div class="row justify-content-center">
      <div class="col-md-8">
        <div class="card card-default">
          <div class="card-header">Example Component</div>

          <div class="card-body">
            I'm an example component.
            <div class="roledetail">
              ID: {{ id }}<br>
              Name: {{ name }}<br>
              Role: {{ role }}<br>
            </div>
            <button v-on:click="axiosLogout">logout</button>
          </div>

        </div>
      </div>
    </div>
  </div>
</template>

<style scoped>
.roledetail {
  color: red;
  font-size: 4vw;
}
</style>

<script>
export default {
  props: {
    id: String,
    name: String,
    role: String,
    logout: String,
  },

  mounted() {
    console.log('ExampleComponent mounted.')
    console.log('name: '+ this.name)
  },

  methods: {
    axiosLogout() {
      axios.post(this.logout)
      .then( function (response) {
        console.log(response)
      }.bind(this))

      .catch(function (error) {
        console.log(error)
        if (error.response) {
          if (error.response.status) {
            if (error.response.status == 401 || error.response.status == 419) {
              var parser = new URL(this.logout)
              location.href=parser.origin
            }
          }
        }
      }.bind(this))
    },
  },
}
</script>
管理者用コンポーネント
ユーザ用からコピーして
$ cp resources/js/components/ExampleComponent.vue resources/js/components/AdminComponent.vue
中身の名称部分を変更
<template>
  <div class="container">
    <div class="row justify-content-center">
      <div class="col-md-8">
        <div class="card card-default">
          <div class="card-header">Admin Component</div>

          <div class="card-body">
            I'm an admin component.
            <div class="roledetail">
              ID: {{ id }}<br>
              Name: {{ name }}<br>
              Role: {{ role }}<br>
            </div>
            <button v-on:click="axiosLogout">logout</button>
          </div>

        </div>
      </div>
    </div>
  </div>
</template>

<style scoped>
.roledetail {
  color: blue;
  font-size: 4vw;
}
</style>

<script>
export default {
  props: {
    id: String,
    name: String,
    role: String,
    logout: String,
  },

  mounted() {
    console.log('AdminComponent mounted.')
    console.log('name: '+ this.name)
  },

  methods: {
    axiosLogout() {
      axios.post(this.logout)
      .then( function (response) {
        console.log(response)
      }.bind(this))

      .catch(function (error) {
        console.log(error)
        if (error.response) {
          if (error.response.status) {
            if (error.response.status == 401 || error.response.status == 419) {
              var parser = new URL(this.logout)
              location.href=parser.origin
            }
          }
        }
      }.bind(this))
    },
  },
}
</script>
管理者用コンポーネント取り込み
require('./bootstrap');

window.Vue = require('vue');

Vue.component('example-component', require('./components/ExampleComponent.vue'));
Vue.component('admin-component', require('./components/AdminComponent.vue'));

const app = new Vue({
    el: '#app'
});
Laravel側からの呼び出し部分
GATEで管理者用コンポーネントとユーザ用コンポーネントを出し分け
vue 側にLaravelのユーザ名とか権限(role)とかも渡しておく
<!doctype html>
<html lang="{{ app()->getLocale() }}">
<head>
    <meta charset="utf-8">
    <meta http-equiv="X-UA-Compatible" content="IE=edge">
    <meta name="viewport" content="width=device-width, initial-scale=1">
    <meta name="csrf-token" content="{{ csrf_token() }}">

    <title>Laravel5.7 + Vue.js2.5</title>

    <!-- Fonts -->
    <link href="https://fonts.googleapis.com/css?family=Nunito:200,600" rel="stylesheet" type="text/css">

    <!-- Styles -->
    <link rel="stylesheet" href="{{ mix('css/app.css') }}">
    <style>
    html, body {
        background-color: #fff;
        color: #636b6f;
        font-family: 'Nunito', sans-serif;
        font-weight: 200;
        height: 100vh;
        margin: 0;
    }
    </style>
</head>
<body>
    <div id="app">
        @can('admin')
            <admin-component
                id="{{ Auth::user()->id }}"
                name="{{ Auth::user()->name }}"
                role="{{ Auth::user()->role }}"
                logout="{{ route('logout') }}"
            ></admin-component>
        @else
            <example-component
                id="{{ Auth::user()->id }}"
                name="{{ Auth::user()->name }}"
                role="{{ Auth::user()->role }}"
                logout="{{ route('logout') }}"
            ></example-component>
        @endcan
    </div>
    <script src=" {{ mix('js/app.js') }} "></script>
</body>
</html>
4.権限毎にコンポーネントが変わっていることを確認
コンポーネントをいじっているのでコンパイルしてから、laravelを起動
npm run dev
php artisan serve --host=172.16.0.100  --port=8000
ブラウザでアクセスして
http://172.16.0.100:8000/
↓↓
ログインページへ飛ばされて
http://172.16.0.100:8000/login
ログインでパスワードとかを間違えるとエラーが表示されて
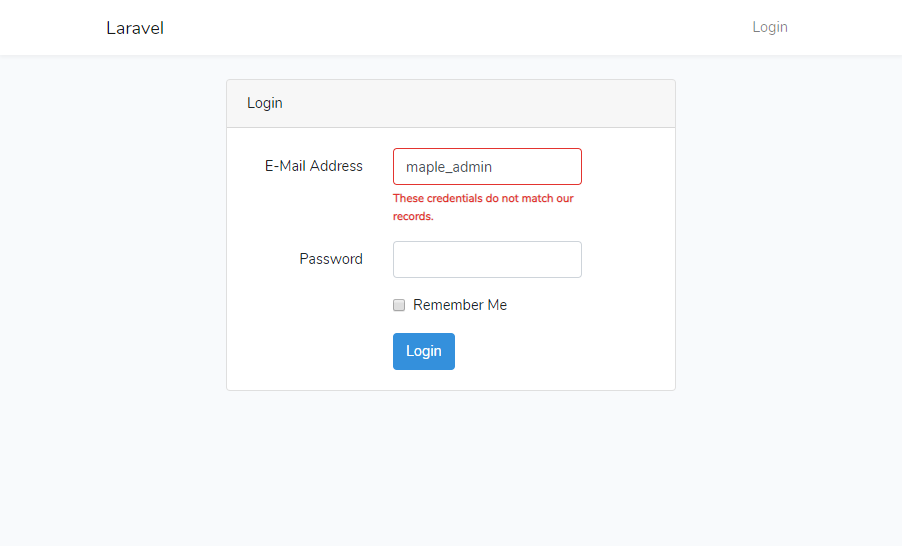
↓↓
Admin の管理者権限でログインしたら
Adminのコンポーネントが表示されて、
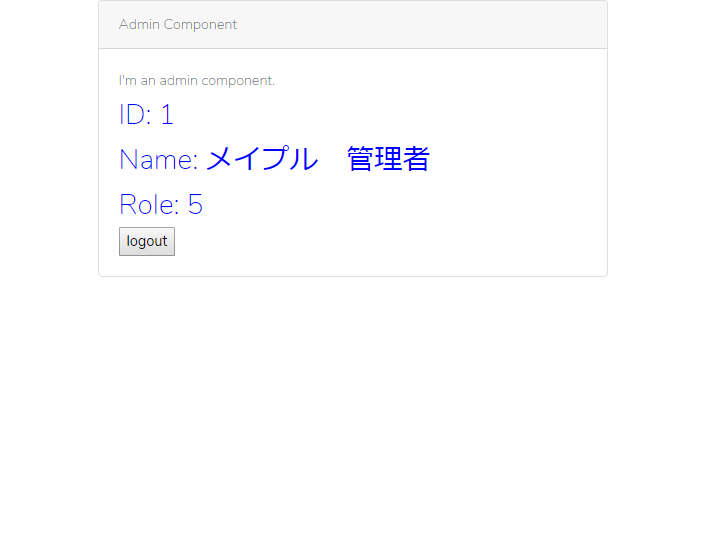
ログアウトボタンでログアウトしたら
↓↓
ログインページへ戻って、
User のユーザ権限でログインしたら
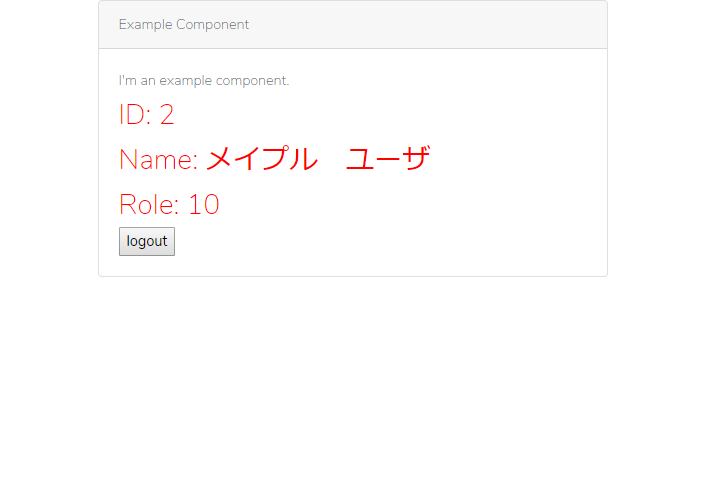
ユーザ用のコンポーネントが表示されること
以上
環境設定他関連記事はこちら
Laravel + Vue + Vuetify で業務サイト作ってみる