これは何か
PYNQ-Z1 を使って遊んでみます。
今回は、下記ができるようになる事を目指します。
- BRAM を使ってみる
- (前の記事) AXI BRAM Controller を使って python から読み書きしてみる
- (本記事) 自作 IP を接続して、FPGA 内部で生成したデータを python から読み出してみる
関連記事:
4-1. プロジェクトの作成
-
PYNQ や Vivado のセットアップがまだな場合
- 手順 1-2. 開発の準備 を参考に済ませておきます
-
手順 1-3. プロジェクトの作成 を参考に、新規プロジェクトを作成します
- Project name : asobu04
- Project location : ~/vivado/asobu
- にしました。
-
手順 1-4-1. ZYNQ の IP を配置する を参考に、Block Design を作ります
- 名前は design_1 のままにしました
- ZYNQ も配置しておきます
4-2. BRAM にデータを送り続けるモジュールを作る
-
手順 2-2-1. Verilog HDL のファイルを追加します を参考に verilog HDL ファイルを追加します。
- ファイル名は、bram_interface.v にしました。
-
手順 2-2-2. Verilog HDL のファイルを編集します を参考に、ファイルを編集します
bram_interface.v
module bram_interface
  (
    input wire CLK,
    output wire bram_clk,
    output wire [31:0] bram_addr,
    output wire [31:0] bram_data,
    output wire [3:0] bram_we,
    output wire bram_en,
    output wire bram_rst
  );

  reg [31:0] count;

  assign bram_clk = CLK;
  // BRAM を駆動するクロックを指定します。
  //   今回はこのモジュールと同期させて動かすので、
  //   モジュールに入力されたクロックをそのまま assign しています。

  assign bram_addr = {count[27:24], 2'b00};
  // count のうち、27-24 bit 目をアドレスに使います。
  //   24 bit 目がカウントアップするのは 0.17 秒に 1 度です。
  //   27-24 bit が 0000 --> 1111 まで変化するのに、2.7 秒かかります。
  //   bram_addr は 4 byte 単位で指定しますので、アドレス末尾に 00 の 2 bit を追加します。
  //   bram_addr 000000 から 111100 まで、16個のアドレスを 2.7 秒かけて網羅する事になります。

  assign bram_data = count[31:28];
  // count のうち、28 bit 目以降をデータとします。
  //   アドレスを一周したら、1つ大きな数字になります。

  // 以下は、BRAM の制御用の入力です。
  // 今回は、常時、データを書き続けるので、書き込み有効状態を定数で指定します。
  assign bram_we = 4'hF;
  assign bram_en = 1'b1;
  assign bram_rst = 1'b0;

  // カウンタを実装します
  always @(posedge CLK)
    begin
      count <= count + 1;   // 100 MHz CLK をカウントします
    end
endmodule
4-3. IP を配置し配線する
4-3-1. IP を配置する
- IP Integrator で IP を配置します。
- 2-3-1. 自作モジュールを配置する の要領で、bram_interface.v を配置します。
- 3-2-1. Block Memory Generator IP を配置する の要領で、Block Memory Generator IP を配置します。
- 3-2-2. AXI BRAM Controller IP を配置する の要領で AXI BRAM Controller を配置し、Number of BRAM Intnerfaces を 1 にしておきます。
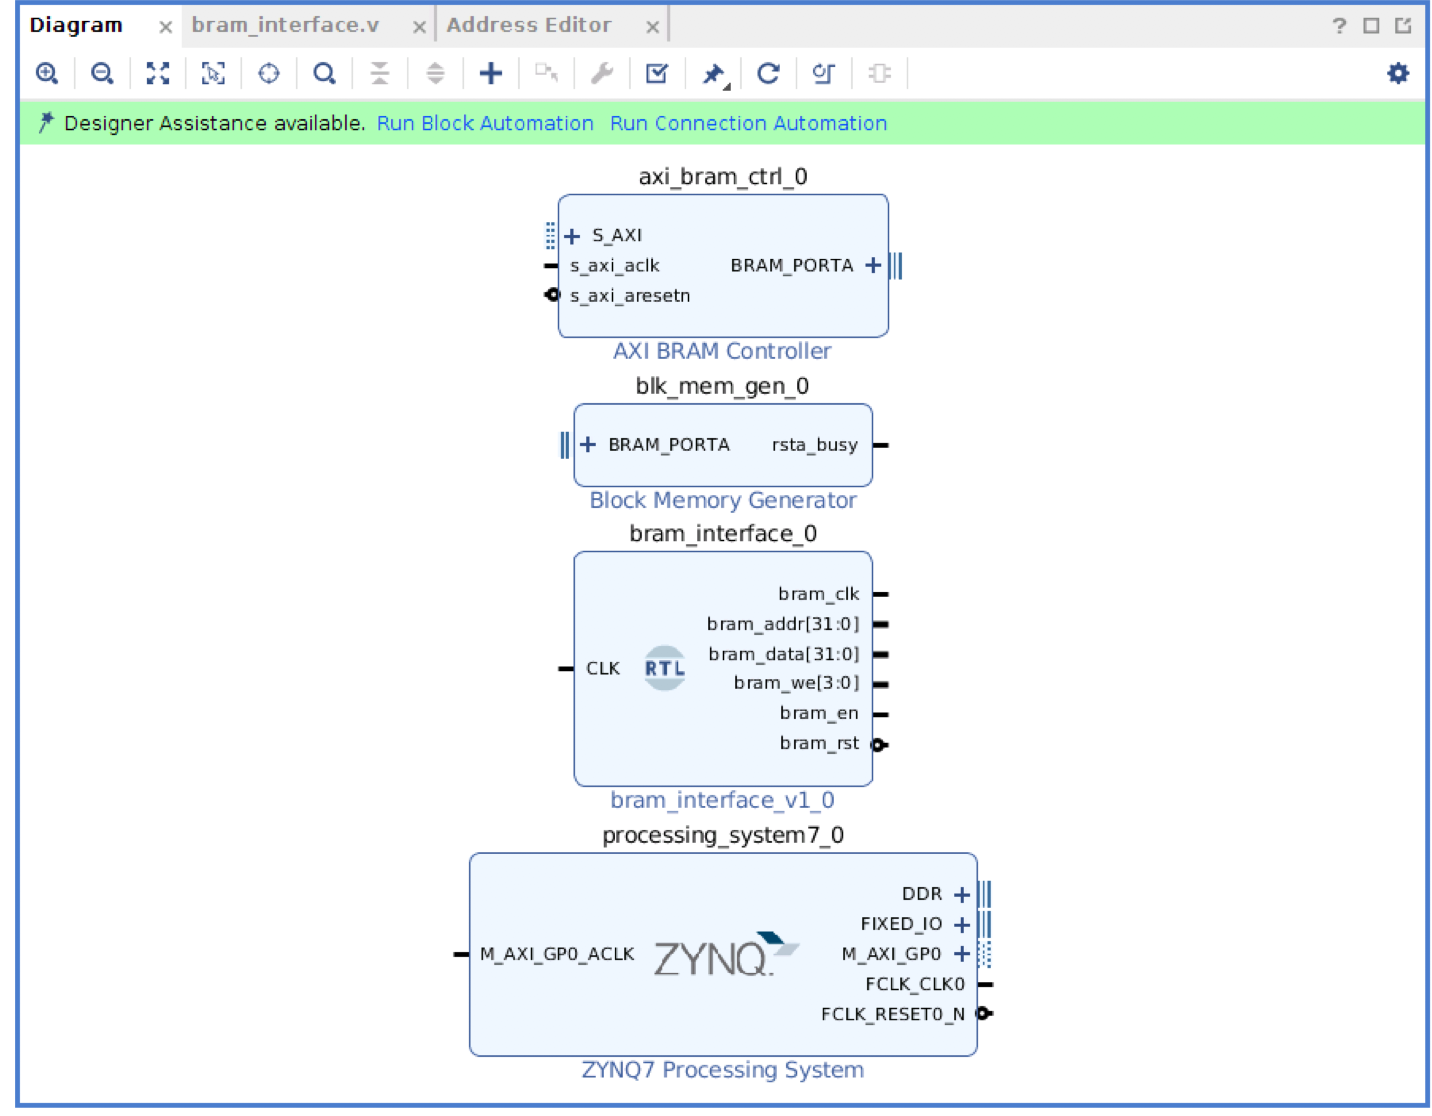
こんな感じになりました。
4-3-2. Block Memory Generator を Dual Port に設定する
- 今回は、BRAM を、PL (FPGA 内部) からと、PS (CPU, python) から使うので、Block Memory Generator を Dual Port に設定する必要があります。
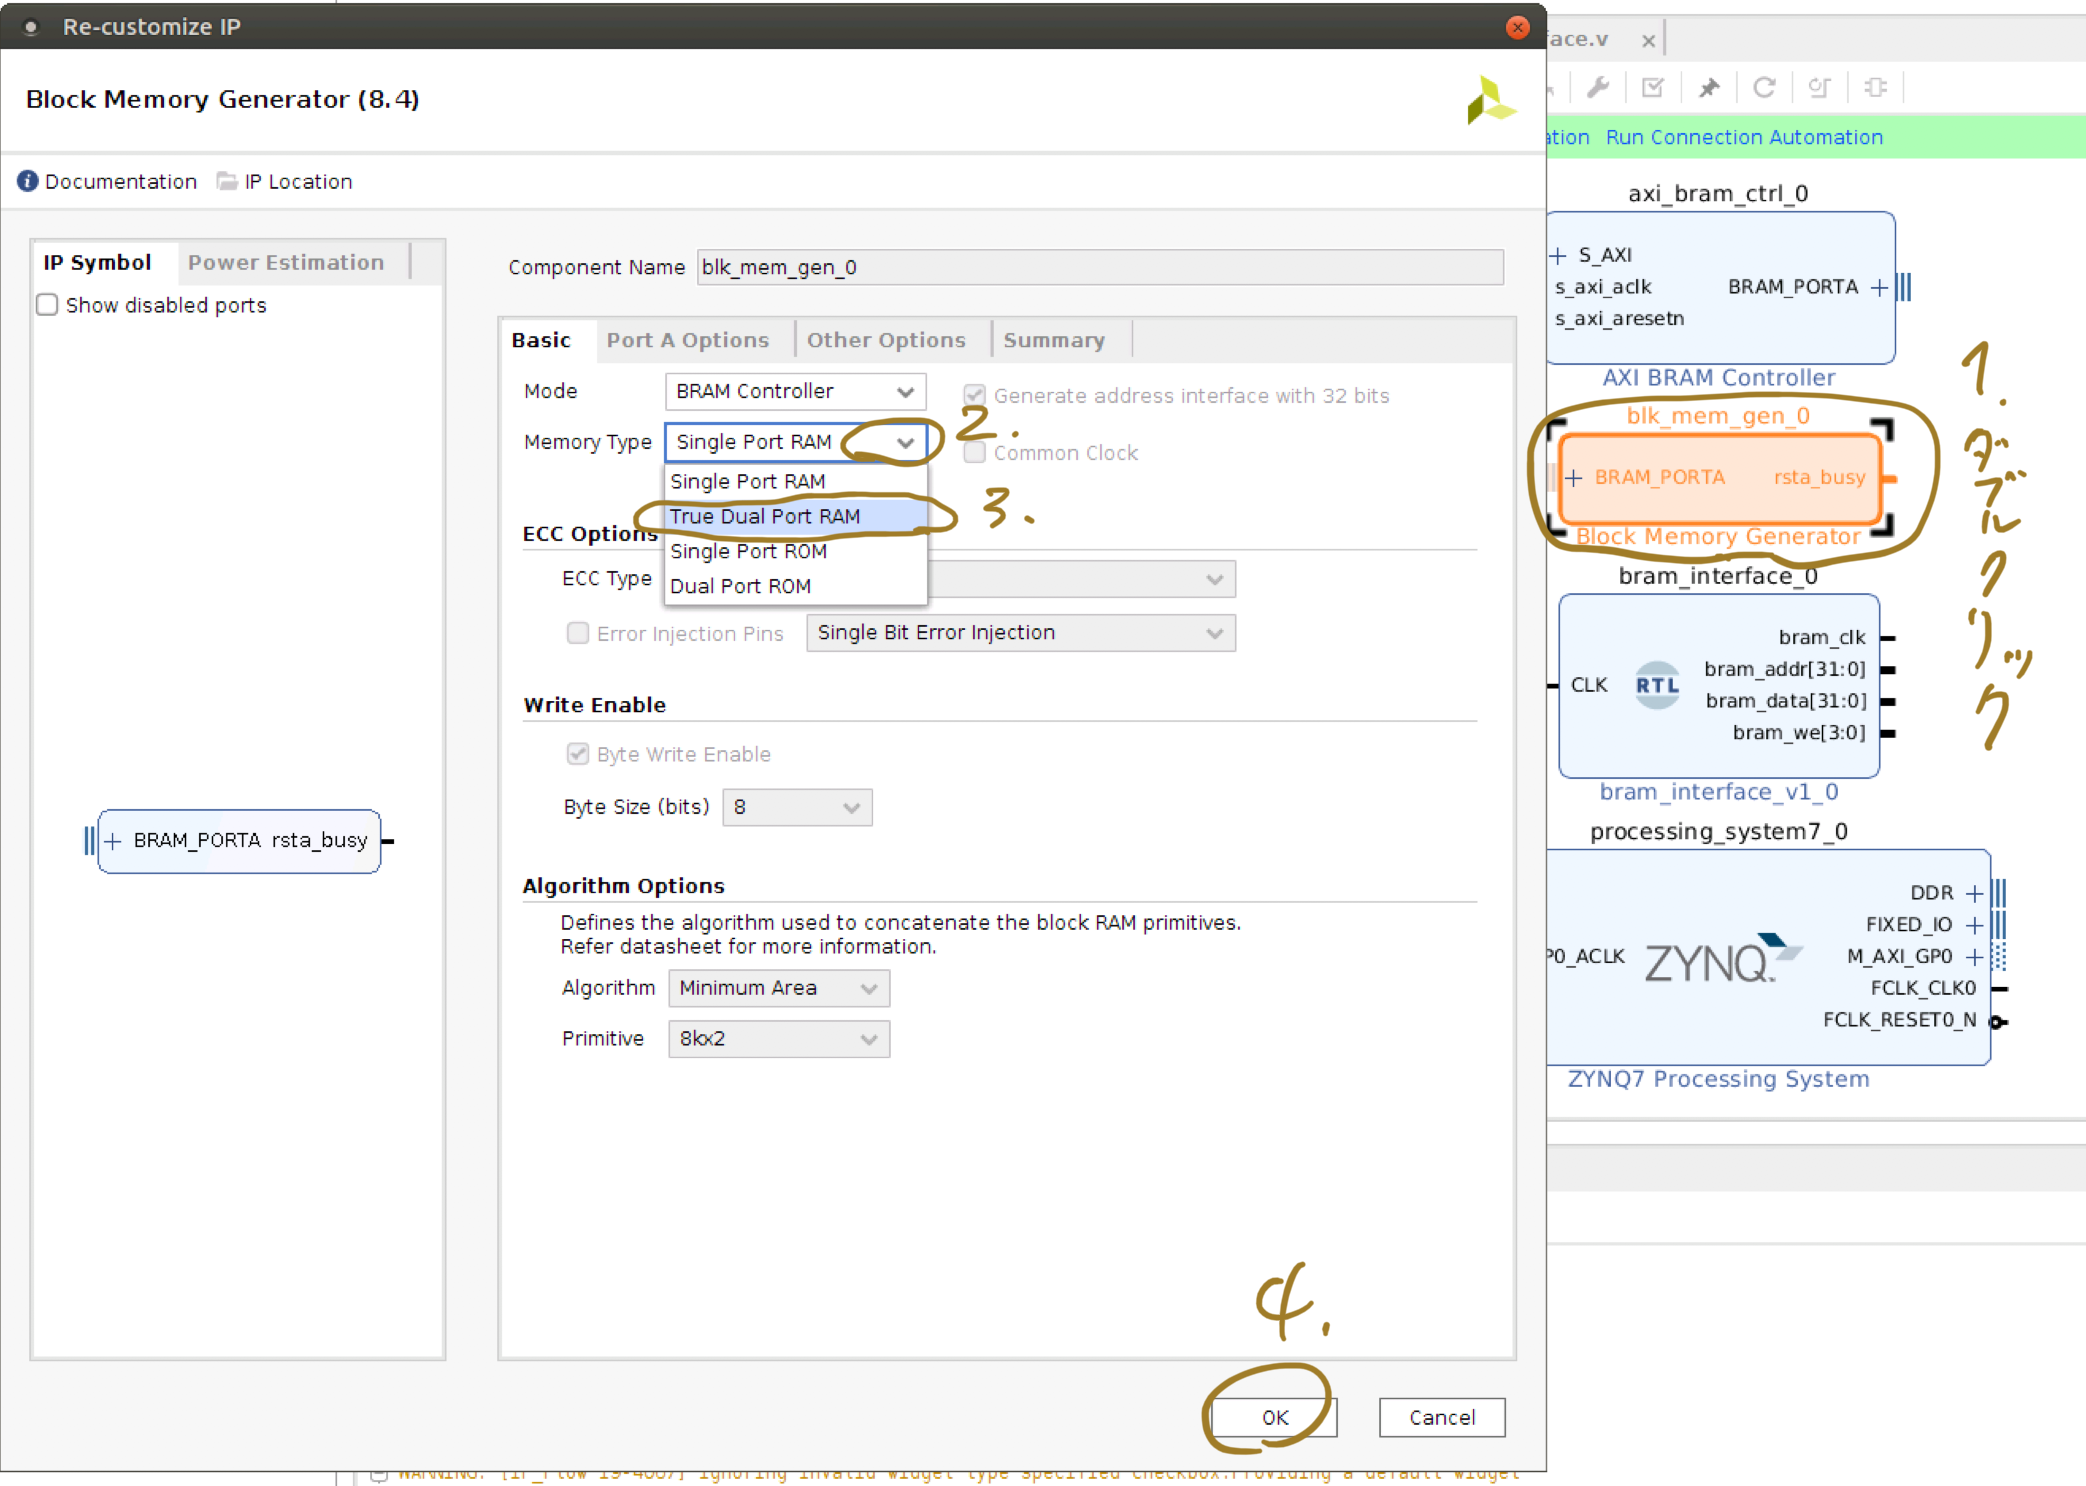
4-3-3. IP を配線する
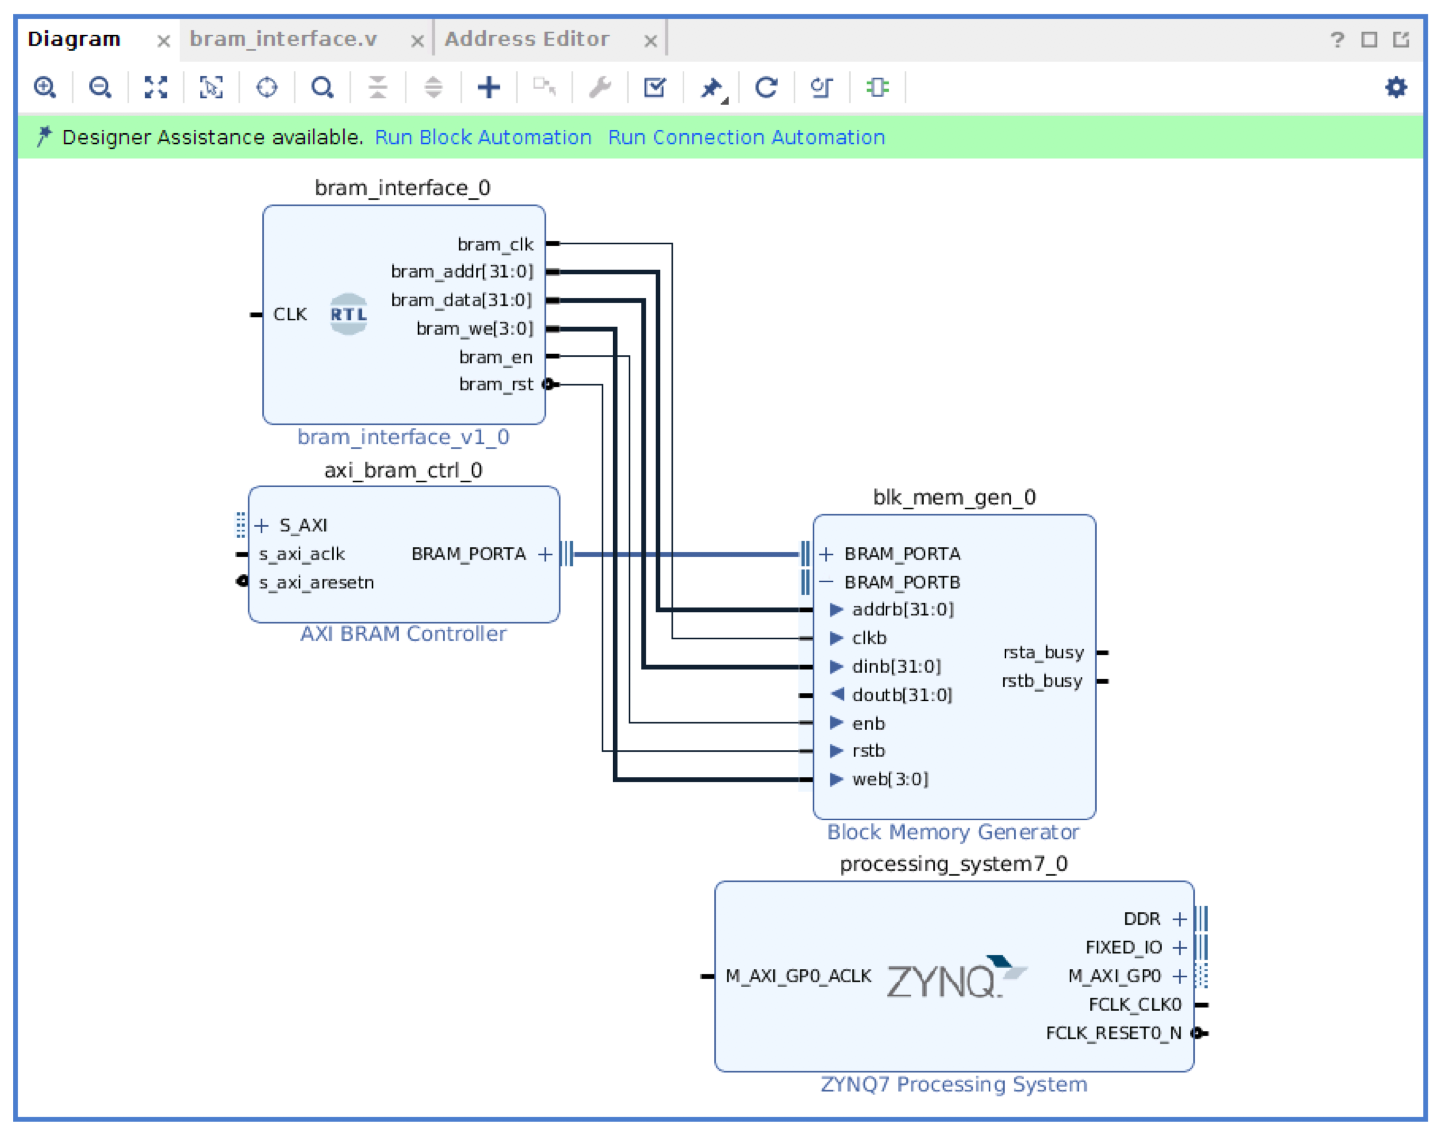
- 次の配線を行います:
- blk_mem_gen_0.BRAM_PORTA を axi_bram_ctrl_0.BRAM_PORTA に
- blk_mem_gen_0.BRAM_PORTB を bram_interface_0 に
- blk_mem_gen_0.clkb -- bram_innterface_0.bram_clk
- blk_mem_gen_0.addrb -- bram_innterface_0.bram_addr
- blk_mem_gen_0.dinb -- bram_innterface_0.bram_data
- blk_mem_gen_0.web -- bram_innterface_0.bram_we
- blk_mem_gen_0.enb -- bram_innterface_0.bram_en
- blk_mem_gen_0.rstb -- bram_innterface_0.bram_rst
- Run Connection Automation (チェックボックスを全て選択) と、Run Block Automation を実行します。
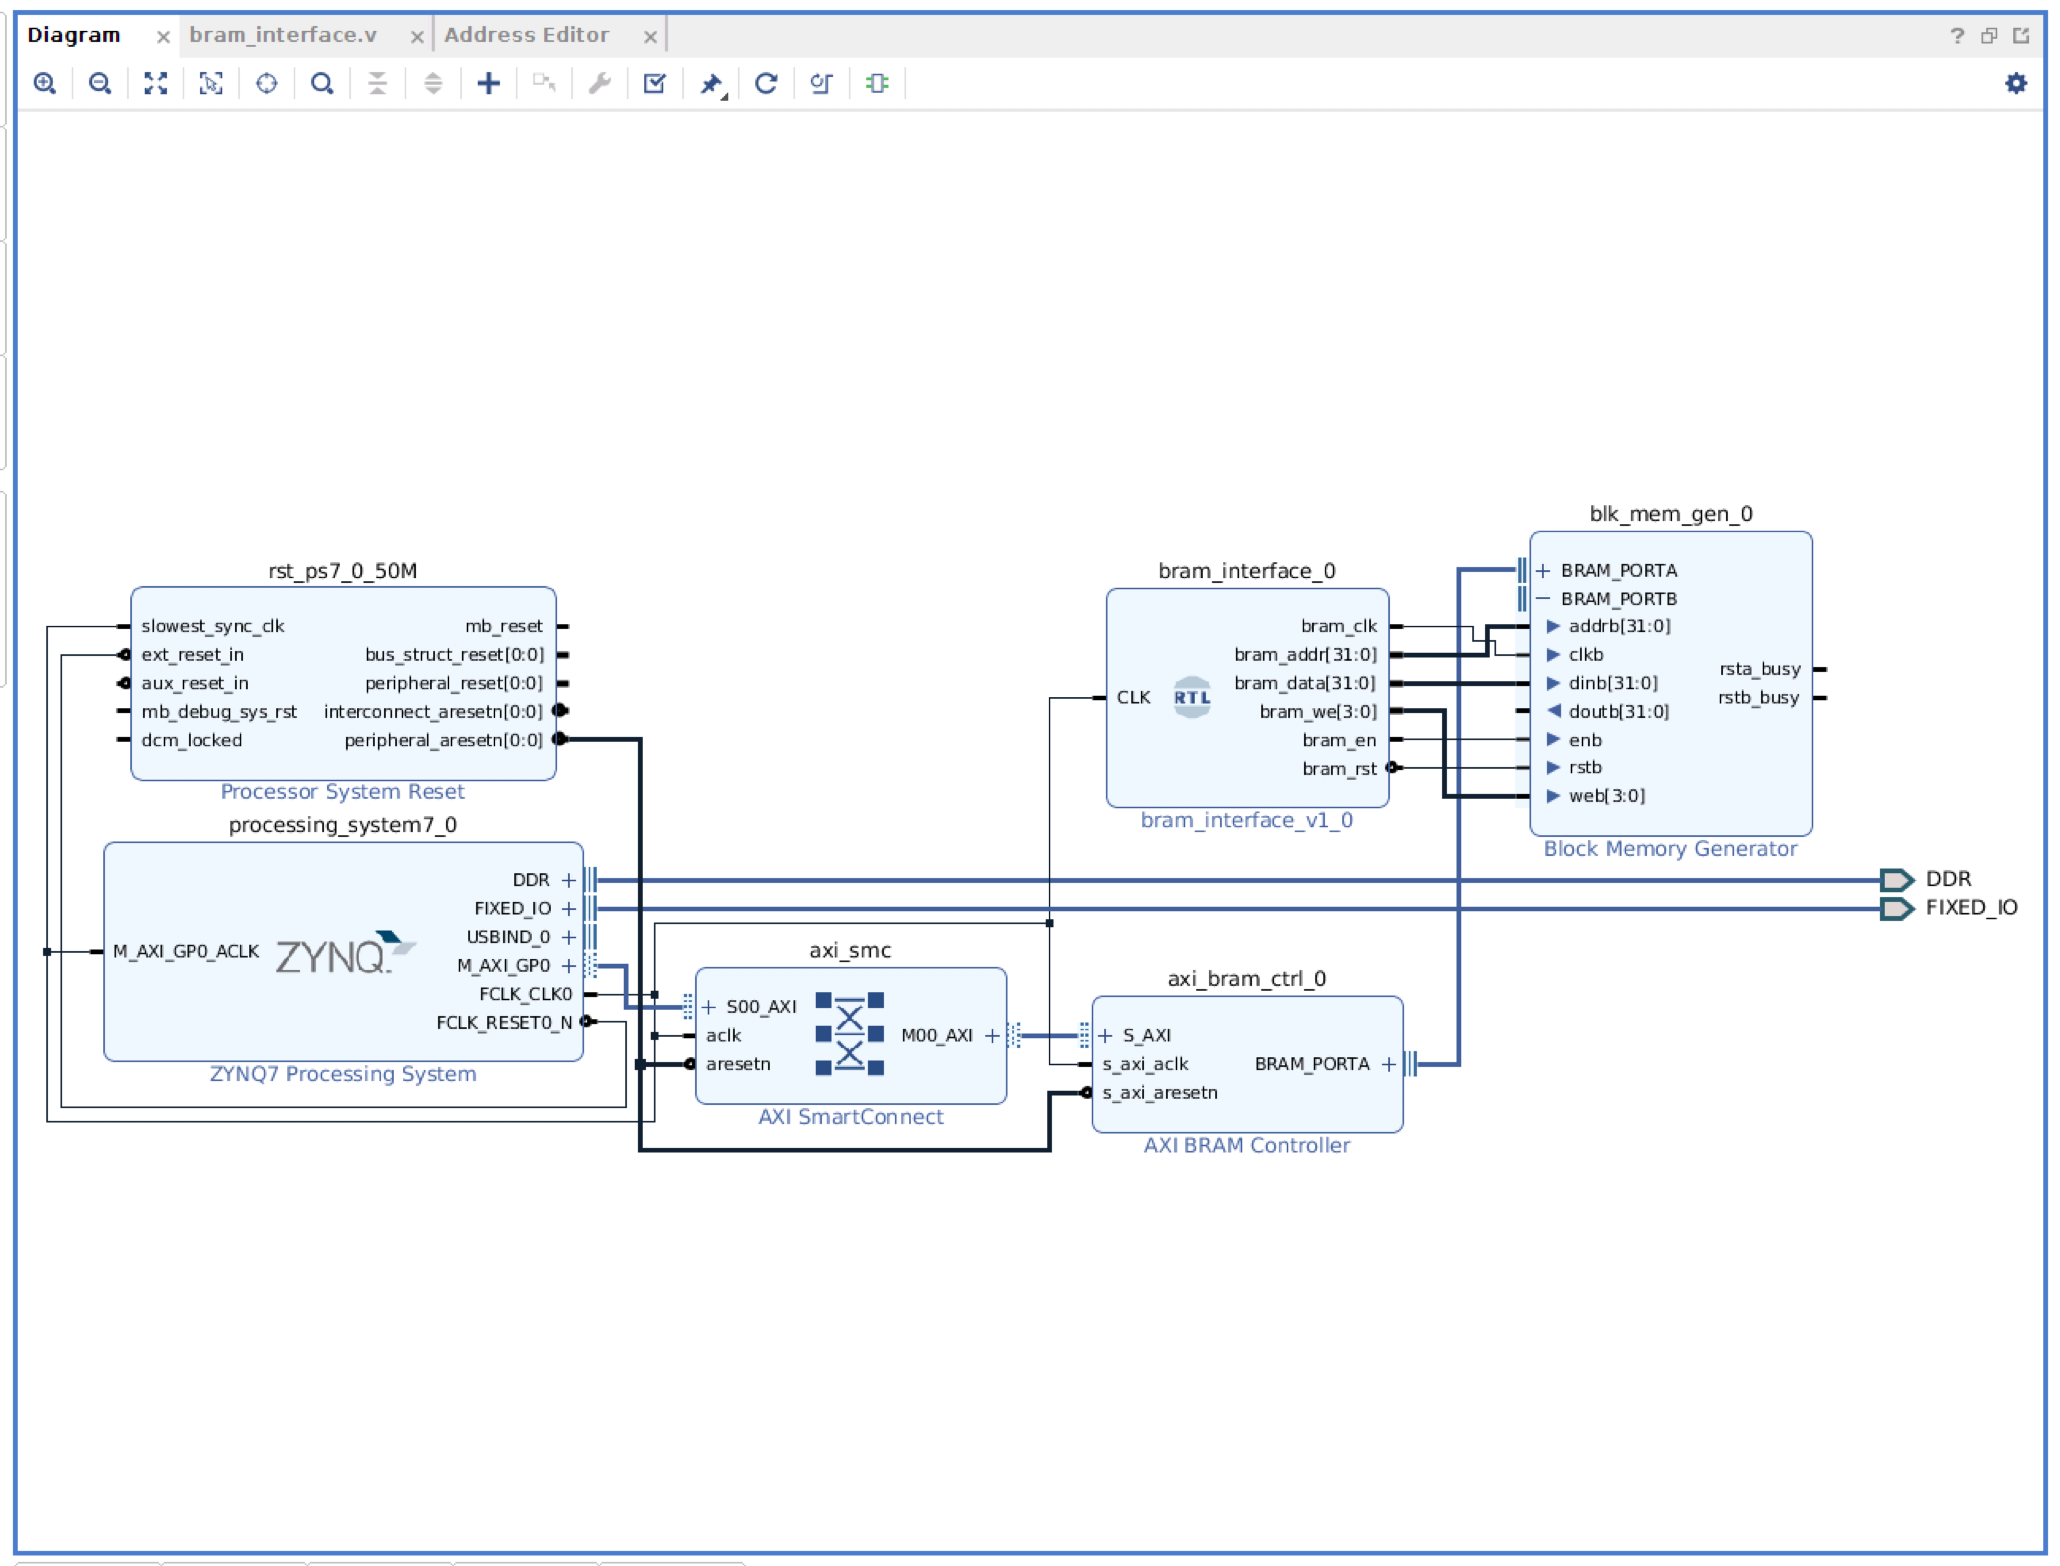
こんな感じになりました。
4-4. 後仕上げ
4-4-1. HDL Wrapper を生成する
手順 1-5. HDL Wrapper を生成する と同様の手順です
4-4-2. 生成する
手順 1-7. 生成する と同様の手順です
こんな実装になりました。

4-5. PYNQ で実行する
4-5-1. ファイルのアップロード
- 手順 1-8-1. ファイルのアップロード を参考に PYNQ へアップロードします
- 例えばこんなコマンドになります
scp ~/vivado/asobu/asobu04/asobu04.runs/impl_1/design_1_wrapper.bit xilinx@192.168.2.99:pynq/overlays/asobu04/asobu04.bit
scp ~/vivado/asobu/asobu04/asobu04.srcs/sources_1/bd/design_1/hw_handoff/design_1.hwh xilinx@192.168.2.99:pynq/overlays/asobu04/asobu04.hwh
4-5-2. jupyter で実行
- 手順 1-8-2. jupyter で実行 を参考に実行します
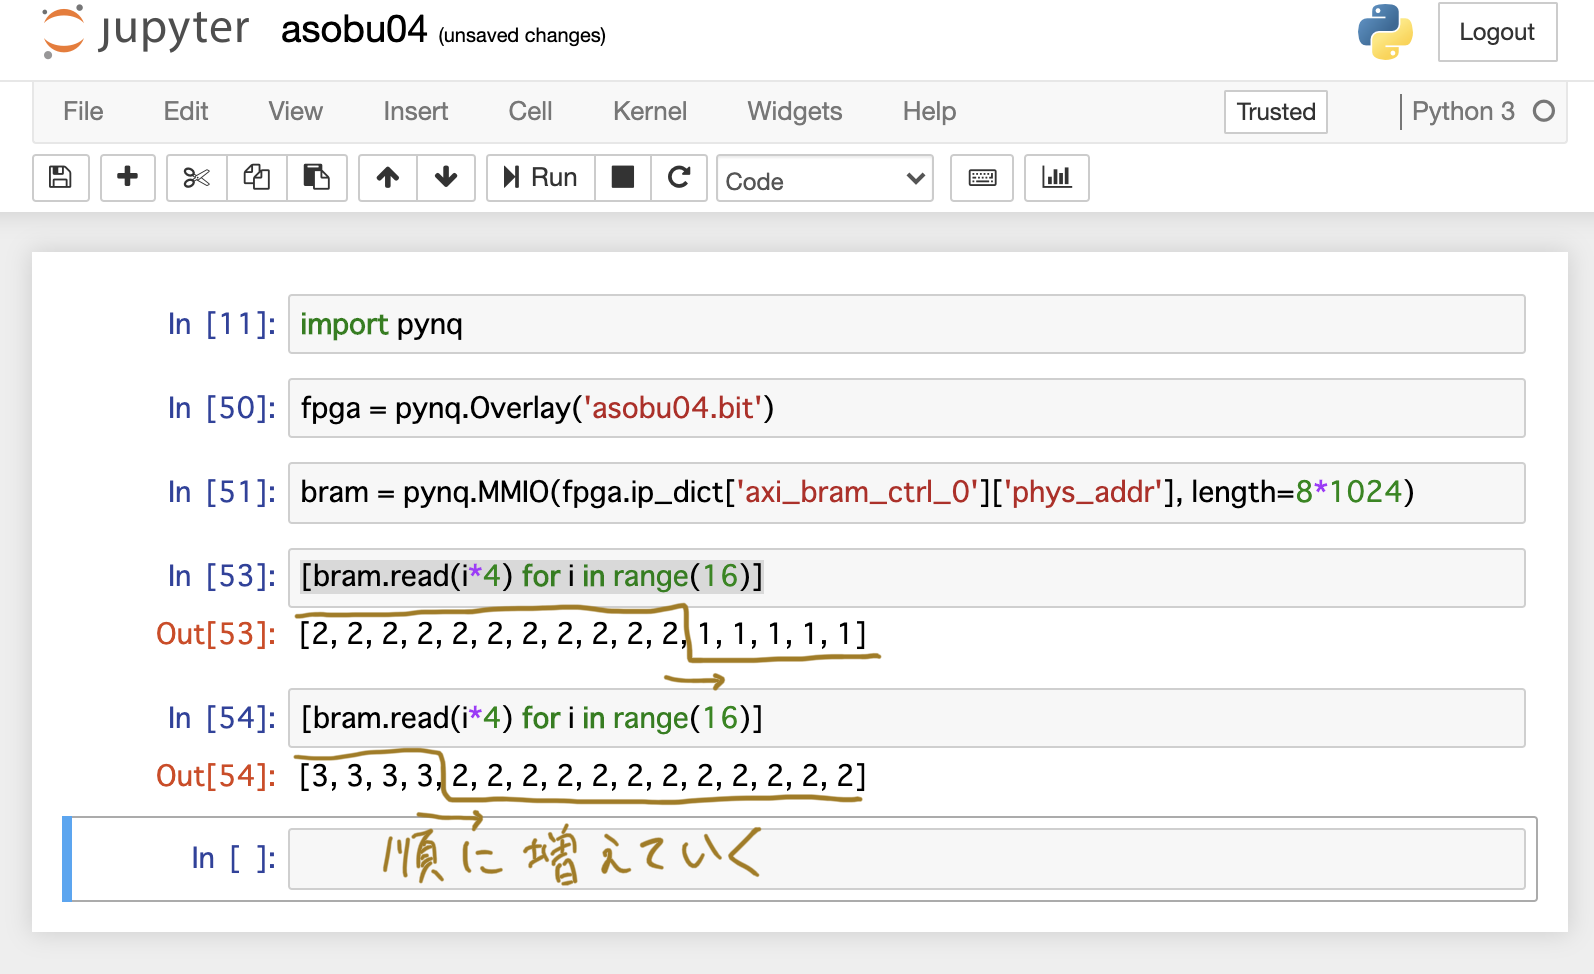
asobu04.ipynb
import pynq
fpga = pynq.Overlay('asobu04.bit')

bram = pynq.MMIO(fpga.ip_dict['axi_bram_ctrl_0']['phys_addr'], length=8*1024)

# 読み込んでみます。
[bram.read(i*4) for i in range(16)]
# >> [2, 2, 2, 2, 2, 2, 2, 2, 2, 2, 2, 1, 1, 1, 1, 1]
# 値が左 (アドレス小) から右に (アドレス大) 順番に増えていきます
