0. ヘビゲーム
前回のさめがめにつづき,今日はヘビゲームをつくりましょう。
elm-formatを噛ませても200行程度のシンプルなやつです。
手順ごとにヘッドラインを入れた結果TOCがやばいことになってますが,文章自体は少ないです。あしからず。
- リポジトリ: https://github.com/nikueater/elm-snake-example/
- デモ: https://nikueater.github.io/elm-snake-example/
1. 初期化
% mkdir snake
% cd ./snake
% elm init
とりあえず,プロジェクトを作成します。
パッケージの追加は適宜やっていきます。
ここから_./src/Main.elm_を編集していきましょう。
2. おなじみTEA
いつものやつなので折り畳み
module Main exposing (main)
import Browser
import Html exposing (Html, text)
type alias Model = {}
type Msg = NoMsg
main : Program () Model Msg
main =
Browser.element
{ init = always init
, update = update
, subscriptions = subscriptions
, view = view
}
init : ( Model, Cmd Msg )
init =
( {}, Cmd.none )
update : Msg -> Model -> ( Model, Cmd Msg )
update msg model =
( model, Cmd.none )
subscriptions : Model -> Sub Msg
subscriptions model =
Sub.none
view : Model -> Html Msg
view model =
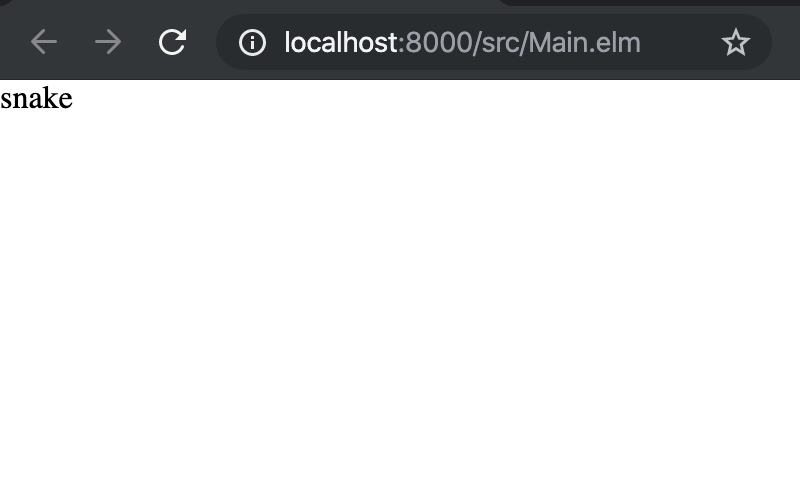
text "snake"
_Elm_でなんか作るときは大抵書くやつです。
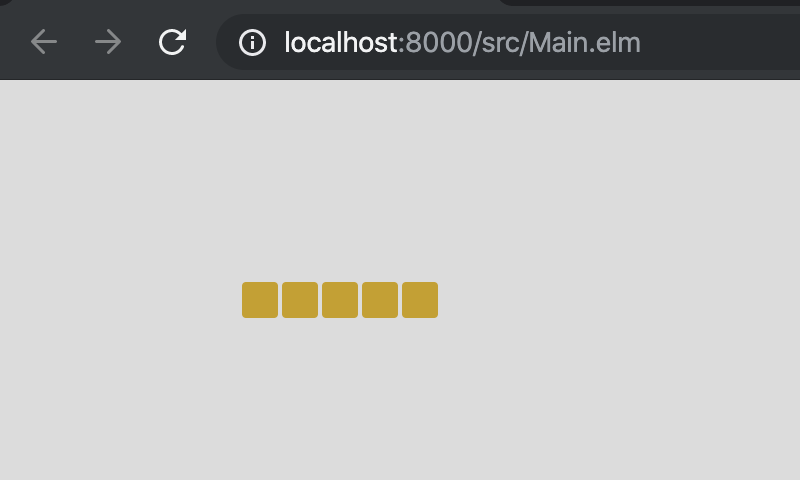
% elm reactor
% open http://localhost:8000/src/Main.elm
実行してみます。
3. ヘビのモデル
3.1. ヘビの位置をモデルにする
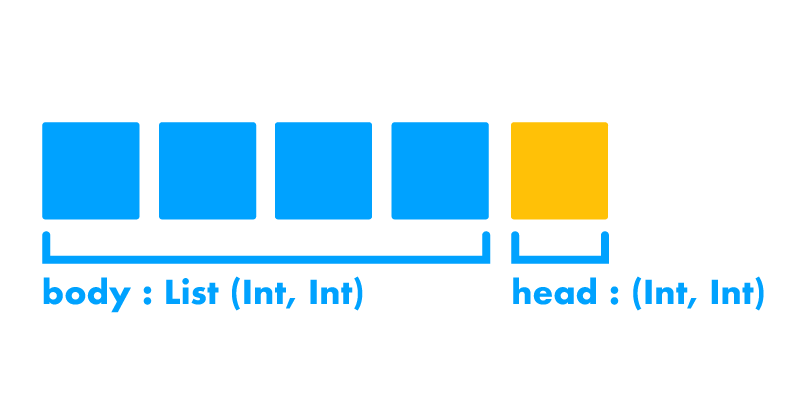
type alias Model =
    { head : (Int, Int)
    , body : List (Int, Int)
    }
まずはヘビをどうデータに表すかです。
一つのリストでも良いですが,今回は
- 頭はキーで操作する
- 頭は胴体と接触を判定する
- 頭は餌と接触を判定する
- 胴体は頭についていく
ということから,頭部と胴体を分けることにしました。
3.2. (便利なelm-community/list-extra)
% elm install elm-community/list-extra
リストに対して標準では用意されていないけど頻繁に出てくる処理に対して,その都度専用の関数を書くのは面倒ですよね。
そういう**"リストでよく必要になる処理"**なんかをelm-communityがまとめて公開してくれているので,今回はそれを利用しましょう。
我々が今作りたいのはへびさんゲームで,それ以外の車輪の再発明は不要です。
elm-community/list-extra
3.3. 実際にヘビの初期位置を指定する
init : ( Model, Cmd Msg )
init =
     -- body = [(9, 5), (8, 5), (7, 5), (6, 5)]
    ( { head = (10, 5)
      , body = List.initialize 4 (\n -> (9 - n, 5))
      }
    , Cmd.none
    )
ゲーム開始時のヘビの位置を指定しましょう。
さっそく_List-Extra_の出番です。
List.Extra.initializeを使って,長さ4のヘビの胴体をそれぞれのブロックがx軸方向に1ずつずれるように初期化しています。
4. へびさん描画
4.1. elm-ui!
% elm install mdgriffith/elm-ui
mdgriffith/elm-uiは_Html_や_CSS_を直接触らずに_View_を生成するパッケージです。
詳しくはelm-uiハンズオンにまとめておきました。
今回もこれを使ってゲームの画面を描画します。
4.2. ステージの描画に必要なデータを追加
import Element exposing (..)
import Element.Background as Bg
import Element.Border as Border

-- ステージのサイズ
stageSize : {w: Int, h: Int}
stageSize =
    { w = 20, h = 10 }

-- ステージのマスのタイプ
type Cell
    = None
    | Snake
4.3. Modelからステージを生成
-- ステージ用のデータを生成
stage : Model -> List Cell
stage model =
    let
       indexToCor : Int -> (Int, Int)
       indexToCor i =
           ( modBy stageSize.w i, i // stageSize.w )

       corToCell : (Int, Int) -> Cell
       corToCell c =
           if List.member c (model.head :: model.body) then
               Snake
           else
               None
    in
    List.initialize
        (stageSize.w * stageSize.h)
        (indexToCor >> corToCell)
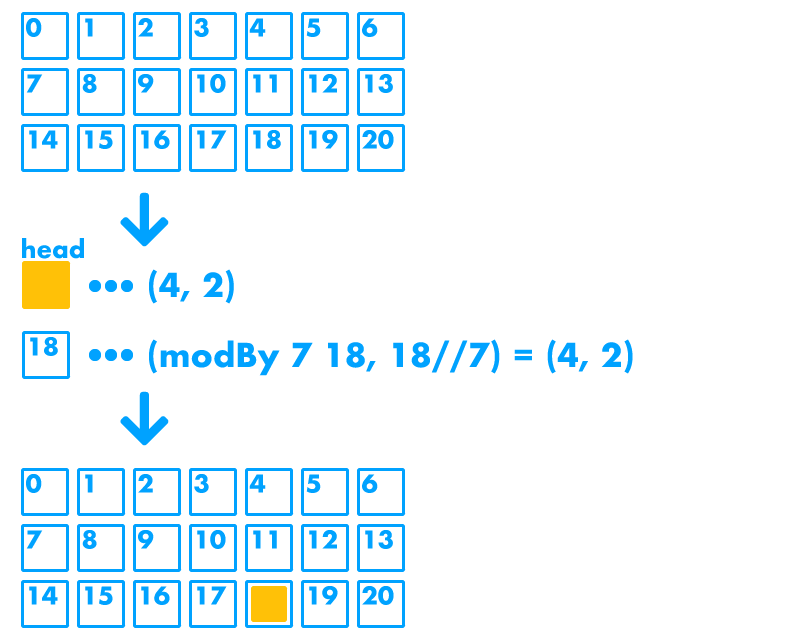
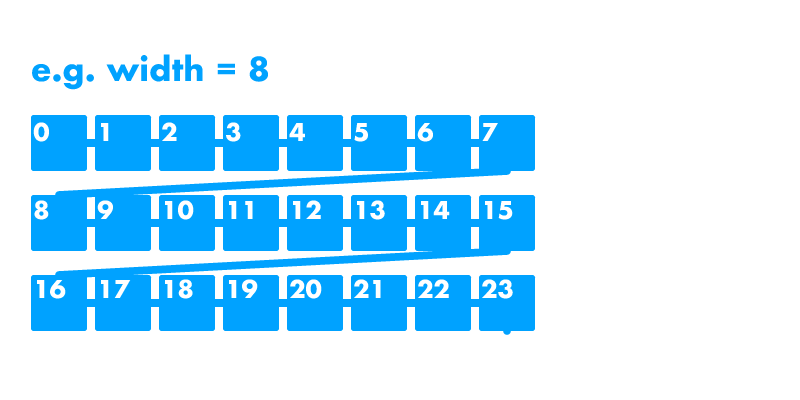
ステージのx軸方向のセルの数を_x_, y軸方向のセルの数を_h_とすると,
ステージ全体のセルは左上から水平方向に [0, 1, 2, 3, 4, ..., w * h - 1] といったようにインデックスを割り振ることができます。
やはり左上の座標を_(0, 0)とすると,インデックス_n_のセルは(n÷wの余り, n÷wの整数部)_として表現できるため,そのインデックスがヘビの胴体の座標と同じならSnakeをそうで無いならNoneとしてリストに入れていきます。
4.4. wrappedRowで楽々描画
view : Model -> Html Msg
view model =
    layout [Bg.color (rgb255 220 220 220)] (viewStage model)

viewStage : Model -> Element Msg
viewStage model =
    wrappedRow
        [width (px (stageSize.w * 20))
        ]
        (List.map viewCell (stage model))

viewCell : Cell -> Element Msg
viewCell cell =
    el
        [ width (px 20)
        , height (px 20)
        , padding 1
        ]
        <|
            case cell of
                None ->
                    none
                Snake ->
                    el
                        [ width fill
                        , height fill
                        , Bg.color (rgb255 200 160 0)
                        , Border.rounded 2
                        ]
                        none
ステージは二次元なのに対して,先ほど生成したモデルは一次元のリストです。
どうやって描画しましょう?
[ [1, 2, 3, 4]
, [5, 6, 7, 8]
, [9,10,11,12]
]
のような二次元のリストに変換して描画しなくちゃ行けないのかななんて悩む必要はありません。
wrappedRowはボックス内にコンテンツを水平方向に並べていきますが,その横幅の端までくると折り返してくれます。
5. アニメーション
5.1. subscription
タイマーやキー入力など,外部で発生したイベントを監視するには_subscriptions_を使います。
5.2. elm/time
% elm install elm/time
% elm install elm-community/maybe-extra
アニメーションということは一定時間ごとにモデルと画面を更新すれば実現できます。
ということで,Elmで時間を扱いたくなったので,elm/timeを使いましょう。
ついでに_Maybe_を便利に扱えるelm-community/maybe-extraも入れておきましょう。
import Time
import Maybe.Extra as Maybe
{- (中略) -}
type Msg
    = Tick Time.Posix

{- (中略) -}
subscriptions : Model -> Sub Msg
subscriptions _ =
    Time.every 300 Tick
もしもっとヌルヌル動くようなフレーム単位のアニメーションが必要な場合は,Time.everyではなく,Browser.onAnimationFrameDeltaが推奨されているのでそちらを検討しましょう。
5.3. アニメーションする
move : Model -> Model
move model =
    let
        -- とりあえず頭のx座標を右に1ふやす
        head =
            model.head
                |> (\(x, y) -> (x + 1, y))
        -- headに追従させる
        body =
            model.body
                |> List.init
                |> Maybe.unwrap [] ((::) model.head)
    in
    { model | head = head, body = body }


update : Msg -> Model -> (Model, Cmd Msg)
update msg model =
    case msg of
         Tick _ ->
             (move model, Cmd.none)
Time.every 300 Tickにより300ms毎にupdateが呼び出されるようになったので,_Model_が持つヘビの座標を更新しています。
moveにはheadの座標を右に1進める処理と,bodyがheadに追従していく処理を書いておきましょう。

6. キーで操作
6.1. 操作を踏まえてモデルを修正
type alias Model =
    { body : List (Int, Int)
    , direction : (Int, Int)
    }

init : ( Model, Cmd Msg )
init =
    ( { body = List.initialize 5 (\n -> (10 - n, 5))
      , direction = (1, 0)
      }
    , Cmd.none
    )
現在ヘビがどちらの方向に進んでいるかは状態なので_Model_に持たせる必要があります。
上, 下, 左, 右 を表すカスタム型を用意するのも良いですが,
今回は200行前後に収めたかった関係で進行方向を_(x, y)_のベクトルで持つことにしました。
6.2. subscriptionふたたび
% elm install elm/json
キーの押下はBrowser.onKeyDownで取得できますが,イベントオブジェクトをデコードしてやる必要があるのでelm/jsonをプロジェクトに追加してやりましょう。
6.3. キー押下を取得する
import Browser.Events as Events
import Json.Decode as Decode
{-(中略)-}
type Msg
    = Tick Time.Posix
    | ChangeDirection (Int, Int)

{-(中略)-}
update : Msg -> Model -> (Model, Cmd Msg)
update msg model =
    case msg of
         Tick _ ->
             (move model, Cmd.none)

         ChangeDirection direction ->
             (model, Cmd.none)
{-(中略)-}
keyDecoder : (Int, Int) -> Decode.Decoder (Int, Int)
keyDecoder default =
    Decode.field "key" Decode.string
    |> Decode.map
        (\k ->
            case (default, k) of
                ((_, 0), "ArrowUp")    -> (0, -1)
                ((_, 0), "ArrowDown")  -> (0, 1)
                ((0, _), "ArrowLeft")  -> (-1, 0)
                ((0, _), "ArrowRight") -> (1, 0)
                _ -> default
        )

subscriptions : Model -> Sub Msg
subscriptions model =
    Sub.batch
        [ Time.every 500 Tick
        , Events.onKeyDown (Decode.map ChangeDirection (keyDecoder model.direction))
        ]
subscriptions に複数の_Sub Msg_を登録する場合はSub.batchを使います。
方向転換については_"ArrowUp", "ArrowDown", "ArrowLeft", "ArrowRight"_だけで判断してしまうと,例えば左に向かって進んでいる時に右へと方向転換できてしまい頭部が胴体に接触してしまいます。
それを避けるために,直前の進行方向を見て現在が水平方向の移動の時のみ垂直方向への転換ができ,垂直方向の移動中のみ水平方向への方向転換ができるようにしています。
6.4. directionに応じて進行方向を変更
move : Model -> List (Int, Int)
move model =
    let
        addTuple (a, b) (c, d) =
            (a + c, b + d)

        head =
            model.head
                |> addTuple model.direction
     {- 略 -}
headが(x, y)で,directionが(dx, dy)の時,head = (x + dx, y + dy)としています。
6.5. 端っこまできたらループする
move : Model -> List (Int, Int)
move model =
    let
        addTuple (a, b) (c, d) =
            (a + c, b + d)

        loop (x, y) =
            ( modBy stageSize.w x, modBy stageSize.h y )

        head =
            model.head
                |> addTuple model.direction
                |> loop
     {- 略 -}
画面の端まで頭部が移動した時に反対側へと移動できるようにするには,_modBy_を使ってやれば簡単です。
6.6. リファクタリング
move : Model -> List (Int, Int)
move model =
    let
        applyTuple : (a -> a -> a) -> (a, a) -> (a, a) -> (a, a)
        applyTuple f (a, b) (c, d) =
            (f a c, f b d)

        head =
            List.head
                |> applyTuple (+) model.direction
                |> applyTuple modBy (stageSize.w, stageSize.h)
補助関数のaddTupleとloopですが,頭の座標と_Int_のタプルを受け取り,_x_と_y_の成分に何らかの処理を施す という意味では同じですので,なんだかまとめられそうですね。
そこで,関数applyTuple : (a -> a -> a) -> (a, a) -> (a, a) -> (a, a)を定義します。
そうすると,
addTuple = applyTuple (+)
loop = applyTuple modBy
と表すことができます。
7. 給餌
7.1. 給餌を踏まえてモデルを修正
type alias Model =
    { head : (Int, Int)
    , body : List (Int, Int)
    , direction : (Int, Int)
    , food : Maybe (Int, Int)
    }
foodを追加しましょう。
7.2. elm/random
% elm install elm/random
乱数を使いたいので,_elm/random_を追加します。
Elmでの乱数の使い方についてはElm guideのRandomを参考にすると良いでしょう。
7.3. ランダムに座標を決める
import Random
{- 中略 -}
type Msg
    = Tick Time.Posix
    | ChangeDirection (Int, Int)
    | NewFood (Int, Int)

setFood : Cmd Msg
setFood =
    Random.pair (Random.int 0 (stageSize.w - 1)) (Random.int 0 (stageSize.h - 1))
    |> Random.generate NewFood
タプルの乱数生成器にx座標の乱数生成器とy座標の乱数生成器を渡し,乱数を生成したらupdateにてCmd (NewFood (Int, Int))で受け取れるようにします。
7.4. 開始直後に餌の位置を指定
init : (Model, Cmd Msg)
init =
    let
        {- 中略 -}
    in
    ( { head = head, body = body, direction = ( 1, 0 ), food = Nothing }, setFood )
initが呼び出されるタイミングではランダムな座標を取得できていないので,Nothingをセットします。
そして,Cmd.noneの代わりにsetFoodを返しましょう。これで,ランダムな座標を生成してupdateで受け取れるようになります。
7.5. ランダムな座標を受け取る
update : Msg -> Model -> ( Model, Cmd Msg ) ‣ local 3 references
update msg model =
    case msg of
        {- 中略 -}
        NewFood food ->
            ( { model | food = Just food }, Cmd.none )
これは特に説明不要ですよね。
7.6. view関数を修正
type Cell
    = None
    | Snake
    | Food

stage : Model -> List Cell
stage model =
    let
       {- 中略 -}
       corToCell : (Int, Int) -> Cell
       corToCell c =
           if model.food == Just c then
               Food
           else if List.member c (model.head :: model.body) then
               Snake
           else
               None
    in
    {- 省略 -}

viewCell : Cell -> Element Msg
viewCell cell =
    {- 中略 -}
        Food ->
            el
                [ width fill
                , height fill
                , Bg.color (rgb255 0 200 0)
                , Border.rounded 2
                ]
                none
これまでステージ上のセルはNone, SnakeでしたがNone, Snake, Foodになったので,それに合わせて描画周辺も修正しています。
8. アタリ判定
8.1. アタリ判定(餌)
checkEaten : (Model, Cmd Msg) -> (Model, Cmd Msg)
checkEaten (model, cmd) =
    if Just model.head == model.food then
        ( { model
            | food = Nothing
            , body =
                List.last model.body
                    |> Maybe.unwrap model.body (\x -> List.append model.body [ x ])
          }
        , setFood
        )
    else
        ( model, cmd )
頭部が餌を食べたかどうかチェックしましょう。
Just model.head == model.food ならアタリです。foodを_Nothing_にリセットし,bodyの最後にセルを一つ追加します(値は現時点でのbodyの最後の要素と同じにしています)。
8.2. アタリ判定(胴体)
checkCollapse : (Model, Cmd Msg) -> (Model, Cmd Msg)
checkCollapse ((model, _ ) as default) =
    model.body
        |> List.elemIndex model.head
        |> Maybe.unwrap default (always init)
model.bodyの要素にmodel.headと同じ値が存在すれば,
頭と胴体が接触したと判断してゲームオーバー(modelを初期化)にします。
Elmでは一応引数にも_as_で別名を与えることができます。
あんまり見ないので,「あるよ」程度に紹介しておきます。
8.3. アタリ判定(まとめる)
update : Msg -> Model -> ( Model, Cmd Msg )
update msg model =
    case msg of
        Tick _ ->
            (move model, Cmd.none)
                |> checkEaten
                |> checkCollapse
これらをまとめましょう。
9. 完成
完成版のソースです。Main.elm(GitHub)
それでは,よいお年を。