はじめに
レシートの経費入力や家計簿つけ、面倒くさいですよね。 既存のアプリも便利ですが、「自分の好きなフォーマットでスプレッドシートに溜めたい」「画像の保管も自動化したい」と思い、Google Apps Script (GAS) と Gemini API を組み合わせて自作しました。
今回は、iPhoneで撮影した画像(HEIC形式)もしっかり認識させて、以下のフローを完全自動化します。
- スマホでレシートを撮影し、Googleドライブの「入力フォルダ」に入れる
- GASが自動で検知し、Gemini APIに画像を投げる
- 「日付」「店名」「金額」をAIが読み取り、スプレッドシートに書き出す
- 処理が終わった画像は「処理済みフォルダ」へ移動する
所要時間:約15分程度
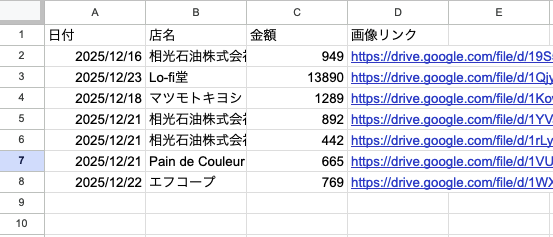
完成イメージ
1. 仕組みの全体像

これを作るのに必要なものは3つだけです。
- Googleアカウント
- Googleスプレッドシート
- Gemini APIキー(無料枠で十分使えます)
2. 準備手順
① Googleドライブとスプレッドシートの用意
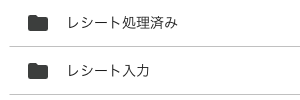
まず、Googleドライブに以下の2つのフォルダを作ります。
- レシート入力 (ここに画像をアップロードします)
- レシート処理済み (処理が終わった画像が勝手に移動します)
ここで、作成したフォルダのURLから、IDを取得しておきます。
IDは、GoogleドライブのURLの**folders/**以降全てです。

次に、スプレッドシートを新規作成し、1行目に項目を作ります。 A列: 日付、B列: 店名、C列: 金額、D列: 画像リンク(ここは自由に設定可能)

② Gemini APIキーの取得
Google AI Studio ( https://aistudio.google.com/ ) にアクセスし、「Get API key」からキーを発行してコピーしておきます。 モデルは安価で高速な Gemini 1.5 Flash を使用します。
③ GASの設定
スプレッドシートのメニューから「拡張機能」→「Apps Script」を開きます。
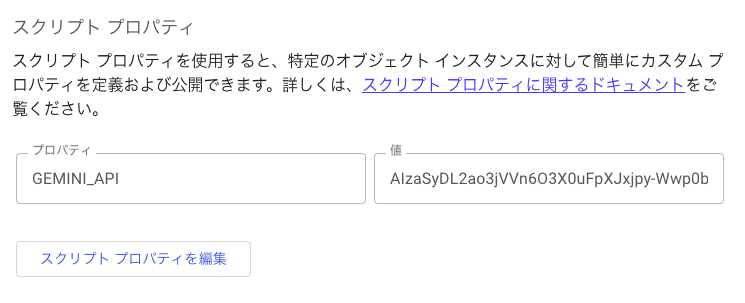
セキュリティのため、APIキーはコードに直書きせず「スクリプトプロパティ」に保存します。 (左メニューの「歯車アイコンのプロジェクトの設定」→「スクリプト プロパティ」→「プロパティを追加」)
- プロパティ: GEMINI_API
- 値: (先ほどコピーしたキー)
3. ソースコード
以下のコードを コード.gs にコピペしてください。 フォルダIDの部分だけ、ご自身のものに書き換える必要があります。
ポイント(ハマりどころ)
- HEIC対応: Googleドライブ上のHEIC画像はMIMEタイプが正しく取得できないことがあるため、拡張子を見て強制的に image/heic を指定する処理を入れています。
- JSON強制: AIが余計な会話(「はい、解析しました」など)をしないよう、プロンプトでJSON出力のみを厳格に指定しています。
function processReceipts() {
  // 1. フォルダとシートを取得
  const inputFolder = DriveApp.getFolderById("【ここに入力フォルダのID】");
  const processedFolder = DriveApp.getFolderById("【ここに処理済みフォルダのID】");
  // シート名
  const sheet = SpreadsheetApp.getActiveSpreadsheet().getSheetByName("シート1");

  // 2. 入力フォルダにあるファイル(画像)をすべて取得
  const files = inputFolder.getFiles();

  while (files.hasNext()) {
    const file = files.next();

    // 3. 画像データをGemini APIに送信して解析させる
    // プロンプト例: "このレシート画像から、日付(YYYY/MM/DD)、店名、合計金額を抽出してJSONで返して"
    const receiptData = callGeminiApi(file);

    // 4. スプレッドシートに書き込む
    sheet.appendRow([
      receiptData.date,   // 日付
      receiptData.store,  // 店名
      receiptData.amount, // 金額
      file.getUrl()       // 画像のリンク
    ]);

    // 5. ファイルを処理済みフォルダに移動
    file.moveTo(processedFolder);
  }
}

// Gemini APIを呼び出す関数(HEIC, PNG, JPEG対応版)
function callGeminiApi(file) {
  const apiKey = PropertiesService.getScriptProperties().getProperty("GEMINI_API");
  const url = `https://generativelanguage.googleapis.com/v1beta/models/gemini-flash-latest:generateContent?key=${apiKey}`;

  const blob = file.getBlob();
  const base64Image = Utilities.base64Encode(blob.getBytes());

  // ファイルの拡張子を見て、正しいMIMEタイプをセットする
  let mimeType = blob.getContentType(); // デフォルトの値を取得
  const fileName = file.getName().toLowerCase(); // ファイル名を小文字にする

  if (fileName.endsWith(".heic")) {
    mimeType = "image/heic";
  } else if (fileName.endsWith(".png")) {
    mimeType = "image/png";
  } else if (fileName.endsWith(".jpg") || fileName.endsWith(".jpeg")) {
    mimeType = "image/jpeg";
  }

  console.log(`ファイル: ${fileName}, 送信MIMEタイプ: ${mimeType}`);

  const promptText = `
    Extract the following from the receipt image and return as a JSON object:
    - date (format YYYY/MM/DD)
    - store (store name)
    - amount (total amount as a number, remove currency symbols)

    Use strictly these keys in JSON: "date", "store", "amount".
    Output ONLY the raw JSON string. No markdown code blocks.
  `;

  const payload = {
    "contents": [
      {
        "parts": [
          { "text": promptText },
          {
            "inline_data": {
              "mime_type": mimeType,
              "data": base64Image
            }
          }
        ]
      }
    ],
    "generationConfig": {
      "response_mime_type": "application/json"
    }
  };

  const options = {
    "method": "post",
    "contentType": "application/json",
    "payload": JSON.stringify(payload),
    "muteHttpExceptions": true
  };

  try {
    const response = UrlFetchApp.fetch(url, options);
    const responseCode = response.getResponseCode();

    if (responseCode !== 200) {
      console.error(`API Error (Code ${responseCode}): ${response.getContentText()}`);
      return { date: "", store: "API Error " + responseCode, amount: 0 };
    }

    const json = JSON.parse(response.getContentText());
    if (!json.candidates || json.candidates.length === 0) {
      return { date: "", store: "No Content", amount: 0 };
    }

    let contentText = json.candidates[0].content.parts[0].text;

    // Markdown記号の除去
    contentText = contentText.replace(/```json/g, "").replace(/```/g, "").trim();

    return JSON.parse(contentText);

  } catch (e) {
    console.error("Script Exception: " + e.toString());
    return { date: "", store: "Script Error: " + e.toString(), amount: 0 };
  }
}
4. 自動実行(トリガー)の設定
最後に、これを自動で動かす設定をします。 左メニューの「時計アイコン(トリガー)」から、以下のように設定します。
- 右下のトリガーを追加ボタンをクリック
- 実行する関数:processReceipts
- イベントのソース:時間主導型
- タイプ:分ベースのタイマー(例:15分ごと、など)
これで、フォルダにレシート画像を入れておけば、勝手にスプレッドシートに行が追加されていきます。
※イベントのソースを「カレンダーから」にしておくと、月末にまとめて。なども可能ですね!

5. 実行結果
実際にiPhoneで撮影したレシート(HEIC形式)を入れて試してみました。
完璧に読み取れています! OCR専用ソフトを使わなくても、GASとGeminiだけでここまで出来きますので、ぜひ活用ください!