はじめに
サーバレスやるならAPI GatewayだけじゃなくてAppSync知っておけよ、という天の声が聞こえてきたので、作ってみた。
たぶん慣れればお手軽。GraphQLとVTLを覚えるコストがかかるといったところか。
全体構成
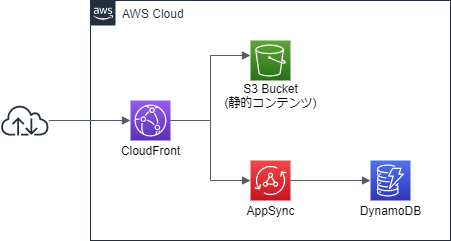
以下のような構成にする。AppSyncを使うので、Lambdaすら不要。
静的コンテンツはS3から取得し、DynamoDBからAppSyncをデータを取得する。
別にCloudFrontを経由する必要はないのだが、AppSyncがCORSを扱えないため、静的コンテンツと同一オリジンになるよう、CloudFrontにぶら下げる。
さて、それぞれのTerraformリソースを見ていこう。
Terraformリソース定義
DynamoDB
DynamoDBは、ユーザIDをハッシュキーとしたテーブルにする。
ここでは、名前と年齢を登録しておく。
resource "aws_dynamodb_table" "user" {
  name         = local.dynamodb_table_name
  billing_mode = "PAY_PER_REQUEST"

  hash_key = "id"

  attribute {
    name = "id"
    type = "S"
  }
}

resource "aws_dynamodb_table_item" "user" {
  count = 1

  table_name = aws_dynamodb_table.user.name
  hash_key   = aws_dynamodb_table.user.hash_key
  range_key  = aws_dynamodb_table.user.range_key

  item = <<ITEM
{
  "id": {"S": "00001"},
  "name": {"S": "Taro"},
  "age": {"S": "35"}
}
ITEM
}
S3バケット
静的コンテンツを入れるS3バケットの定義。
本当なら、CloudFrontを使うなら直接アクセスをさせないよう private にしておき、Origin Access Identity を設定する方が良いが、今回はおためしなので端折っている。
なお、Webアプリのコンテンツ側もお手軽に、今回は Vue.js 2.x の CDN 版で作る。
resource "aws_s3_bucket" "contents" {
  bucket = local.bucket_name
  acl    = "public-read"

  website {
    index_document = "index.html"
  }
}

resource "aws_s3_bucket_object" "index" {
  bucket       = aws_s3_bucket.contents.id
  source       = "../contents/index.html"
  key          = "contents/index.html"
  acl          = "public-read"
  content_type = "text/html"
  etag         = filemd5("../contents/index.html")
}

resource "aws_s3_bucket_object" "app" {
  bucket       = aws_s3_bucket.contents.id
  source       = "../contents/app.js"
  key          = "contents/app.js"
  acl          = "public-read"
  content_type = "text/javascript"
  etag         = filemd5("../contents/app.js")
}
AppSync
今回のキモになるAppSync。
アクセスは APIキー をヘッダに設定することでアクセスできるように設定する。この場合、aws_appsync_api_key を併せて定義しておこう。aws_appsync_api_key.test.key でキー情報を参照可能なので、output しておくと良い。
resource "aws_appsync_graphql_api" "test" {
  name                = local.appsync_graphql_api_name
  authentication_type = "API_KEY"
  schema              = data.local_file.graphql_schema.content
}

data "local_file" "graphql_schema" {
  filename = "./appsync_schema.graphql"
}

resource "aws_appsync_api_key" "test" {
  api_id      = aws_appsync_graphql_api.test.id
  description = "${var.prefix}用APIキー"
}

resource "aws_appsync_datasource" "dynamodb" {
  api_id           = aws_appsync_graphql_api.test.id
  name             = local.appsync_dynamodb_datasource_name
  service_role_arn = aws_iam_role.appsync.arn
  type             = "AMAZON_DYNAMODB"

  dynamodb_config {
    table_name = local.dynamodb_table_name
  }
}

resource "aws_appsync_resolver" "createuser" {
  api_id      = aws_appsync_graphql_api.test.id
  field       = "createUser"
  type        = "Mutation"
  data_source = aws_appsync_datasource.dynamodb.name

  request_template  = file("./createuser_request.template")
  response_template = file("./createuser_response.template")
}

resource "aws_appsync_resolver" "user" {
  api_id      = aws_appsync_graphql_api.test.id
  field       = "user"
  type        = "Query"
  data_source = aws_appsync_datasource.dynamodb.name

  request_template  = file("./user_request.template")
  response_template = file("./user_response.template")
}
aws_appsync_datasource で DynamoDB に接続する設定をしているが、サービスロールに DynamoDB にアクセスする権限を与える必要があるので、以下のような感じで定義しておく。
resource "aws_iam_role" "appsync" {
  name               = local.appsync_role_name
  assume_role_policy = data.aws_iam_policy_document.appsync_assume.json
}

data "aws_iam_policy_document" "appsync_assume" {
  statement {
    effect = "Allow"

    actions = [
      "sts:AssumeRole",
    ]

    principals {
      type = "Service"
      identifiers = [
        "appsync.amazonaws.com",
      ]
    }
  }
}

resource "aws_iam_role_policy_attachment" "appsync" {
  role       = aws_iam_role.appsync.name
  policy_arn = aws_iam_policy.appsync_custom.arn
}

resource "aws_iam_policy" "appsync_custom" {
  name   = local.appsync_policy_name
  policy = data.aws_iam_policy_document.appsync_custom.json
}

data "aws_iam_policy_document" "appsync_custom" {
  statement {
    effect = "Allow"

    actions = [
      "dynamodb:BatchGetItem",
      "dynamodb:GetItem",
      "dynamodb:Query",
      "dynamodb:Scan",
      "dynamodb:BatchWriteItem",
      "dynamodb:PutItem",
      "dynamodb:UpdateItem",
      "dynamodb:DeleteItem",
    ]

    resources = [
      "*",
    ]
  }
}
aws_appsync_graphql_api では以下のスキーマを定義する。
schema {
  query: Query
  mutation: Mutation
}

type Query {
  user(id: ID!): User
}

type Mutation {
  createUser(name: String!): User
}

type User {
  id: ID!
  name: String!
  age: String!
}
さて、これでデータソースとスキーマの定義が終わったので、これをリゾルバに設定していく。
リゾルバでは、VTLで以下のようにリクエストとレスポンスの情報を制御する。
{
    "version" : "2017-02-28",
    "operation" : "PutItem",
    "key" : {
        "id" : { "S" : "$util.autoId()" }
    },
    "attributeValues" : {
        "name" : { "S" : "${context.arguments.name}" },
    }
}
$utils.toJson($context.result)
{
    "version" : "2017-02-28",
    "operation" : "GetItem",
    "key" : {
        "id" : $util.dynamodb.toDynamoDBJson($ctx.args.id)
    }
}
$utils.toJson($ctx.result)
ここまで作ると、AppSyncとしての動作確認はできるので、以下のような感じで正常性確認をしてみよう。
x-api-key は、↑の方で払い出したAPIキーだ。
curl \
  -w "\n" \
  -H 'Content-Type: application/json' \
  -H "x-api-key: xxx-xxxxxxxxxxxxxxxxxxxxxxxxxx" \
  -X POST -d '
    {
      "query": "query { user(id: \"00001\") { id name } }"
    }' \
  https://xxxxxxxxxxxxxxxxxxxxxxxxxx.appsync-api.ap-northeast-1.amazonaws.com/graphql
curl \
  -w "\n" \
  -H 'Content-Type: application/json' \
  -H "x-api-key: xxx-xxxxxxxxxxxxxxxxxxxxxxxxxx" \
  -X POST -d '
    {
      "query": "mutation { createUser(name: \"Jiro-san\") { name } }"
    }' \
  https://xxxxxxxxxxxxxxxxxxxxxxxxxx.appsync-api.ap-northeast-1.amazonaws.com/graphql
CloudFront
CloudFront は以下のようにマルチオリジンの定義をする。AppSync の domain_name で変なことをやっているのは、Terraform が AppSync の domain_name を良い感じに取る属性を持っていないためだ……残念。
resource "aws_cloudfront_distribution" "appsync" {
  origin {
    domain_name = trimsuffix(trimprefix(aws_appsync_graphql_api.test.uris["GRAPHQL"], "https://"), "/graphql")
    origin_id   = local.cloudfront_appsync_origin_id

    custom_origin_config {
      http_port              = 80
      https_port             = 443
      origin_protocol_policy = "https-only"
      origin_ssl_protocols   = ["TLSv1", "TLSv1.1", "TLSv1.2"]
    }
  }

  origin {
    domain_name = aws_s3_bucket.contents.bucket_regional_domain_name
    origin_id   = local.cloudfront_s3_origin_id
  }

  enabled = true
  comment = "AppSync用CloudFront"

  default_cache_behavior {
    allowed_methods  = ["DELETE", "GET", "HEAD", "OPTIONS", "PATCH", "POST", "PUT"]
    cached_methods   = ["GET", "HEAD"]
    target_origin_id = local.cloudfront_appsync_origin_id

    forwarded_values {
      query_string = false

      cookies {
        forward = "none"
      }
    }

    viewer_protocol_policy = "allow-all"
  }

  ordered_cache_behavior {
    path_pattern     = "/contents/*"
    allowed_methods  = ["DELETE", "GET", "HEAD", "OPTIONS", "PATCH", "POST", "PUT"]
    cached_methods   = ["GET", "HEAD"]
    target_origin_id = local.cloudfront_s3_origin_id

    forwarded_values {
      query_string = false

      cookies {
        forward = "none"
      }
    }

    viewer_protocol_policy = "allow-all"
  }

  restrictions {
    geo_restriction {
      restriction_type = "none"
    }
  }

  viewer_certificate {
    cloudfront_default_certificate = true
  }
}
ここまでくればあと一歩。
静的コンテンツ
静的コンテンツは、以下のように Vue.js を作る。
払い出された CloudFront のドメインと APIキー を忘れず書いておこう。
GraphQL とは言え、所詮は JSON を POST リクエストしているだけなので、axios でサクッとデータを引っ張ってくることができる。
Javascriptのコードは、eslint してなかったりエラーハンドリングが不真面目だったりするけど、おためしなのでそこは気にしないでいただきたい。
<html>
  <head>
    <style>
      [v-cloak] { display: none }
    </style>
    <meta charset="utf-8">
    <title>Vue TEST</title>
  </head>
  <body>
    <div id="myapp" v-cloak>
      <input type="text" v-model="user_id" placeholder="ユーザID(5桁)を入力">
      <button v-on:click="check_employee" v-bind:disabled="is_invalid">確認</button>
      <table border="1" v-if="user_info">
        <tr><th>id</th><th>name</th><th>age</th></tr>
        <tr v-model="item"><td>{{ item['id'] }}</td><td>{{ item['name'] }}</td><td>{{ item['age'] }}</td></tr>
      </table>
    </div>

    <script src="https://cdn.jsdelivr.net/npm/vue"></script>
    <script src="https://cdn.jsdelivr.net/npm/axios/dist/axios.min.js"></script>
    <script src="/contents/app.js"></script>
  </body>
</html>
const APIGATEWAY_INVOKE_URL = 'https://[CloudFrontのドメイン]/graphql'
const APPSYNC_API_KEY = '[払い出したAPIキー]'

const app = new Vue({
  el: '#myapp',
  data: {
    user_info: false,
    user_id: '',
    is_invalid: true,
    item: null
  },
  watch: {
    user_id: function (newVal, oldVal) {
      this.is_invalid = newVal.length !== 5
    }
  },
  methods: {
    check_employee: function () {
      const headers = {
        'x-api-key': `${APPSYNC_API_KEY}`
      }

      const body = {
        query: `query{
          user(id: "${this.user_id}\")
          {
            id
            name
            age
          }
        }`
      }

      axios
        .post(`${APIGATEWAY_INVOKE_URL}`, body, { headers: headers })
        .then(response => {
          this.item = response.data.data.user
          this.user_info = true
        })
    }
  }
})

app.$mount('#app')
これで完成!
ブラウザから CloudFront のコンテンツにアクセスしてみると…
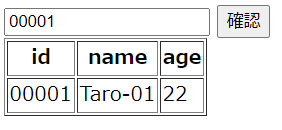
動いた!
GraphQL でどこまで複雑なことを実装できるかまだ深追いできていないけど、少なくとも API Gateway のAWSサービス統合よりは柔軟なことができそうな雰囲気。