はじめに
みのるんさんの記事https://qiita.com/minorun365/items/84bef6f06e450a310a6a「【AWSコンテナ入門】簡単なPythonアプリをECSにデプロイしてみよう!」に触発されて、「EC2に入ってAWS CLIだけで、ECSデプロイまで完結できるのでは?」と思い立ち、手を動かしながら手順を整理しました。
本記事は、そのとき実際に使ったCLIコマンドを、コピペで進められる形にまとめたものです!
構成イメージ
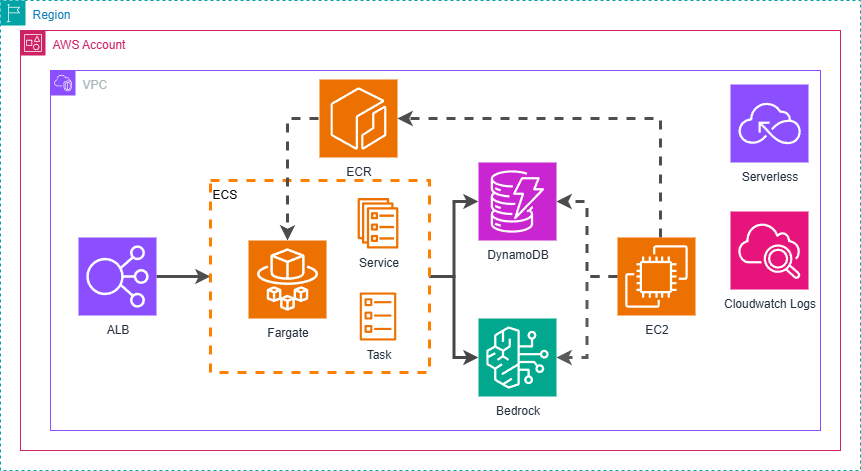
- EC2上でフロントエンド(Streamlit/Python)を作成
- Amazon Bedrock(Claude 3.5 Sonnet)とDynamoDBに接続して動作確認
- Dockerでアプリをコンテナ化
- ECRにプッシュ
- ECS(Fargate)でサービス化 + ALBで外部公開
前提
- OS: Amazon Linux 2023(EC2)
- EC2は、パブリックIPで起動
- Python: 3.9以上
- リージョン:
ap-northeast-1 - IAMユーザおよびEC2のIAMロールに、以下の権限がアタッチされていること

- 本記事のコマンドは基本そのまま実行可能です。ただしアカウントID / VPC / サブネット / SGは自環境で置換してください。
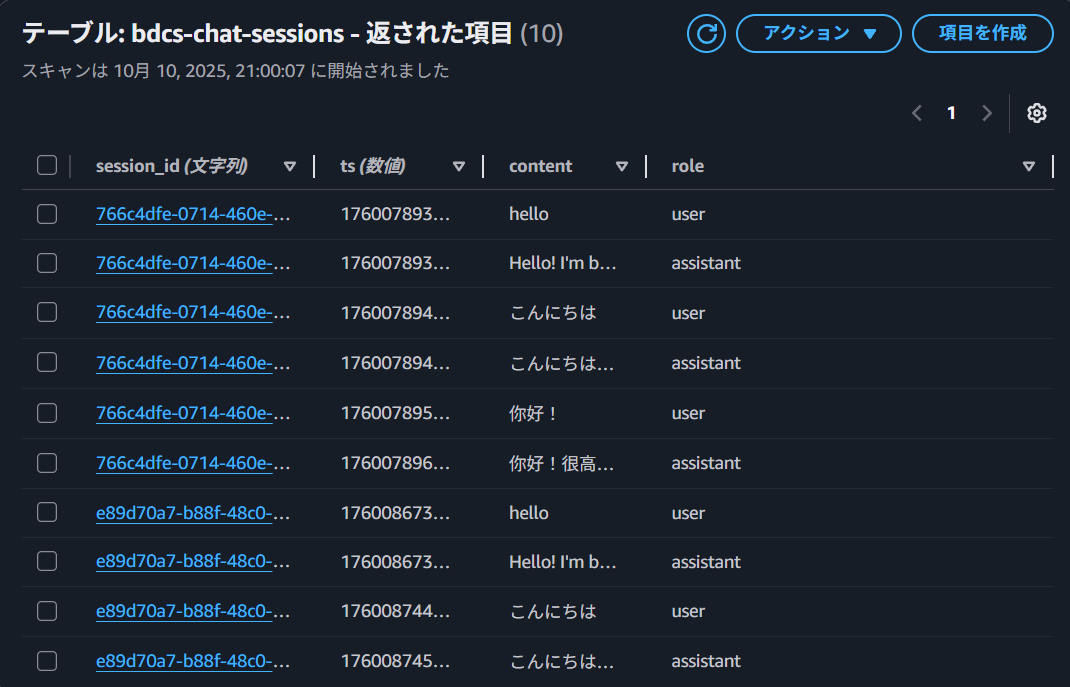
1. DynamoDBテーブル作成
Dynamoサービスを使って、会話履歴を時系列で保存します。
aws dynamodb create-table \
  --table-name bdcs-chat-sessions \
  --attribute-definitions AttributeName=session_id,AttributeType=S AttributeName=ts,AttributeType=N \
  --key-schema AttributeName=session_id,KeyType=HASH AttributeName=ts,KeyType=RANGE \
  --billing-mode PAY_PER_REQUEST \
  --region ap-northeast-1
-
session_idを文字列(S)、ts(timestamp)を数値(N)にする -
table-nameは、自定義でもOK! -
billing-modeをオンデマンド課金にする
2. OS準備(EC2上)
sudo dnf -y update
システム全体のパッケージを最新化する(セキュリティ修正・不具合修正の適用)。-y は確認プロンプトを自動承認。
sudo dnf -y install python3-pip python3-virtualenv git
python3-pip:Pythonパッケージ管理ツール(pip)を提供
python3-virtualenv:プロジェクトごとに独立したPython環境を作成するためのツール
git:アプリケーションコードの取得・バージョン管理用
3. 作業用ディレクトリ作成とパッケージインストール
# 作業用デレクトリー作成 & 仮想環境(venv)有効化
mkdir -p ~/bdcs-chatbox && cd ~/bdcs-chatbox
python3 -m venv .venv && source .venv/bin/activate

# requirements.txt を作成
cat > requirements.txt <<'REQ'
streamlit==1.38.0
boto3==1.35.0
botocore==1.35.0
REQ

# パッケージインストール
pip install -r requirements.txt
-
source .venv/bin/activateを忘れるとシステムPythonに入るので要注意
4. アプリ本体の作成
4.1 Pythonファイルの作成・配置
~/bdcs-chatbox(3で作成)配下にフロントエンドのPythonファイルを作成します。
vi app.py
以下の内容を貼り付けて:wqで保存します。
# app.py — bdcs Chatbox (Claude 3.5 Sonnet on Bedrock + DynamoDB + Streamlit)
import os, json, time, uuid
from decimal import Decimal

import streamlit as st
import boto3
from botocore.config import Config
from botocore.exceptions import BotoCoreError, ClientError
from boto3.dynamodb.conditions import Key

# ========= 設定(環境変数で上書き可) =========
REGION = os.getenv("AWS_REGION", "ap-northeast-1")
MODEL_ID = os.getenv("BEDROCK_MODEL_ID", "anthropic.claude-3-5-sonnet-20240620-v1:0")
TABLE_NAME = os.getenv("DDB_TABLE", "bdcs-chat-sessions")
SYSTEM_PROMPT = os.getenv("SYSTEM_PROMPT", "You are a helpful assistant named bdcs.")

# boto3 クライアント
cfg = Config(retries={"max_attempts": 6, "mode": "standard"}, read_timeout=60, connect_timeout=10)
bedrock = boto3.client("bedrock-runtime", region_name=REGION, config=cfg)
ddb = boto3.resource("dynamodb", region_name=REGION)
table = ddb.Table(TABLE_NAME)

# ========= DynamoDB ユーティリティ =========
def put_message(session_id: str, role: str, content: str):
    ts = Decimal(str(time.time()))
    table.put_item(Item={"session_id": session_id, "ts": ts, "role": role, "content": content})

def load_history(session_id: str, limit: int = 50):
    r = table.query(
        KeyConditionExpression=Key("session_id").eq(session_id),
        ScanIndexForward=True,  # 古→新
        Limit=limit
    )
    return r.get("Items", [])

# ========= Claude(Anthropic on Bedrock)用ペイロード =========
def build_claude_body(history_items, system_prompt: str, max_tokens: int, temperature: float):
    msgs = []
    for it in history_items:
        if it["role"] in ("user", "assistant"):
            msgs.append({"role": it["role"], "content": [{"type": "text", "text": it["content"]}]})
    # 先頭は user に
    if not msgs or msgs[0]["role"] != "user":
        msgs = [{"role": "user", "content": [{"type": "text", "text": ""}]}] + msgs

    body = {
        "anthropic_version": "bedrock-2023-05-31",
        "messages": msgs,
        "max_tokens": max_tokens,
        "temperature": temperature,
    }
    if system_prompt:
        body["system"] = [{"type": "text", "text": system_prompt}]
    return body

# ========= ストリーミング呼び出し =========
def call_bedrock_stream_claude(history_items, system_prompt, temperature: float, max_tokens: int):
    body = build_claude_body(history_items, system_prompt, max_tokens, temperature)
    resp = bedrock.invoke_model_with_response_stream(
        modelId=MODEL_ID,
        contentType="application/json",
        accept="application/json",
        body=json.dumps(body),
    )
    acc = []
    for event in resp.get("body"):
        if "chunk" not in event:
            continue
        payload = json.loads(event["chunk"]["bytes"])
        if payload.get("type") == "content_block_delta":
            t = payload.get("delta", {}).get("text")
            if t:
                acc.append(t); yield t
    yield ""  # flush

# ========= Streamlit UI =========
st.set_page_config(page_title="bdcs Bedrock × DynamoDB Chat", page_icon="🤖", layout="centered")
st.title("🤖 bdcs Bedrock × DynamoDB Chat (Streamlit)")

# セッションID生成
if "session_id" not in st.session_state:
    st.session_state.session_id = str(uuid.uuid4())

with st.sidebar:
    st.markdown("### Settings")
    st.text_input("AWS Region", value=REGION, key="ui_region")
    st.text_input("Model ID", value=MODEL_ID, key="ui_model")
    temperature = st.slider("temperature", 0.0, 1.0, 0.7, 0.1)
    max_tokens = st.number_input("max_tokens", min_value=256, max_value=8192, value=2048, step=256)
    st.markdown("---")
    if st.button("🔄 New Session"):
        st.session_state.session_id = str(uuid.uuid4())
        st.success("Started a new session.")
    st.caption(f"Session ID: {st.session_state.session_id}")

# 履歴表示
for it in load_history(st.session_state.session_id, limit=100):
    with st.chat_message("user" if it["role"] == "user" else "assistant"):
        st.write(it["content"])

# 入力欄
prompt = st.chat_input("メッセージを入力して送信(Shift+Enterで改行)")

# 送信処理
if prompt:
    put_message(st.session_state.session_id, "user", prompt)
    with st.chat_message("user"): st.write(prompt)

    try:
        history = load_history(st.session_state.session_id, limit=50)
        with st.chat_message("assistant"):
            area = st.empty(); acc = []
            for delta in call_bedrock_stream_claude(history, SYSTEM_PROMPT, temperature, max_tokens):
                acc.append(delta); area.markdown("".join(acc))
            answer = "".join(acc).strip()
        if answer:
            put_message(st.session_state.session_id, "assistant", answer)
    except (BotoCoreError, ClientError) as e:
        st.error(f"Bedrock 呼び出しに失敗しました: {e}")
    except Exception as ex:
        st.error(f"想定外エラー: {ex}")
4.2 アプリ起動テスト
EC2内でStreamlitを直接起動してみます。
アプリを起動する前に、まず仮想環境(venv)に入っているかを確認します。

環境変数を設定します。
export AWS_REGION=ap-northeast-1
export BEDROCK_MODEL_ID="anthropic.claude-3-5-sonnet-20240620-v1:0"
export DDB_TABLE="bdcs-chat-sessions"
アプリを起動してみます。
streamlit run app.py
- ブラウザで
http://<EC2 PublicIP>:8501を開いて動作確認してください。(チャットボックスが表示されればOK!)

- 終了後は
Ctrl + Cでアプリを止めて、deactivateコマンド で仮想環境(venv)を終了してください。
5. アプリをコンテナ化 → ECRへプッシュ
5.1 Dockerfile作成(~/bdcs-chatbox 直下)
vi Dockerfile
以下の内容を貼り付けて:wqで保存します。
# ---- runtime image ----
FROM python:3.11-slim

# OS deps(ca証明書/ヘルスチェック用curl)
RUN apt-get update && apt-get install -y --no-install-recommends \
    curl ca-certificates && \
    rm -rf /var/lib/apt/lists/*

# 非rootユーザで実行
RUN useradd -m appuser
WORKDIR /app

# 依存を先に入れてキャッシュを効かせる
COPY requirements.txt /app/requirements.txt
RUN pip install --no-cache-dir -r /app/requirements.txt

# アプリ本体
COPY app.py /app/app.py

# 既定値(ECSの環境変数で上書き可能)
ENV AWS_REGION=ap-northeast-1 \
    BEDROCK_MODEL_ID=anthropic.claude-3-5-sonnet-20240620-v1:0 \
    DDB_TABLE=bdcs-chat-sessions

# ポート公開
EXPOSE 8501

# コンテナ内の簡易ヘルスチェック(ALBのHCとも合わせる)
HEALTHCHECK --interval=30s --timeout=3s --start-period=20s \
  CMD curl -f http://localhost:8501/_stcore/health || exit 1

USER appuser

# 起動コマンド
CMD ["bash","-lc","streamlit run /app/app.py --server.address 0.0.0.0 --server.port 8501"]
5.2 Dockerインストール&セットアップ
sudo dnf -y install docker
Docker本体をインストール。-y は確認を自動承認。
sudo systemctl enable --now docker
Dockerサービスを自動起動設定(enable)し、即時起動(--now)。
sudo usermod -aG docker ec2-user
ec2-userをdockerグループに追加。これによりsudoなしでDockerコマンドを実行可能にします。
5.3 コンテナをビルド & ECRへプッシュ
# 環境変数を設定
REGION=ap-northeast-1
ACCOUNT_ID=$(aws sts get-caller-identity --query Account --output text)
REPO=bdcs-chatbox
IMAGE=${ACCOUNT_ID}.dkr.ecr.${REGION}.amazonaws.com/${REPO}:v1

# ECRリポジトリ作成(存在していればスキップ)
aws ecr create-repository --repository-name $REPO --region $REGION 2>/dev/null || true

# ログイン(パスワードは1行でパイプ)
aws ecr get-login-password --region $REGION | docker login \
  --username AWS --password-stdin ${ACCOUNT_ID}.dkr.ecr.${REGION}.amazonaws.com

# ビルド → タグ付け → ECRにプッシュ
docker build -t ${REPO}:v1 .
docker tag ${REPO}:v1 ${IMAGE}
docker push ${IMAGE}
- タグは
vYYYYMMDDやgit-shaなどの追跡しやすい形式を推奨しますが、今回はシンプルにv1にします。
6. ECS(Fargate)サービス作成 + ALBで公開
ここからはECS三点セット(タスク定義 / サービス / ロードバランサー)を作ります。
※ハンズオンのため、タスクには Public IP付与(assignPublicIp=ENABLED)を設定していますが、後からPrivateに切り替えることも可能です。
6.1 事前に変数をセットする
自環境のIDに置き換えてください。
REGION=ap-northeast-1
ACCOUNT_ID=$(aws sts get-caller-identity --query Account --output text)

# ECRイメージ
REPO=bdcs-chatbox
IMAGE=${ACCOUNT_ID}.dkr.ecr.${REGION}.amazonaws.com/${REPO}:v1

# ネットワーク情報(要修正)
VPC_ID=vpc-xxxxxxxxxxxxxxxx
SUBNET_A=subnet-xxxxxxxxxxxxxxxx
SUBNET_B=subnet-xxxxxxxxxxxxxxxx
SERVICE_SG=sg-xxxxxxxxxxxxxxxx   # タスク用SG(ALBから8501を許可)

# ECS/Logs/DDB(このまま利用可)
CLUSTER=bdcs-chat-cluster
SERVICE=bdcs-chat-service
TASK_FAMILY=bdcs-chat-task
LOG_GROUP=/ecs/bdcs-chatbox
DDB_TABLE=bdcs-chat-sessions
6.2 IAMロール作成(実行ロール/タスクロール)
# タスク実行ロール(ECR Pull、CloudWatch Logs出力)
aws iam create-role --role-name ecsTaskExecutionRole-bdcs \
  --assume-role-policy-document '{
    "Version":"2012-10-17",
    "Statement":[{"Effect":"Allow","Principal":{"Service":"ecs-tasks.amazonaws.com"},"Action":"sts:AssumeRole"}]
  }' 2>/dev/null || true
aws iam attach-role-policy \
  --role-name ecsTaskExecutionRole-bdcs \
  --policy-arn arn:aws:iam::aws:policy/service-role/AmazonECSTaskExecutionRolePolicy

# タスクロール(アプリの実行時権限:Bedrock/DynamoDB)
aws iam create-role --role-name ecsTaskRole-bdcs \
  --assume-role-policy-document '{
    "Version":"2012-10-17",
    "Statement":[{"Effect":"Allow","Principal":{"Service":"ecs-tasks.amazonaws.com"},"Action":"sts:AssumeRole"}]
  }' 2>/dev/null || true

cat > bdcs-taskrole-policy.json <<JSON
{
  "Version":"2012-10-17",
  "Statement":[
    {"Effect":"Allow","Action":["bedrock:InvokeModel","bedrock:InvokeModelWithResponseStream"],"Resource":"*"},
    {"Effect":"Allow","Action":["dynamodb:PutItem","dynamodb:Query","dynamodb:DescribeTable"],
     "Resource":"arn:aws:dynamodb:${REGION}:${ACCOUNT_ID}:table/${DDB_TABLE}"}
  ]
}
JSON

aws iam put-role-policy --role-name ecsTaskRole-bdcs \
  --policy-name bdcs-inline --policy-document file://bdcs-taskrole-policy.json
-
ecsTaskExecutionRole-bdcs
- ECRからのイメージPull、CloudWatch Logs 出力を担う実行ロール
- 付与ポリシー:AmazonECSTaskExecutionRolePolicy(公式マネージド)
-
ecsTaskRole-bdcs
- アプリ本体が実行時に使うタスクロール
- 今回許可する操作:
- Bedrockの推論呼び出し(
InvokeModel/InvokeModelWithResponseStream) - DynamoDB(特定テーブル)への書き込み / 参照(
PutItem/Query/DescribeTable)
- Bedrockの推論呼び出し(
6.3 CloudWatchロググループ/ ECSクラスターの作成
aws logs create-log-group --log-group-name $LOG_GROUP --region $REGION 2>/dev/null || true
aws ecs create-cluster --cluster-name $CLUSTER --region $REGION 2>/dev/null || true
6.4 ALB用セキュリティグループ & ターゲットグループ
# ALB用SG(80番をインターネットへ公開)
ALB_SG_ID=$(aws ec2 create-security-group \
  --group-name bdcs-alb-sg --description bdcs-alb-sg --vpc-id $VPC_ID \
  --query GroupId --output text)

aws ec2 authorize-security-group-ingress \
  --group-id $ALB_SG_ID --protocol tcp --port 80 --cidr 0.0.0.0/0

# タスク用SGに「ALBからの8501」を許可
aws ec2 authorize-security-group-ingress \
  --group-id $SERVICE_SG --protocol tcp --port 8501 \
  --source-group $ALB_SG_ID

# ターゲットグループ(IPターゲット、HCはStreamlitのヘルス)
TG_ARN=$(aws elbv2 create-target-group \
  --name bdcs-tg --protocol HTTP --port 8501 \
  --target-type ip --vpc-id $VPC_ID \
  --health-check-path "/_stcore/health" \
  --health-check-interval-seconds 30 \
  --query 'TargetGroups[0].TargetGroupArn' --output text)
echo $TG_ARN
6.5 ALB作成+リスナー
ALB_ARN=$(aws elbv2 create-load-balancer \
  --name bdcs-alb \
  --subnets $SUBNET_A $SUBNET_B \
  --security-groups $ALB_SG_ID \
  --query 'LoadBalancers[0].LoadBalancerArn' --output text)

aws elbv2 create-listener \
  --load-balancer-arn $ALB_ARN --protocol HTTP --port 80 \
  --default-actions Type=forward,TargetGroupArn=$TG_ARN
パブリック ALB を 2 サブネットに作成し、HTTP:80 でターゲットグループ($TG_ARN)へ転送する最小構成になっています。
後でHTTPS(443) + ACMを追加し、HTTP→HTTPSリダイレクトに変更する事も可能です。
6.6 タスク定義の作成(Fargate)
cat > taskdef.json <<JSON
{
  "family": "${TASK_FAMILY}",
  "networkMode": "awsvpc",
  "requiresCompatibilities": ["FARGATE"],
  "cpu": "512",
  "memory": "1024",
  "executionRoleArn": "arn:aws:iam::${ACCOUNT_ID}:role/ecsTaskExecutionRole-bdcs",
  "taskRoleArn": "arn:aws:iam::${ACCOUNT_ID}:role/ecsTaskRole-bdcs",
  "containerDefinitions": [
    {
      "name": "bdcs",
      "image": "${IMAGE}",
      "essential": true,
      "portMappings": [{ "containerPort": 8501, "protocol": "tcp" }],
      "environment": [
        {"name":"AWS_REGION","value":"${REGION}"},
        {"name":"BEDROCK_MODEL_ID","value":"anthropic.claude-3-5-sonnet-20240620-v1:0"},
        {"name":"DDB_TABLE","value":"${DDB_TABLE}"}
      ],
      "logConfiguration": {
        "logDriver": "awslogs",
        "options": {
          "awslogs-group": "${LOG_GROUP}",
          "awslogs-region": "${REGION}",
          "awslogs-stream-prefix": "ecs"
        }
      },
      "healthCheck": {
        "command": ["CMD-SHELL","curl -f http://localhost:8501/_stcore/health || exit 1"],
        "interval": 30,
        "timeout": 5,
        "retries": 3,
        "startPeriod": 30
      }
    }
  ]
}
JSON

aws ecs register-task-definition \
  --cli-input-json file://taskdef.json --region $REGION
Fargateでawsvpcネットワークのタスク定義を登録し、ECRイメージ(${IMAGE})を1コンテナで起動します。
6.7 サービス作成
aws ecs create-service \
  --cluster $CLUSTER \
  --service-name $SERVICE \
  --task-definition $TASK_FAMILY \
  --desired-count 1 \
  --launch-type FARGATE \
  --network-configuration "awsvpcConfiguration={subnets=[$SUBNET_A,$SUBNET_B],securityGroups=[$SERVICE_SG],assignPublicIp=ENABLED}" \
  --load-balancers "targetGroupArn=$TG_ARN,containerName=bdcs,containerPort=8501" \
  --health-check-grace-period-seconds 60 \
  --region $REGION
Fargate サービスを ALB(HTTP/HTTPS)配下で起動し、awsvpcで2サブネットに配置し、Public IPを付与して外部公開します。
※PrivateIPに切り替えたい場合はassignPublicIp=DISABLEDに変更し、NAT または VPCエンドポイント(Bedrock: Interface、DynamoDB: Gateway)を用意する必要があります。
6.8 ALBのDNS名を取得してアクセスしてみる
ALB_DNS=$(aws elbv2 describe-load-balancers \
  --load-balancer-arns $ALB_ARN --query 'LoadBalancers[0].DNSName' --output text)
echo "Open: http://$ALB_DNS"
ブラウザでALBのDNS名を開き、StreamlitのUI表示 → プロンプト送信 → Bedrockの応答 → DynamoDBへの保存まで確認できれば、今回のハンズオンは完了です。
お疲れさまでした! 🎉
トラブルシューティング
-
ALB 502/504:ターゲットのHC 失敗 → セキュリティグループの8501、
/_stcore/health、startPeriodの見直し -
ECR Push失敗:
ecr:GetAuthorizationToken/docker login再実行、リージョン/アカウントID確認 - Bedrock 403:リージョン/モデルID不一致 or Private環境でVPCE未作成
-
DDB書込み失敗:テーブル名/リージョン/
PutItem許可を確認
ハンズオン完了後の片付け
ハンズオン完了後は、今回作成したリソースを整理・削除してクリーンアップしましょう!
※ECSサービス/ALB/ターゲットグループ/SG/LogGroup/ECR/DynamoDBを順に削除してください。
# サービス停止 & 削除
aws ecs update-service --cluster $CLUSTER --service $SERVICE --desired-count 0
aws ecs delete-service --cluster $CLUSTER --service $SERVICE --force

# タスク定義の登録解除(タスク定義ファミリー内でアクティブなすべてのリビジョンをまとめて登録解除する)
aws ecs list-task-definitions --family-prefix $TASK_FAMILY --status ACTIVE --query 'taskDefinitionArns[]' --output text | xargs -n1 aws ecs deregister-task-definition --task-definition

# ALB/TG/SG
aws elbv2 delete-listener --listener-arn $(aws elbv2 describe-listeners --load-balancer-arn $ALB_ARN --query 'Listeners[].ListenerArn' --output text)
aws elbv2 delete-load-balancer --load-balancer-arn $ALB_ARN
aws elbv2 delete-target-group --target-group-arn $TG_ARN
aws ec2 delete-security-group --group-id $ALB_SG_ID

# クラスター/ログ
aws ecs delete-cluster --cluster $CLUSTER
aws logs delete-log-group --log-group-name $LOG_GROUP

# ECR(リポジトリごと削除)
aws ecr delete-repository --repository-name $REPO --force

# DDB(必要なら)
aws dynamodb delete-table --table-name $DDB_TABLE