はじめに
わたしは猫さんが大好きです!
機械学習を初めてから一番最初にやりたいと思ったのが猫の種類を当てるモデルを作ることでした。
作ってみたので復習のために書いていこうと思います!
今回はデータセットにわんちゃんも入っていたのでわんちゃんも猫さんも種類を判別できるモデルを作成しました!
データセット
今回、データセットはオックスフォード大学の公開しているデータセットを使用しました
The Oxford-IIIT Pet Dataset
開発環境
・Google Colaboratory
使用したもの
・python3
・Inception V3
モデル作成
まずはいろんなものをimport
import tensorflow as tf
from tensorflow import keras
import numpy as np
from keras.utils import np_utils
import matplotlib.pyplot as plt
import pandas as pd
import glob
from sklearn.model_selection import train_test_split
from keras.preprocessing.image import load_img, save_img, img_to_array, array_to_img, ImageDataGenerator
import os
import shutil
from PIL import Image
from keras.applications.inception_v3 import InceptionV3, preprocess_input, decode_predictions
from keras.models import Model, load_model
from keras.layers.core import Dense
from keras.layers.pooling import GlobalAveragePooling2D
from keras.optimizers import Adam, RMSprop, SGD
from keras.utils.np_utils import to_categorical
from keras.callbacks import EarlyStopping, ModelCheckpoint, ReduceLROnPlateau, TensorBoard
from keras.layers import Input, Dropout
Google Driveと接続と画像データ準備
Google Driveと接続
データセットが画像で、とても重たいので今回はGoogleDriveにデータを入れてそこから取り出すようにしました
Google Colabでやるととても簡単でスムーズです。
GoogleColabのファイルを開き、ドライブをマウントを押すと「このコードを実行してください」とセルが追加されます。
それに従って認証などを行います。
# Google Driveと接続
from google.colab import drive
drive.mount('/content/drive')
zipファイルの解凍
容量が大きいのでzipファイルの解凍もgoogle drive上で行いました
# /content/images/がなければ/content/のなかにimages.zipを入れる。
if os.path.exists('/content/images/')==False:
    id = '....'  # 共有リンクで取得した id= より後の部分
    downloaded = drive.CreateFile({'id': id})
    downloaded.GetContentFile('images.zip')
else:
    pass

# /content/images/がない時はimages.zipを解凍
if os.path.exists('/content/images/')==False:
    !unzip images.zip
# /content/images/があればzipはgoogle drive上で解凍されているので処理は必要ないです。
else:
    pass
データセットの中の犬と猫の種類をlistに入れる
kind_list = ['Abyssinian','Bengal','Birman','Bombay','British_Shorthair','Egyptian_Mau','Maine_Coon','Persian'
            ,'Ragdoll','Russian_Blue','Siamese','Sphynx',
        'american_bulldog','american_pit_bull_terrier','basset_hound','beagle','boxer',
        'chihuahua', 'english_cocker_spaniel','english_setter', 'german_shorthaired','great_pyrenees',
        'havanese','japanese_chin','keeshond','leonberger','miniature_pinscher','newfoundland','pomeranian',
        'pug', 'saint_bernard','samoyed','scottish_terrier','shiba_inu','staffordshire_bull_terrier',
        'wheaten_terrier','yorkshire_terrier']
画像を種類で分ける
今回使用するデータセットが、画像の名前にその画像に写っている子の種類が書いてあるものになります。
ファイル分けなどはされておらず、作成しようとしているモデルの学習には少し使いづらいので、種類ごとにディレクトリを作成して画像を分けることにしました。
先ほど作成したkind_listを使用してディレクトリを作成し、その中に画像を入れていきます!
# 種類別にディレクトリ作成
# すでにディレクトリがあればpass、なければ作成
for j in kind_list:
    if  os.path.exists('/content/images/'+str(j)+'/') ==True:
        pass
    else :
        os.mkdir('/content/images/'+str(j)+'/')

# 種別に写真を分けて格納
# 画像には種類と番号がふられているので適当な番号(500)で区切ってその番号の名前の画像があれば先ほど作ったディレクトリに移動させる
for j in kind_list:
    for i in range (1,500):
        if os.path.exists('/content/images/'+str(j)+'_'+str(i)+'.jpg') ==False:
            pass
        else:
            shutil.move('/content/images/'+str(j)+'_'+str(i)+'.jpg', '/content/images/'+str(j)+'/')

# 謎のmat形式の画像?をいらないので削除
for i in range(100,103):
    if  os.path.exists('/content/images/Abyssinian_'+str(i)+'.mat') ==False:
        pass
    else:
        os.remove('/content/images/Abyssinian_'+str(i)+'.mat')
これでデータセットの中の画像を使いやすい状態にすることができました!
データセットの画像をモデル学習用のデータにする
次に、データセットの画像をそのままモデルの学習には使えないので、使える形にしていきます!
# 画像をリストにarrayにしていれる。ラベルもリストの形で作る
# 空の配列を作成
data_img=[] #画像用
kind_label=[] #ラベル用
# リストに入れる際の画像のサイズを指定
img_size = 224

for j in  kind_list:
    for i in range(1,300):
        #画像がなければpass
        if os.path.exists('/content/images/'+str(j)+'/'+str(j)+'_'+str(i)+'.jpg') ==False:
            pass
        #画像があったら
        else:
            #file_listのなかに画像ファイルのpathを取得
            file_list = glob.glob('/content/images/'+str(j)+'/'+str(j)+'_'+str(i)+'.jpg')
            for file in file_list:
                img_path = file
                #画像を読み込む
                img = load_img(img_path, target_size=(img_size, img_size))
                #読み込んだ画像をarrayに変換
                x = img_to_array(img)
                #作成したdata_imgのリストの中に入れる
                data_img.append(x)
                #画像の名前の種類の部分をラベルとしてkind_labelのリストの中に入れる
                kind_label.append(j)

# ラベル(kind_label)をダミー変数に直す
Y_dummy = pd.get_dummies(kind_label)

# 画像データ(data_img)とラベル(Y_dummy)をtrainとtestに分ける
X_train, X_test, y_train, y_test = train_test_split(
    data_img, Y_dummy, test_size=0.1, random_state=22, stratify=Y_dummy)
これで、学習データとしての用意が整いました!
モデルを作成する(転移学習)
転移学習
今回はTnsolflowの転移学習モデルInception-v3を使いました。
転移学習とは、学習済みのモデルに、タスク固有のデータを追加で学習させることです。
一般に、少ないデータ数でそれなりに高い精度のモデルが得られると言われています。
また、学習の際に学習済みのモデルの重みは固定し、追加した層のみを使用して学習します。
今回は、様々なカテゴリの画像を学習済みのInception-v3モデルに、猫と犬の画像を追加で学習させて、猫と犬の種類判別に特化したモデルになるようパラメータを調整します。
転移学習の仲間にファインチューニングもあります。
同じと思われがちですが、異なる手法です。
学習済みのモデルを使用した手法であることは同じですが、
ファインチューニングは学習済みのモデルの層の重みを微調整する手法になります。
学習済みモデルの重みを初期値とし、再度学習することによって微調整します。
そこが転移学習とは異なる点です。
モデルの作成
# ベースモデルの設定
base_model = InceptionV3(include_top = False, weights='imagenet', input_tensor=None, input_shape=(224,224,3))

from keras.models import Model
# Denseレイヤーを接続
x = base_model.output
x = GlobalAveragePooling2D()(x)
x = Dense(1024, activation='relu')(x)
predictions = Dense(len(kind_list), activation='softmax')(x)

# データの拡張
datagen = ImageDataGenerator(
   #(True)各チャンネルごとの画素値の平均を0
    featurewise_center = False,
   #(True)サンプルごとの画素値の平均を0
    samplewise_center = False,
   #(True)各チャンネルごとの画素値の分散を1
    featurewise_std_normalization = False,
   #(True)サンプルごとの画素値の分散を1
    samplewise_std_normalization = False,
   #(True)白色化
    zca_whitening = False,
   #ランダムに回転
    rotation_range = 0,
   #左右に平行移動
    width_shift_range = 0.1,
   #上下に平行移動
    height_shift_range = 0.1,
   #ランダムに左右反転
    horizontal_flip = True,
   #ランダムに上下反転
    vertical_flip = False)

# 転移学習モデル
transfer_model = Model(inputs=base_model.input, outputs=predictions)

# 最終段のDenseだけ再学習する
for layer in transfer_model.layers[:310]:
    layer.trainable = False
for layer in transfer_model.layers[310:]:
    layer.trainable = True

# 転移学習したモデルをコンパイル
transfer_model.compile(loss='categorical_crossentropy',
                       optimizer='adam',
                       metrics=['accuracy'])

hist=transfer_model.fit_generator(
                             datagen.flow(X_train, y_train, batch_size=32),
                             epochs=10,
                             validation_data=(X_test, y_test))

# 精度確認用に出力
loss= transfer_model.evaluate(X_test, y_test)
print(loss)
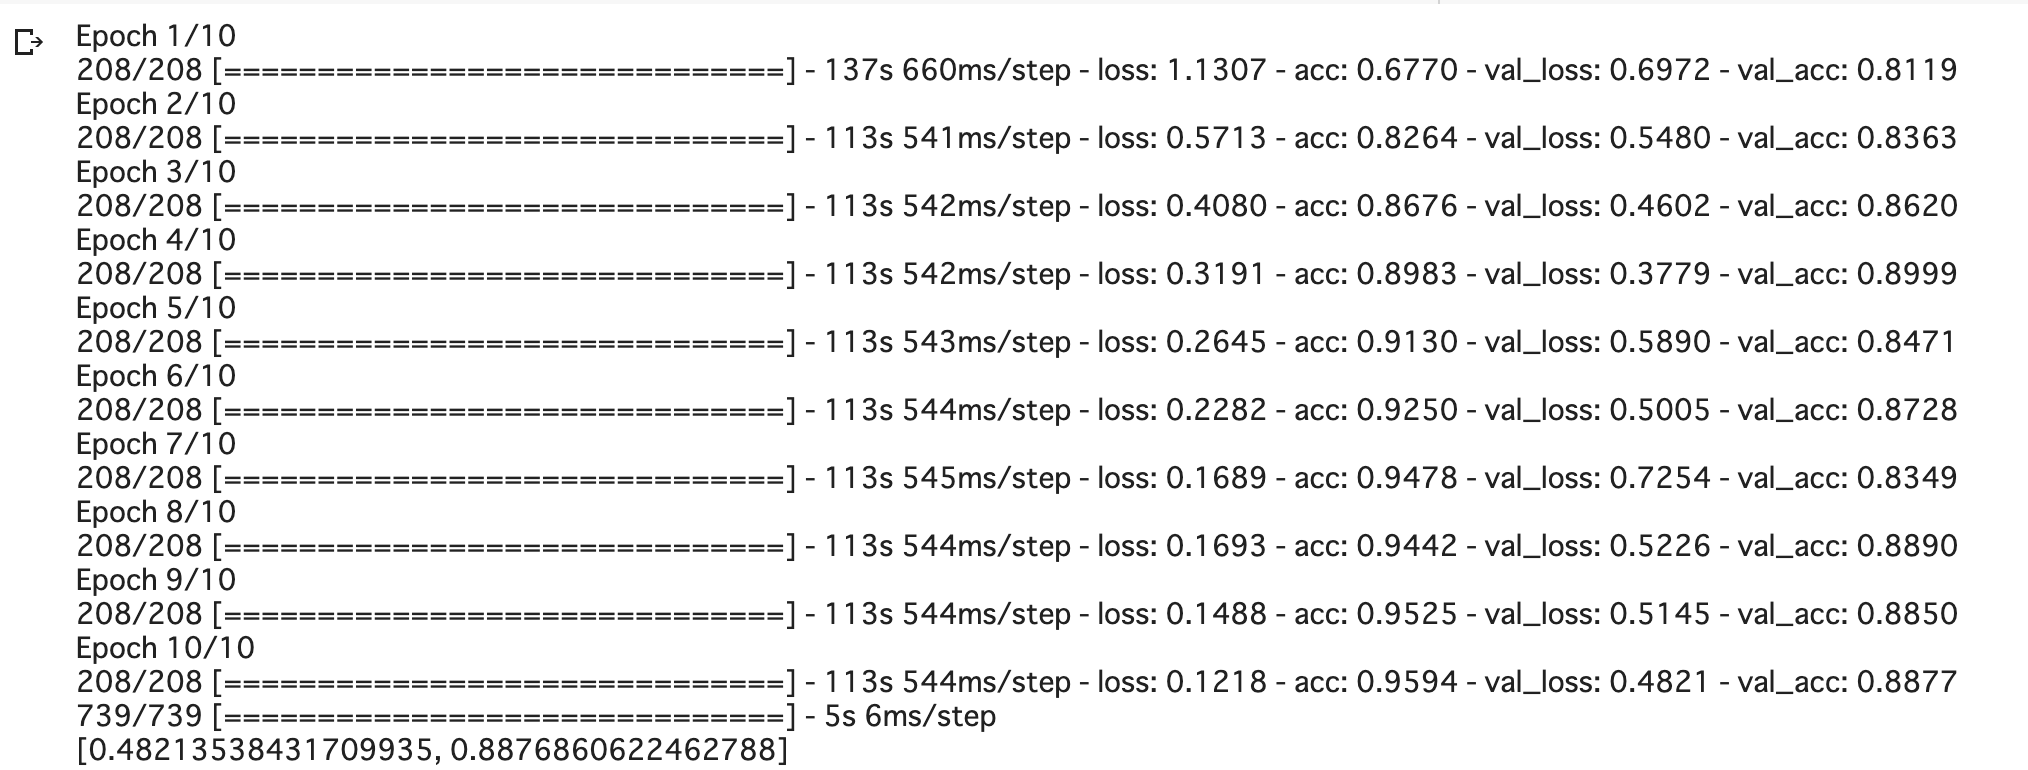
これを実行すると以下のように学習の様子を見ることができます。学習回数を重ねるごとにlossが減ってaccが上がっているのがわかります
よく学習していてかわいいですね!
データの拡張を多めにしたり、バッチのサイズを変えると精度向上や時間の短縮など工夫することができます

モデルの保存
# モデル保存用のディレクトリがなければ作成
model_dir = './gdrive/My Drive/model/'
if os.path.exists(model_dir) == False:
    os.mkdir(model_dir)

# モデルを保存
transfer_model.save(model_dir + 'model_3.hdf5')

# optimizerのない軽量モデルを保存(学習や評価は不可だが、予測は可能)
transfer_model.save(model_dir + 'model_3-opt.hdf5', include_optimizer = False)


# ベストの重みのみ保存
transfer_model.save_weights(model_dir + 'model_3_weight.hdf5')
ここまででデータの学習とモデルの作成は終了しました!
作成したモデルを使用して犬や猫の種類を予測
モデルの読み込み
# モデル読み込み
model = load_model(model_dir + 'model_3-opt.hdf5', compile = False)
testデータを使用した検証
まずtestデータ30件の画像と正解ラベルを出力してみます。
# testデータ30件の正解ラベル
true_classes = np.argmax(y_test[0:30], axis = 1)

# testデータ30件の画像と正解ラベルを出力
plt.figure(figsize = (16, 6))
for i in range(30):
    plt.subplot(3, 10, i +1)
    plt.axis("off")
    plt.title(kind_list[true_classes[i]])
    plt.imshow(Image.fromarray(np.uint8(X_test[i])))
plt.show()

次に、testデータ30件を予測した予測ラベルと、どれくらいの確率でそのラベルの種類なのか(予測確率)を出力します。
# testデータ30件の予測ラベル
pred_classes=np.argmax(model.predict(X_test[0:30]),axis=1)

# テストデータ30件の予測確率
pred_probs = np.max(model.predict(X_test[0:30]),axis=1)
pred_probs = ['{:.4f}'.format(i) for i in pred_probs]

# testデータ30件の画像と予測ラベル&予測確率を出力
plt.figure(figsize = (16, 6))
for i in range(30):
    plt.subplot(3, 10, i + 1)
    plt.axis("off")
    if pred_classes[i] == true_classes[i]:
        plt.title(kind_list[pred_classes[i]] + '\n' + pred_probs[i])
    else:
        plt.title(kind_list[pred_classes[i]] + '\n' + pred_probs[i], color = "red")
    plt.imshow(Image.fromarray(np.uint8(X_test[i])))
plt.show()
 黒い文字で出力されているのは、予測ラベルと正解ラベルが同じだったものつまり、予測が当たったデータ。
赤い文字で出力されているのは、予測ラベルと正解ラベルが違ったものつまり、予測が外れてしまったデータになります。
新しい画像に対する予測
# 画像を読み込む
img_path = str(input())
img = load_img(img_path,target_size=(224, 224))
x = img_to_array(img)
y = np.expand_dims(x, axis=0)

# 予測
features = model.predict(y)

# 一番確率が高い種類を取得
pred_classes=np.argmax(features, axis=1)

# 一番確率が高い種類の予測確率を取得
pred_probs = np.max(features,axis=1)
pred_probs = ['{:.4f}'.format(i) for i in pred_probs]
a=float(pred_probs[0])

# 予測確率が0.7以下の時はあまり自信がないので似ている種類を出していることにします
if a<= 0.7:
    print( kind_list[pred_classes[0]]+'に似ています。')
else:
    print(kind_list[pred_classes[0]] + '\n' + pred_probs[0])

# 読み込んだ画像も出力
Image.fromarray(np.uint8(x))
これで入れた画像に写っているわんちゃんや猫さんの種類を判別してくれるモデルが出来上がりました!!