自分の忘備録のため、荒くまとめていきます。各項目に参照元サイトを乗っけていますので、詳しく見られたい方はそちらをどうぞ。
JavaScriptインストール
参照元はこちらのサイト
https://qiita.com/leomaro7/items/2c3a767bbbb6cc535b19
sshして、とりあえずupdate
       __|  __|_  )
       _|  (     /   Amazon Linux 2 AMI
      ___|\___|___|

https://aws.amazon.com/amazon-linux-2/
3 package(s) needed for security, out of 5 available
Run "sudo yum update" to apply all updates.
[ec2-user@ip-172-31-3-55 ~]$ sudo yum update
はい、レポジトリ取ってきます。
[root@ip-172-31-3-55 ~]# curl -sL https://rpm.nodesource.com/setup_10.x | bash -

## Installing the NodeSource Node.js 10.x repo...


## Inspecting system...

+ rpm -q --whatprovides redhat-release || rpm -q --whatprovides centos-release || rpm -q --whatprovides cloudlinux-release || rpm -q --whatprovides sl-release
+ uname -m

## Confirming "el7-x86_64" is supported...

+ curl -sLf -o /dev/null 'https://rpm.nodesource.com/pub_10.x/el/7/x86_64/nodesource-release-el7-1.noarch.rpm'

## Downloading release setup RPM...

+ mktemp
+ curl -sL -o '/tmp/tmp.2aS450lqdw' 'https://rpm.nodesource.com/pub_10.x/el/7/x86_64/nodesource-release-el7-1.noarch.rpm'

## Installing release setup RPM...

+ rpm -i --nosignature --force '/tmp/tmp.2aS450lqdw'

## Cleaning up...

+ rm -f '/tmp/tmp.2aS450lqdw'

## Checking for existing installations...

+ rpm -qa 'node|npm' | grep -v nodesource

## Run `sudo yum install -y nodejs` to install Node.js 10.x and npm.
## You may also need development tools to build native addons:
     sudo yum install gcc-c++ make
## To install the Yarn package manager, run:
     curl -sL https://dl.yarnpkg.com/rpm/yarn.repo | sudo tee /etc/yum.repos.d/yarn.repo
     sudo yum install yarn
準備できたようなので、管理ツールとともにインストールかけていきます。gccなども一緒に。
[root@ip-172-31-3-55 ~]# sudo yum install -y yarn nodejs
[root@ip-172-31-3-55 ~]# yum install -y gcc-c++ make
バージョンチェックします
[root@ip-172-31-3-55 ~]# npm -v
6.11.3
[root@ip-172-31-3-55 ~]# node -v
v10.17.0
AWS Amplify-CLIのインストール
参照元はこちら
https://qiita.com/Junpei_Takagi/items/f2bc567761880471fd54
はい、続いてAmplifyいきます。結構時間かかるかもしれません。(数分)
[root@ip-172-31-3-55 ~]# npm install -g @aws-amplify/cli
この文字が出ればインストールは完了です
----------------------------------------
Successfully installed the Amplify CLI
----------------------------------------
AWSアカウントとの紐づけ
この辺もちゃっちゃと終わらせましょう。リージョンとユーザー名とかは好きなように。
[root@ip-172-31-3-55 ~]# amplify configure
このようにアドレスが出るので、クリックしたらAWSのIAMコンソールにつながり、どんどんユーザー設定を進めていけます。
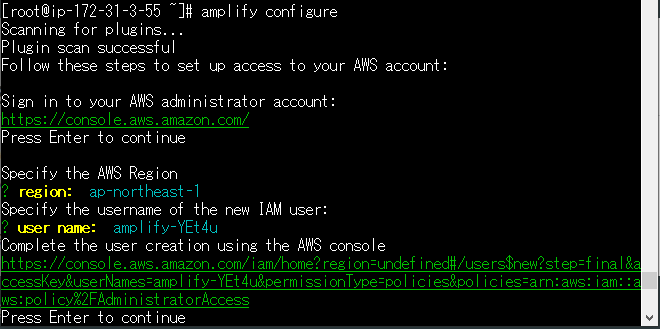
ユーザー作成が完了したら、アクセスキーやシークレットアクセスキーがcsvファイルでダウンロードできます。
そのファイルを使い、ターミナル画面に戻り、クレデンシャルを入力していきましょう。
ターミナル上で下記の文字が出たらセットアップ完了です。
Successfully set up the new user.
vue-cliのインストール
参照元はこちら(一部のみ)
https://qiita.com/deehii/items/58e6da680f322fce10ff
インストールしますー。
[root@ip-172-31-3-55 ~]# sudo npm install -g @vue/cli
[root@ip-172-31-3-55 ~]# vue -V
@vue/cli 4.0.5
このようにバージョンが表示されればOKです。
プロジェクトを作る
参照元はこちら(一部のみ)
https://qiita.com/nightswinger/items/d33d64f0b729630d0c3d
[root@ip-172-31-3-55 ~]# vue create projectName
[root@ip-172-31-3-55 ~]# cd projectName
[root@ip-172-31-3-55 ~]# vue add pug
[root@ip-172-31-3-55 systest]# npm install --save aws-amplify aws-amplify-vue
ここでも少し時間がかかるかもしれません。
プロジェクトが出来たらamplifyのプラグインを、プロジェクトのルートディレクトリにインストールしていきましょう。
必要な方はプラグインも合わせて入れてください。pugを使いたいので私は入れてます。
AWSバックエンドのセットアップ
AWS側のセットアップを進めていきましょう。これでCloudFormation側が勝手に動いてくれます
[root@ip-172-31-3-55 ~]# amplify init
参考までに今回の私のケースだとこんな感じ
[root@ip-172-31-3-55 ~]# amplify init
Note: It is recommended to run this command from the root of your app directory
? Enter a name for the project    //好きなプロジェクト名
? Enter a name for the environment     //好きな環境名
? Choose your default editor: Visual Studio Code
? Choose the type of app that you're building javascript
Please tell us about your project
? What javascript framework are you using vue
? Source Directory Path:  src
? Distribution Directory Path: dist
? Build Command:  npm run-script build
? Start Command: npm run-script serve
Using default provider  awscloudformation


For more information on AWS Profiles, see:
https://docs.aws.amazon.com/cli/latest/userguide/cli-multiple-profiles.html

? Do you want to use an AWS profile? Yes
? Please choose the profile you want to use default
? Initializing project in the cloud...


...? Successfully created initial AWS cloud resources for deployments.
? Initialized provider successfully.
Initialized your environment successfully.

Your project has been successfully initialized and connected to the cloud!
現在のamplify環境の状況はこんな感じです
[root@ip-172-31-3-55 ~]# amplify status

Current Environment: amplify

| Category | Resource name | Operation | Provider plugin |
| -------- | ------------- | --------- | --------------- |
当たり前ですが何もありませんね。
Authを追加する
ログイン画面を作っていきましょう。
[root@ip-172-31-3-55 systest]# amplify add auth
ウィザードが立ち上がるので、必要に合わせて、yes/noで進めていってください。
ログイン画面を作る
以下サイトを参考に、ファイルを書き換えていきます。
https://qiita.com/nightswinger/items/d33d64f0b729630d0c3d
src/main.jsファイルの書き換え
 import Vue from 'vue'
 import App from 'App.vue'
 import Amplify, * as AmplifyModules from 'aws-amplify'
 import { AmplifyPlugin } from 'aws-amplify-vue'
 import aws_exports from './aws-exports'
 Amplify.configure(aws_exports)

 Vue.use(AmplifyPlugin, AmplifyModules)

 // It's important that you instantiate the Vue instance after calling Vue.use!

 new Vue({
   render: h => h(App)
 }).$mount('#app')
src/App.vueの書き換え
<template>
  <div id="app">
    <amplify-authenticator></amplify-authenticator>
  </div>
</template>
<script>
import { Auth } from 'aws-amplify'
export default {
  name: 'app',
  components: {}
}
</script>
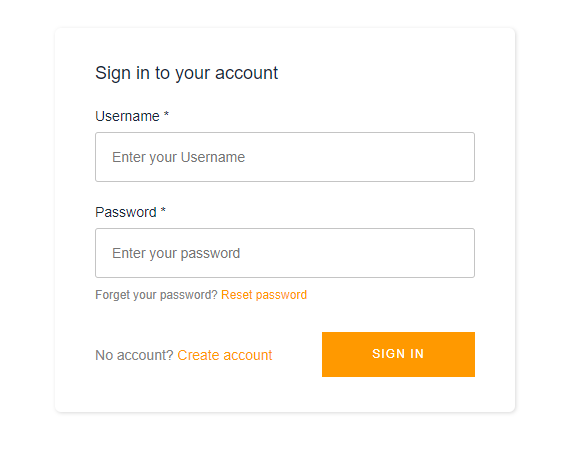
ブラウザで開く
完了したら、バックエンドに反映させるためpushしましょう。
10分くらい時間がかかると思います。
[root@ip-172-31-3-55 systest]# amplify push
ブラウザでチェックを先にしたいなら下記を表示する
npm run serveコマンドを実行してPublicIP:8080にて表示しましょう。
無事完了して、ブラウザで下記が表示されたらおしまい。※セキュリティグループのポート開放を忘れずに。