はじめに
- 導入編: https://qiita.com/negimochi/items/4eac2a6f6725d03f0cf1
- Slate編: https://qiita.com/negimochi/items/4a4645f83f6060531633
前回、前々回に引き続き、UnrealEnginePython プラグインを使ってみるシリーズ。
今回はアセットインポート~マテリアル作成・ノード接続・メッシュ割当てあたりのテストコード書いてみる。
ここではサンプル用のデータとして Gray ちゃんアセット(http://rarihoma.xvs.jp/products/graychan/) の
テクスチャと fbx ファイルを使わせていただきました。
(目的がインポートやマテリアルの作成なので、.uasset ファイルはあえて使用しません)
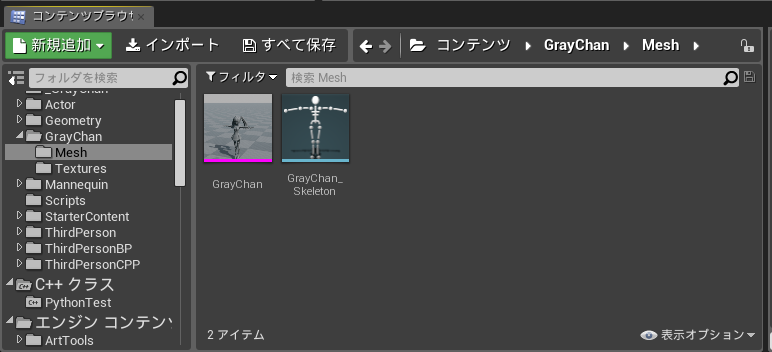
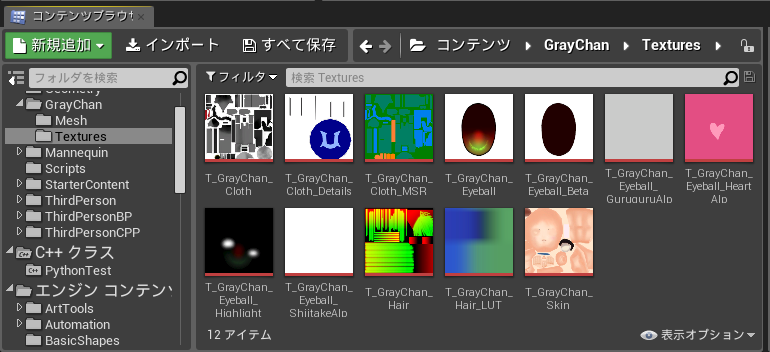
アセットインポート
Gray ちゃんアセットのテクスチャと fbx ファイルを Python からパスを与えてインポートしてみる。
import unreal_engine as ue
from unreal_engine.classes import PyFbxFactory, TextureFactory
from unreal_engine.enums import TextureCompressionSettings
from unreal_engine import FRotator
import glob
import os.path

# GrayChan アセットのリソース先
resource_dir = 'D:/UnrealEngine/PythonTest/Resource/GrayChan_0_5_0/'
# インポート先
import_dir = '/Game/GrayChan/'

## テクスチャのインポート ##
texture_factory = ue.find_class('TextureFactory')
textures = {}
texture_output = os.path.join(import_dir,'Textures')
for file in glob.glob(os.path.join(resource_dir, 'Textures/*.png')):
    name, ext = os.path.splitext(os.path.basename(file))
    textures[name] = ue.import_asset(file, texture_output, texture_factory)
for file in glob.glob(os.path.join(resource_dir, 'Textures/*.psd')):
    name, ext = os.path.splitext(os.path.basename(file))
    textures[name] = ue.import_asset(file, texture_output, texture_factory)

# VectorDisplacementmap の設定
textures['T_GrayChan_Hair'].SRGB = False
textures['T_GrayChan_Hair'].CompressionSettings = TextureCompressionSettings.TC_VectorDisplacementmap
textures['T_GrayChan_Cloth_MSR'].SRGB = False
textures['T_GrayChan_Cloth_MSR'].CompressionSettings = TextureCompressionSettings.TC_VectorDisplacementmap

# テクスチャアセット保存
for tex in textures.values():
    tex.save_package()


## fbx のインポート ##
fbx_factory = PyFbxFactory()

# インポート設定
fbx_factory.ImportUI.bCreatePhysicsAsset = False
fbx_factory.ImportUI.bImportMaterials = False
fbx_factory.ImportUI.bImportTextures = False
fbx_factory.ImportUI.bImportAnimations = False
fbx_factory.ImportUI.SkeletalMeshImportData.ImportRotation = FRotator(-90.0,0.0,0.0)

# インポートとアセット保存
mesh_dir = os.path.join(import_dir,'Mesh')
graychan_mesh = fbx_factory.factory_import_object(os.path.join(resource_dir, 'GrayChan.fbx'), mesh_dir)
graychan_mesh.save_package()
テクスチャの場合、TextureFactory と ue.import_asset でインポートができる。
fbx の場合は別途 PyFbxFactory クラスが設けられている。
fbx_factory.ImportUI は、通常の fbx インポートするときのメニュー項目である UFbxImportUI と同じプロパティが扱える。
ここでは、ImportRotation で回転してインポートするようにしてある。
実行結果。
なお、アセット管理に関しては、大体このあたりに解説がある。
Delete, Move, Duplicate, Reimport など一通り揃っている。
このあたりは、他のシステムと連携することで、大量のアセットを自動更新する機能などの拡張ができそうだ。
マテリアルの作成とノード接続
なんと、UnrealEnginePython ではマテリアルをゼロから作ることが可能!
もちろん、ノード接続も含めてすべて Python で書くことができる。まじかよすげー!
ってことで、試しに Gray ちゃんマテリアルを Python だけで構築してみる。
以下、スクリプト行数がかなり膨大になってしまったので、区切りながら解説する。
1. エクスプレッションクラスのインポート・マテリアルのファクトリ
とりあえず、最初の定義部分。
import unreal_engine as ue
from unreal_engine.classes import Texture2D, MaterialFunction, MaterialFactoryNew
from unreal_engine.classes import MaterialExpressionTextureSample, MaterialExpressionTextureObject
from unreal_engine.classes import MaterialExpressionBumpOffset
from unreal_engine.classes import MaterialExpressionAdd, MaterialExpressionMultiply, MaterialExpressionSubtract
from unreal_engine.classes import MaterialExpressionConstant, MaterialExpressionConstant3Vector, MaterialExpressionClamp
from unreal_engine.classes import MaterialExpressionLinearInterpolate, MaterialExpressionMaterialFunctionCall
from unreal_engine.enums import EMaterialShadingModel, EMaterialSamplerType
from unreal_engine.structs import LinearColor, ColorMaterialInput, ScalarMaterialInput, ExpressionInput

import os.path

# インポートしたときのパス。マテリアルアセットを置くパス
import_dir = '/Game/GrayChan/'
material_dir = os.path.join(import_dir, 'Materials/')
texture_dir = os.path.join(import_dir, 'Textures/')

# マテリアルのファクトリ
material_factory = MaterialFactoryNew()
エクスプレッションについて
'from unreal_engine.classes' で大量にインポートしている中で MaterialExpression と名がつくのはエクスプレッション、要するにマテリアルの表現式、マテリアルノードのクラスのこと。
例えば、
- MaterialExpressionAdd
- マテリアル: Add 表現式
- C++ Class: UMaterialExpressionAdd
- MaterialExpressionConstant
- マテリアル: Constant 表現式
- C++ Class: UMaterialExpressionConstant
- MaterialExpressionLinearInterpolate
- マテリアル: Lerp 表現式
- C++ Class: UMaterialExpressionLinearInterpolate
e.t.c.
といった具合。
これを事前にインポートしておくことで、これらのノードの作成、プロパティ設定、ノード接続が可能になる。
他のエクスプレッションはソースコードは Engine/Source/Runtime/Engine/Classes/Materials 以下に、
API リファレンスの解説は https://docs.unrealengine.com/latest/INT/API/Runtime/Engine/Materials に一覧がある。
これらを読んで、エクスプレッションを組む際の参考にする。
マテリアル作成のファクトリ
MaterialFactoryNew がマテリアルを作成するためのファクトリ。
新規マテリアル作成時はこれを使用する。
2. Gray ちゃんの目(エフェクト無し版)のマテリアル作成
では、まず、GrayChan の目のマテリアルを作ってみる。
### M_GrayChan_Eyeball #################################################################################
def make_eyeball_material():
    # eyeball マテリアルオブジェクト生成
    new_material = material_factory.factory_create_new(os.path.join(material_dir, 'M_GrayChan_Eyeball'))
    # Eyeball のテクスチャサンプラー
    eyeball_base = MaterialExpressionTextureSample('', new_material)
    eyeball_base.Texture = ue.load_object(Texture2D, os.path.join(texture_dir, 'T_GrayChan_Eyeball'))
    eyeball_base.MaterialExpressionEditorX = -600
    eyeball_base.MaterialExpressionEditorY = 0
    # Eyeball(Highlight) のテクスチャサンプラー
    eyeball_highlight = MaterialExpressionTextureSample('', new_material)
    eyeball_highlight.Texture = ue.load_object(Texture2D, os.path.join(texture_dir, 'T_GrayChan_Eyeball_Highlight'))
    eyeball_highlight.MaterialExpressionEditorX = -600
    eyeball_highlight.MaterialExpressionEditorY = 200
    # eyeball のベースカラー用加算 (base + highlight)
    eyeball_basecolor_add = MaterialExpressionAdd('', new_material)
    eyeball_basecolor_add.MaterialExpressionEditorX = -400
    eyeball_basecolor_add.MaterialExpressionEditorY = 0
    # emissive カラー用 Const
    const_specular = MaterialExpressionConstant('', new_material)
    const_specular.R = 0.0
    const_specular.MaterialExpressionEditorX = -100
    const_specular.MaterialExpressionEditorY = 100
    # emissive カラー用乗算
    eyeball_emissive_mult = MaterialExpressionMultiply('', new_material)
    eyeball_emissive_mult.MaterialExpressionEditorX = -300
    eyeball_emissive_mult.MaterialExpressionEditorY = 200
    # emissive カラー用加算
    eyeball_emissive_add = MaterialExpressionAdd('', new_material)
    eyeball_emissive_add.MaterialExpressionEditorX = -100
    eyeball_emissive_add.MaterialExpressionEditorY = 200

    # 事前に Expression を設定してないとマテリアルを開くときに容赦なくエディタが落ちる
    new_material.Expressions = [eyeball_base, eyeball_highlight, eyeball_basecolor_add, eyeball_highlight,
                            const_specular, eyeball_emissive_mult, eyeball_emissive_add]

    # BaseColor ノード接続
    eyeball_basecolor_add.A = ExpressionInput(Expression=eyeball_base)
    eyeball_basecolor_add.B = ExpressionInput(Expression=eyeball_highlight)
    new_material.BaseColor = ColorMaterialInput(Expression=eyeball_basecolor_add)
    # Specular ノード接続
    new_material.Specular = ScalarMaterialInput(Expression=const_specular)
    # EmissiveColor ノード接続
    eyeball_emissive_mult.A = ExpressionInput(Expression=eyeball_highlight)
    eyeball_emissive_mult.ConstB = 4.0
    eyeball_emissive_add.A = ExpressionInput(Expression=eyeball_base)
    eyeball_emissive_add.B = ExpressionInput(Expression=eyeball_emissive_mult)
    new_material.EmissiveColor = ColorMaterialInput(Expression=eyeball_emissive_add)

    # マテリアルの変更を伝える
    new_material.post_edit_change()
    return new_material
この関数を実行すると、以下のマテリアルが作られる。
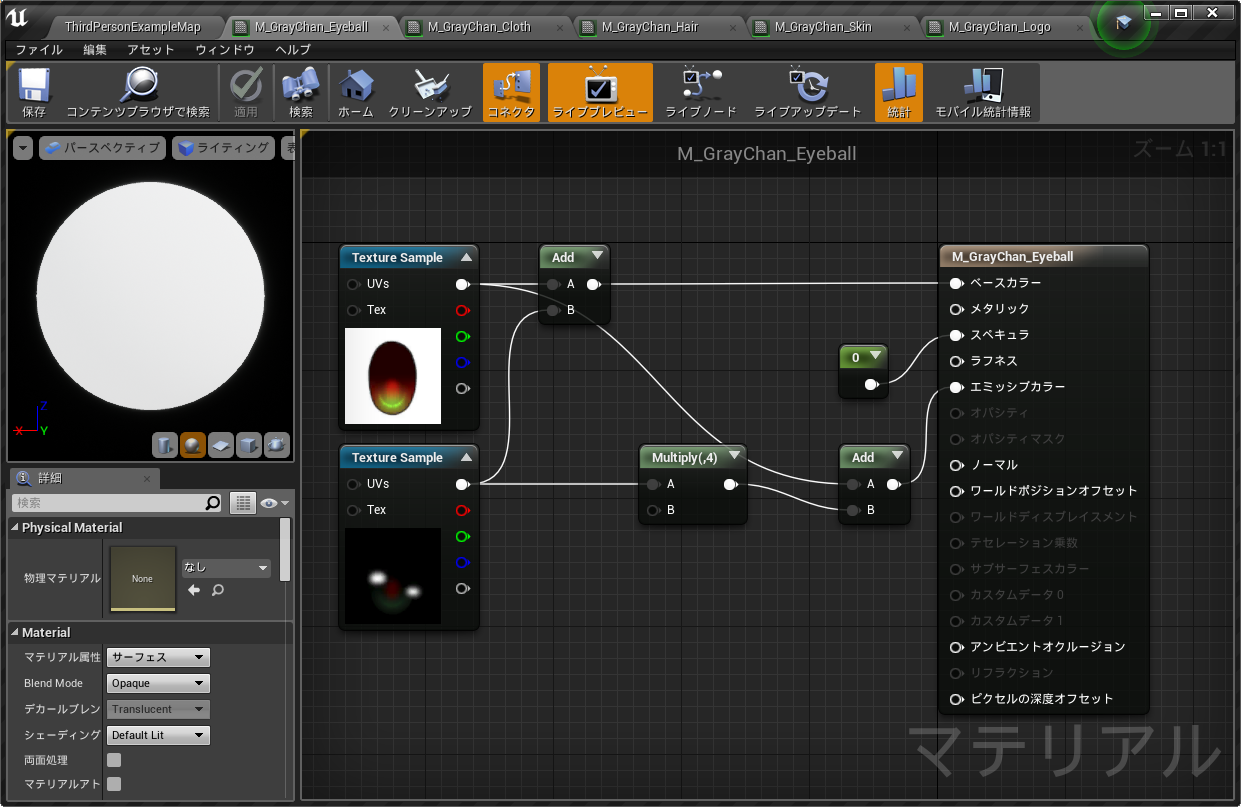
普通に作ったようにみえるけど、UE エディタ上では一切操作していません。上の Python を実行しただけ。なんてこったい。
エクスプレッションの定義
見て分かる通り、必要なノードごとに、インスタンスを作る必要がある。
MaterialExpressionEditorX, MaterialExpressionEditorY は、マテリアルエディタ内での座標位置。
マテリアルのリザルトノードは、デフォルトで左上が (0,0) の位置に置かれるらしい。
なので、可読性よくするためにも、X方向はだいたいマイナス側を設定することになる。
必要に応じて、各ノードごとのパラメタ値の指定、さらに、ExpressionInput クラスを使用してノード接続を行う。
Expressions の注意点
注意点としては、'new_material.Expressions' の行。
Expressions には事前に各 Expression を配列で格納しておく必要がある。
これをしておかないと Python を実行した瞬間に UE エディタもろともクラッシュしてしまう。
3. Gray ちゃんの髪の毛マテリアル作成
### M_GrayChan_Hair #################################################################################
def make_hair_material():
    # hair マテリアルオブジェクト生成
    new_material = material_factory.factory_create_new(os.path.join(material_dir, 'M_GrayChan_Hair'))
    # hair のテクスチャサンプラー
    hair_base = MaterialExpressionTextureSample('', new_material)
    hair_base.Texture = ue.load_object(Texture2D, os.path.join(texture_dir, 'T_GrayChan_Hair'))
    hair_base.SamplerType = EMaterialSamplerType.SAMPLERTYPE_LinearColor
    hair_base.MaterialExpressionEditorX = -1200
    hair_base.MaterialExpressionEditorY = 0
    # hair のテクスチャオブジェクト
    hair_lut = MaterialExpressionTextureObject('', new_material)
    hair_lut.Texture = ue.load_object(Texture2D, os.path.join(texture_dir, 'T_GrayChan_Hair_LUT'))
    hair_lut.MaterialExpressionEditorX = -1200
    hair_lut.MaterialExpressionEditorY = 300
    # hair カラー用乗算
    basecolor_mult = MaterialExpressionMultiply('', new_material)
    basecolor_mult.MaterialExpressionEditorX = -1000
    basecolor_mult.MaterialExpressionEditorY = 30
    # GradientMap_Multi 用 Const
    const_zero = MaterialExpressionConstant('', new_material)
    const_zero.R = 0.0
    const_zero.MaterialExpressionEditorX = -850
    const_zero.MaterialExpressionEditorY = 60
    # GradientMap_Multi 用 Const
    const_one = MaterialExpressionConstant('', new_material)
    const_one.R = 1.0
    const_one.MaterialExpressionEditorX = -850
    const_one.MaterialExpressionEditorY = 200
    # GradientMap_Multi 用 Const
    const_two = MaterialExpressionConstant('', new_material)
    const_two.R = 2.0
    const_two.MaterialExpressionEditorX = -850
    const_two.MaterialExpressionEditorY = 300
    # FunctionCall(GradientMap_Multi) 1つ目
    gradientmap_mult0 = MaterialExpressionMaterialFunctionCall('', new_material)
    gradientmap_mult0.MaterialExpressionEditorX = -700
    gradientmap_mult0.MaterialExpressionEditorY = 0
    gradientmap_mult0.SetMaterialFunction(ue.load_object(MaterialFunction,
            '/Engine/Functions/Engine_MaterialFunctions02/Gradients/GradientMap_Multi'))
    # FunctionCall(GradientMap_Multi) 2つ目
    gradientmap_mult1 = MaterialExpressionMaterialFunctionCall('', new_material)
    gradientmap_mult1.MaterialExpressionEditorX = -700
    gradientmap_mult1.MaterialExpressionEditorY = 200
    gradientmap_mult1.SetMaterialFunction(ue.load_object(MaterialFunction,
            '/Engine/Functions/Engine_MaterialFunctions02/Gradients/GradientMap_Multi'))
    # Lerp Alpha 計算する Subtracts
    basecolor_sub = MaterialExpressionSubtract('', new_material)
    basecolor_sub.MaterialExpressionEditorX = -750
    basecolor_sub.MaterialExpressionEditorY = 400
    basecolor_sub.ConstB = 0.9
    # Lerp Alpha 計算する Clamp
    basecolor_clamp = MaterialExpressionClamp('', new_material)
    basecolor_clamp.MaterialExpressionEditorX = -500
    basecolor_clamp.MaterialExpressionEditorY = 400
    basecolor_clamp.MinDefault = 0.0
    basecolor_clamp.MaxDefault = 1.0
    # BaseColor につなげる Lerp
    basecolor_lerp = MaterialExpressionLinearInterpolate('', new_material)
    basecolor_lerp.MaterialExpressionEditorX = -200
    basecolor_lerp.MaterialExpressionEditorY = 0
    # roughness 用 Const
    const_roughness = MaterialExpressionConstant('', new_material)
    const_roughness.R = 0.6
    const_roughness.MaterialExpressionEditorX = -100
    const_roughness.MaterialExpressionEditorY = 200

    # 事前に Expression を設定してないとマテリアルを開くときに容赦なくエディタが落ちる
    new_material.Expressions = [ hair_base, hair_lut, basecolor_mult,  const_zero, const_one, const_two,
                            gradientmap_mult0, gradientmap_mult1,
                            basecolor_sub, basecolor_clamp, basecolor_lerp, const_roughness]

    # BaseColor ノード接続
    inputs = gradientmap_mult0.FunctionInputs
    inputs[0].Input = ExpressionInput(Expression=hair_base, Mask=1, MaskR=1)
    inputs[1].Input = ExpressionInput(Expression=const_zero)
    inputs[2].Input = ExpressionInput(Expression=hair_lut)
    inputs[3].Input = ExpressionInput(Expression=const_two)
    gradientmap_mult0.FunctionInputs = inputs
    basecolor_mult.A = ExpressionInput(Expression=hair_base, Mask=1, MaskR=1)
    basecolor_mult.B = ExpressionInput(Expression=hair_base, Mask=1, MaskG=1)
    inputs = gradientmap_mult1.FunctionInputs
    inputs[0].Input = ExpressionInput(Expression=basecolor_mult)
    inputs[1].Input = ExpressionInput(Expression=const_one)
    inputs[2].Input = ExpressionInput(Expression=hair_lut)
    inputs[3].Input = ExpressionInput(Expression=const_two)
    gradientmap_mult1.FunctionInputs = inputs
    basecolor_sub.A = ExpressionInput(Expression=hair_base, Mask=1, MaskG=1)
    basecolor_clamp.Input = ExpressionInput(Expression=basecolor_sub)
    basecolor_lerp.A = ExpressionInput(Expression=gradientmap_mult0, OutputIndex=0)
    basecolor_lerp.B = ExpressionInput(Expression=gradientmap_mult1, OutputIndex=0)
    basecolor_lerp.Alpha = ExpressionInput(Expression=basecolor_clamp)
    new_material.BaseColor = ColorMaterialInput(Expression=basecolor_lerp)
    # Roughness ノード接続
    new_material.Roughness = ScalarMaterialInput(Expression=const_roughness)

    # マテリアルの変更を伝える
    new_material.post_edit_change()
    return new_material
この関数を実行すると、以下のマテリアルが作られる。
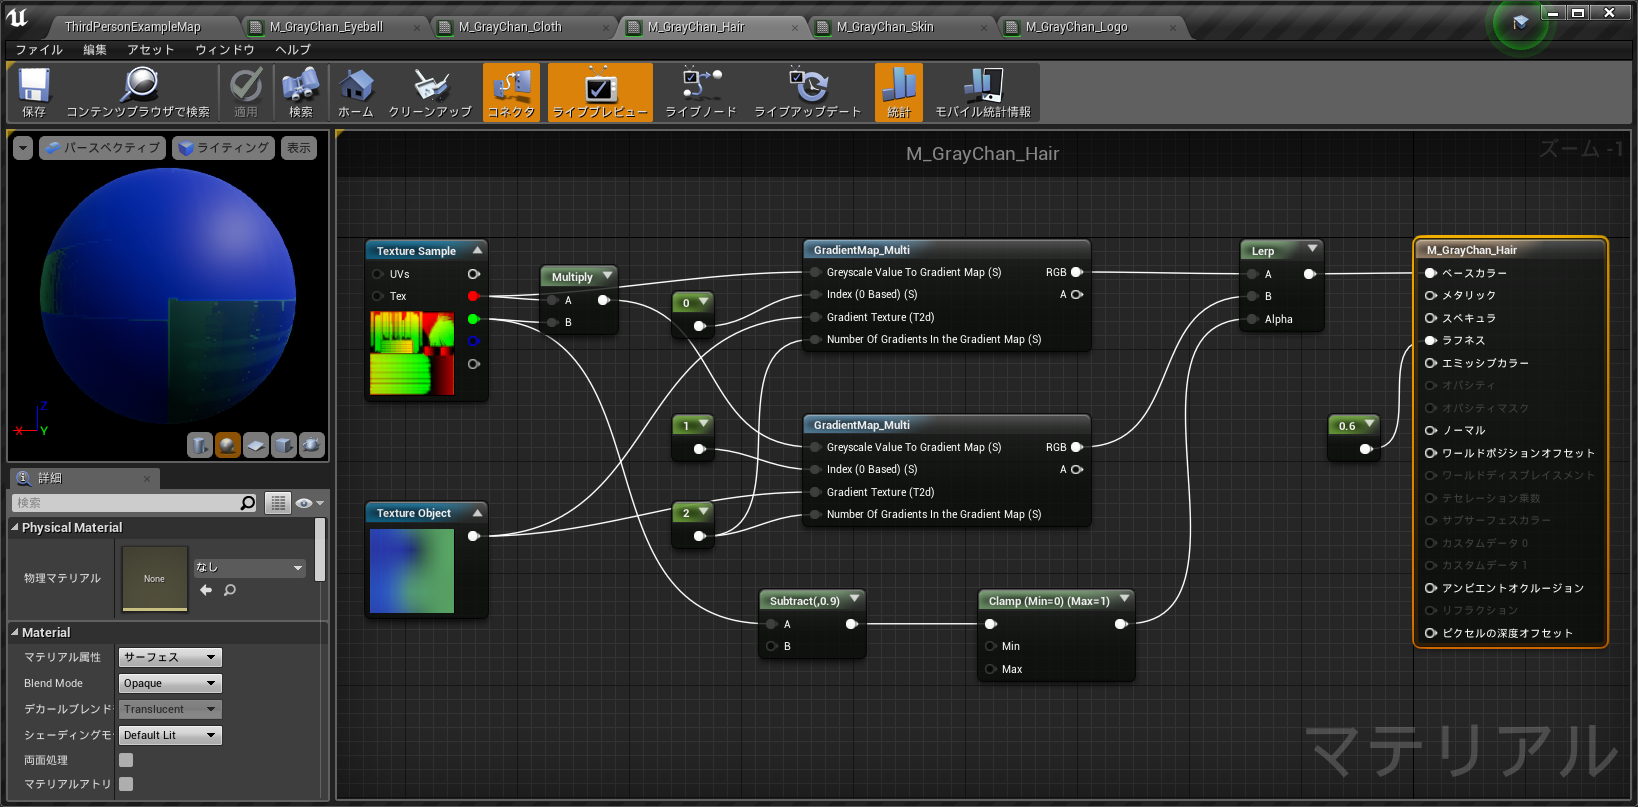
・・・正直つかれた _(:3」∠)_
エクスプレッション数やノード数が増えると一気に行数が増えていく。つらい・・・
TextureSample のタイプ
`hair_base.SamplerType = EMaterialSamplerType.SAMPLERTYPE_LinearColor' というように、
EMaterialSamplerType を使用して設定する。
TextureSample の RGBA ノード
basecolor_mult.A = ExpressionInput(Expression=hair_base, Mask=1, MaskR=1) などのように、
TextureSmaple に対して ExpressionInput 時にマスク指定すると、マスクされた個別のノードから接続ができる。
マテリアルファンクションノード
MaterialExpressionMaterialFunctionCall はマテリアルファンクションだが、
ue.load_object で対象のマテリアルファンクションのアセットを指定することで問題なく使用することができた。
Input 側の接続は、inputs = gradientmap_mult1.FunctionInputs で一旦 Input の内容を展開してから、
その中の Input に接続すべきノードを書き込む。
Output 側の接続は、ExpressionInput(Expression=gradientmap_mult0, OutputIndex=0) というように、OutputIndex で指定が可能。
4. Gray ちゃんの肌マテリアル作成
### M_GrayChan_Skin #################################################################################
def make_skin_material():
    # skin マテリアルオブジェクト生成
    new_material = material_factory.factory_create_new(os.path.join(material_dir, 'M_GrayChan_Skin'))
    new_material.ShadingModel = EMaterialShadingModel.MSM_Subsurface
    # skin のテクスチャサンプラー
    skin_base = MaterialExpressionTextureSample('', new_material)
    skin_base.Texture = ue.load_object(Texture2D, os.path.join(texture_dir, 'T_GrayChan_Skin'))
    skin_base.MaterialExpressionEditorX = -600
    skin_base.MaterialExpressionEditorY = 0
    # skin 用 Const Vector3
    skin_color = MaterialExpressionConstant3Vector('', new_material)
    skin_color.Constant = LinearColor(R=0.886275, G=0.560784, B=0.478431)
    skin_color.MaterialExpressionEditorX = -600
    skin_color.MaterialExpressionEditorY = 200
    # sub カラー用乗算
    skin_mult = MaterialExpressionMultiply('', new_material)
    skin_mult.MaterialExpressionEditorX = -300
    skin_mult.MaterialExpressionEditorY = 200
    # specular 用 Const
    const_specular = MaterialExpressionConstant('', new_material)
    const_specular.R = 0.0
    const_specular.MaterialExpressionEditorX = -100
    const_specular.MaterialExpressionEditorY = 60
    # roughness 用 Const
    const_roughness = MaterialExpressionConstant('', new_material)
    const_roughness.R = 0.35
    const_roughness.MaterialExpressionEditorX = -100
    const_roughness.MaterialExpressionEditorY = 120
    # opacity 用 Const
    const_opacity = MaterialExpressionConstant('', new_material)
    const_opacity.R = 0.1
    const_opacity.MaterialExpressionEditorX = -100
    const_opacity.MaterialExpressionEditorY = 160

    # 事前に Expression を設定してないとマテリアルを開くときに容赦なくエディタが落ちる
    new_material.Expressions = [skin_base, skin_color, skin_mult,
                            const_specular, const_roughness, const_opacity]

    # BaseColor ノード接続
    new_material.BaseColor = ColorMaterialInput(Expression=skin_base)
    # Specular ノード接続
    new_material.Specular = ScalarMaterialInput(Expression=const_specular)
    # Roughness ノード接続
    new_material.Roughness = ScalarMaterialInput(Expression=const_roughness)
    # Opacity ノード接続
    new_material.Opacity = ScalarMaterialInput(Expression=const_opacity)
    # SubsurfaceColor ノード接続
    skin_mult.A = ExpressionInput(Expression=skin_base, Mask=1, MaskR=1, MaskG=1, MaskB=1)
    skin_mult.B = ExpressionInput(Expression=skin_color)
    new_material.SubsurfaceColor = ColorMaterialInput(Expression=skin_mult)

    # マテリアルの変更を伝える
    new_material.post_edit_change()
    return new_material
この関数を実行すると、以下のマテリアルが作られる。
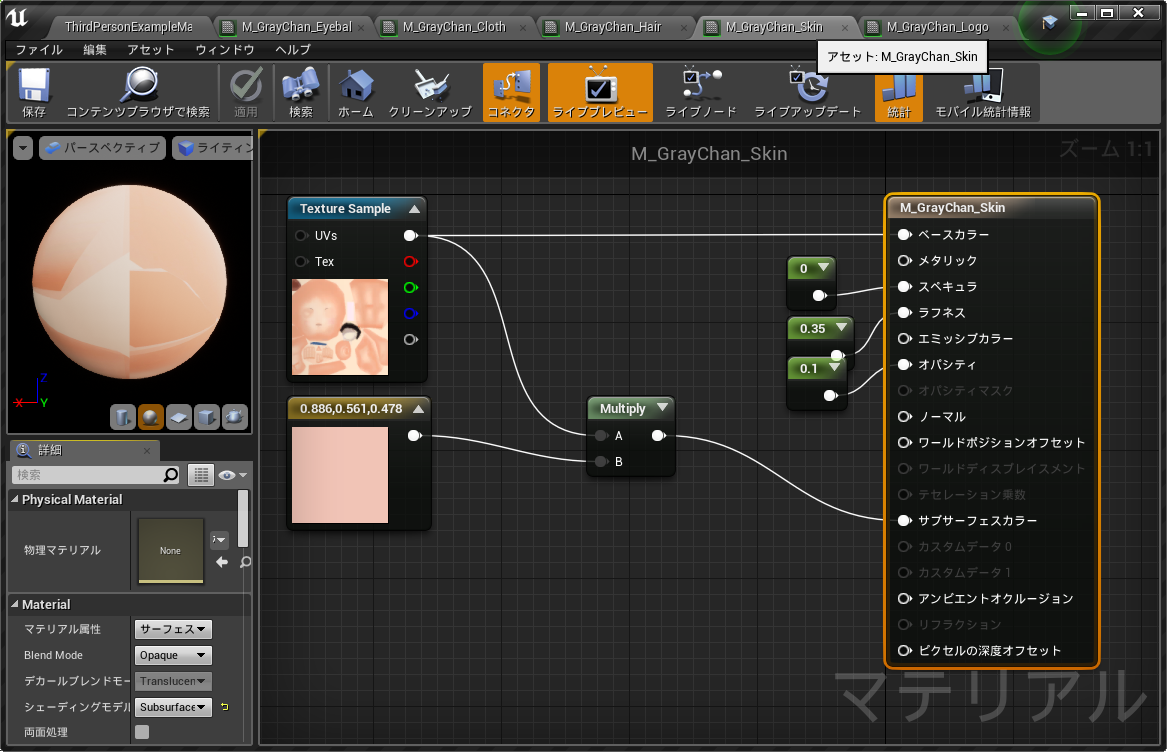
ShadingModel
ここでは、new_material.ShadingModel = EMaterialShadingModel.MSM_Subsurface とマテリアル側のプロパティに
EMaterialShadingModel を指定している。
5. Gray ちゃんの服・ロゴ(発光なし)マテリアル作成
### M_GrayChan_Cloth #################################################################################
def make_cloth_material():
    # cloth マテリアルオブジェクト生成
    new_material = material_factory.factory_create_new(os.path.join(material_dir, 'M_GrayChan_Cloth'))
    # cloth のテクスチャサンプラー1
    cloth_base = MaterialExpressionTextureSample('', new_material)
    cloth_base.Texture = ue.load_object(Texture2D, os.path.join(texture_dir, 'T_GrayChan_Cloth'))
    cloth_base.MaterialExpressionEditorX = -600
    cloth_base.MaterialExpressionEditorY = 0
    # cloth のテクスチャサンプラー2
    cloth_detail = MaterialExpressionTextureSample('', new_material)
    cloth_detail.Texture = ue.load_object(Texture2D, os.path.join(texture_dir, 'T_GrayChan_Cloth_Details'))
    cloth_detail.MaterialExpressionEditorX = -600
    cloth_detail.MaterialExpressionEditorY = 200
    # cloth のテクスチャサンプラー3
    cloth_msr = MaterialExpressionTextureSample('', new_material)
    cloth_msr.Texture = ue.load_object(Texture2D, os.path.join(texture_dir, 'T_GrayChan_Cloth_MSR'))
    cloth_msr.SamplerType = EMaterialSamplerType.SAMPLERTYPE_LinearColor
    cloth_msr.MaterialExpressionEditorX = -300
    cloth_msr.MaterialExpressionEditorY = 150
    # basecolor 用乗算
    base_mult = MaterialExpressionMultiply('', new_material)
    base_mult.MaterialExpressionEditorX = -300
    base_mult.MaterialExpressionEditorY = 0

    # 事前に Expression を設定してないとマテリアルを開くときに容赦なくエディタが落ちる
    new_material.Expressions = [cloth_base, cloth_detail, cloth_msr, base_mult]

    # BaseColor ノード接続
    base_mult.A = ExpressionInput(Expression=cloth_base)
    base_mult.B = ExpressionInput(Expression=cloth_detail)
    new_material.BaseColor = ColorMaterialInput(Expression=base_mult)

    # Metallic ノード接続
    new_material.Metallic = ScalarMaterialInput(Expression=cloth_msr, Mask=1, MaskR=1)
    # Specular ノード接続
    new_material.Specular = ScalarMaterialInput(Expression=cloth_msr, Mask=1, MaskG=1)
    # Roughness ノード接続
    new_material.Roughness = ScalarMaterialInput(Expression=cloth_msr, Mask=1, MaskB=1)

    # マテリアルの変更を伝える
    new_material.post_edit_change()
    return new_material

### M_GrayChan_Logo #################################################################################
def make_logo_material():
    # logo マテリアルオブジェクト生成
    new_material = material_factory.factory_create_new(os.path.join(material_dir, 'M_GrayChan_Logo'))

    # BumpOffset 用 height の const
    const_height = MaterialExpressionConstant('', new_material)
    const_height.R = -1.0
    const_height.MaterialExpressionEditorX = -700
    const_height.MaterialExpressionEditorY = 200
    # BumpOffset
    bump_offset = MaterialExpressionBumpOffset('', new_material)
    bump_offset.ReferencePlane = 0.5
    bump_offset.HeightRatio = 0.05
    bump_offset.MaterialExpressionEditorX = -600
    bump_offset.MaterialExpressionEditorY = 200
    # cloth のテクスチャサンプラー1
    cloth_base = MaterialExpressionTextureSample('', new_material)
    cloth_base.Texture = ue.load_object(Texture2D, os.path.join(texture_dir, 'T_GrayChan_Cloth'))
    cloth_base.MaterialExpressionEditorX = -300
    cloth_base.MaterialExpressionEditorY = 0
    # cloth のテクスチャサンプラー2
    cloth_detail = MaterialExpressionTextureSample('', new_material)
    cloth_detail.Texture = ue.load_object(Texture2D, os.path.join(texture_dir, 'T_GrayChan_Cloth_Details'))
    cloth_detail.MaterialExpressionEditorX = -300
    cloth_detail.MaterialExpressionEditorY = 200
    # BaseColor 用乗算
    base_mult = MaterialExpressionMultiply('', new_material)
    base_mult.MaterialExpressionEditorX = -100
    base_mult.MaterialExpressionEditorY = 0

    # 事前に Expression を設定してないとマテリアルを開くときに容赦なくエディタが落ちる
    new_material.Expressions = [const_height, bump_offset, cloth_base, cloth_detail, base_mult]

    # BaseColor
    bump_offset.Height = ExpressionInput(Expression=const_height)
    cloth_detail.Coordinates = ExpressionInput(Expression=bump_offset)
    base_mult.A = ExpressionInput(Expression=cloth_base)
    base_mult.B = ExpressionInput(Expression=cloth_detail)
    new_material.BaseColor = ColorMaterialInput(Expression=base_mult)

    # マテリアルの変更を伝える
    new_material.post_edit_change()
    return new_material
それぞれ、Gray ちゃんの服マテリアルは、
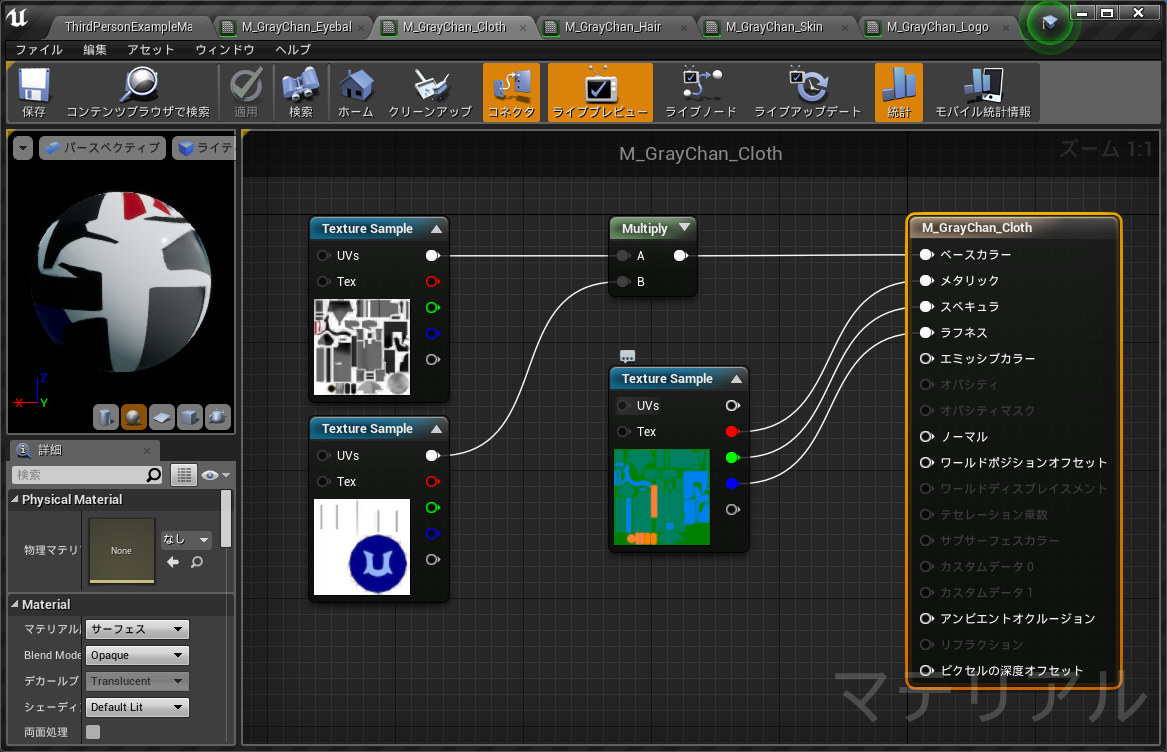
Gray ちゃんのロゴ(発光なし)マテリアルは、
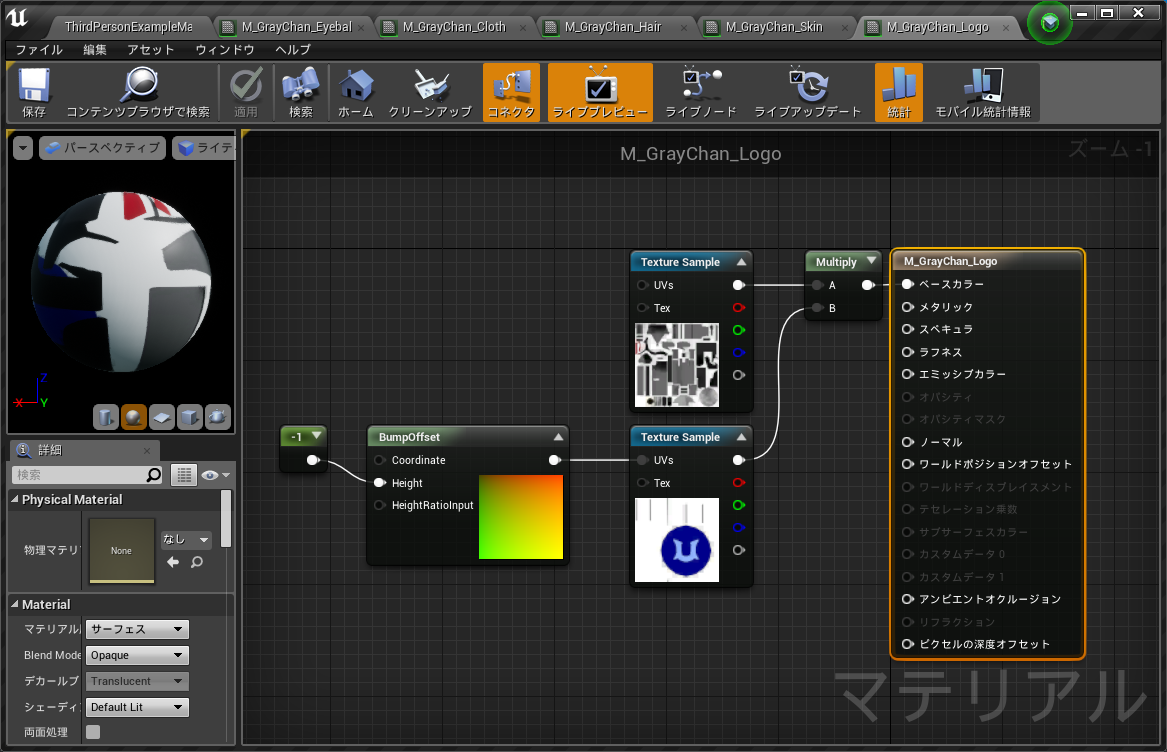
こんな感じ。
他のマテリアルと同様なので、補足は特になし。
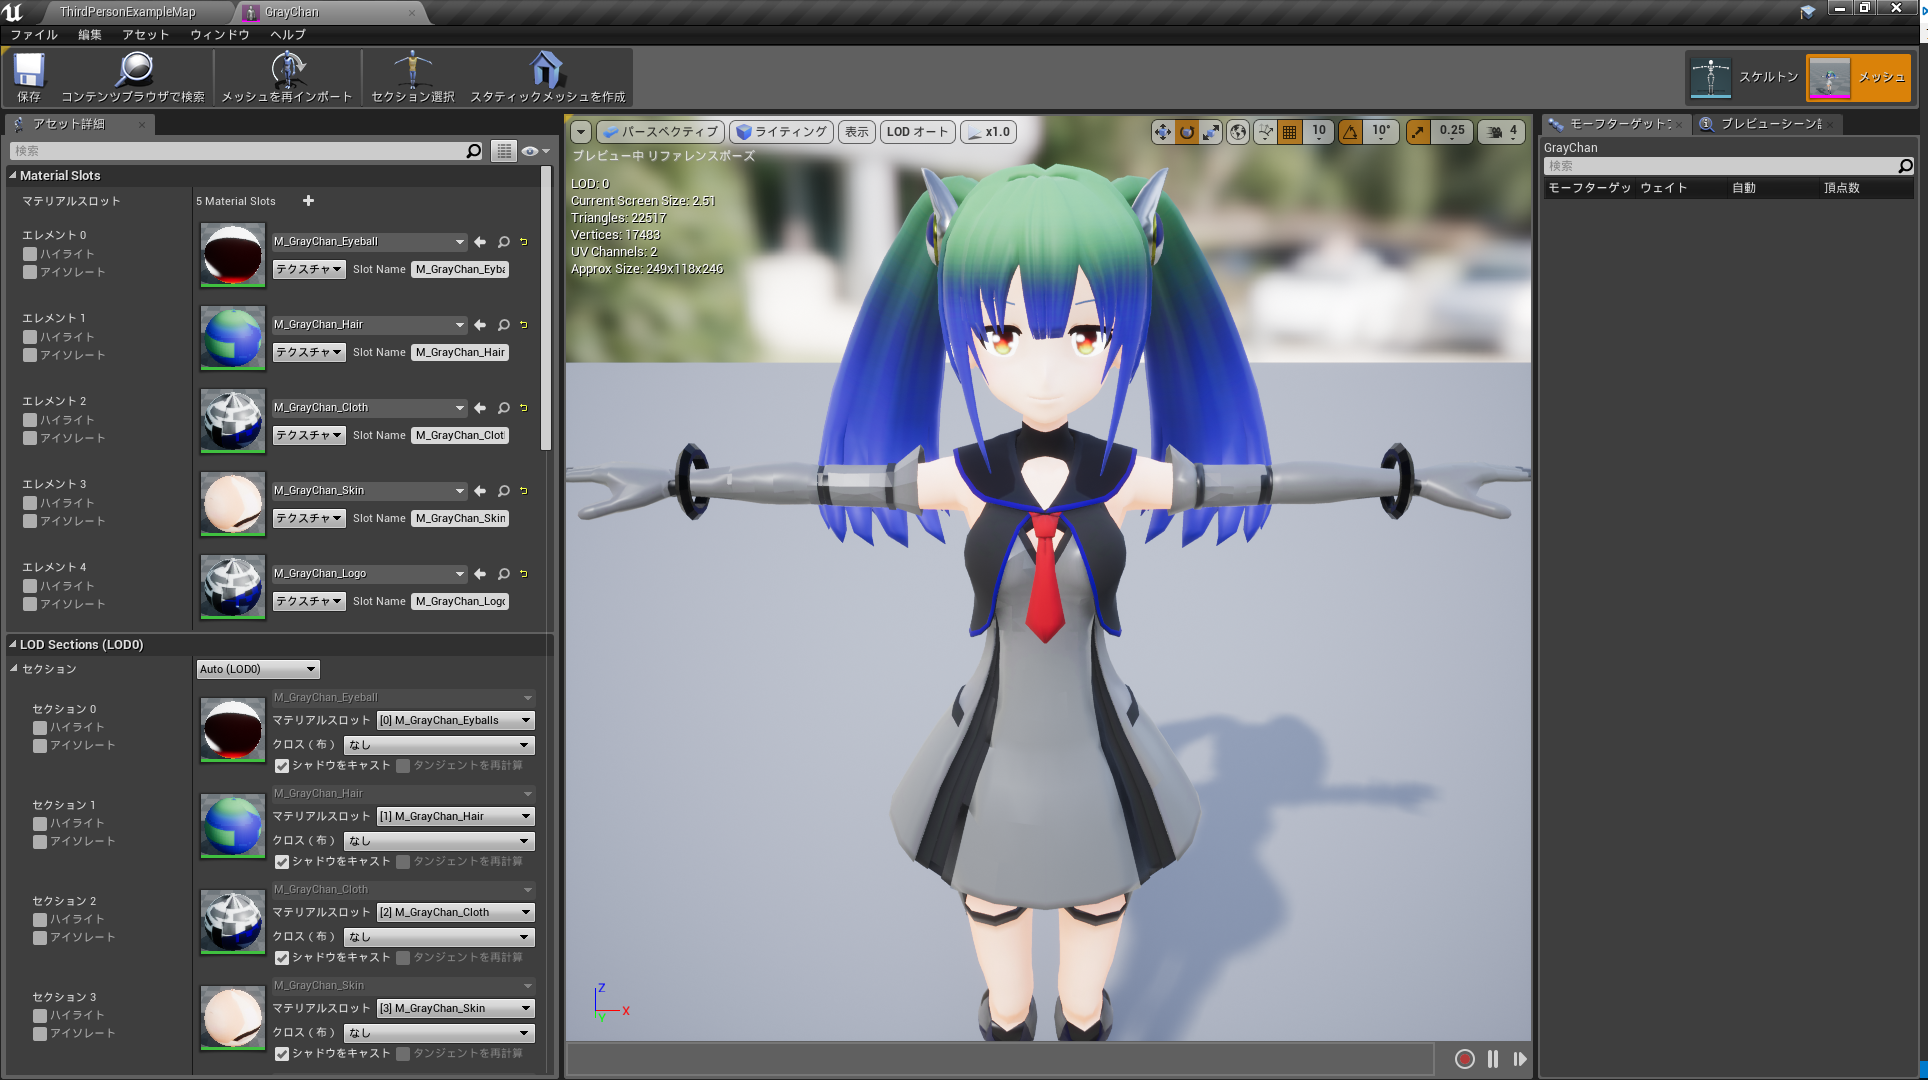
マテリアルをスケルタルメッシュに割り当て
最後に、せっかくマテリアルを作ったので、最初にインポートした GrayChan スケルタルメッシュに割り当ててみる。
事前に、前の節での関数が定義されていたとして、以下のスクリプトでマテリアルを生成、保存する。
# M_GrayChan_Eyeball を作成する
m_eyeball = make_eyeball_material()
# M_GrayChan_Hair を作成する
m_hair = make_hair_material()
# M_GrayChan_Cloth を作成する
m_cloth = make_cloth_material()
# M_GrayChan_Logo_Tim を作成する
m_logo = make_logo_material()
# M_GrayChan_Skin を作成する
m_skin = make_skin_material()

# 保存
m_eyeball.save_package()
m_hair.save_package()
m_cloth.save_package()
m_logo.save_package()
m_skin.save_package()
さらに、以下のようにして、メッシュに対してマテリアルの設定が可能。
from unreal_engine.classes import SkeletalMesh
from unreal_engine.structs import SkeletalMaterial, MeshUVChannelInfo

# メッシュにマテリアルを割り当てる
mesh_dir = os.path.join(import_dir,'Mesh/')
graychan_mesh = ue.load_object(SkeletalMesh, os.path.join(mesh_dir, 'GrayChan'))

graychan_mesh.Materials = [
    SkeletalMaterial(MaterialInterface=m_eyeball, MaterialSlotName='M_GrayChan_Eyballs', UVChannelData=MeshUVChannelInfo(bInitialized=True)),
    SkeletalMaterial(MaterialInterface=m_hair, MaterialSlotName='M_GrayChan_Hair', UVChannelData=MeshUVChannelInfo(bInitialized=True)),
    SkeletalMaterial(MaterialInterface=m_cloth, MaterialSlotName='M_GrayChan_Cloth', UVChannelData=MeshUVChannelInfo(bInitialized=True)),
    SkeletalMaterial(MaterialInterface=m_skin, MaterialSlotName='M_GrayChan_Skin', UVChannelData=MeshUVChannelInfo(bInitialized=True)),
    SkeletalMaterial(MaterialInterface=m_logo, MaterialSlotName='M_GrayChan_Logo', UVChannelData=MeshUVChannelInfo(bInitialized=True))
]
graychan_mesh.save_package()
実行結果。
作ったマテリアルがちゃんと設定できていることが確認できる。