はじめに
- 今日は
IoTなコンテキストでよく出てくるMQTTを触ってみます。 -
MQTTの実装はかなりたくさんあります。今回はMosquitto™を使います1
環境を作る
- 今回は
dockerをつかってやります -
Docker Hubからイメージをpullしておく 2
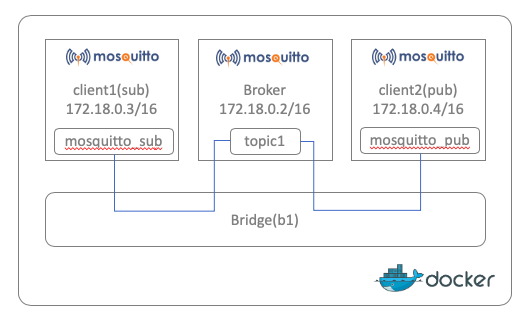
こんな構成をつくります
環境構築
コンテナ間通信するので、ネットワーク設定周りはここざっと眺めておくといいです
デフォルトのネットワークの確認
host$ docker network ls
NETWORK ID          NAME                DRIVER              SCOPE
a2aa12d48404        bridge              bridge              local
b9b43877c91b        host                host                local
757d4a14f3ed        none                null                local
ブリッジをつくる
host$ sudo docker network create -d bridge b1

host$ docker network ls
NETWORK ID          NAME                DRIVER              SCOPE
3c0e6d4fe7a7        b1                  bridge              local
a2aa12d48404        bridge              bridge              local
b9b43877c91b        host                host                local
757d4a14f3ed        none                null                local

host$ sudo docker network inspect b1
[
    {
        "Name": "b1",
        "Id": "3c0e6d4fe7a75599a421e10940a0e4b0650cb1c795a4803e41f47af17245a5e4",
        "Created": "2020-04-11T00:27:29.553576367Z",
        "Scope": "local",
        "Driver": "bridge",
        "EnableIPv6": false,
        "IPAM": {
            "Driver": "default",
            "Options": {},
            "Config": [
                {
                    "Subnet": "172.18.0.0/16",
                    "Gateway": "172.18.0.1"
                }
            ]
        },
        "Internal": false,
        "Attachable": false,
        "Ingress": false,
        "ConfigFrom": {
            "Network": ""
        },
        "ConfigOnly": false,
        "Containers": {},
        "Options": {},
        "Labels": {}
    }
]
ブリッジ b1 をアタッチしながら起動
アタッチするには --net=b1 とする
host$ docker run -d --name broker --hostname="broker" --net=b1 eclipse-mosquitto
host$ docker run -d --name client1 --hostname="client1" --net=b1 eclipse-mosquitto
host$ docker run -d --name client2 --hostname="client2" --net=b1 eclipse-mosquitto
立ち上がった
host$ docker ps
CONTAINER ID        IMAGE               COMMAND                  CREATED             STATUS              PORTS               NAMES
483b408c3333        eclipse-mosquitto   "/docker-entrypoint.…"   2 minutes ago       Up 2 minutes        1883/tcp            broker
e1dc590bfe3a        eclipse-mosquitto   "/docker-entrypoint.…"   55 minutes ago      Up 55 minutes       1883/tcp            client2
b975c833a9c6        eclipse-mosquitto   "/docker-entrypoint.…"   55 minutes ago      Up 55 minutes       1883/tcp            client1
b1 を inspect してみると、broker client1 client2 ともにアタッチされていることがわかる
host$ docker network inspect b1
[
    {
        "Name": "b1",
        "Id": "3c0e6d4fe7a75599a421e10940a0e4b0650cb1c795a4803e41f47af17245a5e4",
        "Created": "2020-04-11T00:27:29.553576367Z",
        "Scope": "local",
        "Driver": "bridge",
        "EnableIPv6": false,
        "IPAM": {
            "Driver": "default",
            "Options": {},
            "Config": [
                {
                    "Subnet": "172.18.0.0/16",
                    "Gateway": "172.18.0.1"
                }
            ]
        },
        "Internal": false,
        "Attachable": false,
        "Ingress": false,
        "ConfigFrom": {
            "Network": ""
        },
        "ConfigOnly": false,
        "Containers": {
            "7a42e9d8f88e9be9107273a350a8680dec7a849fbbf81d76be67c5170aa9cfd6": {
                "Name": "broker",
                "EndpointID": "d7ef7686f7224274b831816f52f1b8bce380a5a3e8208e914129ce31531857a0",
                "MacAddress": "02:42:ac:12:00:02",
                "IPv4Address": "172.18.0.2/16",
                "IPv6Address": ""
            },
            "b975c833a9c68aac888ff41ac05501eb60f15a41866b3b5768aed5fb1a262183": {
                "Name": "client1",
                "EndpointID": "2277bbbb5b09544bb99f7ea7afa20568fae7b6452a8681cf7db6b06d7d924b50",
                "MacAddress": "02:42:ac:12:00:03",
                "IPv4Address": "172.18.0.3/16",
                "IPv6Address": ""
            },
            "e1dc590bfe3a121025d61d4f8381d560531df3cbbc5e3e67193ec52134896d80": {
                "Name": "client2",
                "EndpointID": "b92cb3a1518270e7c542870123fb6e7518592e28c183f055cb956d18e2078414",
                "MacAddress": "02:42:ac:12:00:04",
                "IPv4Address": "172.18.0.4/16",
                "IPv6Address": ""
            }
        },
        "Options": {},
        "Labels": {}
    }
]
ping 疎通確認
-
client1からclient2brokerへpingが通った
$ docker exec -it b975c833a9c6 sh
/ # ifconfig
eth0      Link encap:Ethernet  HWaddr 02:42:AC:12:00:03
          inet addr:172.18.0.3  Bcast:172.18.255.255  Mask:255.255.0.0
          UP BROADCAST RUNNING MULTICAST  MTU:1500  Metric:1
          RX packets:12 errors:0 dropped:0 overruns:0 frame:0
          TX packets:0 errors:0 dropped:0 overruns:0 carrier:0
          collisions:0 txqueuelen:0
          RX bytes:936 (936.0 B)  TX bytes:0 (0.0 B)

lo        Link encap:Local Loopback
          inet addr:127.0.0.1  Mask:255.0.0.0
          UP LOOPBACK RUNNING  MTU:65536  Metric:1
          RX packets:0 errors:0 dropped:0 overruns:0 frame:0
          TX packets:0 errors:0 dropped:0 overruns:0 carrier:0
          collisions:0 txqueuelen:1000
          RX bytes:0 (0.0 B)  TX bytes:0 (0.0 B)

/ # ping 172.18.0.2
PING 172.18.0.2 (172.18.0.2): 56 data bytes
64 bytes from 172.18.0.2: seq=0 ttl=64 time=0.286 ms
64 bytes from 172.18.0.2: seq=1 ttl=64 time=0.151 ms
^C
--- 172.18.0.2 ping statistics ---
2 packets transmitted, 2 packets received, 0% packet loss
round-trip min/avg/max = 0.151/0.218/0.286 ms

/ # ping 172.18.0.1
PING 172.18.0.1 (172.18.0.1): 56 data bytes
64 bytes from 172.18.0.1: seq=0 ttl=64 time=0.174 ms
64 bytes from 172.18.0.1: seq=1 ttl=64 time=0.152 ms
^C
--- 172.18.0.1 ping statistics ---
2 packets transmitted, 2 packets received, 0% packet loss
round-trip min/avg/max = 0.152/0.163/0.174 ms
環境構築できた
ブローカーを介してMQTT通信
では、ようやくMQTTに触れていきます
-
Mosquittoにはクライアントが付属しているのでそれを使う- パブリッシュ側
mosquitto_pub - サブスクライブ側
mosquitto_sub
- パブリッシュ側
-
client2(pub)とclient1(sub)双方ともにブローカのアドレスに向かって設定 -
client2(pub)からclient1(sub)へ届いているようだ
host$ docker exec -it b975c833a9c6 sh

/ client2# mosquitto_pub -h 172.18.0.2 -t topic1 -m AAA
/ client2# mosquitto_pub -h 172.18.0.2 -t topic1 -m BBB
host$ docker exec -it b975c833a9c6 sh

/ client1# mosquitto_sub -h 172.18.0.2 -t topic1
AAA
BBB
たくさん送ってみても特に取りこぼしている感じはない
loop.sh
for i in `seq 1 1000000`
do
  mosquitto_pub -h 172.18.0.2 -t topic1 -m "MSG_$i";
done
Mosquitto のテストサーバを使う
Mosquitto がテストサーバ(ブローカー) test.mosquitto.org を立ててくれているみたいです。知らんかった。ブローカーを設定せずに、クライアントの動作を試すことができます。
mosquitto_sub -h test.mosquitto.org -t myTopic
mosquitto_pub -h test.mosquitto.org -t myTopic -m hello
まとめ
とりあえず環境つくって動かすところまでやりました。次は、クライアントを書いていこうかなとおもいます。
シリーズ
- DockerとMosquitto™でMQTTに触れる
- MQTTを調べている
- MQTTの通信を可視化する - shiftr.io
- Azure IoT Hub に Mosquitto™ から MQTT なげてみる
- MQTT.js でブラウザから MQTTブローカ に Pub/Sub する