環境
- ruby 3.1.4
- rails 7.0.8.1
- vue 3.4.21
事前準備
workspaceという作業環境を構築
バックエンドとフロントエンドで作業環境を分けた。
- 使用したライブラリ
rails
rack-cors(クロスドメイン対策)
ActionCable(標準用意されている。サーバ側からクライアントに直接情報)
vue.js
axios(HTTPリクエストで使用)
vue-router(ルーティング処理)
actioncable
バックエンド側
- データベースモデル
schema.rb
ActiveRecord::Schema[7.0].define(version: 2024_04_17_075212) do
  create_table "messages", force: :cascade do |t|
    t.text "content"
    t.string "sender_name"
    t.integer "room_id", null: false
    t.datetime "created_at", null: false
    t.datetime "updated_at", null: false
    t.index ["room_id"], name: "index_messages_on_room_id"
  end

  create_table "rooms", force: :cascade do |t|
    t.string "name"
    t.datetime "created_at", null: false
    t.datetime "updated_at", null: false
  end

  add_foreign_key "messages", "rooms"
end
他にも細かな設定はあるけど省略します
- チャットルームcontoroler
rooms_controller.rb
class RoomsController < ApplicationController
    def index
        # Room モデルの全てのデータを取得して、JSON形式でレスポンスを返します。
        rooms = Room.all
        render json: rooms, status: :ok
    end

    def create
        # Room モデルに新しいデータを作成して、JSON形式でレスポンスを返します。
        room = Room.create(room_params)
        render json: room, status: :created
    end

    private

    def room_params
        params.require(:room).permit(:name)
    end
end
- チャットのメッセージのcontoroler
messages_controller.rb
class MessagesController < ApplicationController
    def index
        # room_id パラメータに一致するRoomオブジェクトを取得
        room = Room.find(params[:room_id])
        messages = room.messages.limit(20) # 取得するデータ件数を20に指定

        render json: messages, status: :ok
    end
    def create
        room = Room.find(params[:room_id])
        message = room.messages.create(message_params)
        render json: message, status: :created
        # メッセージが作成されたときに指定したチャンネルにブロードキャスト(チャンネル経由でフロントエンドに送信)
        ActionCable.server.broadcast "room_channel_#{params[:room_id]}", message
    end

    private

    def message_params
        # キーの指定
        params.require(:message).permit(:content, :sender_name)
    end
end
- ルーティング設定
routes.rb
Rails.application.routes.draw do
  # API設定
  get '/api/test', to: 'application#test'
  # 特定のアクションへマッピング
  resources :rooms, only: [:index, :create] do
    # チャットルームごとにメッセージを取得できるよう設定
    resources :messages, only: [:index,:create]
  end
end
フロント側
- チャットルームの一覧と作成
ChatRooms.vue
<template>
    <div>
        <h1>VueChat - チャットルーム一覧 </h1>
        <ul>
            <li v-for="room in chatRooms" :key="room.id">
            <!-- aタグみたいなもの -->
            <router-link :to="`/rooms/${room.id}`">{{ room.name }}</router-link>
            </li>
        </ul>
        <h3>チャットルーム作成</h3>
        <input type="text" v-model="newRoomName" />
        <div>
            <button @click="createRoom">作成</button>
        </div>
    </div>
</template>

<script>
import axios from 'axios';

export default {
    data(){
        return {
            chatRooms:[],
            // 新しく作成するチャットルームの名前を保持するためのデータ
            newRoomName:'',
        };
    },
    created() {
        // コンポーネントが作成されたときに、チャットルーム一覧を取得する
        this.fetchChatRooms();
    },
    methods:{
        fetchChatRooms(){
            axios
            .get(`${import.meta.env.VITE_API_URL}/rooms`)
            .then(response => {
                this.chatRooms = response.data;
            })
            .catch(error => {
                console.error(error);
            });
        },
        // newRoomNameを使用して新しいチャットルームを作成する
        createRoom(){
            // 作成フォームの入力内容をサーバーに送信
            axios.post(`${import.meta.env.VITE_API_URL}/rooms`, {
                name: this.newRoomName,
            })
            .then(response => {
                this.chatRooms.push(response.data);
                this.newRoomName = '';
            })
            .catch(error => {
                console.error(error);
            });
        },
    },
};
</script>
ChatRoom.vue
<template>
    <div>
        <h1>チャットルーム {{ this.roomId }}</h1>

        <ul>
            <li v-for="message in messages" :key="message.id">
                <strong>{{ message.sender_name }}:</strong> {{ message.content }}
            </li>
        </ul>
        <!-- form -->
        <!-- フォームが送信されたときに sendMessage メソッドを実行 -->
        <form @submit.prevent="sendMessage">
            <div>
                <h3>名前</h3>
                <input type="text" v-model="senderName" placeholder="名前を入力" required />
            </div>
            <div>
                <h3>メッセージ</h3>
                <input type="text" v-model="newMessageContent" placeholder="メッセージを入力" required />
            </div>
            <div>
                <button type="submit">送信</button>
            </div>
        </form>
    </div>
</template>
<script>
import axios from 'axios';
import { inject } from 'vue';

export default {
    props: ['roomId'],
    data(){
        return{
            roomName: '',
            messages: [],
            // メッセージの送信者名
            senderName: '',
            // 送信するメッセージの内容
            newMessageContent: '',
        };
    },
    setup(){
        const cable = inject('cable');
        return { cable };
    },
    created() {
        this.fetchMessages();
        this.createSubscription();
    },
    methods:{
        // 特定のチャンネル(チャットルーム)に対してサブスクリプションを作成
        createSubscription(){
            // 指定したチャンネルに対して新しいサブスクリプションを作成
            this.subscription = this.cable.subscriptions.create(
                // 作成するチャンネル名と受信時の動作定義
                { channel: 'RoomChannel', room_id: this.roomId },
                {
                    // メッセージ受信時の動作
                    received: message => {
                        console.log(message);
                        this.messages.push(message);
                    },
                }
            );
        },
        fetchMessages(){
            // 特定のチャットルームのメッセージを取得
            axios
            .get(`${import.meta.env.VITE_API_URL}/rooms/${this.roomId}/messages`)
            .then((response) => {
                this.messages = response.data;
            })
            .catch((error) => {
                console.error(error);
            });
        },
        // メッセージ送信
        sendMessage(){
            axios
            // 送信先のURLは、チャットルームのIDとメッセージを組み合わせたもの
            .post(`${import.meta.env.VITE_API_URL}/rooms/${this.roomId}/messages`, {
                // 内容
                content: this.newMessageContent,
                // 送信者名
                sender_name: this.senderName
            })
            .then(() => {
                // newMessageContent を空にしてフォームをリセット(次回入力の際にメッセージを残さない)
                this.newMessageContent = ''
            })
            .catch((error) => {
                console.error(error)
            })
        }
    }
}
</script>
- ルーティング
index.js
import { createRouter,createWebHistory } from "vue-router";
import ChatRooms from "../components/ChatRooms.vue";
import ChatRoom from '../components/ChatRoom.vue';

const routes = [
    { path: '/', component: ChatRooms },
    { path: '/rooms/:id', component: ChatRoom, props: route =>({ roomId: route.params.id }) },
];

const router = createRouter({
    history: createWebHistory(),
    routes
});

export default router;
- メイン
main.js
import { createApp } from 'vue';
import App from './App.vue';
import router from './router';
import ActionCable from 'actioncable';
// Rails側のActionCableサーバとの接続
const cable = ActionCable.createConsumer('URLが入ります');

const app = createApp(App);
app.use(router);
// アプリケーション全体から利用できるよう設定
app.provide('cable',cable);
app.mount('#app')
APIを自分で作成して、それを繋げるという作業自体はあまりやったことなかったが仕組み的なとこは理解できたと思う。
railsも前から触っていた言語で特に困ることもなく、、、
vueのactioncableや記述方法がいまいち理解が足りてないかな、、、、、
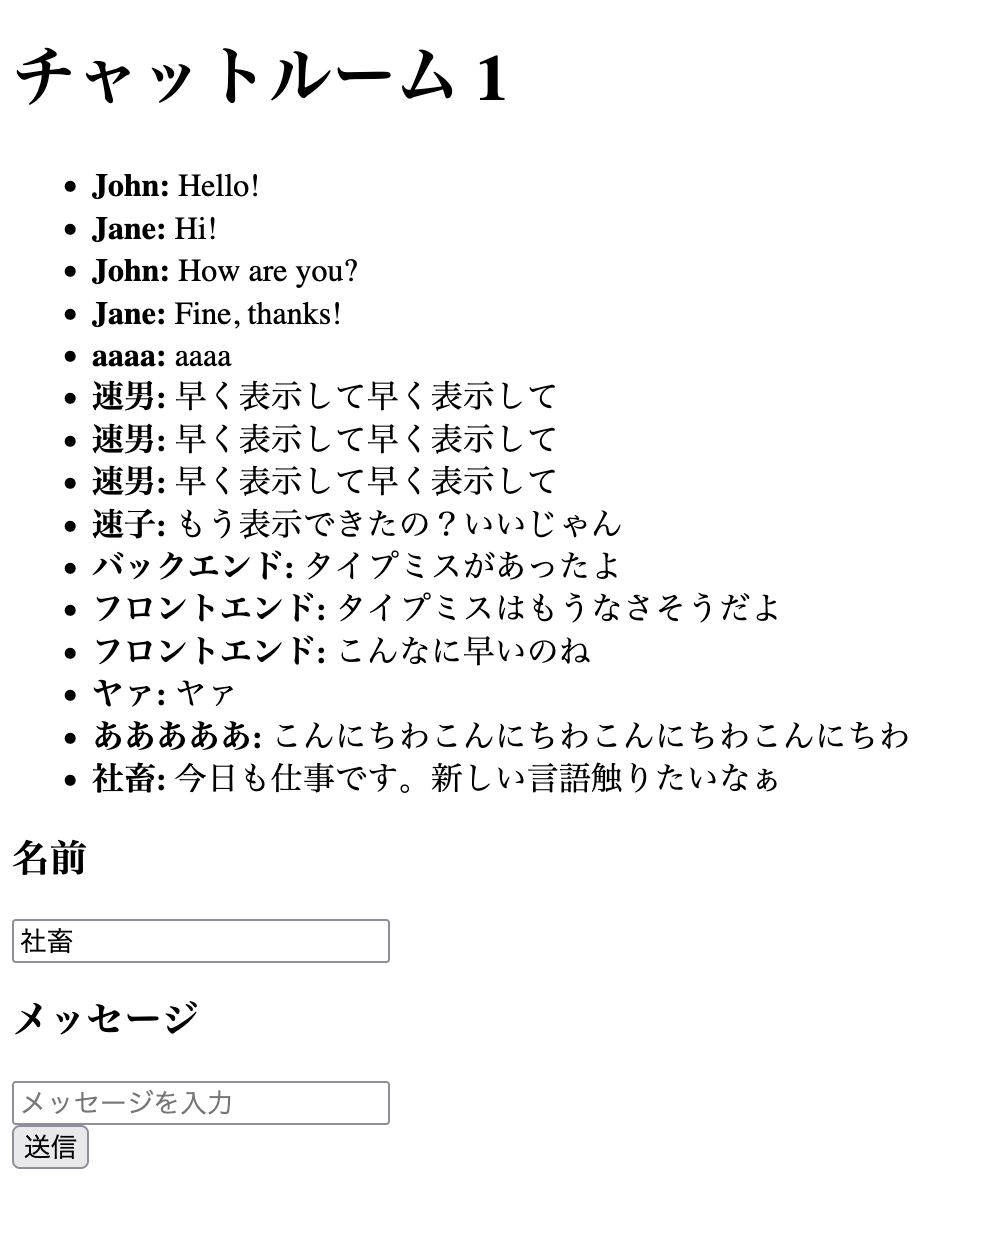
出来上がりはこんな感じ
デザインも何もしていないのでかなり殺伐としているが、、、
