はじめに
「AndroidスマホとOBD2アダプターを使って車の内部情報を取得するのに「obd2-lib」を活用」で、OBD2スキャンツール経由で車の内部データを取得しました。ただ、走行するたびにアプリのスタートボタン、ストップボタンを押すのも面倒だし、忘れてしまうこともあるので、車のシガーソケット等から充電用のUSBケーブルを接続しておき、キー操作(電源供給)と連動してデータ取得をスタート、ストップできるようにしました。
検証環境
この記事の内容は、以下の環境で検証しました。
- Android Studio Electric Eel | 2022.1.1 Patch 1
- targetSdk 32
- 実機確認 Sony SOG04 Android 12,API 31
デバイスが充電されているかどうかを検出する
Android Developersの「電池残量と充電状態を監視する」には
BroadcastReceiver をマニフェストで登録し、ACTION_POWER_CONNECTED と ACTION_POWER_DISCONNECTED をインテント フィルタ内で定義することで両方のイベントをリッスンする必要があります。
とあります。一方で、「Android 充電ケーブル挿す、抜くのイベントを拾う」には、マニフェストに登録して検出できるのはAndroid 7までで、Android 8以降は BroadcastReceiverをレシーバーとして登録する、かつ、アプリが起きていないと検出できない、と書いてありました。この記事には、「ブロードキャストの概要」も参考にした、と書いてありましたので、確認すると、Android 8.0(API レベル 26)以降では制限が増えているようですね。ということで、IntentFilterとBroadcastReceiverをMainActivity.javaに追加し、onCreate()でブロードキャストレシーバーを登録して電源接続、切断が受信できるようにし、onDestroy()で解除するようにして、電源接続、切断が検出できるか確認しました。
package com.example.myapplication;

import android.content.Intent;
import android.content.IntentFilter;
import android.os.Bundle;
import android.util.Log;

import androidx.appcompat.app.AppCompatActivity;

public class MainActivity extends AppCompatActivity{

    PowerConnectionReceiver mReceiverPowerConnection;

    @Override
    protected void onCreate(Bundle savedInstanceState) {
        super.onCreate(savedInstanceState);
        setContentView(R.layout.activity_main);
        Log.d("debug", "onCreate");

        mReceiverPowerConnection = new PowerConnectionReceiver();

        // インテントフィルタ
        IntentFilter filter = new IntentFilter();
        filter.addAction(Intent.ACTION_BATTERY_CHANGED);
        filter.addAction(Intent.ACTION_POWER_CONNECTED);
        filter.addAction(Intent.ACTION_POWER_DISCONNECTED);
        // ブロードキャストレシーバ登録
        registerReceiver(mReceiverPowerConnection, filter);
    }

    @Override
    public void onDestroy() {
        super.onDestroy();
        Log.d("debug", "onDestroy");
        unregisterReceiver(mReceiverPowerConnection);
    }
}
BroadcastReceiverには電源接続、切断を検出した時の処理を追加したいので、BroadcastReceiverを継承した新しいクラスを作りました。ブロードキャストレシーバーで受信するIntentのgetAction()がIntent.ACTION_BATTERY_CHANGEDだった時にバッテリーの情報が取得できるようで、そこからさらにgetIntExtra(String name, int defaultValue)でBatteryManager.EXTRA_PLUGGEDをキーとして値を取り出すことで電源が接続されているかどうか、接続先がAC電源か、USBか、が分かるようになっているそうです。実際にPCとの接続で実験すると、デバイスの接続/切断で色々メッセージとかも出て分かりにくいので、Toastも追加しておきます。試してみると、PCのUSBポートから接続しても、BATTERY_PLUGGED_ACのトーストが出るので、たいていの場合はAC電源と認識するようです。
package com.example.myapplication;

import android.content.BroadcastReceiver;
import android.content.Context;
import android.content.Intent;
import android.os.BatteryManager;
import android.util.Log;
import android.widget.Toast;

import java.util.Objects;

public class PowerConnectionReceiver extends BroadcastReceiver {
    public final String TAG = Objects.requireNonNull(new Object() {}.getClass().getEnclosingClass()).getName() ;

    @Override
    public void onReceive(Context context, Intent intent) {
        String action = intent.getAction();
        if(Objects.requireNonNull(action).equals(Intent.ACTION_BATTERY_CHANGED)) {
            int nowPlugged = intent.getIntExtra(BatteryManager.EXTRA_PLUGGED, -1);
            if (nowPlugged == BatteryManager.BATTERY_PLUGGED_AC) {        // int android.os.BatteryManager.BATTERY_PLUGGED_AC : 1 [0x1]
                Log.d(TAG, "ケーブルの接続状態 = BATTERY_PLUGGED_AC");
                Toast.makeText(context, "BATTERY_PLUGGED_AC", Toast.LENGTH_LONG ).show();
            } else if (nowPlugged == BatteryManager.BATTERY_PLUGGED_USB) {
                //	int android.os.BatteryManager.BATTERY_PLUGGED_USB : 2 [0x2]
                Log.d(TAG, "ケーブルの接続状態 = BATTERY_PLUGGED_USB");
                Toast.makeText(context, "BATTERY_PLUGGED_USB", Toast.LENGTH_LONG ).show();
            } else if (nowPlugged == 0) {
                Log.d(TAG, "Unplugged.");
                Toast.makeText(context, "Unplugged.", Toast.LENGTH_LONG ).show();
            } else {
                Log.d(TAG,"nowPlugged = " + nowPlugged);
            }
        }
    }
}
実機デバッグしてみると、Intent.ACTION_BATTERY_CHANGEDが例えば充電残量が減ったり、何か状態が変わるたびに送られてくるようで、PCに接続しっぱなしだとDebug画面にLogが何度も表示されます。
やりたかったのは、接続した時(電圧がかかった時)、ケーブルを抜いた時(電圧が下がった時)を検出したいということだったので、状態を記憶する変数を一個追加し、状態が変化した時、という条件を追加します。ここでは、PowerConnectionReceiver.javaにstatic 変数を追加し、前回値と違う場合のみ、Log、Toastを出すようにしました。
public class PowerConnectionReceiver extends BroadcastReceiver {
    public final String TAG = Objects.requireNonNull(new Object() {}.getClass().getEnclosingClass()).getName() ;

    private static int mPluggedLast = -1;

    @Override
    public void onReceive(Context context, Intent intent) {
        String action = intent.getAction();
        if(Objects.requireNonNull(action).equals(Intent.ACTION_BATTERY_CHANGED)) {
            int nowPlugged = intent.getIntExtra(BatteryManager.EXTRA_PLUGGED, -1);
            if (mPluggedLast != nowPlugged) {
                if (nowPlugged == BatteryManager.BATTERY_PLUGGED_AC) {        // int android.os.BatteryManager.BATTERY_PLUGGED_AC : 1 [0x1]
                    Log.d(TAG, "ケーブルの接続状態 = BATTERY_PLUGGED_AC");
                    Toast.makeText(context, "BATTERY_PLUGGED_AC", Toast.LENGTH_LONG ).show();
                } else if (nowPlugged == BatteryManager.BATTERY_PLUGGED_USB) {
                    //	int android.os.BatteryManager.BATTERY_PLUGGED_USB : 2 [0x2]
                    Log.d(TAG, "ケーブルの接続状態 = BATTERY_PLUGGED_USB");
                    Toast.makeText(context, "BATTERY_PLUGGED_USB", Toast.LENGTH_LONG ).show();
                } else if (nowPlugged == 0) {
                    Log.d(TAG, "Unplugged.");
                    Toast.makeText(context, "Unplugged.", Toast.LENGTH_LONG ).show();
                } else {
                    Log.d(TAG,"nowPlugged = " + nowPlugged);
                }
                mPluggedLast = nowPlugged;
            }
        }
    }
}
接続状態の確認ができる可能性を増やす
この状態でも、画面が消灯していたり、ほかのアプリを使っていても検出してくれるようですが、アプリを間違ってクリア(終了)してしまったり、ある程度の時間がたった後に"Doze"モードに入ってシステムで制限をかけて電池の消費を抑える、なんてこともあるそうなので、接続状態の確認ができる可能性を増やす方法として、フォアグラウンドサービス(Foreground services)を試してみます。
フォアグラウンドサービスの設定
「【Android】バックグラウンド(フォアグラウンド サービス)とマルチスレッド(Thread)の動きを簡単な事例で実験的に調査」の「Foreground Service」を基に、ReceivingServiceという名前でServiceを継承したクラスを作りました。中身のほとんどはお約束のNotificationManagerやNotificationChannelの設定です。通知としては、アプリの名前(今回はMy application)と、「待機中...」と表示させてみました。
次に、onStartCommand()メソッドにインテントフィルター追加とブロードキャストレシーバーを登録しています。こうすることで、アプリがクリアされてもバッテリーの情報がキャッチできるはずです。
package com.example.myapplication;

import android.app.Notification;
import android.app.NotificationChannel;
import android.app.NotificationManager;
import android.app.PendingIntent;
import android.app.Service;
import android.content.BroadcastReceiver;
import android.content.Context;
import android.content.Intent;
import android.content.IntentFilter;
import android.graphics.Color;
import android.os.BatteryManager;
import android.os.IBinder;
import android.util.Log;
import android.widget.Toast;

import java.util.Objects;

public class ReceivingService extends Service {

    PowerConnectionReceiver mReceiverPowerConnection;

    private static int mPluggedLast = -1;

    @Override
    public void onCreate() {
        mReceiverPowerConnection = new PowerConnectionReceiver();
    }

    @Override
    public IBinder onBind(Intent intent)  {
        return null;
    }

    @Override
    public int onStartCommand(Intent intent, int flags, int startId) {

        String TAG = Objects.requireNonNull(new Object() {}.getClass().getEnclosingClass()).getName() ;
        Log.d(TAG, "Start");

        Context context = getApplicationContext();

        int requestCode = 0;
        String channelId = "default";
        String title = context.getString(R.string.app_name);

        if (android.os.Build.VERSION.SDK_INT >= android.os.Build.VERSION_CODES.O) {
            PendingIntent pendingIntent =
                    PendingIntent.getActivity(context, requestCode,
                            intent, PendingIntent.FLAG_IMMUTABLE);

            // ForegroundにするためNotificationが必要、Contextを設定
            NotificationManager notificationManager =
                    (NotificationManager) context.
                            getSystemService(Context.NOTIFICATION_SERVICE);

            // Notification Channel 設定
            NotificationChannel channel = new NotificationChannel(
                    channelId, title, NotificationManager.IMPORTANCE_DEFAULT);
            channel.setDescription("Silent Notification");
            // 通知音を消さないと毎回通知音が出てしまう
            // この辺りの設定はcleanにしてから変更
            channel.setSound(null, null);
            // 通知ランプを消す
            channel.enableLights(false);
            channel.setLightColor(Color.BLUE);
            // 通知バイブレーション無し
            channel.enableVibration(false);

            if (notificationManager != null) {
                notificationManager.createNotificationChannel(channel);
                Notification notification = new Notification.Builder(context, channelId)
                        .setContentTitle(title)
                        .setSmallIcon(android.R.mipmap.sym_def_app_icon)
                        //		.setSmallIcon(android.R.drawable.sym_def_app_icon)
                        .setContentText(getString(R.string.waiting))
                        .setAutoCancel(true)
                        .setContentIntent(pendingIntent)
                        .setWhen(System.currentTimeMillis())
                        .build();

                // startForeground
                startForeground(1, notification);
            }
        } else {
            Notification notification = new Notification.Builder(this)
                    .setContentTitle(title)
                    .setContentText(getString(R.string.waiting))
//				.setContentIntent(pendingIntent)	//	通知からの起動なし
                    .setSmallIcon(android.R.mipmap.sym_def_app_icon)
                    //		.setSmallIcon(android.R.drawable.sym_def_app_icon)
                    .setAutoCancel(true)
                    .build();
            startForeground(1, notification);

        }

        // インテントフィルタ
        IntentFilter filter = new IntentFilter();
        filter.addAction(Intent.ACTION_BATTERY_CHANGED);
        filter.addAction(Intent.ACTION_POWER_CONNECTED);
        filter.addAction(Intent.ACTION_POWER_DISCONNECTED);
        // ブロードキャストレシーバ登録
        registerReceiver(mReceiverPowerConnection, filter);

        filter = new IntentFilter();
        filter.addAction("DO_ACTION");
        registerReceiver(mReceiverPowerConnection, filter);
        return START_NOT_STICKY;
    }

    @Override
    public void onDestroy() {
        super.onDestroy();

        NotificationManager notificationManager =
                (NotificationManager) context.
                        getSystemService(Context.NOTIFICATION_SERVICE);
        notificationManager.cancel(1);

        unregisterReceiver(mReceiverPowerConnection);
    }
}
<resources>
	...
    <!-- ReceivingService -->
    <string name="waiting">待機中...</string>
</resources>
MainActivityの変更
onCreateでstartForegroundService()を実行することでフォアグラウンドサービスを開始しています。アンドロイドのバージョン違いによるメソッドの名前の違いも一応、残しておきます。インテントフィルターの設定と、ブロードキャストレシーバーの登録はフォアグラウンドサービスの方に移したので削除しておきました。
package com.example.myapplication;

import android.content.Intent;
import android.os.Build;
import android.os.Bundle;
import android.util.Log;

import androidx.appcompat.app.AppCompatActivity;

public class MainActivity extends AppCompatActivity{

    @Override
    protected void onCreate(Bundle savedInstanceState) {
        super.onCreate(savedInstanceState);
        setContentView(R.layout.activity_main);
        Log.d("debug", "onCreate");

        Intent serviceIntent = new Intent(this, ReceivingService.class);
        serviceIntent.putExtra("REQUEST_CODE", 1);

        // Serviceの開始
        if (Build.VERSION.SDK_INT >= Build.VERSION_CODES.O) {
            startForegroundService(serviceIntent);
        } else {
            startService(serviceIntent);
        }
    }

    @Override
    public void onDestroy() {
        super.onDestroy();
        Log.d("debug", "onDestroy");
    }
}
実行すると、通知バーにドロイド君の頭のアイコンが表示されます。
この状態でマルチタスクメニューからアプリを消してもこのアイコンは消えずに、電源接続、切断を検出できました。
フォアグラウンドサービスの開始と終了
電源接続、切断が検出できた、とは言っても、デバッグ中にPCとの接続ケーブルを抜き差ししたり、電池残量が減ってしまって純粋に充電したいときになどにアプリが何か反応するのも煩わしい時もあるので、そういう時はフォアグラウンドサービスをオプションメニューから終了できるようにしておきたいと思います。
フォアグラウンドサービスの終了は
	Intent serviceIntent = new Intent(getActivity(), ReceivingService.class);
	stopService(serviceIntent);
を実行すればよいので、オプションメニューで「自動接続」のチェックを外したらstopService()を実行する、という仕組みにしました。ちなみに、これをMainActivityのonDestory()内に書いてしまうと、アプリが破棄された時点でフォアグラウンドサービスが終了してしまうので、マルチタスクメニューからアプリを消してもケーブルの抜き差しを検出する、という当初の狙いは達成できません...。
オプションメニューの設定はMainActivityにonCreateOptionsMenuとonOptionsItemSelectedを追加しました。
    @Override
    public boolean onCreateOptionsMenu(Menu menu) {
        // Inflate the menu; this adds items to the action bar if it is present.
        getMenuInflater().inflate(R.menu.option_menu, menu);
        return true;
    }

    @Override
    public boolean onOptionsItemSelected(MenuItem item) {
        int id = item.getItemId();
        if (id == R.id.autoStartCheck) {
            item.setChecked(!item.isChecked()); // false -> true, true -> false
            boolean isChecked = item.isChecked();   //  反映後の状態を取得
            if (isChecked) {
                Log.d(TAG, "select autoStart");
                Intent serviceIntent = new Intent(this, ReceivingService.class);
                serviceIntent.putExtra("REQUEST_CODE", 1);

                // Serviceの開始
                if (Build.VERSION.SDK_INT >= Build.VERSION_CODES.O) {
                    startForegroundService(serviceIntent);
                } else {
                    startService(serviceIntent);
                }
            } else {
                Log.d(TAG, "select stop autoStart");
                // Serviceの終了
                Intent serviceIntent = new Intent(this, ReceivingService.class);
                boolean stopServiceSuccessfully = stopService(serviceIntent);
                if (stopServiceSuccessfully) {
                    Log.d(TAG, "stop ReceivingService Successfully");
                } else {
                    Log.d(TAG, "ReceivingService is not running");
                }
            }
            return true;
        } else {
            Log.d(TAG, "Unexpected value: " + item.getItemId());
            return false;
        }
    }
xmlファイルの方は、res/menu ディレクトリを作成し、option_menu.xml として設定しました。
<?xml version="1.0" encoding="utf-8"?>
<menu  xmlns:app="http://schemas.android.com/apk/res-auto"
    xmlns:android="http://schemas.android.com/apk/res/android">

    <item
        android:id="@+id/autoStart"
        android:title="@string/autoStartSetting"
        app:showAsAction="never" >
        <menu>
            <item
                android:id="@+id/autoStartCheck"
                android:title="@string/autoStartOK"
                android:checkable="true"
                app:showAsAction="never" />
        </menu>
    </item>
</menu>
stringは res/values/strings.xml に追加しました。
<resources>
	...

    <!-- Options Menu -->
    <string name="autoStartSetting">自動接続開始設定</string>
    <string name="autoStartOK">自動接続</string>
</resources>
ここで少し気になるのが、チェックボックスのON/OFFは、アプリが生きている間はよさそうですが、マルチタスクメニューでアプリがクリアされる時まで想定すると、そういう時にはON/OFFが初期値に戻ってしまいます。そうすると、例えばONでフォアグラウンドサービスが起動した状態でアプリをクリアすると、次起動したときにフォアグラウンドサービスは引き続き動いているのにチェックボックスがOFFになっている、という状況が起きます。そこで、SharedPreferencesを使ってみます。「SharedPreferencesの使い方(基礎編)」や「SharedPreferencesの管理方法」などを参考にさせていただき、Contextさえあれば使えそうなので「保存されている値を使用する」のPreferenceManager.getDefaultSharedPreferences(Context context)を使うことにしました。
MainActivityにSharedPreferencesの変数を追加し、onCreate()でPreferenceManager.getDefaultSharedPreferences()を使えるようにし、onOptionsItemSelectedでON/OFF選択されたらその結果をautoStartというキーで書き込んでおき、onPrepareOptionsMenuでオプションメニューが表示される時にSharedPreferencesの設定を読み込んで反映させておく、というようにしておきました。
public class MainActivity extends AppCompatActivity{
    ...
    SharedPreferences sharedPreferences;

    protected void onCreate(Bundle savedInstanceState) {
		...
        sharedPreferences =
                PreferenceManager.getDefaultSharedPreferences(this /* Activity context */);
    }
	...

    @Override
    public boolean onPrepareOptionsMenu(@NonNull Menu menu){
        super.onPrepareOptionsMenu(menu);

        boolean isChecked = sharedPreferences.getBoolean(getString(R.string.autoStart), false);
        if(isChecked && !ReceivingService.isRunning()){
            isChecked = false;
        }

        menu.findItem(R.id.autoStart).getSubMenu().findItem(R.id.autoStartCheck).setChecked(isChecked);
        return true;
    }
	...

    public boolean onOptionsItemSelected(MenuItem item) {
			...
        if (id == R.id.autoStartCheck) {
 			...
            SharedPreferences.Editor editor = sharedPreferences.edit();
            editor.putBoolean(getString(R.string.autoStart), isChecked);
            editor.apply();

            return true;
        } else {
 			...
        }
    ...
}
電源接続に合わせてBluetooth接続、文字列の送信を開始
Bluetooth接続先の指定
「【Android】PCとBluetooth接続し、PCに文字列を送信する」では、毎回、オプションメニューから接続先を指定するようにしていましたが、毎回接続先を指定するのも煩わしいですのでまず、オプションメニューから接続先の設定が確認できる画面(Activity)を新設し、その設定が所望の接続先でなければ、接続先設定画面(DeviceListActivity)に移行するようにしたいと思います。接続先情報はアプリがクリアされても大丈夫なようにSharedPreferencesに保存し、その新設した画面でSharedPreferencesの内容の確認と表示、変更あれば保存するようにします。
まず、オプションメニューに、接続先の設定ができる選択肢を追加します。
	...
    <item
        android:id="@+id/deviceSetting"
        android:title="@string/deviceSetting"
        app:showAsAction="never" />
	...
	...
    <!-- Options Menu -->
	...
    <string name="deviceSetting">接続先 設定...</string>
	...
さらに、MainActivityのonOptionsItemSelectedにこの選択肢が選択されたときの処理を追加します。deviceSettingが選択されたときは新設のSettingsActivityを呼び出します。
    public boolean onOptionsItemSelected(MenuItem item) {
			...
        if (id == R.id.autoStartCheck) {
 			...
        } else if(id == R.id.deviceSetting){
            // Ensure this device is discoverable by others
            Log.d(TAG, "deviceSetting");
            Intent serverIntent = new Intent(this, SettingsActivity.class);
            startActivity(serverIntent);
            return true;
        } else {
 			...
        }
    }
}
SettingsActivity
次に、SettingsActivityの中身ですが、MainActivity.java等を置いていあるディレクトリでFile > New (Windowsの場合は右クリックでも可) > Activity > Setting Activity を選択するとひな形を新設、マニフェストへの登録などしてくれました。これをもとに、適宜修正していきたいと思います。
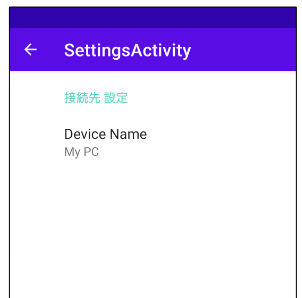
まず、どんな情報を扱うか、ということですが、res/xml/root_preferences.xmlが生成されていましたので、ここに定義します。とりあえず、接続先デバイスの名前が分かるように設定しておきます。
<PreferenceScreen xmlns:app="http://schemas.android.com/apk/res-auto">

    <PreferenceCategory app:title="@string/setting_header">

        <Preference
            app:key="@string/deviceName_key"
            app:title="@string/deviceName_title"
            app:summary="@string/deviceName_summary" />

    </PreferenceCategory>

</PreferenceScreen>
キーや、画面上に表示されるタイトル、内容も設定しておきます。
    <!-- root_Preference -->
    <string name="setting_header">接続先 設定</string>
    <string name="deviceName_key">deviceName_key</string>
    <string name="deviceName_title">Device Name</string>
    <string name="deviceName_summary">No Device</string>
レイアウトは特に指定なしなので自動生成されたままです。
<LinearLayout xmlns:android="http://schemas.android.com/apk/res/android"
    android:layout_width="match_parent"
    android:layout_height="match_parent">

    <FrameLayout
        android:id="@+id/settings"
        android:layout_width="match_parent"
        android:layout_height="match_parent" />
</LinearLayout>
あともう一つ、res/valuesディレクトリにarrays.xmlが生成されていましたが、これはどこにも使われていないようなので削除していいと思います。
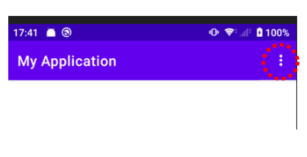
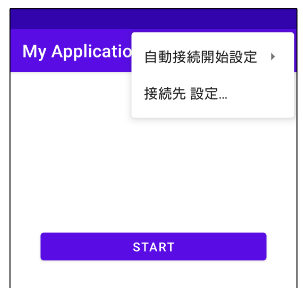
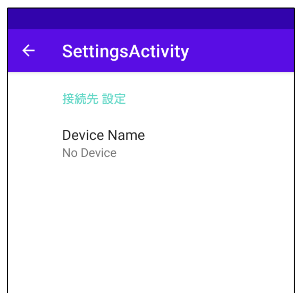
オプションメニューを選択すると、「自動接続」の下に「接続先設定...」があり、接続先設定を選択するとSettingsActivity画面が開きます。
最初は「Device Name」のところが「No Device」になっていますが、タップするとDeviceListActivityが開始されます。
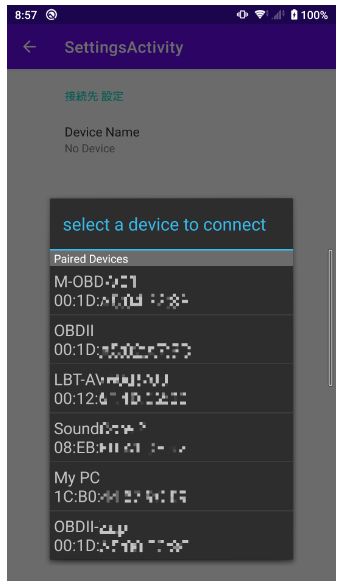
すると、デバイスに設定されているBluetoothデバイスが一覧で出てくるので、選択します。
「My PC」を選択した場合は、こんな表示になります。
以上の動きを実現しているソースコードは以下のようになります。
SettingsFragmentのonCreatePreferencesメソッド内でroot_preferences.xmlを指定し、findPreference(getString(R.string.deviceName_key))のsetOnPreferenceClickListenerに画面上をタップされたときの処理(DeviceListActivityの開始)を設定します。ここはオリジナルではstartActivityForResultを使って、onActivityResultで戻ってきた値を受け取っていますが、使えなくなったようなので、ActivityResultLauncherを使った方法にしています。
DeviceListActivityは「【Android】PCとBluetooth接続し、PCに文字列を送信する」のDeviceListActivity.javaを持ってきます。
戻ってきたBluetooth デバイスの名前とアドレスは、BundleのgetStringを使って取り出し、SettingsActivity画面の方もsetSummaryで変更し、同時にSharedPreferencesにも書き込んでおきます。
package com.example.myapplication;

import android.app.Activity;
import android.content.Context;
import android.content.Intent;
import android.content.SharedPreferences;
import android.os.Bundle;
import android.util.Log;
import android.view.MenuItem;

import androidx.activity.result.ActivityResultLauncher;
import androidx.activity.result.contract.ActivityResultContracts;
import androidx.appcompat.app.ActionBar;
import androidx.appcompat.app.AppCompatActivity;
import androidx.preference.Preference;
import androidx.preference.PreferenceFragmentCompat;
import androidx.preference.PreferenceManager;

public class SettingsActivity extends AppCompatActivity {

    @Override
    protected void onCreate(Bundle savedInstanceState) {
        super.onCreate(savedInstanceState);
        setContentView(R.layout.settings_activity);
        if (savedInstanceState == null) {
            getSupportFragmentManager()
                    .beginTransaction()
                    .replace(R.id.settings, new SettingsFragment())
                    .commit();
        }
        ActionBar actionBar = getSupportActionBar();
        if (actionBar != null) {
            actionBar.setDisplayHomeAsUpEnabled(true);
        }
    }

    @Override
    public boolean onOptionsItemSelected(MenuItem item) {
        switch (item.getItemId()) {
            // Respond to the action bar's Up/Home button
            case android.R.id.home:
                super.onBackPressed();
                return true;
        }
        return super.onOptionsItemSelected(item);
    }

    public static class SettingsFragment extends PreferenceFragmentCompat {
        Context context = MainActivity.getInstance();
        SharedPreferences sharedPreferences = PreferenceManager.getDefaultSharedPreferences(context);
        @Override
        public void onCreatePreferences(Bundle savedInstanceState, String rootKey) {
            setPreferencesFromResource(R.xml.root_preferences, rootKey);

            Preference deviceName = findPreference(getString(R.string.deviceName_key));
            String mDeviceName = sharedPreferences.getString(getString(R.string.SharedPreferenceDeviceName), "");
            if (deviceName != null) {
                if(mDeviceName.length() > 0){
                    deviceName.setSummary(mDeviceName);
                }
                deviceName.setOnPreferenceClickListener(preference -> {
                    Log.d("SettingsFragment", "on deviceName");
                    Intent intent = new Intent(getContext(), DeviceListActivity.class);
                    mGetBluetoothAddress.launch(intent);
                    return true;
                });
            }
        }
        ActivityResultLauncher<Intent> mGetBluetoothAddress = registerForActivityResult(new ActivityResultContracts.StartActivityForResult(),
                result -> {
                    if (result.getResultCode() == Activity.RESULT_OK) {
                        if (result.getData() != null) {
                            Bundle extras = result.getData().getExtras();
                            String deviceName = extras.getString(DeviceListActivity.EXTRA_DEVICE_NAME);
                            String address = extras.getString(DeviceListActivity.EXTRA_DEVICE_ADDRESS);
                            Log.d("mGetBluetoothAddress.getData ", "deviceName = " + deviceName + ",address = " + address);
                            Preference preferenceDeviceName = findPreference(getString(R.string.deviceName_key));
                            if (preferenceDeviceName != null) {
                                preferenceDeviceName.setSummary(deviceName);
                            }

                            SharedPreferences.Editor editor = sharedPreferences.edit();
                            editor.putString(getString(R.string.SharedPreferenceDeviceName), deviceName);
                            editor.putString(getString(R.string.SharedPreferenceDeviceAddress), address);
                            editor.apply();

                        }
                    }
                });
    }
}
Android Studio の File → New → Activity でファイルを作ると自動的にマニフェストのactivityの設定を自動で追加してくれたのですが、自動で作っていない場合は設定を追加が必要です。
	...
        <activity
            android:name=".DeviceListActivity"
            android:exported="false"
            android:label="@string/select_device"
            android:theme="@android:style/Theme.Holo.Dialog" />
        <activity
            android:name=".SettingsActivity"
            android:exported="false"
            android:label="@string/title_activity_settings" />
    ...
あれ、android:exported="false"ってなに?と思ったら「android:exported='false' とはどういうことか?」という記事がありました。アクティビティを他のアプリのコンポーネントから起動できるかどうか、起動できない(させたくない)場合は 'false' でいいそうです。
小話(1) DeviceListActivity と Theme
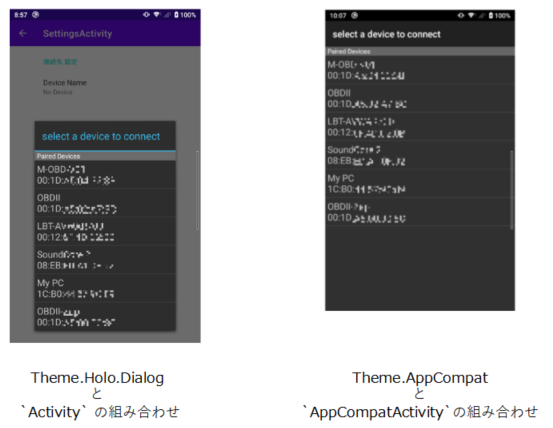
DeviceListActivityは元々、「android-BluetoothChat」から持ってきていますが、File > New > Activity > Empty Activity でクラスを作って必要部分をコピーし、res/layout/activity_device_list.xmlとres/layout/device_name.xmlをコピーして試しました。すると、以前は先程の画面のように選択するリストが画面中央に浮き上がったように表示されたのですが、今回は様子が違いました。何が違うか比較すると、マニフェストに自動で<activity ~が挿入されていて、
	...
        <activity
            android:name=".DeviceListActivity"
            android:exported="false" />
	...
となっているのに対して、android-BluetoothChatのマニフェストは
	...
        <activity
            android:name=".DeviceListActivity"
            android:configChanges="orientation|keyboardHidden"
            android:label="@string/select_device"
            android:theme="@android:style/Theme.Holo.Dialog"/>
	...
となっていて、そうか、themeが違うのか、ということでここもコピーして試しました。すると、
java.lang.RuntimeException: Unable to start activity ComponentInfo{com.example.myapplication/com.example.myapplication.DeviceListActivity}: java.lang.IllegalStateException: You need to use a Theme.AppCompat theme (or descendant) with this activity.
というエラーが出て落ちてしまいます。Theme.AppCompatと言われても良く分からなったので調べたところ、「Android : Theme.Holo VS Theme.AppCompat」 に
<application
    android:theme="@style/Theme.AppCompat"
    ...
と書くんだよ、と書いてあったのでこれで試してみました。すると、エラーは出なくなったのですが、表示されるイメージがちょっと違います。
「AppCompat widget that can only be used with a Theme.AppCompat theme (or descendant)」に、Activityなんとか、と書いてあったのでソースコードをよく見ると、android-BluetoothChat の方は
public class DeviceListActivity extends Activity
になっているのに対して、今回作った方は
public class DeviceListActivity extends AppCompatActivity
になっていました。今回たまたま、File > New > Activity > Empty Activity でクラスを作って必要部分をコピーしたのですが、そうすると、AppCompatActivityが継承されたクラスになっていたようです。Activityに修正するとTheme.Holo.Dialogでもエラーなくビルド出来て、元の画面表示がでることがわかりました。見た目だけの問題なので、どちらでもいいのですが、一方で、R.style | Android Developers の「Theme_Holo_Dialog」にAPI 28から非推奨で他のAPI 21以上のテーマを使うか、AppCompat をサポートしているAPIと使うように、というようなメッセージも書いてあるので、いずれ使えなくなるのかもしれませんね。Themeはあまり詳しくありませんので、また別の機会に調べたいと思います。
小話(2) アクションバーの「←」
自動で生成された時点で、
        ActionBar actionBar = getSupportActionBar();
        if (actionBar != null) {
            actionBar.setDisplayHomeAsUpEnabled(true);
        }
となっていて、アクションバー(画面の一番上)に「←」が表示されているのですが、onOptionsItemSelectedを実装しないと押しても動かないです(Navigate back from settings activity)。自動で生成するなら、これも入れておいてくれればいいのに、と思いました。
    @Override
    public boolean onOptionsItemSelected(MenuItem item) {
        switch (item.getItemId()) {
            // Respond to the action bar's Up/Home button
            case android.R.id.home:
                super.onBackPressed();
                return true;
        }
        return super.onOptionsItemSelected(item);
    }
Bluetooth接続処理の呼び出し
これまでのPowerConnectionReceiverと名付けたBroadcastReceiverでは、電源の接続検出してもToastを出すだけなので、接続に合わせて何か処理をするには、BroadcastReceiverを呼び出した(ReceivingServiceと名付けたフォアグラウンドサービス)側に、接続されたことを伝える必要があります。ということで、今回は「[Android] カスタム Listener を interface を使って実装してみる」を参考に、BroadcastReceiverにinterfaceを追加しました。電源接続の確立通知としてonPowerConnected()、失敗時のonPowerConnectFailed()、切断のonPowerDisconnected()と名付け、PowerConnectionReceiverを呼び出したときに、どこにこれらの実態が実装されているかを設定してもらうようにします。で、いままでToastを出していたところに、これらのメソッドを追加しておきます。
public class PowerConnectionReceiver extends BroadcastReceiver {

    public interface connectionInterface{
        /** Power接続の確立通知を受けるメソッド */
        void onPowerConnected();
        /** Power接続失敗の通知を受けるメソッド */
        void onPowerConnectFailed();
        /** Power接続の切断通知を受けるメソッド */
        void onPowerDisconnected();
    }

    private connectionInterface connectionListener = null;

    PowerConnectionReceiver(connectionInterface listener){
        connectionListener = listener;
    }

public class PowerConnectionReceiver extends BroadcastReceiver {
    public final String TAG = Objects.requireNonNull(new Object() {}.getClass().getEnclosingClass()).getSimpleName() ;

    public interface connectionInterface{
        /** Power接続の確立通知を受けるメソッド */
        void onPowerConnected();
        /** Power接続失敗の通知を受けるメソッド */
        void onPowerConnectFailed();
        /** Power接続の切断通知を受けるメソッド */
        void onPowerDisconnected();
    }

    private connectionInterface connectionListener = null;

    private static int mPluggedLast = -1;

    PowerConnectionReceiver(connectionInterface listener){
        connectionListener = listener;
    }
    ...

    @Override
    public void onReceive(Context context, Intent intent) {
		...
                if (nowPlugged == BatteryManager.BATTERY_PLUGGED_AC) {        // int android.os.BatteryManager.BATTERY_PLUGGED_AC : 1 [0x1]
                    Log.d(TAG, "ケーブルの接続状態 = BATTERY_PLUGGED_AC");
                    Toast.makeText(context, "BATTERY_PLUGGED_AC", Toast.LENGTH_LONG ).show();
                    if(connectionListener != null){
                        connectionListener.onPowerConnected();
                    }
                } else if (nowPlugged == BatteryManager.BATTERY_PLUGGED_USB) {
                    //	int android.os.BatteryManager.BATTERY_PLUGGED_USB : 2 [0x2]
                    Log.d(TAG, "ケーブルの接続状態 = BATTERY_PLUGGED_USB");
                    Toast.makeText(context, "BATTERY_PLUGGED_USB", Toast.LENGTH_LONG ).show();
                    if(connectionListener != null){
                        connectionListener.onPowerConnected();
                    }
                } else if (nowPlugged == 0) {
                    Log.d(TAG, "Unplugged.");
                    Toast.makeText(context, "Unplugged.", Toast.LENGTH_LONG ).show();
                    if(connectionListener != null){
                        connectionListener.onPowerDisconnected();
                    }
                } else {
                ...
                }
		...
}
次に、PowerConnectionReceiverはReceivingServiceと名付けたフォアグラウンドサービスで呼び出されるので、ReceivingServiceがPowerConnectionReceiver.connectionInterfaceをimplementsし、ReceivingServiceにonPowerConnected()、onPowerConnectFailed()、onPowerDisconnected()でどうするか記述します。onPowerConnected()が呼ばれたときは、そこからMeasureServiceというこれまたフォアグラウンドサービスを呼び出し、ようやく電源接続して自動で開始したい処理が開始できます。接続に失敗したり、切断されたときはMeasureServiceを停止するようにしておきます。
public class ReceivingService extends Service implements PowerConnectionReceiver.connectionInterface{
...
    @Override
    public void onPowerConnected() {
        SharedPreferences sharedPreferences = PreferenceManager.getDefaultSharedPreferences(this /* Activity context */);
        boolean isChecked = sharedPreferences.getBoolean(getString(R.string.autoStart), false);
        if(isChecked){
            if(!MeasureService.isRunning()){
                Intent serviceIntent = new Intent(this, MeasureService.class);
                serviceIntent.putExtra("REQUEST_CODE", 1);

                // Serviceの開始
                if (Build.VERSION.SDK_INT >= Build.VERSION_CODES.O) {
                    startForegroundService(serviceIntent);
                } else {
                    startService(serviceIntent);
                }
            } else {
                Log.d(TAG, "MeasureService.isRunning");
            }
        }
    }

    @Override
    public void onPowerConnectFailed() {
        Intent serviceIntent = new Intent(getApplication(), MeasureService.class);
        stopService(serviceIntent);
    }

    @Override
    public void onPowerDisconnected() {
        Intent serviceIntent = new Intent(getApplication(), MeasureService.class);
        stopService(serviceIntent);
    }
}
MeasureServiceもまず、Bluetoothが接続されたときの通知が受け取れるようにInterefaceをimplementsしておきます。そのあとはフォアグラウンドサービスとして実施することは同じで、このサービスが開始されたらNotification Channel等を設定し、Bluetooth接続処理を実施しています。接続出来たらonBluetoothConnected()の処理を実施、接続できなかったら、接続できなかった時のメッセージをインテントに載せて送信、接続処理を終了します(onBluetoothConnectFailed())。
package com.example.myapplication;

import android.app.Notification;
import android.app.NotificationChannel;
import android.app.NotificationManager;
import android.app.PendingIntent;
import android.app.Service;
import android.content.Context;
import android.content.Intent;
import android.content.SharedPreferences;
import android.os.IBinder;
import android.preference.PreferenceManager;
import android.util.Log;

import java.util.Objects;

public class MeasureService extends Service implements BluetoothConnection.connectionInterface{
    public final String TAG = Objects.requireNonNull(new Object() {}.getClass().getEnclosingClass()).getSimpleName() ;

    MeasureThread thread;
    NotificationManager notificationManager;
    String channelId;
    String title;

    private static boolean onMeasure;
    private BluetoothConnection mBluetoothConnection;

    public static boolean isRunning(){return onMeasure;}

    public IBinder onBind(Intent intent) {
        return null;
    }

    public int onStartCommand(Intent intent, int flags, int startId) {
        String methodName = new Object(){}.getClass().getEnclosingMethod().getName() ;
        Log.d(TAG, methodName);
        Log.d(TAG, "Thread name = " + Thread.currentThread().getName());

        onMeasure = true;

        int requestCode = intent.getIntExtra("REQUEST_CODE",0);
        Context context = getApplicationContext();
        channelId = "default";
        title = context.getString(R.string.app_name);

        if (android.os.Build.VERSION.SDK_INT >= android.os.Build.VERSION_CODES.O) {

            PendingIntent pendingIntent =
                    PendingIntent.getActivity(context, requestCode, intent, PendingIntent.FLAG_IMMUTABLE);

            notificationManager =
                    (NotificationManager) context.getSystemService(Context.NOTIFICATION_SERVICE);

            // Notification Channel 設定
            NotificationChannel channel = new NotificationChannel(
                    channelId, title, NotificationManager.IMPORTANCE_DEFAULT);

            if (notificationManager != null) {
                notificationManager.createNotificationChannel(channel);

                Notification notification = new Notification.Builder(context, channelId)
                        .setContentTitle(title)
                        // android標準アイコンから
                        .setSmallIcon(android.R.mipmap.sym_def_app_icon)
                        .setContentText("車両情報取得中")
                        .setAutoCancel(true)
                        .setContentIntent(pendingIntent)
                        .setWhen(System.currentTimeMillis())
                        .build();

                // startForeground
                startForeground(1, notification);

            }
        }

        SharedPreferences sharedPreferences = PreferenceManager.getDefaultSharedPreferences(context /* Activity context */);
        String address = sharedPreferences.getString(getString(R.string.SharedPreferenceDeviceAddress), "");

        if(address.length() > 0){
            connectDevice(address);
        }

//        stopSelf();
        return START_NOT_STICKY;
    }
    @Override
    public void onDestroy() {
        super.onDestroy();

        String methodName = new Object(){}.getClass().getEnclosingMethod().getName() ;
        Log.d(TAG, methodName);

        if (thread != null) thread.cancel();
        onMeasure = false;

        SharedPreferences sharedPreferences = PreferenceManager.getDefaultSharedPreferences(this /* Activity context */);
        boolean isChecked = sharedPreferences.getBoolean(getString(R.string.autoStart), false);
        if(isChecked) {
            Log.d(TAG + "." + methodName, getString(R.string.waiting));
            if (android.os.Build.VERSION.SDK_INT >= android.os.Build.VERSION_CODES.O) {
                Notification notification = new Notification.Builder(this, channelId)
                        .setContentTitle(title)
                        .setContentText(getString(R.string.waiting))
                        .setSmallIcon(android.R.mipmap.sym_def_app_icon)
                        //		.setSmallIcon(android.R.drawable.sym_def_app_icon)
                        .setContentText(getString(R.string.waiting))
                        .setAutoCancel(true)
                        .setWhen(System.currentTimeMillis())
                        .build();
                notificationManager.notify(1, notification);
                //}
            }
        } else {
            Log.d(TAG + "." + methodName, "notification cancel");
            notificationManager.cancel(1);
        }
    }

    private void connectDevice(String address){
        SharedPreferences sharedPreferences = PreferenceManager.getDefaultSharedPreferences(this /* Activity context */);
        String mDeviceName = sharedPreferences.getString(getString(R.string.SharedPreferenceDeviceName), "");
        Log.d(TAG, "name = " + mDeviceName + ",address = " + address);
        // Get the BluetoothDevice object
//        mBluetoothConnection = BluetoothConnection.getInstance(address);
        mBluetoothConnection = new BluetoothConnection(this, address);
        mBluetoothConnection.setConnectionListener(this);
        mBluetoothConnection.connect();
    }
    @Override
    public void onBluetoothConnected() {
        Intent broadcast = new Intent();
        broadcast.putExtra("onBluetoothConnected", true);
        broadcast.setAction("DO_ACTION");
        getBaseContext().sendBroadcast(broadcast);

        thread = new MeasureThread(mBluetoothConnection);
        thread.start();
        // memo
    }

    @Override
    public void onBluetoothConnectFailed() {
        Intent broadcast = new Intent();
        broadcast.putExtra("onBluetoothConnectFailed", true);
        broadcast.setAction("DO_ACTION");
        getBaseContext().sendBroadcast(broadcast);

        if (mBluetoothConnection != null) {
            mBluetoothConnection.close();
            Log.d(TAG + ".onBluetoothConnectFailed", "mBluetoothConnection.close()");
            mBluetoothConnection = null;
        }
    }
}
Bluetooth接続後の処理
Bluetooth接続後の処理としてMeasureThreadというクラスを別スレッドで起動できるようにThreadを継承してつくりました。まずはPCでの実験用に、文字列を送信する処理で試しました。これは「【Android】PCとBluetooth接続し、PCに文字列を送信する」のMyService.javaにあった、内部クラスのprivate class ConnectedThread extends Threadと同じです。別のファイルにすることで、最終的に実施したい、OBD2アダプターを使ったデータ計測と簡単に差し替えられるようにしました。
package com.example.myapplication;

import android.util.Log;

import java.io.IOException;
import java.io.OutputStream;
import java.util.Objects;

public class MeasureThread extends Thread {
    public final String TAG = Objects.requireNonNull(new Object() {}.getClass().getEnclosingClass()).getSimpleName() ;
    boolean onActive = true;

    OutputStream out;

    public MeasureThread(BluetoothConnection bluetoothConnection) {
        Log.d("MeasureThread", "Thread name = "
                + Thread.currentThread().getName());
        out = Objects.requireNonNull(bluetoothConnection.getOutputStream());
    }

    public void run() {
        Log.d("MeasureThread run", "Thread name = "
                + Thread.currentThread().getName());

        try {
            out.write(("Hello!" + "\r").getBytes());
            out.flush();
            synchronized (this) {
                for (int i = 0; i < 10; i++) {
                    out.write((" i = " + i+ "\r").getBytes());
                    try {
                        wait(1000);
                    } catch (InterruptedException e) {
                        e.printStackTrace();
                    }
                    if(!onActive) break;
                }
            }
        } catch (IOException e) {
            e.printStackTrace();
        }
    }
    public void cancel(){
        onActive = false;
        Log.d("MeasureThread", "cancel");
    }
}
PCでの確認
実機でバックで動作確認しました。基本的なやり方は前回の「Bluetooth接続の実機テスト」と同様ですが、違うところは、Teratermを立ち上げておき、オプションメニューから接続先を設定し、同じくオプションメニューにある「自動接続」をオンにすると、電源接続判定からBluetooth接続、送信処理が自動で実行されるのでデバイスの画面のボタンを押さなくても、Teraterm画面に文字が表示されました。
OBD2アダブターとの送受信機能を追加
「AndroidスマホとOBD2アダプターを使って車の内部情報を取得するのに「obd2-lib」を活用」を参考に、commandsディレクトリ、内のファイルIntegerArrayStream.java、Obd2Command.java、Obd2Connection.java、Obd2LiveFrameGenerator.javaを持ってきます。さらに、BluetoothConnectionクラスにimplements Obd2Connection.UnderlyingTransportを追加、MeasureThreadを以下のように変更します。
package com.example.myapplication;

import android.content.Context;
import android.util.Log;

import org.json.JSONArray;
import org.json.JSONException;
import org.json.JSONObject;

import java.io.File;
import java.io.FileWriter;
import java.io.IOException;
import java.util.Objects;

public class MeasureThread extends Thread {
    public final String TAG = Objects.requireNonNull(new Object() {}.getClass().getEnclosingClass()).getSimpleName() ;
    boolean onActive = true;

    BluetoothConnection mBluetoothConnection;
    Obd2Connection mObd2Connection;
    Obd2LiveFrameGenerator mObd2LiveFrameGenerator;
    Context context;

    public MeasureThread(Context _context, BluetoothConnection bluetoothConnection) {
        Log.d("MeasureThread", "Thread name = "
                + Thread.currentThread().getName());
        mBluetoothConnection = bluetoothConnection;
        context = _context;
    }

    public void run() {
        Log.d("MeasureThread run", "Thread name = "
                + Thread.currentThread().getName());
        mObd2Connection = new Obd2Connection(mBluetoothConnection);
        try {
            mObd2LiveFrameGenerator = new Obd2LiveFrameGenerator(mObd2Connection);
            File myDataFile = new File(context.getFilesDir(), "test.csv");
            FileWriter myDataFileWriter = new FileWriter(myDataFile);
            boolean needTitle = true;
            long startTimeNano = 0;
            while (onActive) {
                JSONObject jsonObject = mObd2LiveFrameGenerator.generate();
                Log.d("ConnectedThread run", "jsonObject = " + jsonObject.toString());

                long timestamp = jsonObject.getLong("timestamp");
                if(startTimeNano == 0){
                    startTimeNano = timestamp;
                }
                long elapsedTimeNano = timestamp - startTimeNano;
                JSONArray datas = jsonObject.getJSONArray("data");

                StringBuilder titles = new StringBuilder();
                StringBuilder values = new StringBuilder();
                titles.append("Elapsed Time");
                values.append(elapsedTimeNano / 1.0e9);   //[sec]

                if(datas.length() > 0){
                    for(int j = 0; j < datas.length(); j++){
                        JSONObject data = datas.getJSONObject(j);
                        titles.append(",").append(data.get("id"));
                        values.append(",").append(data.get("value"));
                    }

                    if(needTitle){
                        myDataFileWriter.write(titles + "\r\n");
                        needTitle = false;
                    }
                    myDataFileWriter.write(values + "\r\n");
                }
            }
            myDataFileWriter.close();

        } catch (IOException | InterruptedException | JSONException e) {
            e.printStackTrace();
            onActive = false;
            Log.d(getClass().getSimpleName(), "onBluetoothDisconnected");
            e.printStackTrace();
        }
        //  正常終了時   異常時はonBluetoothDisconnected()の方が早い→mBluetoothConnection = nullの可能性もあり
        if (mBluetoothConnection != null) {
            mBluetoothConnection.close();
            Log.d("ConnectedThread", "mBluetoothConnection.close()");
            mBluetoothConnection = null;
        }

        Log.d("ConnectedThread", "end");
    }
    public void cancel(){
        onActive = false;
        Log.d("MeasureThread", "cancel");
    }
}
取得したデータを書き出す場所を取得するgetFilesDir()を使う関係で、Contextを引数に追加しています。ので、呼び出し側のMeasureServiceもContextを追加で渡すように変更しています。
    @Override
    public void onBluetoothConnected() {
        ...
        thread = new MeasureThread(this, mBluetoothConnection);
        ...
	}
以上で「AndroidスマホとOBD2アダプターを使って車の内部情報を取得するのに「obd2-lib」を活用」にデバイスと車をUSBケーブルで接続しておき、車のイグニッションをONにする(スタートボタンを押す)と同時に計測開始をする機能が追加できました。実際に試してみると、高速道路でSA/PAで休憩し、走行再開するような状況でも、毎回アプリのスタートボタンを押さなくても計測できるので便利にはなったのですが、やはり100%自動にはならず、夏の車内にデバイスを置いていたような状況では「バッテリー温度が高温です」というメッセージと共にForgroundServiceが勝手に終了になっていたりはします。そういう状況でデバイス(スマホ)を使用するのもスマホのバッテリー寿命の為にも悪い気もしますので、長時間放置する可能性があるときは一度USBケーブルを抜いて持ち歩く等、使い方でカバーするようにします。
参考にした記事等


