はじめに
bluetooth対応のOBD2アダプターを車のOBD(故障診断)コネクターと接続し、車の内部情報を取得するAndroidスマホアプリを作りたいと思います。類似のアプリは多数ありますが、自分なりに確認したり点や、改造したいところがあったので、自作を考えました。
OBD2アダプターの多くは「ELM327」というチップを使っているようで、車の内部情報を取得するにはOBD2アダプターに、「ELM327 datasheet」にあるような手順でATコマンドを送信し、プロトコルの設定や車側の対応の有無のチェックし、対応している情報をリクエスト、データ受信、物理的な値に変換すればよさそうです。
OBD2に関するライブラリーも多くあるようですが、google検索でたまたま見つけた「obd2-lib」(アンドロイド オープンソースプロジェクト?)で公開されているソースコードを活用することで、主な機能を自作せず、車の内部情報を取得できました。
検証環境
この記事の内容は、以下の環境で検証しました。
- Windows 10 Home
- Android Studio Chipmunk | 2021.2.1 Patch 1
- targetSdk 32
- 実機確認 Sony SOG04 Android 12,API 31
obd2-libの内容
obd2-libは以下の図のような構成になっています。

commands ディレクトリ
commandsディレクトリ内のファイルは、OBD2ツールで取得可能な自動車の内部データの定義(パラメータID、データサイズ、変換式等)の情報が、取得可能なデータごとに記載されています。例えば、パラメータID(以下、"PID"と表記) 05 の Engine coolant temperature(エンジン冷却水温) はEngineCoolantTemperature.javaに入っています。
package com.android.car.obd2.commands;

import com.android.car.obd2.IntegerArrayStream;
import com.android.car.obd2.Obd2Command;
import java.util.Optional;

public class EngineCoolantTemperature implements Obd2Command.OutputSemanticHandler<Integer> {
    @Override
    public int getPid() {
        return 0x05;
    }

    @Override
    public Optional<Integer> consume(IntegerArrayStream data) {
        return data.hasAtLeast(
                1,
                theData -> Optional.of(theData.consume() - 40),
                theData -> Optional.<Integer>empty());
    }
}
「OBD-II PIDs」によると、
| PIDs(hex) | Data bytes | Formula |
|---|---|---|
| 05 | 1 | $A-40$ |
とあるので、data.hasAtLeast(Data bytes, Formula)の、theData.consume() - 40がFormula(変換式)に相当する部分ですね。このIntegerArrayStreamは1~4文字の文字列をint型配列として受け取り、値があればconsume()するたびに一文字ずつ取り出し、となっているのでこのような形で実現しているようです。
他にも、取りたいデータがサンプルコードの中になければOBD-II PIDsの定義に従って用意すればいいようです。ただし、例えばAmbientAirTemperature(=外気温)はパラメータIDが16進で 46、変換式は $A-40$ なのに、A*100/256になっていましたので、EngineCoolantTemperature.javaと同じにした方がいいと思います。他のPIDも使用する前に合っているかどうか、確認してからにした方がよさそうです。
package com.android.car.obd2.commands;

import com.android.car.obd2.IntegerArrayStream;
import com.android.car.obd2.Obd2Command;
import java.util.Optional;

public class AmbientAirTemperature implements Obd2Command.OutputSemanticHandler<Float> {
    @Override
    public int getPid() {
        return 0x46;
    }

    @Override
    public Optional<Float> consume(IntegerArrayStream data) {
        return data.hasAtLeast(
                1,
                theData -> Optional.of(theData.consume() - 40),
            //  theData -> Optional.of(theData.consume() * (100.0f / 255.0f)), <- 変更前
                theData -> Optional.<Float>empty());
    }
}
IntegerArrayStream.java
IntegerArrayStream.javaはpackageを今回のアプリに合わせて変更する以外は、そのまま使えます。
| 型 | メソッド | 概要 |
|---|---|---|
| int | consume() | int型配列からひとつづつ値を取り出す |
| int | residualLength() | 配列(データ数)の残りの数を返す |
| boolean | isEmpty() | 残りの配列(データ数)がゼロかどうか |
| boolean | hasAtLeast(int n) | 残りの配列(データ数)がnより多いかどうか |
| <T> | hasAtLeast(int n, Function<IntegerArrayStream, T> ifTrue, Function<IntegerArrayStream, T> ifFalse) | 配列の残りがnの場合はifTrue 関数を、違う場合はifFalse関数を適用 |
| boolean | expect(int... values) | いくつかの文字コードが決められた順番で格納されているかどうか |
hasAtLeast(int n, Function<IntegerArrayStream, T> ifTrue, Function<IntegerArrayStream, T> ifFalse)は
    public <T> T hasAtLeast(
            int n,
            Function<IntegerArrayStream, T> ifTrue,
            Function<IntegerArrayStream, T> ifFalse) {
        if (hasAtLeast(n)) {
            return ifTrue.apply(this);
        } else {
            if (ifFalse != null) {
                return ifFalse.apply(this);
            } else {
                return null;
            }
        }
    }
というロジックになっています。
Obd2Command.java
Obd2Command.javaもロジック部分はそのまま持ってきました。
ここにはcommandsディレクトリの情報を実際にどう処理するか記述されています。戻り値がint型(Integer型)の情報は、SUPPORTED_INTEGER_COMMANDSというマップに、float型(Float型)の情報はSUPPORTED_FLOAT_COMMANDSというマップに、PIDをキーに格納されます(addSupportedIntegerCommands、addSupportedFloatCommands)。取得した車両情報を追加したい場合は、該当するPID、変換式を記述したクラスをcommandsに追加し、ここに追記することで追加可能ですし、不要になればここで削除すればよさそうです。
さらに、getSupportedIntegerCommands、getSupportedFloatCommandsメソッドでこれらのマップのキーセットが取得できます。また、getIntegerCommand(int pid)、getFloatCommand(int pid)でPIDを指定して各クラスを選択することも出来ます。
...
    private static final HashMap<Integer, OutputSemanticHandler<Integer>>
            SUPPORTED_INTEGER_COMMANDS = new HashMap<>();
    private static final HashMap<Integer, OutputSemanticHandler<Float>> SUPPORTED_FLOAT_COMMANDS =
            new HashMap<>();

    private static void addSupportedIntegerCommands(
            OutputSemanticHandler<Integer>... integerOutputSemanticHandlers) {
        for (OutputSemanticHandler<Integer> integerOutputSemanticHandler :
                integerOutputSemanticHandlers) {
            SUPPORTED_INTEGER_COMMANDS.put(
                    integerOutputSemanticHandler.getPid(), integerOutputSemanticHandler);
        }
    }

    private static void addSupportedFloatCommands(
            OutputSemanticHandler<Float>... floatOutputSemanticHandlers) {
        for (OutputSemanticHandler<Float> floatOutputSemanticHandler :
                floatOutputSemanticHandlers) {
            SUPPORTED_FLOAT_COMMANDS.put(
                    floatOutputSemanticHandler.getPid(), floatOutputSemanticHandler);
        }
    }

    public static Set<Integer> getSupportedIntegerCommands() {
        return SUPPORTED_INTEGER_COMMANDS.keySet();
    }

    public static Set<Integer> getSupportedFloatCommands() {
        return SUPPORTED_FLOAT_COMMANDS.keySet();
    }

    public static OutputSemanticHandler<Integer> getIntegerCommand(int pid) {
        return SUPPORTED_INTEGER_COMMANDS.get(pid);
    }

    public static OutputSemanticHandler<Float> getFloatCommand(int pid) {
        return SUPPORTED_FLOAT_COMMANDS.get(pid);
    }

    static {
        addSupportedFloatCommands(
                new AmbientAirTemperature(),
                new CalculatedEngineLoad(),
                new FuelTankLevel(),
                new Bank2ShortTermFuelTrimCommand(),
                new Bank2LongTermFuelTrimCommand(),
                new Bank1LongTermFuelTrimCommand(),
                new Bank1ShortTermFuelTrimCommand(),
                new ThrottlePosition());
        addSupportedIntegerCommands(
                new EngineOilTemperature(),
                new EngineCoolantTemperature(),
                new FuelGaugePressure(),
                new FuelSystemStatus(),
                new RPM(),
                new EngineRuntime(),
                new Speed());
    }

    ...
次に、Obd2Commandはint型のmodeとOutputSemanticHandler<ValueType>が引数になっていて、modeはLIVE_FRAMEかFREEZE_FRAMEですが、今回はLIVE_FRAMEを使います。OutputSemanticHandlerはgetPid()とconsumeというインターフェースを持つクラスで、前述のcommandsディレクトリーにある、それぞれのPIDごとのクラスがこのインターフェースを実装(implements)しているので、あとでPIDごとに引き当ててListにして使います。
    ...

    protected final int mMode;
    protected final OutputSemanticHandler<ValueType> mSemanticHandler;

    Obd2Command(int mode, OutputSemanticHandler<ValueType> semanticHandler) {
        mMode = mode;
        mSemanticHandler = Objects.requireNonNull(semanticHandler);
    }

    public abstract Optional<ValueType> run(Obd2Connection connection) throws Exception;

    public int getPid() {
        return mSemanticHandler.getPid();
    }

    public static final <T> LiveFrameCommand<T> getLiveFrameCommand(OutputSemanticHandler handler) {
        return new LiveFrameCommand<>(handler);
    }

    ...
その後に、Obd2Commandクラスを継承するLiveFrameCommand、FreezeFrameCommandが定義されています。今回は、走行中のデータを取りたいので、LiveFrameCommandを使います。FreezeFrameデータは、故障判定時に原因調査が出来ると思われるデータを保存する(Freeze)時に有効ですが、今回は使いません。
runメソッドはまず、String型の文字列commandを作っていますが、これがELM327を通して車両のデータを要求するコマンドになっています。「ELM327 datasheet」に詳細はありますが、例えばPID 05(Hex)の今の値を要求するコマンドは、01 05です。
String command = String.format("%02X%02X", mMode, mSemanticHandler.getPid()
の部分で文字列として作成していて、コンストラクタでsuper(LIVE_FRAME, semanticHandler)が呼ばれてLIVE_FRAME = 1なのでmMode = 1となり、該当するgetPid()メソッドで今回の例だと05となって01 05が実現されています。01と05の間のスペース有無はどちらでもいいようです。ここで、01は"mode 01"現在の値を取得(show current data)という意味で、01 05はPID 05の現在の値を要求するという意味になり、01の要求の回答は先頭が41になって返送されます。
41はLiveFrameCommandの直後で
private static final int RESPONSE_MARKER = 0x41;
と定義されていて、mode 01 の応答(01 + 40 = 41)を意味するそうです。
PID 05の回答は41 05 7Bになり、最後の7Bが取得できたデータ(現在の値)になります。なので、IntegerArrayStream streamのstream.expectで RESPONSE_MARKER(= 41) と、該当するPID(今回は05)が続けて返って来たと判定できれば、mSemanticHandler.consume(stream)でその次に送られてきた値を取り出し、それぞれのPIDの変換式にしたがって変換した値が取得できる、という仕組みになっています。
    ...

    /**
     * An OBD2 command that returns live frame data.
     *
     * @param <ValueType> The Java type that represents the command's result type.
     */
    public static class LiveFrameCommand<ValueType> extends Obd2Command<ValueType> {
        private static final int RESPONSE_MARKER = 0x41;

        LiveFrameCommand(OutputSemanticHandler<ValueType> semanticHandler) {
            super(LIVE_FRAME, semanticHandler);
        }

        public Optional<ValueType> run(Obd2Connection connection)
                throws IOException, InterruptedException {
            String command = String.format("%02X%02X", mMode, mSemanticHandler.getPid());
            int[] data = connection.run(command);
            IntegerArrayStream stream = new IntegerArrayStream(data);
            if (stream.expect(RESPONSE_MARKER, mSemanticHandler.getPid())) {
                return mSemanticHandler.consume(stream);
            }
            return Optional.empty();
        }
        ...
Obd2Connection.java
UnderlyingTransport インターフェース
ELM327の設定や、コマンドの送受信、車両からの応答の解析を実際に処理する部分は、Obd2Connection.javaにまとめられています。最初に、InputStreamやOutputStreamのインターフェースの定義があります。これを実際にBluetooth接続するクラス(後述のBluetoothConnectionクラス)と関連付けて使います。また、オリジナルには再接続の設定もありますが、接続が切れた時の再接続はどう処理するのが妥当なのか、今は考えが及んでいませんので、実体の部分も合わせてコメントアウトしておきます。
ELM327設定用コマンド
UnderlyingTransport インターフェースのあとに
    private static final String[] initCommands =
            new String[] {"ATD", "ATZ", "AT E0", "AT L0", "AT S0", "AT H0", "AT SP 0"};
があります。この、ATDから始まる文字は、ELM327の設定をするためのコマンド(ATコマンド)で、「ELM327 datasheet」から抜粋すると以下のようになります。
| コマンド | 機能 |
|---|---|
| ATD | 初期化(set all to Defaults) |
| ATZ | 全リセット(reset all) |
| AT E0 | エコーオフ(Echo off)。 E1ならエコーオン、要求コマンドが応答に先立ちエコーとして送信される |
| AT L0 | 改行コードオフ(Linefeeds off)。 L1なら改行コードオン、送信文字列に改行コードが追加される |
| AT S0 | スペース挿入オフ(printing of Spaces off)。 S1ならECUの応答にスペースが挿入される |
| AT H0 | ヘッダーオフ(Headers off)。 H1なら車両からのヘッダー情報が追加されるようですが、通常はオフでいいようです |
| AT SP 0 | プロトコル0(Automatic)を選択(set protocol to 0)。 プロトコルは0~9,A,B,Cから選択 |
最後のプロトコルは、車によっては自動(Automatic)では応答が来ない場合もあるので、上手く情報が出てこない場合はこれを変更して試すことになると思います。そして、コンストラクタが呼び出されたときに、runInitCommandsメソッドが呼ばれて、このコマンドが順番に送信されます。
コマンドの送信と応答の受信処理
runメソッドとrunImplで、Obd2Command.javaのLiveFrameCommandでPIDごとに作ったコマンドを送信し、応答を処理する機能が実装されています。LiveFrameCommand.run(Obd2Connection connection)で、connection.run(command)とすると、この部分が実行される構成になっています。なかなか複雑ですね...
runメソッドからrunImplにコマンドを渡し、さらにOutputStreamに書き込んだところでInputStreamのreadメソッドで応答を待ちます。このOutputStreamはmConnection.getOutputStream()なので、その先はBluetoothConnectionクラスのgetOutputStream()で、さらにはBluetoothSocketのmSocket.getOutputStream()ですね。これも先が長い...
読み出した文字がプロンプト(>)であれば読み込みを終了、\r、\n、' '、'\t'、.は無視してStringBuilderに詰め込んで応答を返します。出来た文字列をさらに加工し、スペースを除いたり、今回は該当ないですが、OBD2のプロトコル的には複数のPIDをまとめて要求でき、その際は応答もまとまって返ってくるので、それを分解(unpackLongFrame)したりし、残った文字をさらに調べます。
ELM327を通じて返ってくる車の応答には、「SEARCHING」、「ERROR」、「BUS INIT」、「BUSINIT」、「BUS ERROR」、「BUSERROR」、「STOPPED」、「?」、「NODATA」、「UNABLETOCONNECT」、「CANERROR」が返ってくることがあります。「UNABLETOCONNECT」、「CANERROR」の場合は、IOExceptionを出すようになっていますが、それ以外は基本は無視ですね。上記のATコマンドがうまく成功した場合は「OK」が返ってきますが、処理としては特に何もしません。残った文字列を、さらに2桁ごとの16進文字として10進にし、int型配列にtoHexValuesメソッドで入れて呼び出し元に返します。
各PIDの対応(サポート)の有無調査
ATコマンドでELM327の設定が出来、クルマからの応答があることが確認できると、次は、欲しいPIDコードの情報がクルマ側で対応(サポート)されているかを調べます。車によって対応しているPIDが結構違うので、実際のデータを要求する前に、そのPIDの情報が返ってくる(サポートされている)のか、調べる必要があります。
コマンド01 00を送ると、PID 01から20までのコードが対応されているか、ビットごとに対応されてる場合は1が、されていない場合は0でセットされます。
「OBD-II PIDs」の例で説明すると、01 00の応答がBE1FA813の場合は、2進にすると
1011 1110 0001 1111 1010 1000 0001 0011
となるので、PID 01, 03, 04, 05, 06, 07, 0C, 0D, 0E, 0F, 10, 11, 13, 15, 1C, 1F と 20 がサポートされています、となります(最上位ビットからPID 01、02、... 最後が20という割付になっています)。
PID 20 がサポートされている、ということは、PIDs supported [21 - 40]ということで、PID 21から40も存在する、という意味になります。これは次に01 20を送ると応答が返ってくることを意味していて、この場合の最下位ビットはPID 40で、これが1なら、さらにPIDs supported [41 - 60]ということで、「OBD-II PIDs」では PID C0まで、192個のPIDが定義されています。
オリジナルの「obd2-lib」のgetSupportedPIDsメソッドでは、サポート有無を調べるコマンドを、"0100", "0120", "0140", "0160"と用意し、順番にforループで送信、それぞれのビットを調べ、サポートあるPID コードをマップ(リスト化)して返しています。が、試したところ例えばPID 20が対応していない車両に01 20を送信しても応答が返ってこず、処理が止まってしまいました。そこで、今回のコマンドに対する応答の最下位ビットが1なら次のコマンドも送信、0ならbreakという処理を追加しています。
    ...

    public Set<Integer> getSupportedPIDs() throws IOException, InterruptedException {
        Set<Integer> result = new HashSet<>();
        String[] pids = new String[] {"0100", "0120", "0140", "0160"};
        int basePid = 1;
        for (String pid : pids) {
            int[] responseData = run(pid);
            if (responseData.length >= 6) {
                byte byte0 = (byte) (responseData[2] & 0xFF);
                byte byte1 = (byte) (responseData[3] & 0xFF);
                byte byte2 = (byte) (responseData[4] & 0xFF);
                byte byte3 = (byte) (responseData[5] & 0xFF);
                if (DBG) {
                    Log.i(TAG, String.format("supported PID at base %d payload %02X%02X%02X%02X",
                        basePid, byte0, byte1, byte2, byte3));
                }
                FourByteBitSet fourByteBitSet = new FourByteBitSet(byte0, byte1, byte2, byte3);
                for (int byteIndex = 0; byteIndex < 4; ++byteIndex) {
                    for (int bitIndex = 7; bitIndex >= 0; --bitIndex) {
                        if (fourByteBitSet.getBit(byteIndex, bitIndex)) {
                            int command = basePid + 8 * byteIndex + 7 - bitIndex;
                            if (DBG) {
                                Log.i(TAG, "command " + command + " found supported");
                            }
                            result.add(command);
                        }
                    }
                }
            }
            basePid += 0x20;
        //  最下位ビットが1なら継続(次のコマンドも送信)、0ならbreak
            if(result.contains(basePid - 1))
                Log.d(TAG,String.format("next Support id %02X supported",basePid - 1));
            else
                break;
        }
        // 追加部分終わり
        return result;
    }

    ...
Obd2LiveFrameGenerator.java
Obd2LiveFrameGeneratorは、Obd2Connectionを引数として呼び出され、コンストラクタではObd2ConnectionのgetSupportedPIDsでサポートしているPIDをList化し、Obd2Commandで設定されているPIDを突き合わせ、Java Stream API を使ってサポートのあるPIDをmIntegerCommands、mFloatCommandsというListにまとめています。
その後に、generateメソッドでmIntegerCommands、mFloatCommandsをそれぞれPIDの数だけ呼び出してコマンドを送信、受信した結果を返します。このメソッドはJsonWriterで返すことになっているので、PIDと値を対にしてJSON形式で戻すようになっています。オリジナルではJsonWriterを引数にしていますが、JsonWriterの使い方がいまいち分からなかったので引数なしで、JsonObjectにPIDと値を対にして入れて返すことにしました。
/*
 * Copyright (C) 2017 The Android Open Source Project
 *
 * Licensed under the Apache License, Version 2.0 (the "License");
 * you may not use this file except in compliance with the License.
 * You may obtain a copy of the License at
 *
 *      http://www.apache.org/licenses/LICENSE-2.0
 *
 * Unless required by applicable law or agreed to in writing, software
 * distributed under the License is distributed on an "AS IS" BASIS,
 * WITHOUT WARRANTIES OR CONDITIONS OF ANY KIND, either express or implied.
 * See the License for the specific language governing permissions and
 * limitations under the License.
 */

package com.example.myapplication;

import android.os.SystemClock;
import android.util.Log;

import com.example.myapplication.Obd2Command.LiveFrameCommand;

import org.json.JSONArray;
import org.json.JSONException;
import org.json.JSONObject;

import java.io.IOException;
import java.util.ArrayList;
import java.util.List;
import java.util.Optional;
import java.util.Set;

public class Obd2LiveFrameGenerator {
    public static final String FRAME_TYPE_LIVE = "live";
    public static final String TAG = Obd2LiveFrameGenerator.class.getSimpleName();

    private final Obd2Connection mConnection;
    private final List<LiveFrameCommand<Integer>> mIntegerCommands = new ArrayList<>();
    private final List<LiveFrameCommand<Float>> mFloatCommands = new ArrayList<>();

    public Obd2LiveFrameGenerator(Obd2Connection connection)
            throws IOException, InterruptedException {
        mConnection = connection;
        Set<Integer> connectionPids = connection.getSupportedPIDs();
        Set<Integer> apiIntegerPids = Obd2Command.getSupportedIntegerCommands();
        Set<Integer> apiFloatPids = Obd2Command.getSupportedFloatCommands();
        apiIntegerPids
                .stream()
                .filter(connectionPids::contains)
                .forEach(
                        (Integer pid) ->
                                mIntegerCommands.add(
                                        Obd2Command.getLiveFrameCommand(
                                                Obd2Command.getIntegerCommand(pid))));
        apiFloatPids
                .stream()
                .filter(connectionPids::contains)
                .forEach(
                        (Integer pid) ->
                                mFloatCommands.add(
                                        Obd2Command.getLiveFrameCommand(
                                                Obd2Command.getFloatCommand(pid))));
        Log.i(
                TAG,
                String.format(
                        "connectionPids = %s\napiIntegerPids=%s\napiFloatPids = %s\n"
                                + "mIntegerCommands = %s\nmFloatCommands = %s\n",
                        connectionPids,
                        apiIntegerPids,
                        apiFloatPids,
                        mIntegerCommands,
                        mFloatCommands));
    }

//    public JsonWriter generate(JsonWriter jsonWriter) throws IOException {    オリジナルの戻り値の型はJsonWriter
    public JSONObject generate() throws IOException {
        return generate(SystemClock.elapsedRealtimeNanos());
    }

//    以下取得したデータは JsonWriter ではなく、JSONObject を使って処理、に変更
    public JSONObject generate(long timestamp) throws IOException {
        JSONObject jsonObject = new JSONObject();
        JSONArray datasArray = new JSONArray();
        try {
            jsonObject.put("type", FRAME_TYPE_LIVE);
            jsonObject.put("timestamp",timestamp);
        } catch (JSONException e) {
            e.printStackTrace();
        }
        for (LiveFrameCommand<Integer> command : mIntegerCommands) {
            try {
                Optional<Integer> result = command.run(mConnection);
                JSONObject intValues = new JSONObject();
                if (result.isPresent()) {
                    intValues.put("id",command.getPid());
                    intValues.put("value",result.get());
                    datasArray.put(intValues);
                }
            } catch (IOException | InterruptedException | JSONException e) {
                Log.w(
                        TAG,
                        String.format(
                                "unable to retrieve OBD2 pid %d due to exception: %s",
                                command.getPid(), e));
                // skip this entry
            }
        }

        for (LiveFrameCommand<Float> command : mFloatCommands) {
            try {
                Optional<Float> result = command.run(mConnection);
                JSONObject floatValues = new JSONObject();
                if (result.isPresent()) {
                    floatValues.put("id",command.getPid());
                    floatValues.put("value",result.get());
                    datasArray.put(floatValues);
                }
            } catch (IOException | InterruptedException | JSONException e) {
                Log.w(
                        TAG,
                        String.format(
                                "unable to retrieve OBD2 pid %d due to exception: %s",
                                command.getPid(), e));
                // skip this entry
            }
        }
        try {
            jsonObject.put("data",datasArray);
        } catch (JSONException e) {
            e.printStackTrace();
        }

        return jsonObject;
    }
}
bluetooth接続機能との統合
BluetoothConnection.java
OBD2アダプターをbluetoothデバイスとしてシリアルポートプロファイルで接続する部分です。BluetoothDeviceのmDeviceを接続したいOBD2アダプターのMAC アドレスで作成し(BluetoothAdapter.getDefaultAdapter().getRemoteDevice(String address))、BluetoothSocketのmSocketを、mDevice.createRfcommSocketToServiceRecord(SERIAL_PORT_PROFILE)メソッドで関連付け、mSocket.connect()で接続する、という流れですが、一般的にはこのconnect()が時間がかかり、その間、反応しないアプリになると良くないとされているので、接続する部分は別のスレッドになるようにしています。と言っても欲しい機能は、前回作ったアプリ(【Android】 PCとBluetooth接続し、PCに文字列を送信する)と同じなので、前述のObd2ConnectionのUnderlyingTransport インターフェースをimplementsして、Obd2Connectionから送受信等出来るようにしている所だけが変更点です。
public class BluetoothConnection implements Obd2Connection.UnderlyingTransport {
//public class BluetoothConnection {

    //    以下、前回のBluetoothConnection.javaと同じ
    ...

}
Bluetooth接続処理
Bluetooth接続はUIスレッドのSTART ボタンが押されたときに、ServiceをForegroundServiceでスタートさせ、BluetoothConnectionのconnect()を呼ぶことで接続し、接続に成功するとonBluetoothConnected()メソッドが呼ばれます。Bluetooth接続後の処理もUIスレッドとは別のスレッドで実行します。onBluetoothConnected()が呼ばれたらConnectedThreadを開始する(start()を呼ぶ)ようにしておきます。
前回はOutputStreamをBluetoothConnectionのgetOutputStreamと関連付けて文字列をwriteすることで送信しましたが、今回は、Obd2Connectionのインスタンスを生成するときに、BluetoothConnectionを引数にし、Obd2Connection経由で送信します。Obd2Connectionのコンストラクタが呼び出されると、ELM327を設定(runInitCommands())する処理が実行されます。
さらに、Obd2LiveFrameGeneratorをObd2Connectionを引数に生成し、Obd2LiveFrameGeneratorのgenerate()を呼び出すことで、JSONObjectとして応答を取得します。取得したデータはファイル名をTest.csvとして保存しておきます。Context#getFilesDir()を使いましたので、data/data/[package_name]/files/Test.csvとして保存されます。一行目はデータのラベル名として、timestamp(時刻)、取得できたPID、2行目以降は実際のデータで時系列で保存することにしました。
一通りのデータが取得出来たら(generate()が終了したら)、繰り返す、としていますので、データ取得周期は車からの応答速度に依存します。まずはこの仕様で試してみます。
また、UIスレッドのSTOPボタンを押すと、onActiveがfalseになり、while文を抜けるようにしています。
package com.example.myapplication;

import android.app.Notification;
import android.app.NotificationChannel;
import android.app.NotificationManager;
import android.app.PendingIntent;
import android.app.Service;
import android.content.Context;
import android.content.Intent;
import android.os.IBinder;
import android.util.Log;

import org.json.JSONArray;
import org.json.JSONException;
import org.json.JSONObject;

import java.io.File;
import java.io.FileWriter;
import java.io.IOException;

public class MyService extends Service implements BluetoothConnection.connectionInterface {

    private BluetoothConnection mBluetoothConnection;

    ConnectedThread thread;

    public IBinder onBind(Intent intent) {
        return null;
    }

    public int onStartCommand(Intent intent, int flags, int startId) {
        Log.d("MyService", "onStartCommand()");
        Log.d("MyService", "Thread name = " + Thread.currentThread().getName());

        int requestCode = intent.getIntExtra("REQUEST_CODE",0);
        Context context = getApplicationContext();
        String channelId = "default";
        String title = context.getString(R.string.app_name);

        if (android.os.Build.VERSION.SDK_INT >= android.os.Build.VERSION_CODES.O) {

            PendingIntent pendingIntent =
                    PendingIntent.getActivity(context, requestCode, intent, PendingIntent.FLAG_IMMUTABLE);

            NotificationManager notificationManager =
                    (NotificationManager) context.getSystemService(Context.NOTIFICATION_SERVICE);

            // Notification Channel 設定
            NotificationChannel channel = new NotificationChannel(
                    channelId, title, NotificationManager.IMPORTANCE_DEFAULT);

            if (notificationManager != null) {
                notificationManager.createNotificationChannel(channel);

                Notification notification = new Notification.Builder(context, channelId)
                        .setContentTitle(title)
                        // android標準アイコンから
                        .setSmallIcon(android.R.drawable.ic_media_play)
                        .setContentText("MediaPlay")
                        .setAutoCancel(true)
                        .setContentIntent(pendingIntent)
                        .setWhen(System.currentTimeMillis())
                        .build();

                // startForeground
                startForeground(1, notification);

            }
        }

        String address = intent.getStringExtra("BT_address");

        if(mBluetoothConnection == null){
                connectDevice(address);
        } else {
            mBluetoothConnection.close();
            mBluetoothConnection = null;
                connectDevice(address);
        }

        return START_NOT_STICKY;
    }
    @Override
    public void onDestroy(){
        thread.cancel();
    }

    private void connectDevice(String address){
        // Get the BluetoothDevice object
        Log.d("connectDevice ", "address = " + address);
        mBluetoothConnection = new BluetoothConnection(this, address);
        mBluetoothConnection.setConnectionListener(this);
        mBluetoothConnection.connect();
    }

    @Override
    public void onBluetoothConnected() {
        thread = new ConnectedThread();
        thread.start();
    }

    @Override
    public void onBluetoothConnectFailed() {
        Log.d(getClass().getSimpleName(), "onBluetoothConnectFailed");
    }

    private class ConnectedThread extends Thread {
        boolean onActive = true;
        Obd2Connection mObd2Connection;
        Obd2LiveFrameGenerator mObd2LiveFrameGenerator;

        public void run() {
            Log.d("ConnectedThread run", "Thread name = " + Thread.currentThread().getName());
            mObd2Connection = new Obd2Connection(mBluetoothConnection);
            try {
                mObd2LiveFrameGenerator = new Obd2LiveFrameGenerator(mObd2Connection);
                File myDataFile = new File(getApplicationContext().getFilesDir(), "test.csv");
                FileWriter myDataFileWriter = new FileWriter(myDataFile);
                boolean needTitle = true;
                while (onActive) {
                    JSONObject jsonObject = mObd2LiveFrameGenerator.generate();
                    Log.d("ConnectedThread run", "jsonObject = " + jsonObject.toString());

                    long timestamp = jsonObject.getLong("timestamp");
                    JSONArray datas = jsonObject.getJSONArray("data");

                    StringBuilder titles = new StringBuilder();
                    StringBuilder values = new StringBuilder();
                    titles.append("timestamp");
                    Date datetime = new Date(timestamp);
                    SimpleDateFormat sdf = new SimpleDateFormat("yyyy/MM/dd HH:mm:ss.SSS", Locale.JAPAN);
                    values.append(sdf.format(datetime));

                    if(datas.length() > 0){
                        for(int j = 0; j < datas.length(); j++){
                            JSONObject data = datas.getJSONObject(j);
                            titles.append(",").append(data.get("id"));
                            values.append(",").append(data.get("value"));
                        }

                        if(needTitle){
                            myDataFileWriter.write(titles + "\r\n");
                            needTitle = false;
                        }
                        myDataFileWriter.write(values + "\r\n");
                    }
                }
                myDataFileWriter.close();

            } catch (IOException | InterruptedException | JSONException e) {
                e.printStackTrace();
                onActive = false;
                Log.d(getClass().getSimpleName(), "onBluetoothDisconnected");
                e.printStackTrace();
            }
            //  正常終了時   異常時はonBluetoothDisconnected()の方が早い→mBluetoothConnection = nullの可能性もあり
            if (mBluetoothConnection != null) {
                mBluetoothConnection.close();
                Log.d("ConnectedThread", "mBluetoothConnection.close()");
                mBluetoothConnection = null;
            }

            Log.d("ConnectedThread", "end");
        }
        public void cancel(){
            onActive = false;
            Log.d("ConnectedThread", "cancel");
        }
    }
統合後の構成
統合後のファイル構成は以下のようになりました。

動作確認
PCでの確認
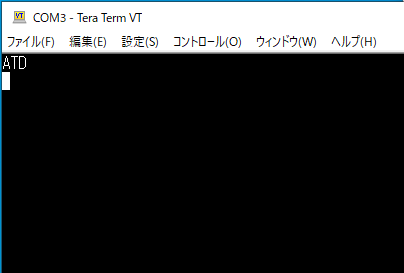
車での動作確認をする前に、PCを相手に通信接続、コマンド送信が出来ているか、確認します(※Teratermの設定は前回の記事と同じです)。
アプリのオプションメニュー →「Connect a device」→ 受信側のPCを選択
をすると、一度最初の画面に戻るので、STARTボタン押します。
Teratermの画面に「ATD」と表示されていれば、接続と、Obd2Connectionのインスタンスの生成、コンストラクタにあるELM327の設定まではたどり着いています。
Teratermのコンソールから>を入力するとObd2ConnectionのString[] initCommandsの内容が次々に送信されてきます。 "ATZ", "AT E0", "AT L0", "AT S0", "AT H0", "AT SP 0"まで順番に送信されてくるので、同じく>を入力すると、次はObd2LiveFrameGeneratorのインスタンスが生成され、Support PIDの確認に進みます。
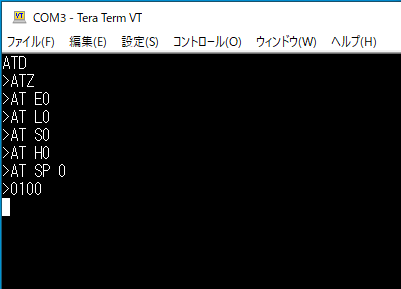
"0100"が送信されてくるので、「OBD-II PIDs」にならって、4100BE1FA813 と打ち込みます。

Android Studio の Logcatもしくは、debugのコンソール画面に
I/Obd2LiveFrameGenerator: connectionPids = [32, 1, 3, 4, 5, 6, 7, 12, 13, 14, 15, 16, 17, 19, 21, 28, 31]
apiIntegerPids=[3, 5, 10, 92, 12, 13, 31]
apiFloatPids = [17, 4, 70, 6, 7, 8, 9, 47]
mIntegerCommands = [com.example.myapplication.Obd2Command$LiveFrameCommand@f687555, ...(以下、省略)
mFloatCommands = [com.example.myapplication.Obd2Command$LiveFrameCommand@48811d1, ...(以下、省略)
と表示されました。connectionPidsに出てきている数字は、「OBD-II PIDs」の
So, supported PIDs are: 01, 03, 04, 05, 06, 07, 0C, 0D, 0E, 0F, 10, 11, 13, 15, 1C, 1F and 20
と一部順番が違いますが一致しています。connectionPidsは10進、こっちは16進ですね。
次のapiIntegerPidsとapiFloatPidsはcommandsに用意されているPIDのうち、戻り値がInteger扱いのPID、Float扱いのPIDがそれぞれ表示されています。
apiIntegerPids=[3, 5, 10, 92, 12, 13, 31]	→ 16進で 03, 05, 0A, 5C, 0C, 0D, 1F
apiFloatPids = [17, 4, 70, 6, 7, 8, 9, 47]	→ 同じく 11, 04, 46, 06, 07, 08, 09, 2F
mIntegerCommands、mFloatCommands はapiIntegerPidsとapiFloatPidsに含まれるPIDのうち、サポートされているPIDのListになっているはずです。ところが、オリジナルのコードではLogの出力にハッシュ値が出力されていて、ちゃんと動いているかわからないでObd2CommandクラスにtoStringメソッドをオーバーライドして
    @Override
    public String toString(){
        return Integer.toString(mSemanticHandler.getPid());
    }
を追加すると、
mIntegerCommands = [3, 5, 12, 13, 31]
mFloatCommands = [17, 4, 6, 7]
となって、supported PIDs に含まれるPIDだけがちゃんと抽出されているのが確認できました。
TeraTermのコンソール上に0103が最後に表示されていますが、mIntegerCommands、mFloatCommandsの順でそれぞれの配列に含まれるPIDの取得要求を出していくことになっているので、その最初のPIDが03、このPIDの現在の値を要求するコマンドは01 03なのでそれが出力されているということで、そこまでは予定通りに動いていることが確認できました。
車での確認
PCを使っての動作確認が出来ましたので、次は実際に車で確認します。
機材等
- 技適マーク付与されているOBD2アダプターとして「CARISTA OBD2 アダプタ」を使用
- トヨタ ヴォクシー(ZRR70)
車の故障診断コネクターにOBD2アダプターを取り付け、エンジンを始動します。次に、スマホのBleutooth設定画面から、OBD2アダプターをペア設定し、接続します。スマホアプリを起動し、オプションメニュー →「Connect a device」→ ペア設定したOBD2アダプターを選択、STARTボタンを押します。正常に動作していると、画面の左上にForegroundServiceで使用されるNotificationで設定したアイコンが表示されます。
しばらく待って、STOPボタンを押し、Android Studioが作動しているPCに接続していない場合は接続し、Android Studioの右下にある「Device File Explorer」から
data/data/[package_name]/filesを開くと、Test.csvが出来ていました。

右クリックでメニューが出て、「Save As...」でデスクトップ等に保存して内容を確認すると、先程のサポートされているPIDの値が計測開始からの時間と一緒に保存されていました。一行目は、項目名です。PIDの数字だけではわかりにくいですが、そこは別途考えましょう。
PID 12(10進)はEngine speed(エンジン回転数、RPM)、5はEngine coolant temperature(エンジン冷却水温度)ですので、グラフにしてみるとエンジン始動直後のエンジン回転数の動き、エンジン冷却水温度が少しずつ上昇していく様子が分かりました。

※本記事は車のOBD(故障診断)コネクターへのOBD2アダプター装着を推奨したり、安全を保証するものではありません。取扱説明書等で装着を認めていない車もあります。
使い方
今回のような車のデータを取るアプリで何が分かるか調べた結果を別途まとめました。
参考にした記事等