Lチカ。
Lチカができれば、その先になにか見える。ハードウェア版のhello world。
Picoの場合、オンボードLED(GP25)があるので、敷居が低すぎる、とも言える。

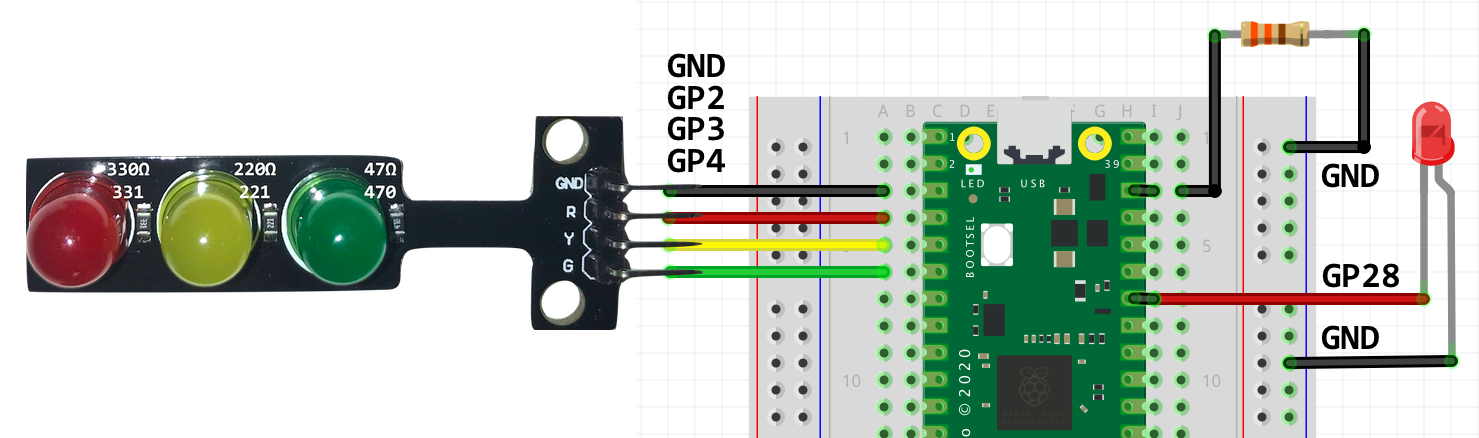
配線
信号機の3色と青色LEDを追加で配線しました。信号機のは、電流制限抵抗がついているので、ジャンパー線不要で便利。青色は、330Ωの抵抗を付けています。

MicroPythonのファームウェアを焼く
ラズパイ財団公式ページに従って、MicroPythonのファームウェアを焼きます。
-
BOOTSEL(boot select)ボタンを押しながら、USB接続。 マスストレージデバイスとして起動してRPI-RP2というUSBドライブとしてマウントされます。
-
ドライブの中のINDEX.HTMをクリック、公式ページへジャンプ。 もう一つ、INFO_UF2.TXTというファイルが見えます。
-
公式ページにある、MicroPythonのファームウェア最新版をダウンロード。https://micropython.org/download/rp2-pico/rp2-pico-latest.uf2
-
ファイルをドラッグ&ドロップでPRI-RP2ドライブに放り込んで書き込み。 micro:bitやmbedボードなどと同じ。
-
Picoが再起動、アンマウントされて、今度はシリアル通信モードで起動します。
ファームウェアをコマンドラインで焼く
RP2用MicroPythonの公式ダウンロードページ
https://micropython.org/download/rp2-pico/
最新版へのリダイレクト用リンク(実際のファイル名は違うので注意。)
https://micropython.org/download/rp2-pico/rp2-pico-latest.uf2
既にMicroPythonが動いているなら、ブートローダーをREPLから起動することもできる。マウントされているので、コピーコマンドで入れることもできる。
REPLで、
import machine
machine.bootloader()
REPLが終了する。親機のコマンドラインで、
wget https://micropython.org/download/rp2-pico/rp2-pico-latest.uf2

実際のファイル名はrp2-pico-2021xxxx-vx.xx.uf2形式。

macOSの場合:
cp rp2-pico-2021xxxx-vx.xx.uf2 /Volumes/RPI-RP2/

ラズパイの場合:
cp rp2-pico-2021xxxx-vx.xx.uf2 /media/pi/RPI-RP2
v1.14
https://micropython.org/resources/firmware/rp2-pico-20210202-v1.14.uf2
ファーストリリースはv1.13(置き場所は、ラズパイ財団のサーバー)
pico_micropython_20210121.uf2
発売時は、ラズパイ財団のリポジトリからリリースされましたが、今後は、MicroPython側のダウンロードページが「正」になります。[今後は、ラズパイ公式、いろいろな場所からMicroPython公式にリンクを貼るね、というGitHub.comでのやりとり。]
(https://github.com/micropython/micropython/pull/6791#issuecomment-772095360)
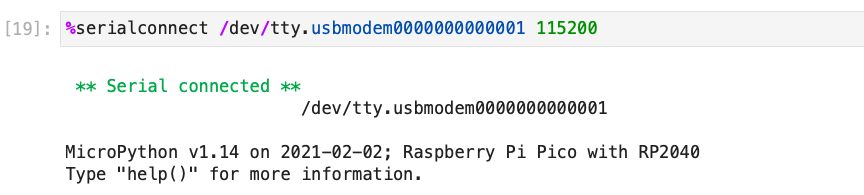
USBシリアル接続
まずは、サクッとターミナルで
macOSの場合:screenコマンド / iTerm2
# ポートを探します。
ls /dev/tty.*

# 接続します。
screen /dev/tty.usbmodem0000000000001 115200

>>>
接続完了。
抜けるときは、ctrl-a, k, yで。(よく忘れる)
ラズパイの場合:minicomコマンド / LXTerminal
(私の手元では、MacからラズパイにSSH接続、その先にPicoがいます。)
# minicomのインストール
sudo apt install minicom

# ポートを探します。
ls /dev/tty*

# 接続!
minicom -b 115200 -o -D /dev/ttyACM0
minicom へようこそ 2.7.1

オプション: I18n
コンパイルされた日時は:  Aug 13 2017, 15:25:34.
ポート /dev/ttyACM0, 11:48:15

CTRL-A Z を押すと、説明画面になります。
接続完了。エンターキーを押すと、プロンプト >>> が出ます。
抜けるときは、ctrl-a, x, 「はい」
ヘルプ/ウエルカム画面
プロンプト >>> に、help()と入力すると、ヘルプ/ウエルカム画面。
>>> help()
Welcome to MicroPython!

For online help please visit https://micropython.org/help/.

For access to the hardware use the 'machine' module.  RP2 specific commands
are in the 'rp2' module.

Quick overview of some objects:
  machine.Pin(pin) -- get a pin, eg machine.Pin(0)
  machine.Pin(pin, m, [p]) -- get a pin and configure it for IO mode m, pull mode p
    methods: init(..), value([v]), high(), low(), irq(handler)
  machine.ADC(pin) -- make an analog object from a pin
    methods: read_u16()
  machine.PWM(pin) -- make a PWM object from a pin
    methods: deinit(), freq([f]), duty_u16([d]), duty_ns([d])
  machine.I2C(id) -- create an I2C object (id=0,1)
    methods: readfrom(addr, buf, stop=True), writeto(addr, buf, stop=True)
             readfrom_mem(addr, memaddr, arg), writeto_mem(addr, memaddr, arg)
  machine.SPI(id, baudrate=1000000) -- create an SPI object (id=0,1)
    methods: read(nbytes, write=0x00), write(buf), write_readinto(wr_buf, rd_buf)
  machine.Timer(freq, callback) -- create a software timer object
    eg: machine.Timer(freq=1, callback=lambda t:print(t))

Pins are numbered 0-29, and 26-29 have ADC capabilities
Pin IO modes are: Pin.IN, Pin.OUT, Pin.ALT
Pin pull modes are: Pin.PULL_UP, Pin.PULL_DOWN

Useful control commands:
  CTRL-C -- interrupt a running program
  CTRL-D -- on a blank line, do a soft reset of the board
  CTRL-E -- on a blank line, enter paste mode

For further help on a specific object, type help(obj)
For a list of available modules, type help('modules')
>>>
いよいよ、Lチカ。
オンボードの黄緑LEDを点灯します。
import machine
led1 = machine.Pin(25, machine.Pin.OUT)
led1.high()
続けて、消灯。
led1.low()
あるいは、
led1.value(0)
led1.off()
Pin.on()、Pin.off()は、v1.13では、実装されていませんでしたが、v1.14で入りました。
(REPL初心者向け)上下矢印キーを活用しましょう。コマンドラインの履歴を利用できます。
トグル動作。今の点灯状態の反対になります。
led1.toggle()
連続で点滅するコードとペーストモード
まとめて一気にコピペできますが、ctrl-eのペーストモードでやらないとインデントがズレズレに。最後にctrl-dで通常モードに抜けると実行されます。
無限ループなので、止めたいときは、ctrl-cで。
from time import sleep
import machine
led1 = machine.Pin(25, machine.Pin.OUT)
while True:
    led1.on()
    sleep(0.125)
    led1.off()
    sleep(0.375)
複数行のサポートが無いのは、ちょっぴり残念
コマンドラインの履歴を利用できるのが、REPLが良いところのひとつですが、残念ながらペーストモードでの入力は再利用できません。
CTRL-A -- on a blank line, enter raw REPL mode
CTRL-B -- on a blank line, enter normal REPL mode
ESP32にはある、ctrl-A, ctrl-Bが実装されていないのですね。
ですが、これは、Jupyterで接続することでカバーできるので、深く追求しません。
v1.14では、raw REPLモードが改善しているらしいけど。。ないのだ。
v1.13

v1.14
点滅をJupyterで。

信号機LED、青色LEDも使ったサンプル。
from time import sleep_ms
import machine

led1 = machine.Pin(25, machine.Pin.OUT)
led_r = machine.Pin(2, machine.Pin.OUT)
led_y = machine.Pin(3, machine.Pin.OUT)
led_g = machine.Pin(4, machine.Pin.OUT)
led_blue = machine.Pin(28, machine.Pin.OUT)

led1.on()
for _ in range(5):
    led_g.on()
    sleep_ms(6000)
    led_g.off()
    led_y.on()
    sleep_ms(600)
    led_y.off()
    led_r.on()
    sleep_ms(3000)
    led_r.off()
    led_blue.toggle()
led1.off()
led_blue.off()
参考
Pinクラス情報(v1.14)
object <class 'Pin'> is of type type
  init -- <function>
  value -- <function>
  low -- <function>
  high -- <function>
  off -- <function>
  on -- <function>
  toggle -- <function>
  irq -- <function>
  IN -- 0
  OUT -- 1
  OPEN_DRAIN -- 2
  ALT -- 3
  PULL_UP -- 1
  PULL_DOWN -- 2
  IRQ_RISING -- 8
  IRQ_FALLING -- 4
(参考)USBドライブとしてマウントされたときのファイル
INDEX.HTMの中身
(ダブルクリックで公式ページをブラウザで開く。)
ランディングページのURLは、https://www.raspberrypi.org/documentation/pico/getting-started/
<html><head>
<meta http-equiv="refresh" content="0;URL='https://raspberrypi.com/device/RP2?version=E0C912D24340'"/></head>
<body>Redirecting to <a href='https://raspberrypi.com/device/RP2?version=E0C912D24340'>raspberrypi.com</a>
</body></html>
INFO_UF2.TXTの中身
(ブートローダーバージョン、モデル名、ボードID)
UF2 Bootloader v1.0
Model: Raspberry Pi RP2
Board-ID: RPI-RP2
次は、Jupiter Notebookで、接続。便利です。
PicoとMicroPythonではじめるフィジカルコンピューティング、初学者、小中学生から80歳まで、オススメ。ラズパイも良いけどPicoだと、Mac/PCでも入門でき、応用編まで連続的にいける。
過去記事
「Raspberry Pi Pico 登場! RP2040関連リソースまとめ」
https://qiita.com/naohiro2g/items/c9f0b0d4485db7e776e3
「MicroPython開発環境(紹介編)」
https://qiita.com/naohiro2g/items/b6aee1833509b2e21d68
「ラズパイPicoでLチカ(1)届いた。RP2とMicroPythonの話し。」
https://qiita.com/naohiro2g/items/2524242c35918db72311