シリアル通信
IoT開発において以下のユースケースなど、ArduinoなどのデバイスをPCと連携させたいパターンは多いと思います。
- PCからデバイスの設定値を上書きする
- デバイスで取得された値をPCに送信する
その際、最もお手軽な方法がシリアル通信ではないでしょうか
Arduinoの標準機能でもありますし、大体のPCのOSでサポートされている機能だと思います。
しかし、物理的なケーブルでPCとデバイスをつないでいるとデバイスの配置などが制限されてしまう場合があります。デバイスのユースケースにおいてはPCとの接続を無線で行いたい場合も多いでしょう。
Bluetoothでの無線の利便性とシリアル通信の手軽さの両方の恩恵に預かれるのが、 Bluetoothの SPP (Serial Port Protocol) という規格です。
SPP (Serial Port Protocol)
SPPとは、Bluetoothのプロファイルのひとつで、Bluetooth搭載機器を仮想のシリアルポート化するためのプロファイルのこと。
シリアル通信をBluetoothで行うための規格がすでに決められています。
PC側では仮想のシリアルポートとして利用するため、シリアルポート経由で行う体でプログラミングすればよく、有線の場合/無線の場合といった考慮が不要になるのが大きなメリットになります。
BluetoothSerial
ESP32のライブラリの1つであり、SPPをデバイスに実装するためのライブラリです。
ライセンスは Apache License, Version 2.0 のようです。
// Copyright 2018 Evandro Luis Copercini
//
// Licensed under the Apache License, Version 2.0 (the "License");
// you may not use this file except in compliance with the License.
// You may obtain a copy of the License at

//     http://www.apache.org/licenses/LICENSE-2.0
//
// Unless required by applicable law or agreed to in writing, software
// distributed under the License is distributed on an "AS IS" BASIS,
// WITHOUT WARRANTIES OR CONDITIONS OF ANY KIND, either express or implied.
// See the License for the specific language governing permissions and
// limitations under the License.
使い方
Arduinoの開発環境に上記 BluetoothSerial を追加し(最初から入っているかも)、以下のように実装します。
# include <M5StickC.h>
# include "BluetoothSerial.h"

BluetoothSerial SerialBT;

void setup() {
  Serial.begin(115200);  // 一応Serialを初期化
  SerialBT.begin("ESP32");
}

void loop() {
  SerialBT.println("Hello World");
  delay(1000);
}
次に、PCに BluetoothSerial のデバイスを覚えさせるためPCとペアリングする必要があります。
デバイスを起動した状態で、各OSの設定メニューからペアリングを行なってください。
上記の実装例の場合ですと ESP32 と表示されるはずです。SerialBT.begin() に渡した文字列で検出されます。
!!もしプログラムを書き込めなくなったら!!
Timed out waiting for packet header などのメッセージで新たにプログラムを書き込めなくなった場合はG0とGNDをジャンパピンなどで繋いで強制書き込みモードにして試してみてください。
最後にPC側の実装です。ここでの実装は C# で行います。
using System.IO.Ports;

const string comPort = "COM7"; // ポート番号は自分で確認してください
const int baudRate = 115200;

public static void Main(string[] args) {
  var serial = new SerialPort(comPort, baudRate);
  serial.Open();
  while (true) {
    string message = serial.ReadLine();
    Console.WriteLine(message); // Hello World
  }
}
動作確認していないコードですが、雰囲気こんな感じです。詳しくはこちらなどをご参照ください
何番のポートに BluetoothSerial の仮想ポートが割り振られているかを事前に知っておく必要があります。Windowsであればデバイスマネージャで確認したりできますが、ArudinoIDEのシリアルモニタで実際につなげてみたりして確認するのが確実でしょう。
また、デバイス側では特にボードレートを設定していませんでしたが、PC側ではよくある値として 115200 を設定しています。もしかしたらなんでも良いのかもしれません。
応用例
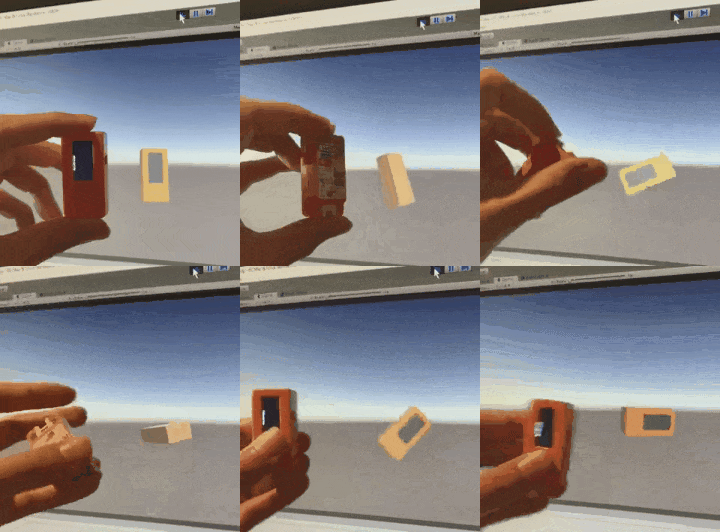
2000円で買える IMU x Bluetooth デバイスである M5StickC を使って無線でIMUのデータをPCに送る開発をしました。

クライアントPC側はUnityで実装しており、無線ジャイロコントローラ的な用途に使えます。
BluetoothSerial で仮想のシリアルポートを使っていれば、Windowsネイティブの処理を呼ばなくてもBluetoothでの送受信が書けるので、Unity Editorでも動作する点が特に助かりました。![]()
参考記事
-
パソコン上のM5Stackの3Dモデルを、M5Stackの動きに合わせて動かす
-
BluetoothSerialを知るきっかけになりました
-
-
UnityとArduinoをシリアル通信
- Unityでのシリアル通信の参考にさせてもらいました