はじめに
たまによく見るapiリクエスト時にレスポンスがエラーだったときのトースト通知を、axios interceptorsとreact-toastifyで実装します。
axios interceptorsを使うことでapiリクエストのエラーハンドリングを共通化出来るので、apiの呼出都度エラー処理のコーディングが不要になって便利です。
axios interceptorsについて
apiリクエスト/レスポンス時に処理を追加できるaxiosの機能です。
メリット
- 一度設定すれば、すべてのaxiosリクエストに対して自動的に適用できる
- 複数のinterceptorを設定して順番に実行させることもできる
axiosの日本語docsにサンプルコードあります👇️
https://axios-http.com/ja/docs/interceptors
実装サンプル
axios interceptorsとreact-toastifyを利用して、APIリクエストがエラーで返ってきた際にトースト通知を表示するサンプルを実装します。
1. パッケージインストール
npm install axios react-toastify
2. react-toastifyの設定
アプリケーションのルートコンポーネント(例:App.jsx)で、ToastContainerを設定します。
tailwindcss等使っているとデフォルトのcssが適用されないのでcssファイルもインポートします(3行目)。
2行目のSlideもアニメーションを付けるためにimport必要です。
import React from 'react';
import { ToastContainer, Slide } from 'react-toastify';
import 'react-toastify/dist/ReactToastify.css';

function App() {
  return (
    <div>
      <ToastContainer
        position="bottom-right"
        autoClose={5000}
        hideProgressBar
        newestOnTop={false}
        closeOnClick
        rtl={false}
        pauseOnFocusLoss
        draggable
        pauseOnHover
        theme="colored"
        transition= {Slide}
        />
      {/* アプリケーションの他のコンポーネント */}
      <ExampleComponent />
    </div>
  );
}

export default App;
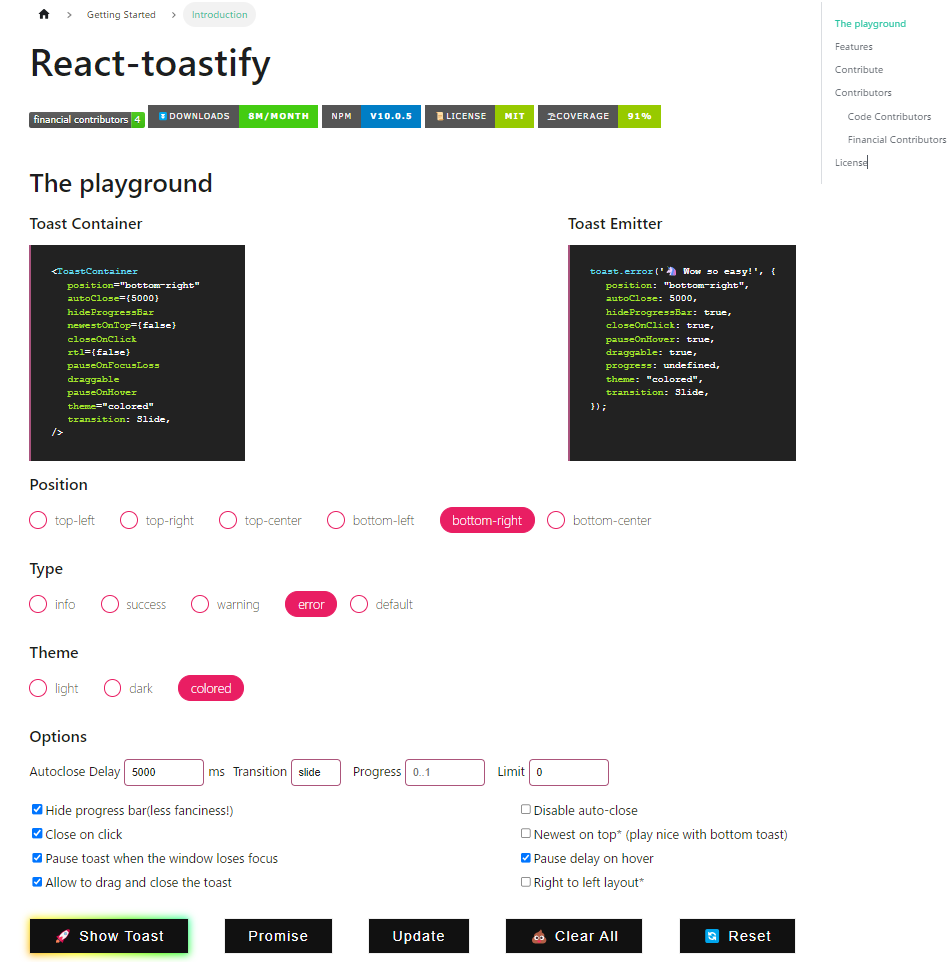
ちなみに、トースト通知のデザインはreact toastifyのデモページで細かく設定したものをコピペすることで簡単に実装できます。
https://fkhadra.github.io/react-toastify/introduction/

👆Toast Containerの方をコピペで持ってくればOK。
ただし、transition: Slideではなくtransition={Slide}が正解(恐らく公式のミス)
3. axios interceptorsの設定ファイル作成
src/api/axiosInstance.js ファイルを作成し、その中でaxiosインスタンスを作成し、レスポンス用のインターセプターを設定します。
*ファイル名とパスはインポートできる場所なら任意でOK
import axios from 'axios';
import { toast } from 'react-toastify';

const axiosInstance = axios.create({
  baseURL: 'https://api.example.com', // APIのベースURLを指定
});

// リクエストインターセプター
// 認証トークンの追加などの設定があればここで行う
// 例として書いてますが今回は不要なのでコメントアウトしてます
//axiosInstance.interceptors.request.use(
//  config => {
//    const token = localStorage.getItem('authToken');
//    if (token) {
//      config.headers.Authorization = `Bearer ${token}`;
//    }
//    return config;
//  },
//  error => {
//    return Promise.reject(error);
//  }
//);

// レスポンスインターセプター
const responseInterceptor = axiosClient.interceptors.response.use(
  (response) => {
    return response; //エラーなしなら何もしない
  },
  (error) => {
    switch (error.response?.status) {
      case 500:
      // エラー発生時のトースト通知
        toast.error("APIリクエストに失敗しました");
      case 400:
      // それぞれのステータスコードに沿ったトースト通知を定義(省略)
        break;
      default:
        break;
    }
    return Promise.reject(error);
  }
);

export default axiosInstance;
4. コンポーネントでの利用
3.で作成したaxiosInstanceを使ってAPIリクエストを送信します。
//ExampleComponent.jsx
import React, { useState } from 'react';
import axiosInstance from '../api/axiosInstance'; //3.で作ったファイルをインポート

const ExampleComponent = () => {
  const [data, setData] = useState(null);

  const fetchData = async () => {
    try {
-      const response = await axios.get('/data-endpoint'); //元のaxiosは使わない
+      const response = await axiosInstance.get('/data-endpoint'); //importしたaxiosInstanceを使う
      setData(response.data);
    }
    //catch (error) {
      // エラーはaxiosInstance内でトースト通知されるので、catch句は定義不要
    //}
  };

  return (
    <div>
        <button onClick={fetchData}>データを取得</button>
        {data && <div>{JSON.stringify(data)}</div>}
    </div>
  );
};

export default ExampleComponent;
これにより
実装したコンポーネントをルートコンポーネント内に配置されていれば、コンポーネント内のapiリクエストがエラー(今回は500エラー)の場合にトースト通知されます。

おわりに
プロダクトで使う場合は通知する文章に気をつけましょう
細かく書きすぎちゃうとめんどくさいユーザーから問い合わせが来るのでシンプルで良いのかなぁと。。
