今回のゴール
チーム開発に必要な API 仕様をコードと乖離せずメンテナンスしていくフローの検討です。
rails で API を作る場合、controller にメソッドを定義してルーティング設定するだけで簡単にできますが、
チーム開発等ではフロントエンジニアにソースを確認してもらうのは現実的ではないため、その API の仕様をドキュメントで共有するかと思います。
方法としては swagger.yaml を書いて swagger ui で確認するというのがあります。
ただし swagger の書き方は若干慣れが必要ですし、API が修正されると実態とずれてしまうリスクがあります。
そこで rswag という rails で spec をかけばそれをもとに swagger.yaml を生成してくれる gem を使えば問題が解決するのではと考えました。
ここではその手順を記録していきます。
rspec とは
rails用のテストライブラリです。
letを使って差分のみのテストパターンを簡単に作成できます。
rswag とは
rspec を拡張して、swagger.yml を生成するテストコードを作成できるようになります。
swagger, swagger ui とは
OpenAPIという仕様に沿ってAPIをドキュメント化する規約とツール類です。
swagger ui は swagger.yml からAPIドキュメントを閲覧、テスト実行できるWebページを用意してくれます。
今回の環境
macOS Monterey
Docker Desktop 4.2.0 (70708)
以下Docker内環境
ruby 3.0.2p107 (2021-07-07 revision 0db68f0233) [x86_64-linux]
Rails 6.1.4.1
検証用 rails プロジェクト作成
下記ページを参考に作成ください。
https://qiita.com/nakazawaken1/items/f442e8c25f3025f8147f
API 作成
コントローラファイルを作成します。
module Api
module V1
class TodosController < ApplicationController
def index
todos = [
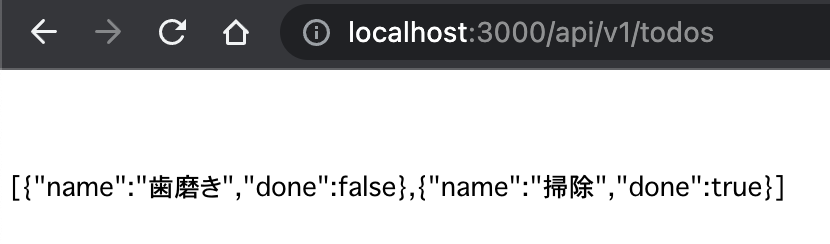
{name: '歯磨き', done: false},
{name: '掃除', done: true},
]
render json: todos
end
end
end
end
ルーティングファイルに作成したコントローラのルートを設定します。
Rails.application.routes.draw do
  namespace :api do
    namespace :v1 do
      resources :todos, only: [:index]
    end
  end
end
ブラウザで http://localhost:3000/api/v1/todos にアクセスしてレスポンスを確認します。
rswag インストール
Gemfile 末尾に以下を追加して bundle install を実行します。
gem 'rswag-api'
gem 'rswag-ui'

group :test do
  gem 'rspec-rails'
  gem 'rswag-specs'
end
bundle install
rswag をインストールします。
bundle exec rails g rswag:api:install
bundle exec rails g rswag:ui:install
bundle exec rails generate rspec:install
RAILS_ENV=test bundle exec rails g rswag:specs:install
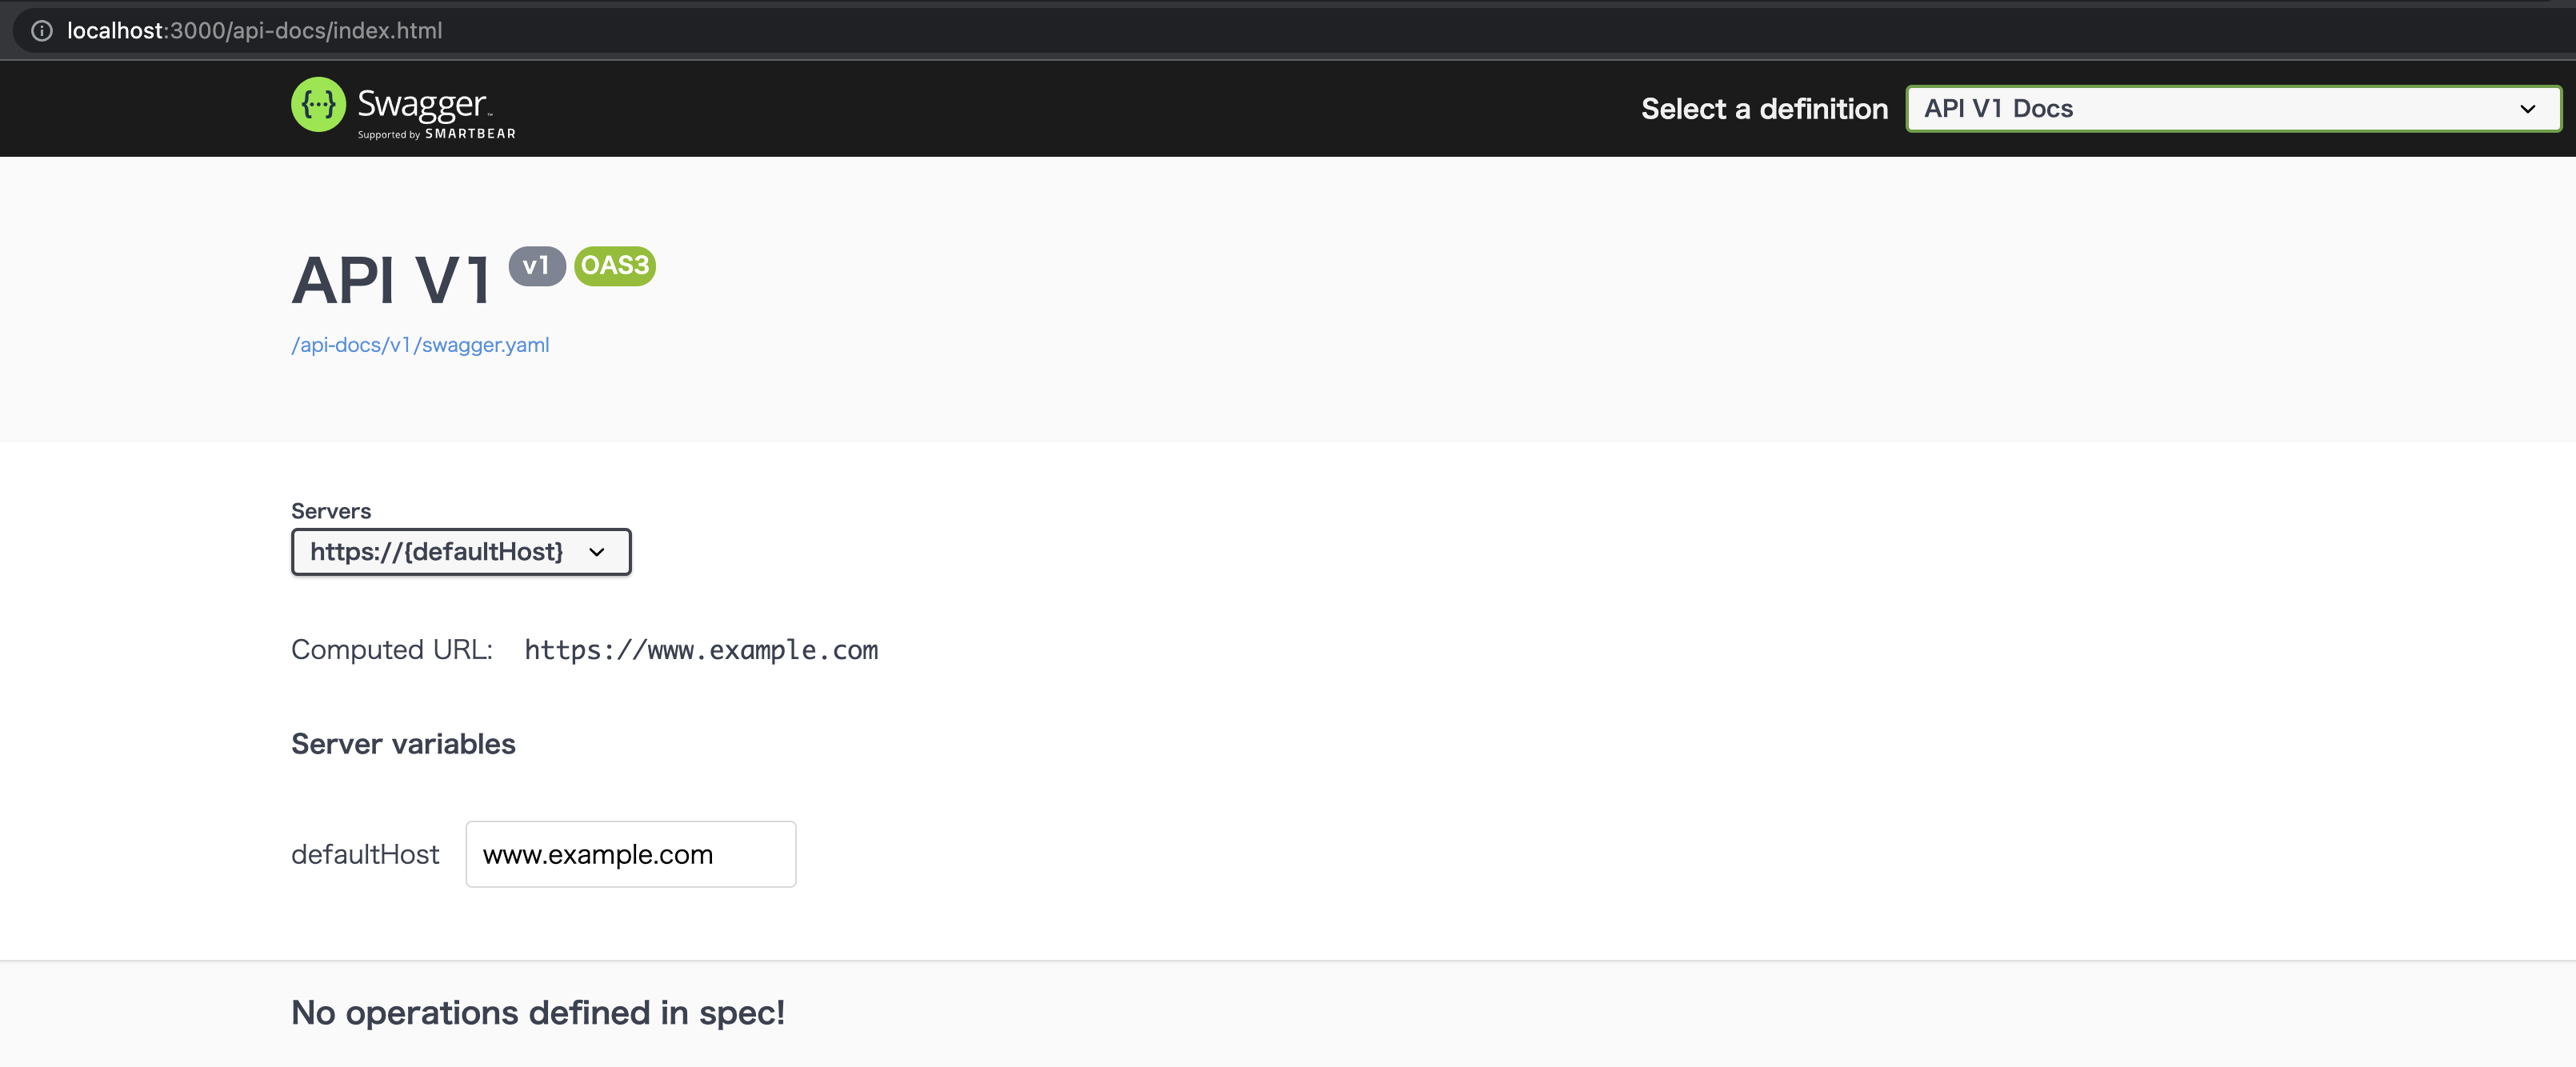
swagger ui 確認
swagger.yml を生成します。
RAILS_ENV=test rake rswag:specs:swaggerize
http://localhost:3000/api-docs/ にアクセスします。
以下のように APIを見る画面が表示されます。
spec 作成
先ほど作った api の spec ファイルを作成します。
require 'swagger_helper'

RSpec.describe 'api/v1/todos', type: :request do

  path '/api/v1/todos' do

    get 'get todo list' do
      consumes 'application/json'
      produces 'application/json'
      response 200, 'todo list' do
        schema type: :array, items: {
          type: :object,
          properties: {
            name: { type: :string },
            done: { type: :boolean },
          },
          required: [:name, :done]
        }
        run_test!
      end
    end
  end
end
rspec 実行
rspec
1 example, 0 failures となれば成功です。
swagger.yml 生成
swagger ui 上で実行できるように swagger_helper.rb ファイルを編集します。
修正前
      servers: [
        {
          url: 'https://{defaultHost}',
          variables: {
            defaultHost: {
              default: 'www.example.com'
            }
          }
        }
      ]
修正後
      servers: [
        {
          url: 'http://localhost:3000'
        }
      ]
生成コマンドを実行します。
RAILS_ENV=test rake rswag:specs:swaggerize
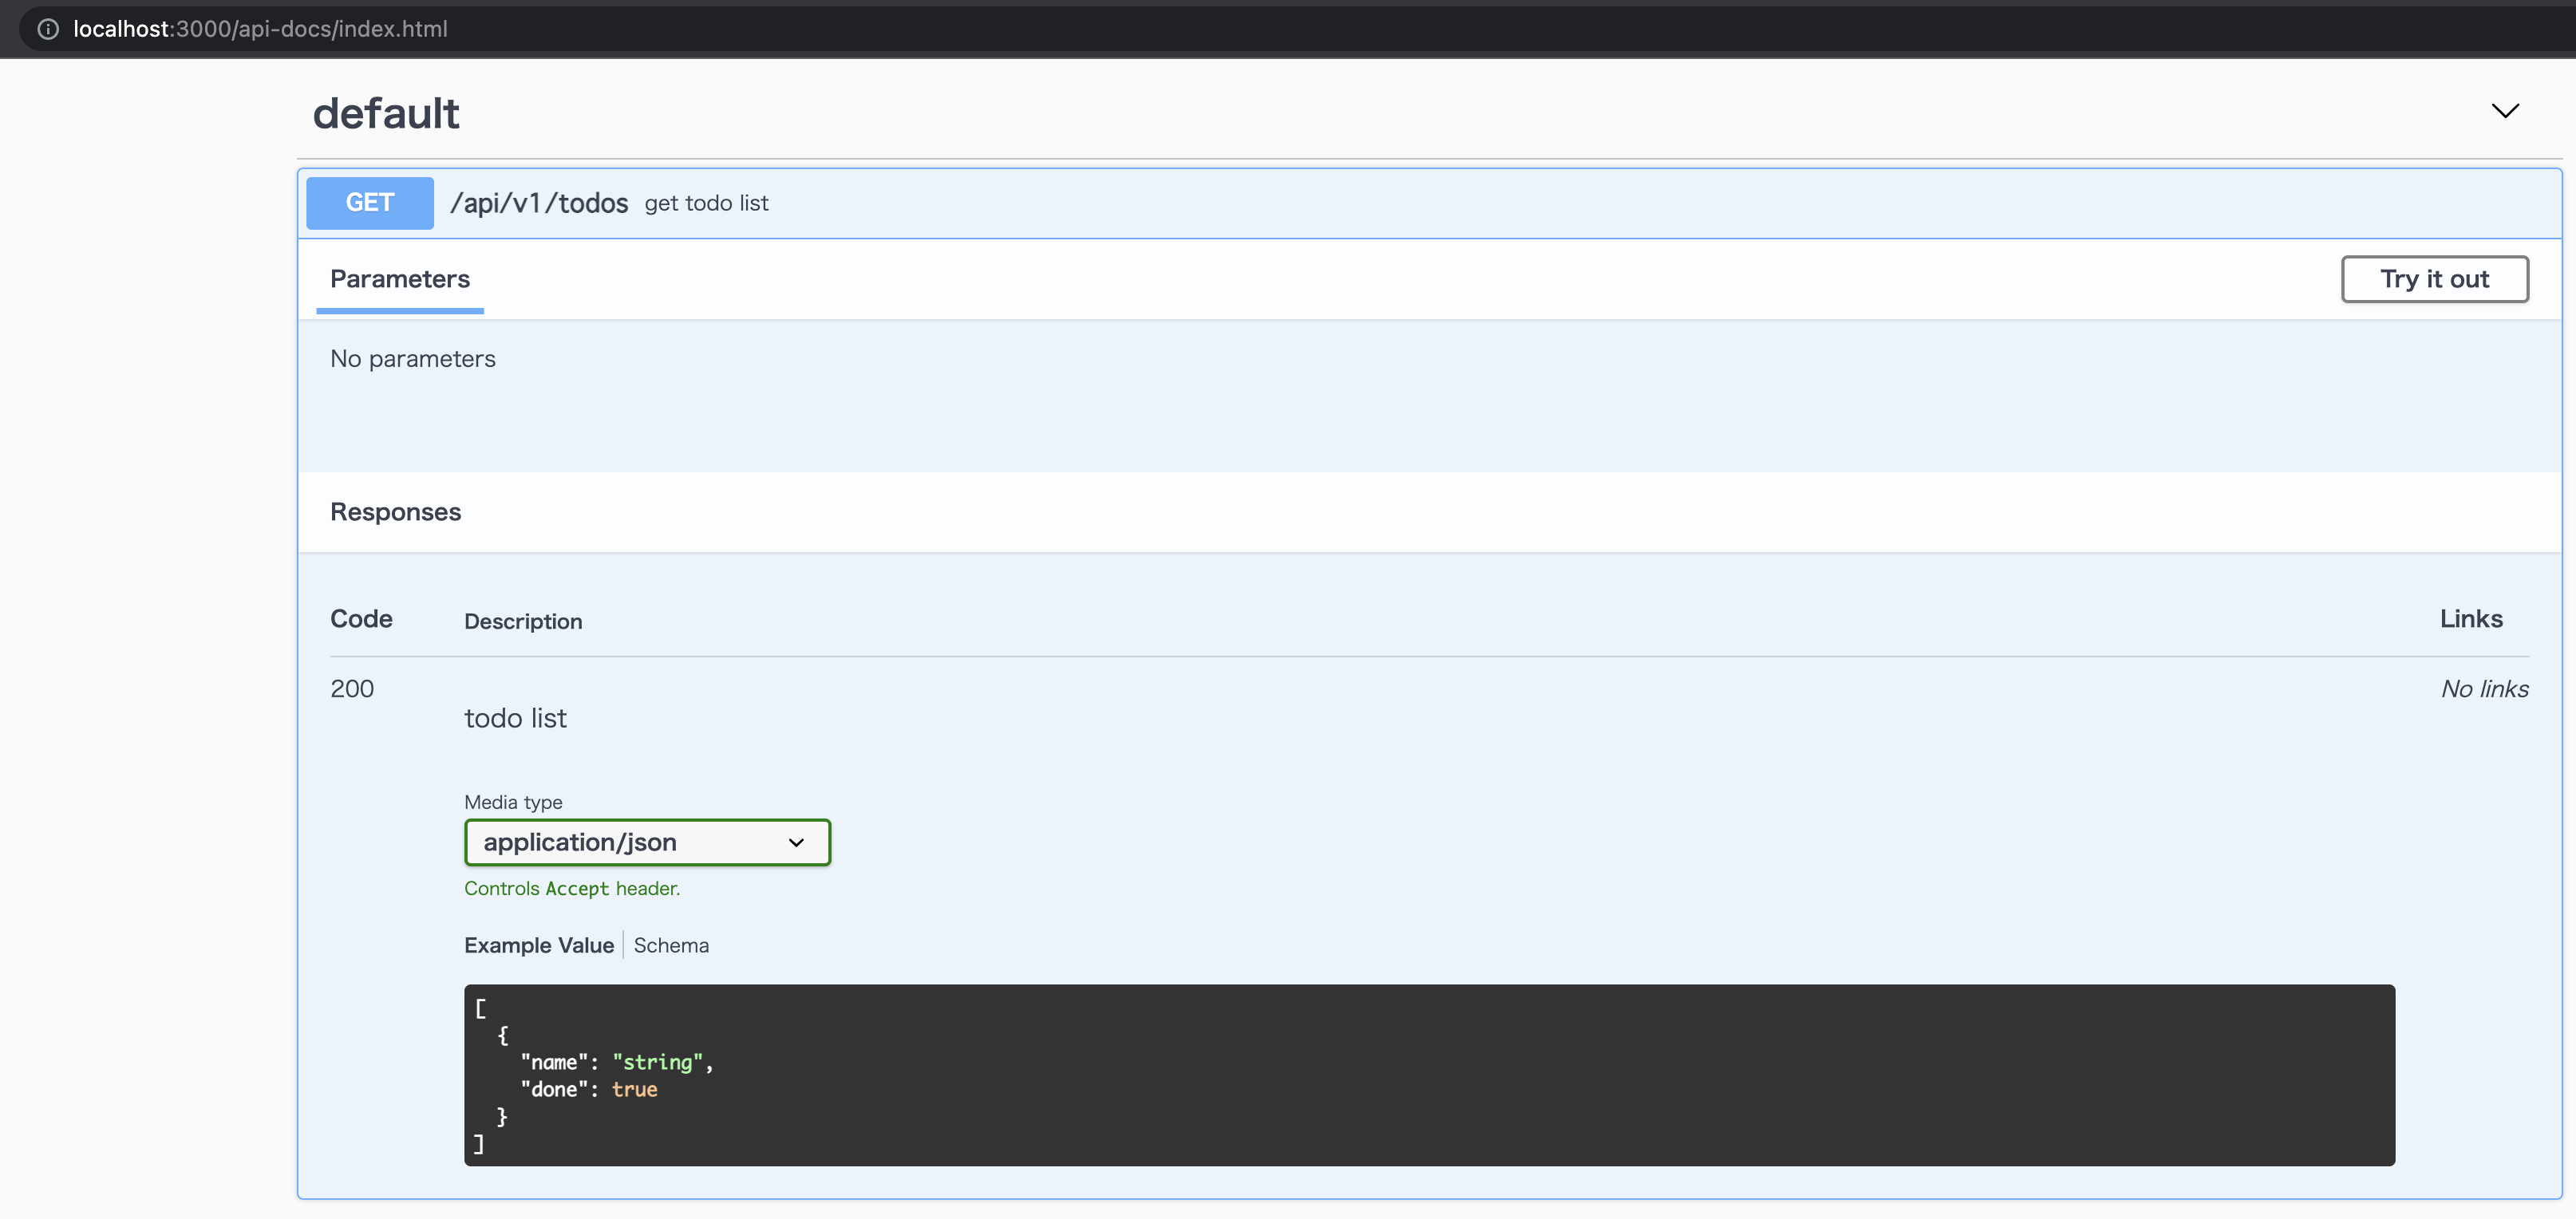
swagger ui の確認
rspec から ドキュメントが生成されているのを確認できます。
認証の追加
ヘッダのトークン(今回は abcdefg123456 固定とします)をチェックする簡易的な認証を application_controller.rb に仕込みます。
class ApplicationController < ActionController::API
  before_action :authenticated?

  def authenticated?
    if request.headers[:Authorization] != 'Barer abcdefg123456'
      render status: 401, json: { error: 'Unauthorized' }
    end
  end
end
rpec ファイルに認証処理を追加します。
require 'swagger_helper'

RSpec.describe 'api/v1/todos', type: :request do

  let(:Authorization) { 'Barer abcdefg123456' } ############### 追加

  path '/api/v1/todos' do

    get 'get todo list' do
      consumes 'application/json'
      produces 'application/json'
      security [Bearer: {}] ############### 追加
      response 200, 'todo list' do
        schema type: :array, items: {
          type: :object,
          properties: {
            name: { type: :string },
            done: { type: :boolean },
          },
          required: [:name, :done]
        }
        run_test!
      end
    end
  end
end
swagger_helper にも設定を追加します。(components: 部分)
# frozen_string_literal: true

require 'rails_helper'

RSpec.configure do |config|
  # Specify a root folder where Swagger JSON files are generated
  # NOTE: If you're using the rswag-api to serve API descriptions, you'll need
  # to ensure that it's configured to serve Swagger from the same folder
  config.swagger_root = Rails.root.join('swagger').to_s

  # Define one or more Swagger documents and provide global metadata for each one
  # When you run the 'rswag:specs:swaggerize' rake task, the complete Swagger will
  # be generated at the provided relative path under swagger_root
  # By default, the operations defined in spec files are added to the first
  # document below. You can override this behavior by adding a swagger_doc tag to the
  # the root example_group in your specs, e.g. describe '...', swagger_doc: 'v2/swagger.json'
  config.swagger_docs = {
    'v1/swagger.yaml' => {
      openapi: '3.0.1',
      info: {
        title: 'API V1',
        version: 'v1'
      },
      paths: {},
      servers: [
        {
          url: 'http://localhost:3000'
        }
      ],
      components: {
        securitySchemes: {
          Bearer: {
            description: 'token necessary to use API calls',
            type: :apiKey,
            name: 'Authorization',
            in: :header
          }
        }
      }
    }
  }

  # Specify the format of the output Swagger file when running 'rswag:specs:swaggerize'.
  # The swagger_docs configuration option has the filename including format in
  # the key, this may want to be changed to avoid putting yaml in json files.
  # Defaults to json. Accepts ':json' and ':yaml'.
  config.swagger_format = :yaml
end
swagger.yml 生成コマンドを実行します。
RAILS_ENV=test rake rswag:specs:swaggerize
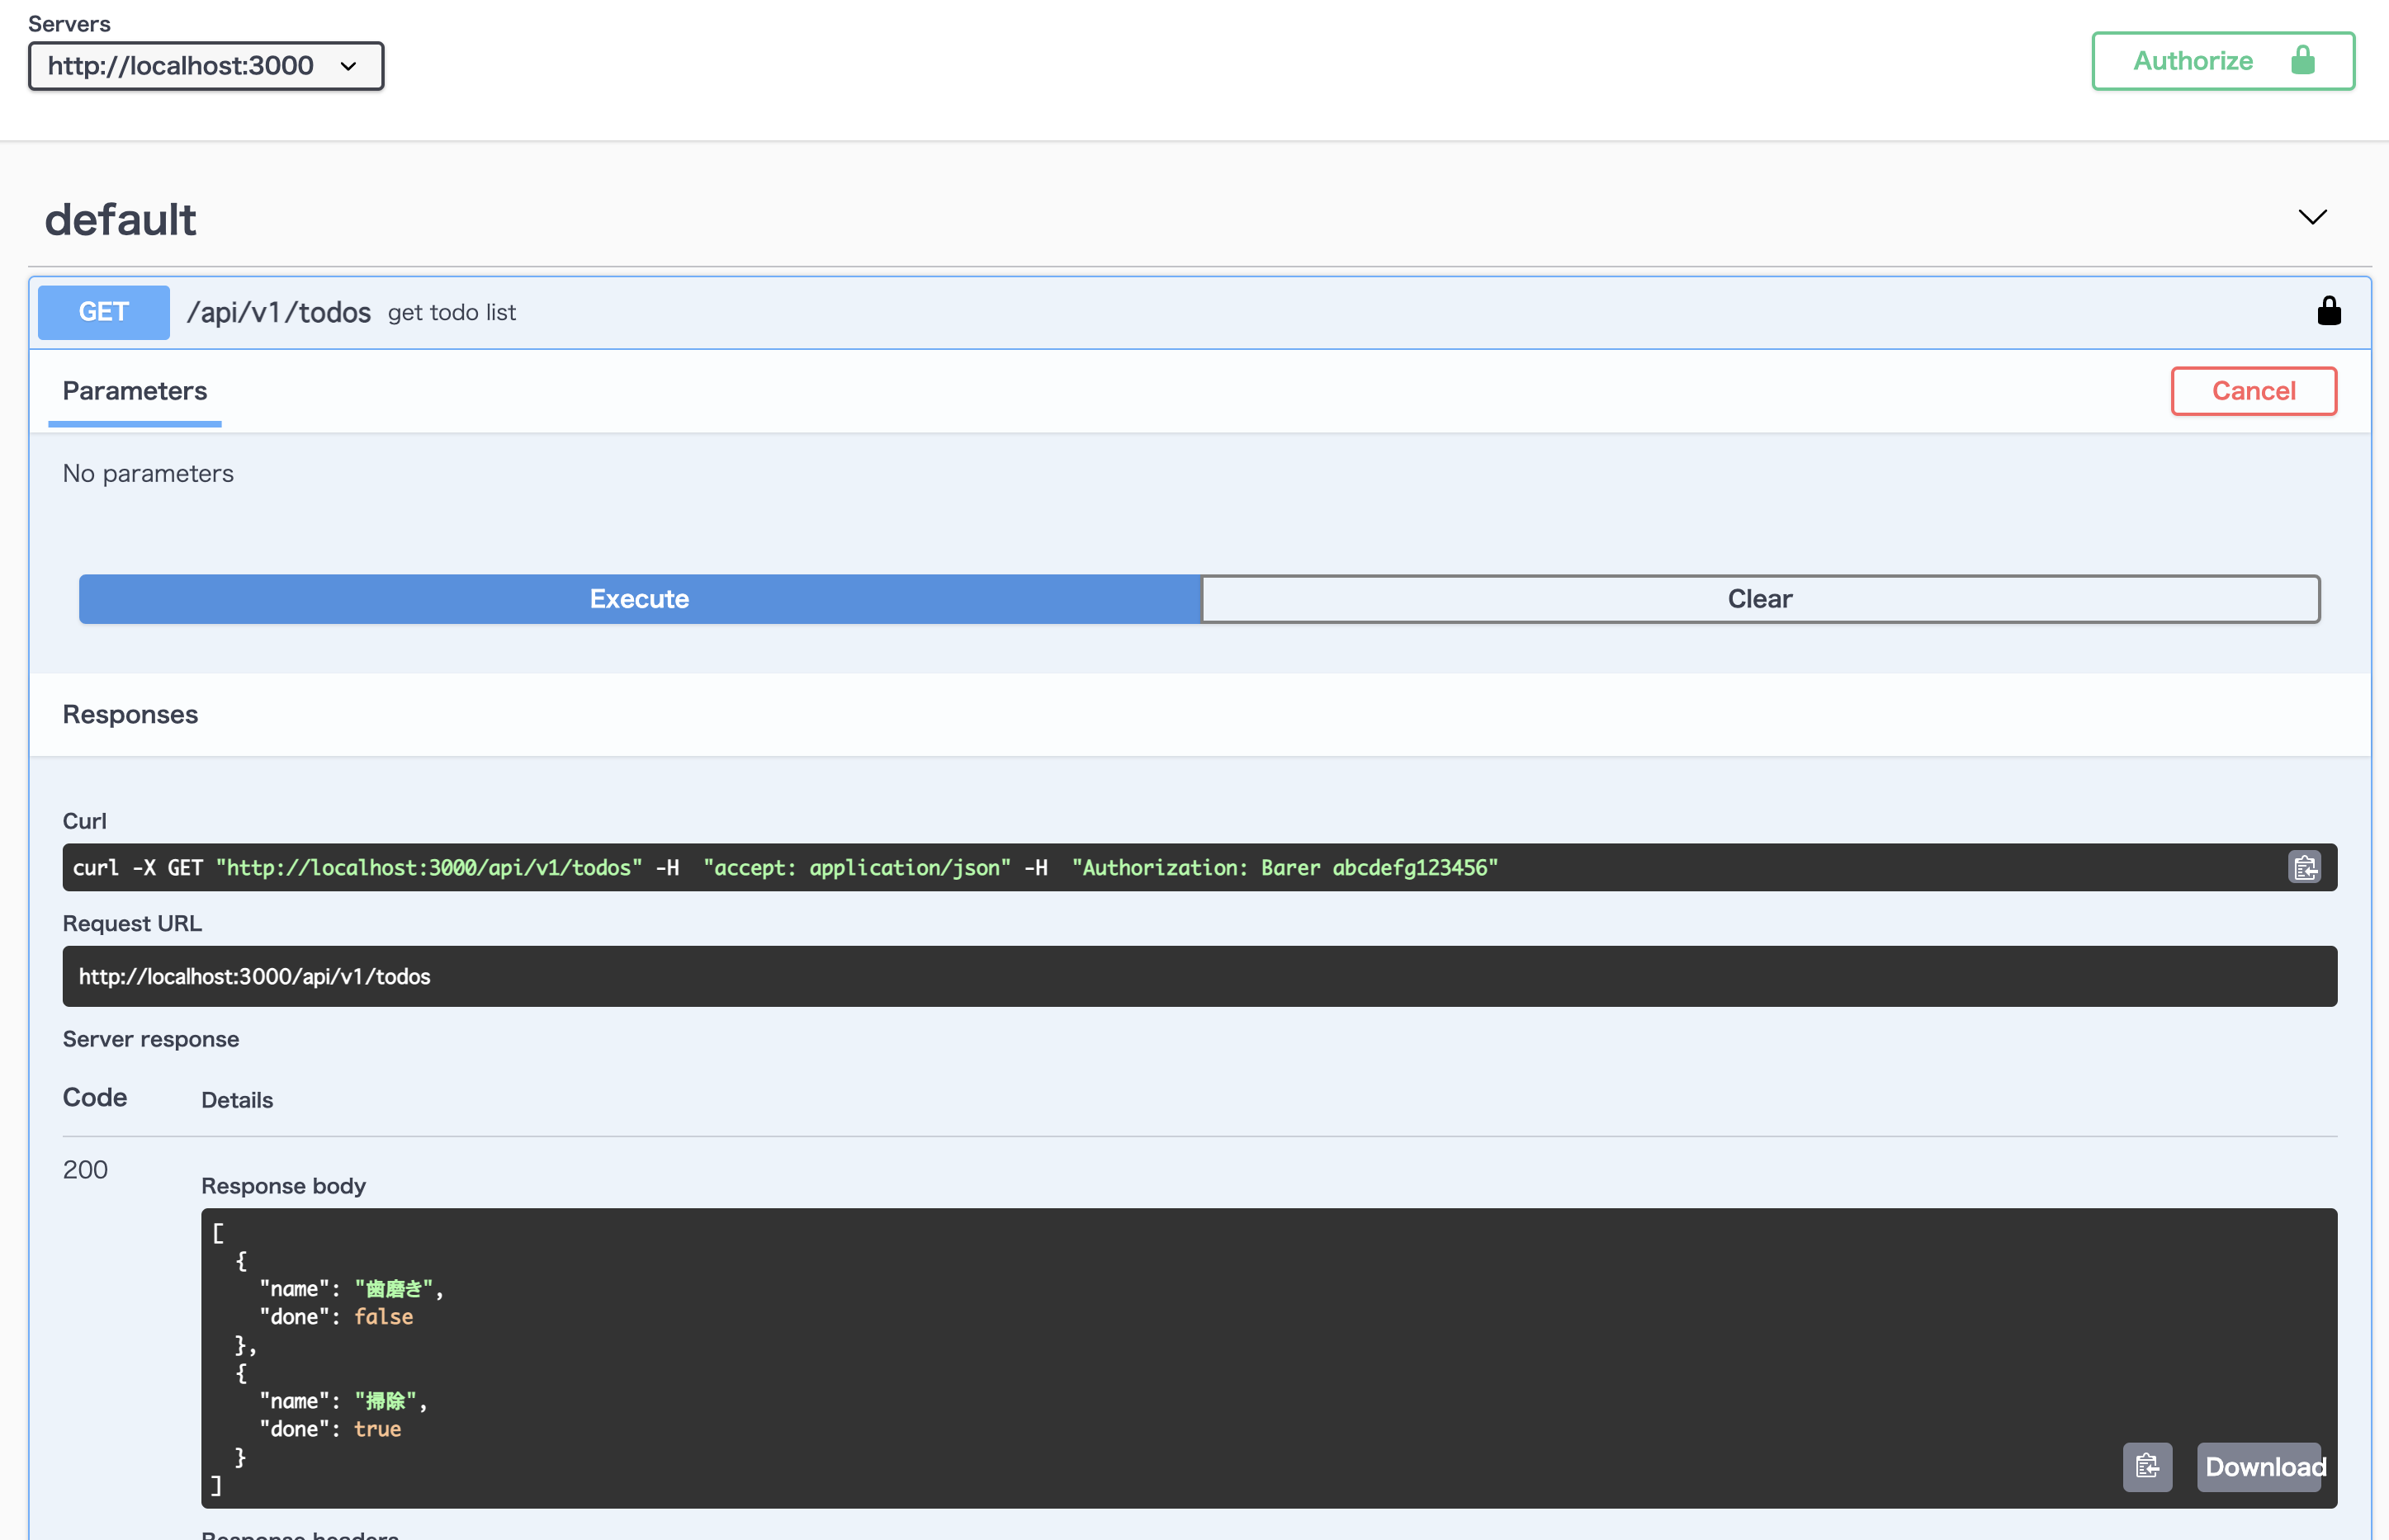
http://localhost:3000/api-docs/ をリロードすると鍵マーク部分が表示されます。

いきなり API を実行しても 401 エラーになります。
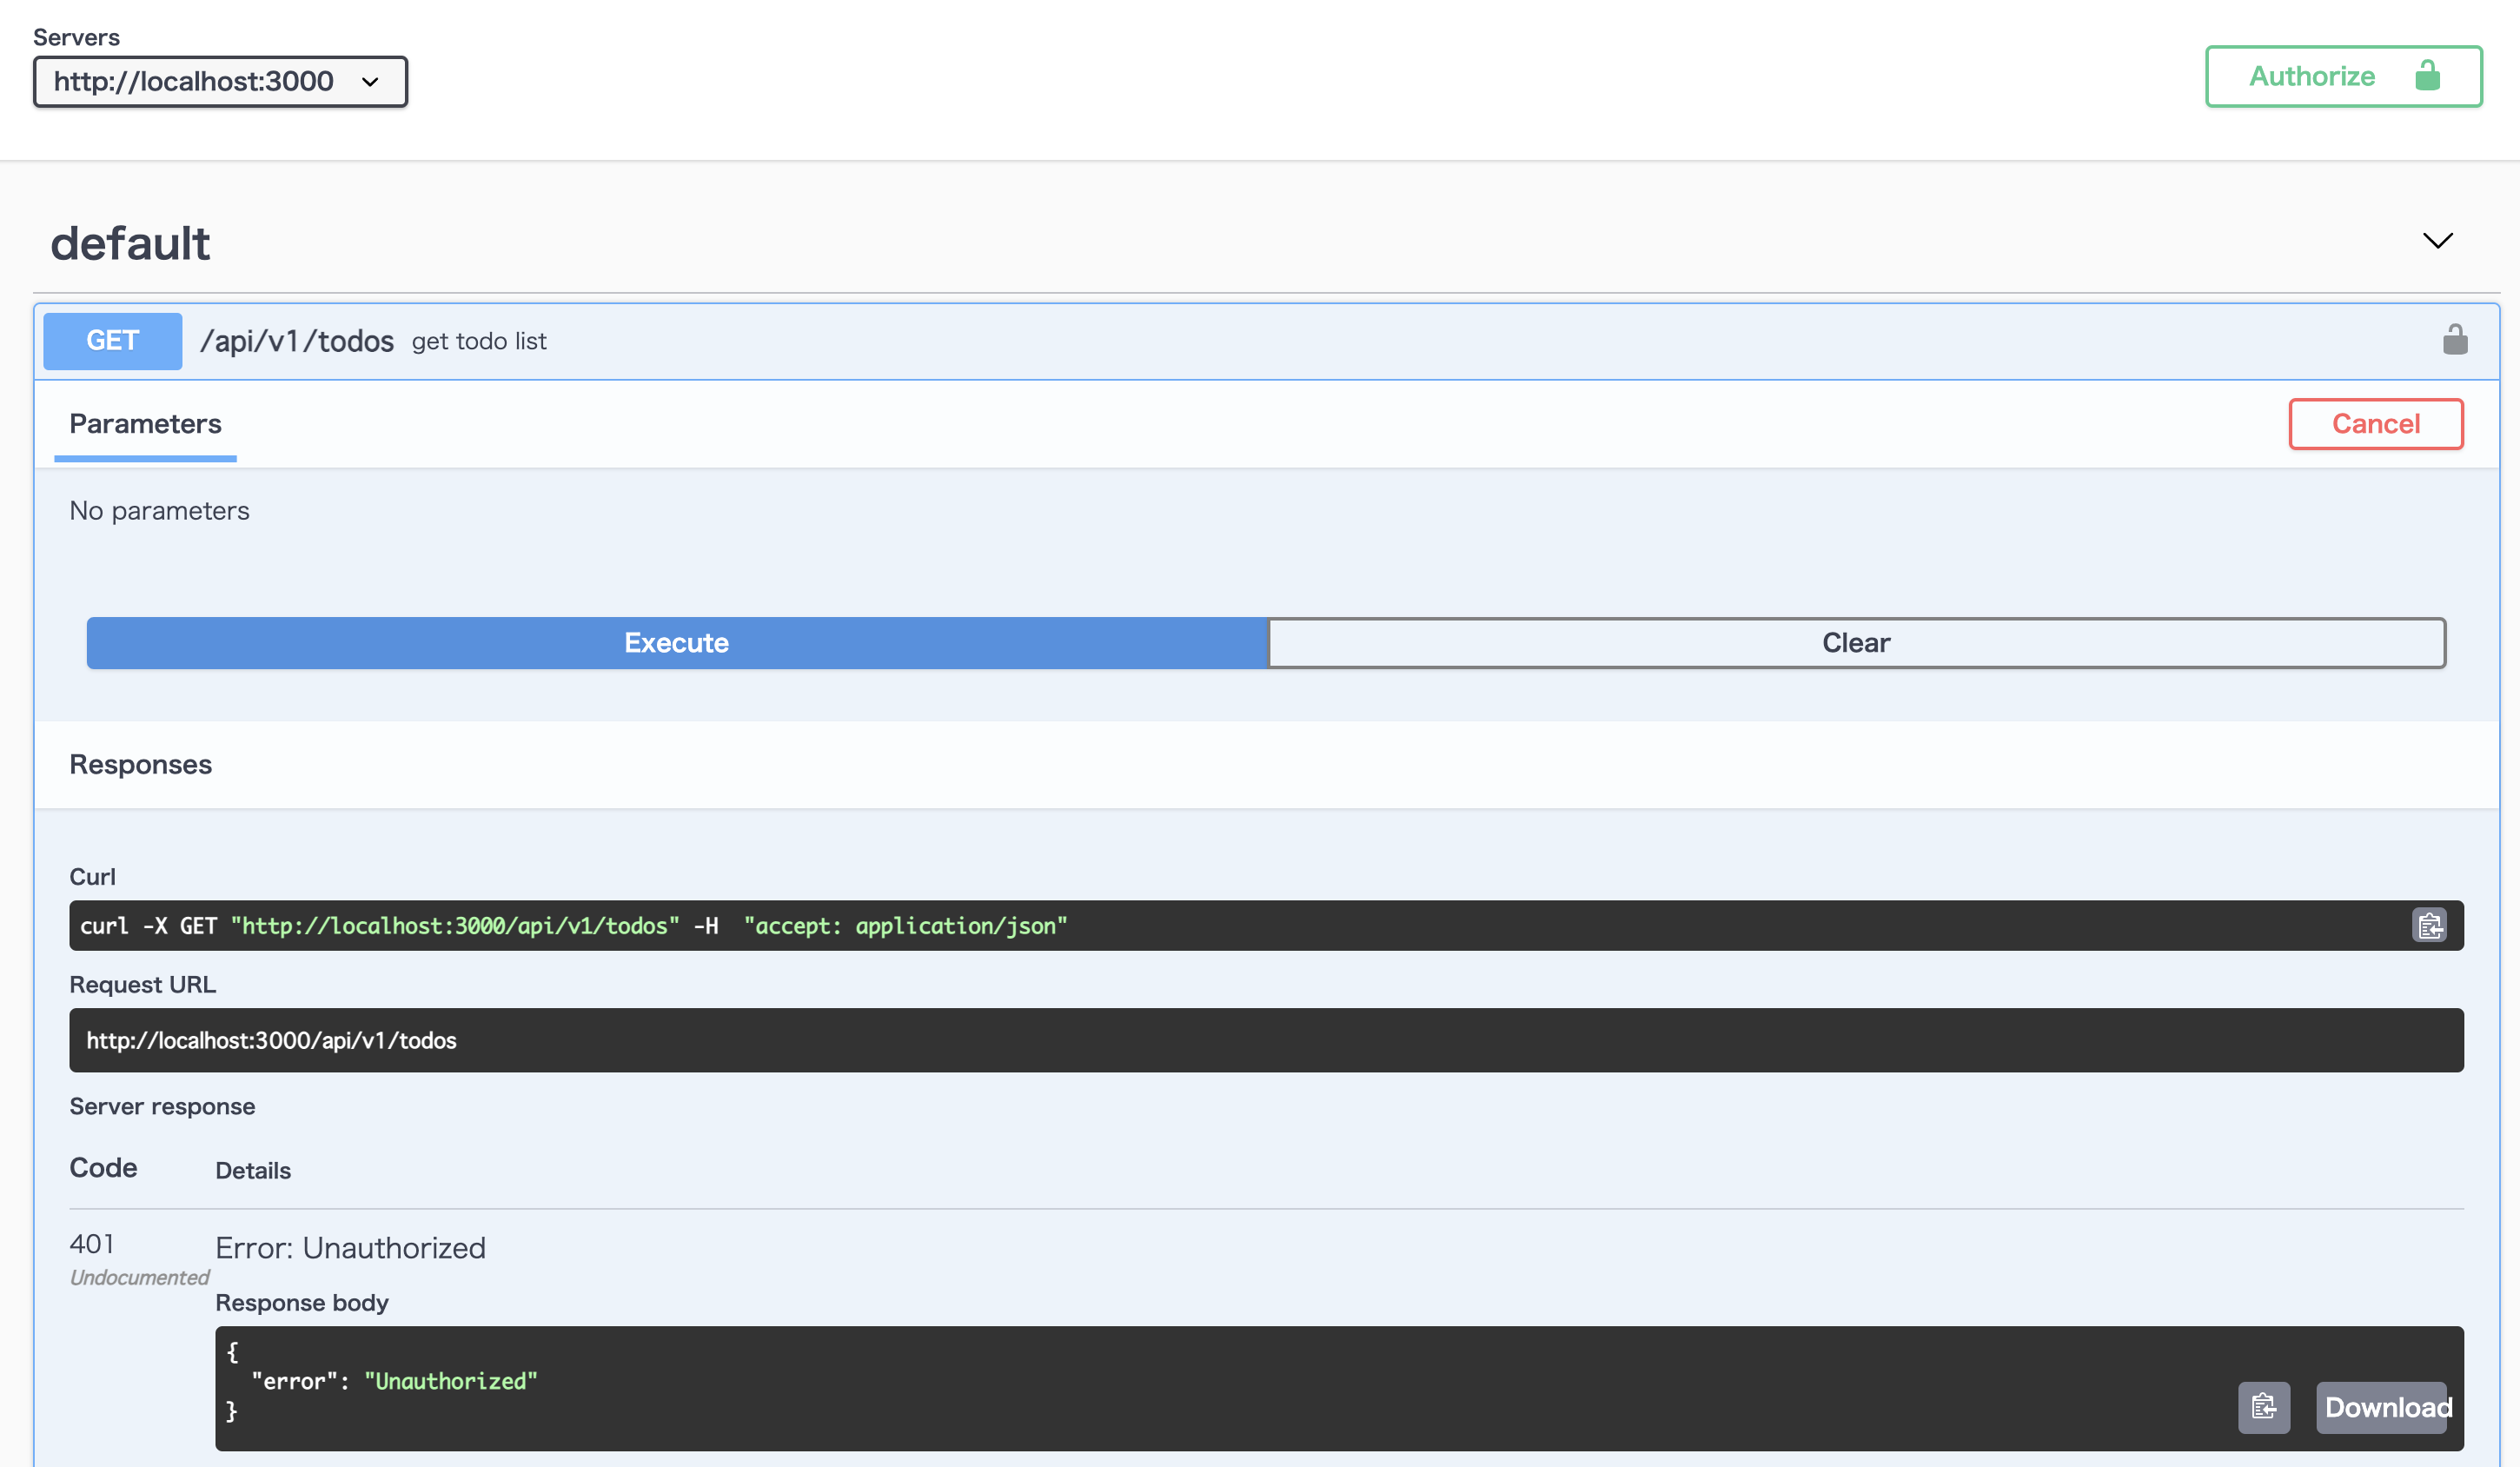
認証を通すために、鍵ボタンをクリックして、 Barer abcdefg123456 で Authorize します。
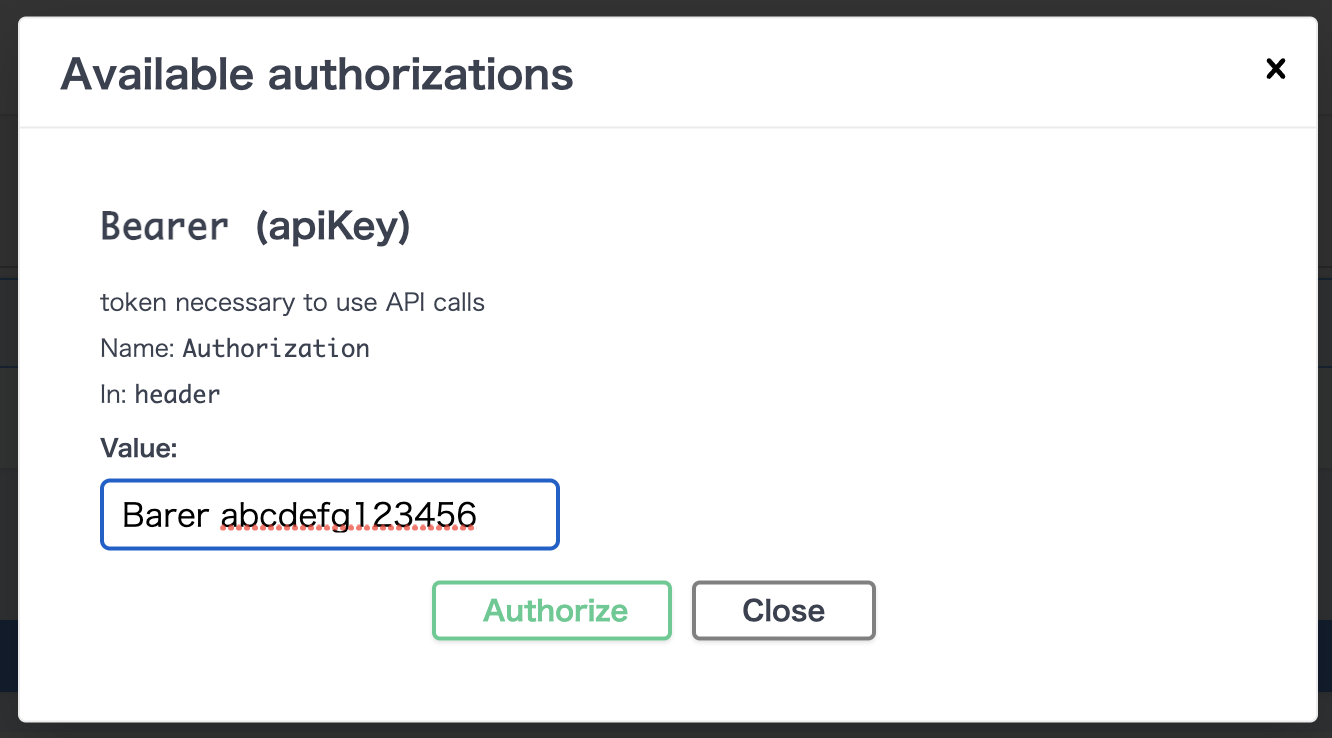
再度 API を実行すれば正常なレスポンスが得られます。
バリデーションの確認
rpec で name は string 型、done は boolean 型と設定していました。
            name: { type: :string },
            done: { type: :boolean },
ですので、todos_contoller.rb のレスポンスの done を数値等に書き換えて rpsec を実行するとエラーになります。
module Api
  module V1
    class TodosController < ApplicationController
      def index
          todos = [
            {name: '歯磨き', done: 0},
            {name: '掃除', done: 1},
          ]
          render json: todos
      end
    end
  end
end
rspec
Failures:

  1) api/v1/todos /api/v1/todos get todo list returns a 200 response
     Failure/Error: raise UnexpectedResponse, "Expected response body to match schema: #{errors[0]}" if errors.any?

     Rswag::Specs::UnexpectedResponse:
       Expected response body to match schema: The property '#/0/done' of type integer did not match the following type: boolean in schema 7fb3a0ae-71c3-5f86-9cff-7e6246836cb2
     # /usr/local/bundle/gems/rswag-specs-2.4.0/lib/rswag/specs/response_validator.rb:53:in `validate_body!'
     # /usr/local/bundle/gems/rswag-specs-2.4.0/lib/rswag/specs/response_validator.rb:20:in `validate!'
     # /usr/local/bundle/gems/rswag-specs-2.4.0/lib/rswag/specs/example_helpers.rb:30:in `assert_response_matches_metadata'
     # /usr/local/bundle/gems/rswag-specs-2.4.0/lib/rswag/specs/example_group_helpers.rb:98:in `block in run_test!'

Finished in 0.07263 seconds (files took 3.59 seconds to load)
1 example, 1 failure

Failed examples:

rspec ./spec/requests/api/v1/todos_spec.rb:13 # api/v1/todos /api/v1/todos get todo list returns a 200 response
これでコードとドキュメントが強制的に同期されますね。
まとめ
swagger.yml の書き方を覚えるより、rswag の書き方を覚えてテストファーストで開発すればドキュメントも自動で整備できる仕組みができました。
実際の開発でもこのフローは使えるのではないかと思います。